
Taking a snapshot of your computer screen, commonly known as a screenshot or screen capture, is a fundamental skill for PC users. Whether you need to share information, create tutorials, or simply keep a visual record of your screen, knowing how to print screen is essential. This guide will walk you through the various methods to effectively print your screen on a PC, ensuring you capture exactly what you need.
Understanding the Print Screen Key
The key to capturing your screen on a Windows PC lies in the Print Screen key, often abbreviated as PrtScr, PrntScrn, or similar variations on your keyboard. This key, typically located in the upper right area of desktop keyboards and sometimes on the function row of laptops, acts as your primary tool for screen capturing. When you press the Print Screen key, Windows takes a snapshot of your screen and copies it to the clipboard. Think of the clipboard as a temporary storage space for data you copy or cut.
On some laptop models, especially compact ones, the Print Screen function might be combined with another key. You may need to press the Fn (Function) key along with PrtScr to activate the screenshot feature. Always check your laptop’s user manual or keyboard for the exact combination if you are unsure.
Figure 1: Print Screen key on a Dell wireless keyboard.
 Print Screen Key on Dell Wireless Keyboard
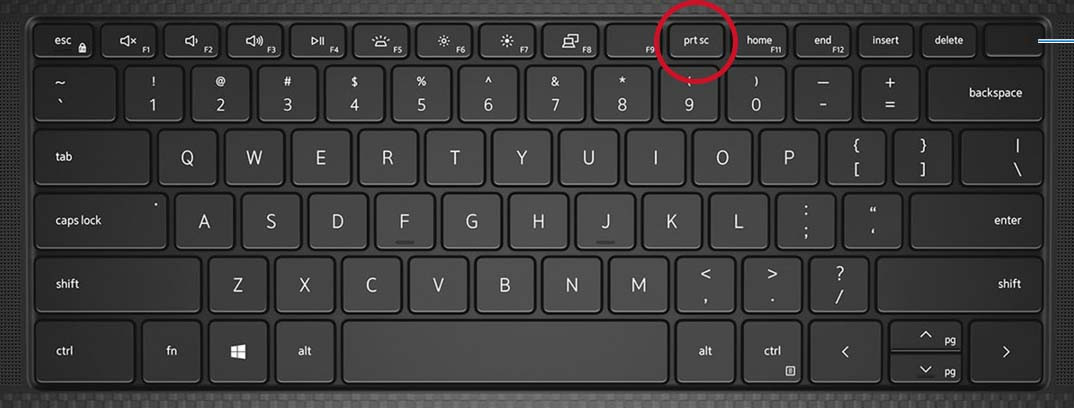
Figure 2: Print Screen key on a Dell Precision laptop keyboard.
Print Screen Key on Dell Wireless Keyboard
Figure 3: Laptop with capacitive Function Key row highlighting function keys.
Different Ways to Print Screen on Windows
Windows offers several ways to utilize the Print Screen key, allowing you to capture different parts of your screen based on your needs. Here’s a breakdown of the common methods:
Capture the Entire Screen
To capture everything visible on your monitor, including all open windows and the taskbar, you have two primary options:
-
Press the PrtScr key alone: This method captures a screenshot of your entire screen and copies it to the clipboard. You won’t see any visual confirmation that a screenshot has been taken, but it’s there, ready to be pasted.
-
Press the Windows logo key + PrtScr keys together: This is a quicker method to not only capture the entire screen but also automatically save it as a file. When you use this combination, your screen will briefly dim, indicating that a screenshot has been taken and saved. The screenshot is saved as a PNG file in the “Screenshots” folder within your “Pictures” library.
For tablets without a physical keyboard, you can achieve the same result by pressing the Windows logo button + the volume down button simultaneously.
Capture All Active Windows
If you have multiple windows open and want to capture all of them as they appear on your screen, simply press the PrtScr key. This method is similar to capturing the entire screen, but it focuses on all currently active windows. The screenshot is copied to the clipboard, and you’ll need to paste it into an application to view or save it.
Capture a Single Active Window
Sometimes, you only need a screenshot of one specific window, such as a browser window or a particular application. To capture just the active window (the window you are currently working in), follow these steps:
- Click on the window you wish to capture to make it the active window.
- Press the Alt + PrtScr keys together. This command captures only the active window and copies it to the clipboard.
Using Your Screenshot
Once you’ve captured your screen using any of the methods above, the next step is to use the screenshot. Since most methods copy the screenshot to the clipboard, you need to “paste” it into an application to see and work with it.
The most common application for pasting and editing screenshots is Microsoft Paint, which is pre-installed on Windows. However, you can paste screenshots into any image editing software, document editors like Microsoft Word, email clients, and even online platforms that support image pasting.
To paste your screenshot, follow these simple steps:
- Open your desired application, for example, Paint.
- Press Ctrl + V (or right-click and select “Paste”). Your screenshot will appear in the application window.
From there, you can edit your screenshot, add annotations, crop it, or save it as an image file in various formats like JPEG or PNG.
For more advanced screen capturing needs, Windows also offers the Snipping Tool and the newer Snip & Sketch (renamed to Snip & Sketch in recent updates), which provide more options for capturing specific regions of your screen, annotating screenshots, and more. These tools can be particularly useful when you need more control over your screen captures than the basic Print Screen key provides.
Conclusion
Knowing how to print screen on your PC is a valuable skill that enhances your productivity and communication. Whether you need to capture the entire screen, active windows, or a single window, Windows provides easy-to-use methods through the Print Screen key and its combinations. By understanding these techniques, you can efficiently capture and share visual information from your computer screen. Experiment with these methods to find the most convenient way to print your screen and streamline your workflow.