Taking a screen print, also known as a screenshot, on your PC is a fundamental skill in today’s digital world. Whether you need to capture important information, share something you see online, or record evidence, knowing how to screen print is essential. This guide will walk you through various methods to screen print on your Windows or Mac computer, ensuring you can capture your screen effectively and efficiently.
Understanding Screen Printing on Your PC
A screen print or screenshot is simply a digital image of what’s displayed on your computer screen. It’s like taking a photo of your screen. This image can then be saved, shared, or edited as needed. Screen prints are incredibly versatile, useful for everything from creating tutorials and documenting errors to preserving online chats and visual content.
How to Screen Print on a Windows PC
Windows offers several built-in methods to screen print, catering to different needs and levels of complexity.
Using the Print Screen (PrtScn) Button
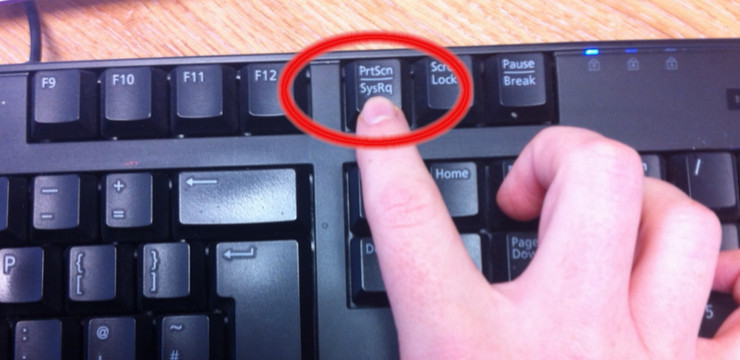
The quickest and most basic way to screen print your entire screen on Windows is using the Print Screen button. This button is usually located in the top right area of your keyboard, often labeled as PrtScn or Print Scrn.
- Capture the entire screen: Simply press the PrtScn button. This action copies an image of your entire screen to the clipboard, a temporary storage area in your computer’s memory.
- Paste the screenshot: To view and save the screenshot, you’ll need to paste it into an application that can handle images. Popular choices include:
- Paint: A basic image editor included with Windows. Open Paint and press Ctrl + V (or right-click and select “Paste”) to paste your screenshot. You can then save the image as a PNG, JPG, or other image format.
- Word: Microsoft Word or similar word processing programs can also be used. Open a new document and paste the screenshot using Ctrl + V. You can then save the document or save the image separately.
- Image Editing Software: For more advanced editing, you can paste the screenshot into programs like Adobe Photoshop, GIMP, or others.
 How to Screenshot
Alt text: Press the PrtScn button on a Windows keyboard to capture the entire screen.
Utilizing the Snipping Tool
For more control over what you capture, Windows provides the Snipping Tool. This program allows you to capture specific parts of your screen and offers basic editing features.
- Open Snipping Tool: Search for “Snipping Tool” in the Windows search bar and open the application.
- Choose a Snip Type: Click on “New” to start a snip. You can choose from different modes:
- Free-form Snip: Draw a freehand shape around the area you want to capture.
- Rectangular Snip: Drag a rectangle to select the area. This is the most common and user-friendly option.
- Window Snip: Capture a single window, like a browser window or application window.
- Full-screen Snip: Captures the entire screen, similar to the PrtScn button.
- Select and Capture: Once you’ve chosen a snip type, follow the on-screen instructions to select the area you want to screen print. The captured screenshot will open in the Snipping Tool window.
- Edit and Save: In the Snipping Tool, you can use a pen or highlighter to annotate the screenshot. Click the “Save Snip” button (disk icon) to save the image to your desired location and format.
How to Screen Print on a Mac
Mac computers also offer straightforward methods for screen printing, primarily through keyboard shortcuts and the Grab utility.
Keyboard Shortcuts for Mac Screenshots
Mac’s keyboard shortcuts are efficient for quickly capturing your screen in different ways.
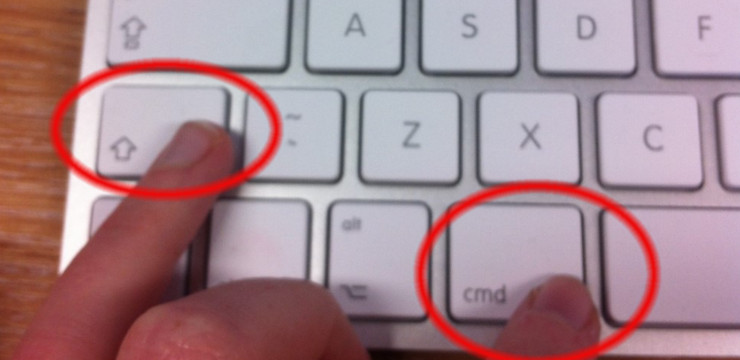
- Capture the entire screen: Press Command + Shift + 3 keys simultaneously. This will take a screenshot of your entire screen and automatically save it as a PNG file on your desktop.
- Capture a selected area: Press Command + Shift + 4 keys together. Your cursor will change to a crosshair. Click and drag to select the rectangular area you want to capture. Once you release the mouse button, the screenshot will be saved as a PNG file on your desktop.
 How to Screenshot
Alt text: Use Command, Shift, and 3 or 4 keys together on a Mac keyboard to take screenshots.
Using the Grab Utility
Similar to Windows’ Snipping Tool, macOS has the Grab utility, which provides more options for screen capture.
- Open Grab: Open Finder, go to Applications > Utilities, and find Grab. Double-click to open it.
- Choose Capture Type: In the Grab menu bar, click “Capture” and select from the following options:
- Selection: Allows you to drag and select a rectangular area, similar to Command + Shift + 4 shortcut.
- Window: Captures a specific window you choose.
- Screen: Captures the entire screen, like Command + Shift + 3.
- Timed Screen: Allows you to set a timer before capturing the entire screen, useful for capturing menus or actions that disappear quickly.
- Capture and Save: Follow the prompts to capture your screen based on the chosen type. The screenshot will open in a new window within Grab. Go to File > Save (or Command + S) to save the screenshot in TIFF format or another available format.
Tips for Effective Screen Printing
- Keep it Clean: Before taking a screen print, close unnecessary windows and applications to keep your screenshot focused and uncluttered.
- Highlight Important Information: Use annotation tools in Snipping Tool or Grab, or image editing software to highlight key areas in your screenshots.
- Save in Appropriate Format: For general use and sharing online, PNG or JPG formats are ideal. PNG is better for screenshots with text and graphics, while JPG is suitable for photographs or images with many colors.
- Organize Your Screenshots: If you take screenshots frequently, create folders to organize them by project or date for easy retrieval.
Mastering screen printing on your PC is a valuable skill that boosts your productivity and communication in the digital age. Whether you’re using Windows or Mac, the methods outlined above will enable you to capture and share your screen content effectively.