Setting up a printer on your Mac is usually a straightforward process, allowing you to quickly get your documents from screen to paper. Often, if your printer and Mac are on the same Wi-Fi network, your Mac might automatically detect it, making it available for immediate use without any complex setup. Before diving into adding a new printer, it’s worth checking if your printer is already recognized. To do this, simply go to File > Print in any application, click the Printer dropdown menu, and look for your printer in the list or under “Other Printers” or “Printers & Scanners settings”. If it’s not there, don’t worry – adding it manually is a breeze. This guide will walk you through each step to ensure you can effortlessly add a printer to your Mac and get back to printing.
Step 1: Check for Existing Connection
Before manually adding a printer, your Mac might already see it. It’s always best to check for an automatic connection first as it saves time and effort. Navigate to the Print menu within any application (like TextEdit or Safari). Click on “File” then “Print”. In the print dialog box, locate the “Printer” pop-up menu. Browse through the list of available printers. Sometimes your printer might be listed directly, or you might need to select “Other Printers” or “Printers & Scanners settings” to see a more comprehensive list. If your printer’s name appears, simply select it, and you should be ready to print. If it’s not listed, proceed to the next steps to manually add your printer.
Step 2: Update Printer Software
Ensuring your printer software is up to date is a crucial step for smooth operation and compatibility with your Mac. Manufacturers frequently release updates that improve performance, fix bugs, and enhance security. To check for updates, visit your printer manufacturer’s website. Look for a support or downloads section, and search for your specific printer model. They will typically have the latest drivers and software available for download.
For AirPrint-enabled printers, software updates are generally handled automatically by Apple, so you usually don’t need to manually check for updates from the manufacturer. AirPrint is Apple’s technology that allows for printing without the need to install specific drivers. If you have an AirPrint printer, it should seamlessly integrate with your Mac.
Step 3: Prepare Your Printer
Proper preparation of your printer is essential before connecting it to your Mac. This involves physically setting up the printer according to the manufacturer’s instructions. Unpack your printer carefully, removing all packing materials and tapes. Install the ink or toner cartridges as directed in the printer’s setup guide. Load paper into the paper tray. Once these physical setup steps are complete, power on your printer. Ensure that the printer powers up without any error messages displayed on its screen. A printer that is correctly prepared is more likely to connect smoothly to your Mac.
Step 4: Connect Your Printer
Connecting your printer to your network is a pivotal step in making it accessible to your Mac. The method of connection can vary depending on your printer type – it could be Wi-Fi, Ethernet, or USB. For a Wi-Fi printer, follow the instructions provided with your printer to connect it to your wireless network. This often involves using the printer’s control panel to select your Wi-Fi network and enter the password.
In some cases, particularly with Wi-Fi printers, you might initially need a USB connection to set up the Wi-Fi printing capability. Connect the printer to your Mac using a USB cable. Then, install the printer software that came with it. This software usually includes a setup assistant that guides you through connecting the printer to your Wi-Fi network. After the Wi-Fi setup is complete, you can disconnect the USB cable. Your printer should now be connected wirelessly. For more detailed guidance on connecting AirPrint printers to Wi-Fi, you can refer to Apple’s support article on Connecting AirPrint printer to Wi-Fi.
Step 5: Add Printer to Your Mac’s Printer List
With your printer prepared and connected to the network, the final step is to add it to your Mac’s list of available printers. To do this, go to the Apple menu in the top-left corner of your screen and select “System Settings” (or “System Preferences” depending on your macOS version). In System Settings, find and click on “Printers & Scanners.” You might need to scroll down to find it.
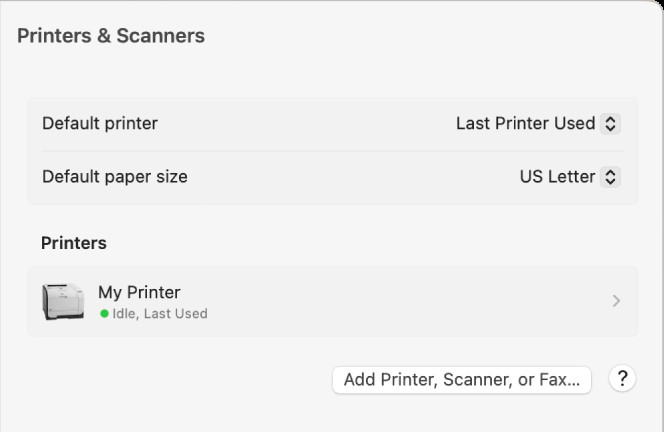 Printers & Scanners settings with Add Printer button highlighted
Within the Printers & Scanners settings, look at the left sidebar. If your printer is not listed, click the “Add Printer, Scanner, or Fax” button, usually located on the right side. A dialog box will appear, displaying printers available on your local network. Wait for your printer to appear in this list – it might take a moment or two to be discovered. Once you see your printer’s name, select it and click “Add.” macOS will then attempt to communicate with the printer and set it up. If prompted to download additional software or drivers, ensure you do so to complete the installation process.
Adding Accessories
During the printer addition process, macOS is usually adept at detecting any special accessories your printer might have, such as extra paper trays, additional memory, or duplex printing units. If for some reason macOS cannot automatically detect these, a dialog will appear allowing you to manually specify them. It’s important to accurately configure these settings to fully utilize all the capabilities of your printer. Double-check the accessories you have installed and ensure they are correctly reflected in the printer settings on your Mac.
Using Print Center
For an alternative method to add a printer, you can use Print Center, an application located in the Utilities folder on your Mac. Open Print Center, and in the menu bar, choose “Printer” > “Add Printer.” This will initiate the same printer discovery and setup process as described through System Settings, providing another pathway to connect your printer. Print Center is also useful for managing print jobs and monitoring printer status, as detailed in Manage printers and print jobs with Print Center.
Conclusion
Adding a printer to your Mac is generally a simple process. By following these steps, from checking for existing connections and updating software to preparing and connecting your printer and finally adding it to your Mac’s printer list, you should be able to get your printer set up and ready to use in no time. Whether you’re using a USB connection or Wi-Fi, macOS provides intuitive tools to guide you through each stage, ensuring a smooth printing experience.