Capturing what’s on your computer screen, known as taking a screenshot or screen capture, is a fundamental skill for anyone using Windows. Whether you need to share information, create tutorials, or simply save something you see online, knowing how to print screen on Windows is essential. Fortunately, Windows offers several easy ways to take screenshots using the Print Screen key and other built-in tools. This guide will walk you through everything you need to know to master screen capturing on your Windows device.
Understanding the Print Screen Key and How it Works
The Print Screen key, often abbreviated as PrtScr or similar variations on your keyboard, is your gateway to capturing screenshots in Windows. When you press the Print Screen key, Windows takes a snapshot of your screen and temporarily saves it to your clipboard. Think of the clipboard as a temporary storage space for copied data. From there, you can paste the screenshot into various applications to view, edit, save, or share it.
Windows provides flexibility in what you capture. You can choose to capture:
- The entire screen: Capturing everything visible on your monitor.
- All active windows: Capturing all open application windows.
- The current active window: Capturing only the window you are currently working in.
Let’s explore how to locate the Print Screen key on your keyboard and then dive into the different methods for capturing screenshots.
Locating the Print Screen Key on Your Keyboard
The location of the Print Screen key can vary slightly depending on whether you are using a desktop or laptop keyboard.
On Desktop Keyboards
Typically, on a desktop keyboard, you’ll find the Print Screen key in the upper right area, often near the function keys (F1-F12) and the number pad. It’s usually labeled as Print Screen, PrintScreen, PrtScn, PrntScr, PrtSc, PrntScrn, or a similar abbreviation. For simplicity, we’ll use PrtScr to refer to all these variations throughout this article.
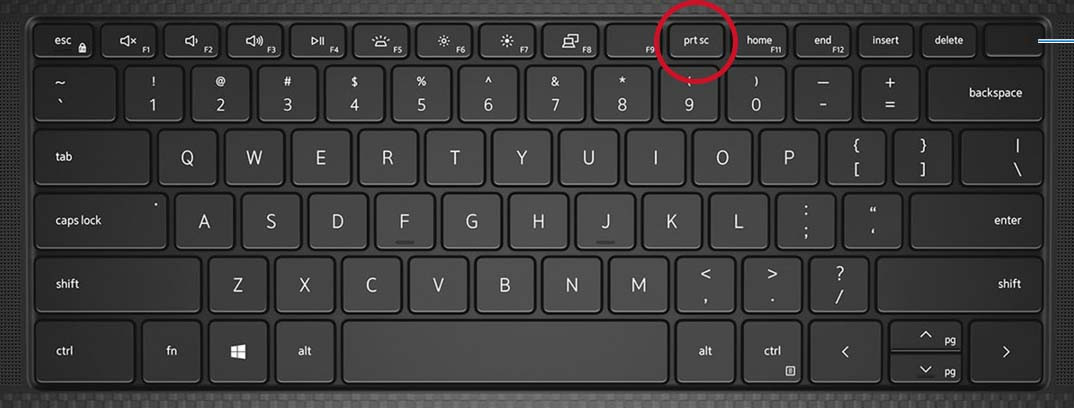 Illustration of the print screen key on Dell KM5221W wireless keyboard
It’s worth noting that some compact desktop keyboards, like the Dell Wireless Keyboard and Mouse combo model KM3322W, might not have a dedicated Print Screen button. In such cases, you’ll usually need to press the Fn (Function) key along with the Insert key to perform the print screen function. Always consult your keyboard’s manual if you are unsure.
On Laptop Keyboards
On laptop keyboards, the Print Screen key is commonly found on the Function key row (F1-F12). Often, it shares a key with another function, such as Insert or another function key. To activate the Print Screen function, you’ll typically need to press and hold the Fn key and then press the PrtScr key simultaneously.
Illustration of the print screen key on Dell KM5221W wireless keyboard
Some modern laptops feature capacitive (illuminated) Function Key rows. On these, you might need to press the Fn key first to switch the function keys to their primary functions, which will illuminate the PrtScr key symbol if it is a secondary function. Refer to your laptop’s user guide for specific instructions on how to use the Function keys and locate the Print Screen functionality.
Illustration of the print screen key on Dell KM5221W wireless keyboard
Now that you know where to find the Print Screen key, let’s explore the different ways to use it in Windows 10 and Windows 11.
Different Ways to Print Screen on Windows 10 and Windows 11
Windows offers several convenient shortcuts using the Print Screen key to capture exactly what you need. Here are the most common methods:
1. Capture the Entire Screen
To capture a screenshot of your entire screen and automatically save it as a file:
-
Press the Windows logo key + PrtScr keys together.
On some tablets, you might need to press the Windows logo button + the volume down button simultaneously instead.
After using this shortcut, your screen will briefly dim to indicate that a screenshot has been taken. The screenshot is automatically saved as a PNG file in the Screenshots folder within your Pictures library. This is the quickest method for saving full-screen captures directly.
2. Capture the Entire Screen to Clipboard (For Pasting)
If you want to capture the entire screen to your clipboard so you can paste it into an application:
- Simply press the PrtScr key.
This action will copy a snapshot of your entire screen to the clipboard. You won’t see any visual confirmation, but the screenshot is ready to be pasted.
3. Capture All Active Windows to Clipboard
To capture all currently open and active windows:
- Press the Alt + PrtScr keys together.
This will capture all windows that are currently open and copy them to your clipboard, excluding the taskbar and desktop.
4. Capture a Single Active Window to Clipboard
If you only need to capture a specific window you are working in:
- Click on the window you want to capture to make it the active window.
- Press the Alt + PrtScr keys together.
This method captures only the content of the selected active window and copies it to the clipboard.
Pasting and Using Your Screenshots
Once you have captured a screenshot using any of the methods above (except for the Windows key + PrtScr method which saves directly to file), the next step is usually to use it. Since the screenshot is on your clipboard, you need to paste it into an application to view, edit, or save it permanently.
Common applications for pasting screenshots include:
- Image Editors: Microsoft Paint (pre-installed on Windows), Paint 3D, Adobe Photoshop, GIMP, and other image editing software. These allow you to crop, annotate, resize, and further modify your screenshots.
- Document Editors: Microsoft Word, Google Docs, and other word processing programs. You can insert screenshots into documents for reports, guides, or presentations.
- Email Clients: You can paste screenshots directly into the body of emails to quickly share visual information.
- Messaging Apps: Many messaging applications support pasting images directly into chat windows.
To paste your screenshot, open your desired application and then use the Ctrl + V keyboard shortcut (or right-click and select “Paste”). The screenshot will appear in the application window, ready for you to work with.
Beyond Print Screen: Exploring the Snipping Tool
While the Print Screen key is incredibly useful for quick captures, Windows also offers a more advanced built-in tool called the Snipping Tool. The Snipping Tool provides more flexibility and options for taking screenshots, including:
- Rectangular Snip: Drag a rectangle to select a specific area of your screen.
- Free-form Snip: Draw a freehand shape around the area you want to capture.
- Window Snip: Select a specific window to capture.
- Full-screen Snip: Captures the entire screen (similar to the PrtScr key alone).
The Snipping Tool also allows you to annotate screenshots, set a delay before capturing, and save screenshots in various file formats. To access the Snipping Tool, simply search for “Snipping Tool” in the Windows search bar.
For more in-depth information on using the Snipping Tool, you can refer to Microsoft’s guide on how to use the Snipping Tool to capture screenshots.
Conclusion
Mastering how to print screen on Windows is a simple yet powerful skill that can significantly enhance your productivity and communication. By understanding the different functions of the Print Screen key and exploring tools like the Snipping Tool, you can efficiently capture and share visual information from your computer screen. Whether you are creating documentation, collaborating with colleagues, or simply saving a moment from your screen, these methods provide you with the tools you need to capture it all.