Taking a screenshot on your PC is a fundamental skill for anyone who uses Windows. Whether you need to capture an error message, share something visually online, or simply keep a record of what’s on your screen, screenshots are incredibly useful. Once you’ve captured that image, you might want a physical copy. This guide will walk you through everything you need to know about how to take a screenshot on your PC and how to print it out, ensuring you can effectively capture and share your screen’s content.
Understanding the Print Screen Key and Screenshots
A screenshot, also known as a screen capture, is a digital image of your computer screen. In Windows, the Print Screen key (often abbreviated as PrtScr or similar) is your primary tool for capturing these images. When you press the Print Screen key, Windows takes a snapshot of your screen and copies it to the clipboard. From there, you can paste it into various applications to view, edit, save, or ultimately, print it.
The Print Screen key offers different capturing options depending on the keys you press in combination with it:
- Capturing the Entire Screen: This captures everything visible on your monitor(s).
- Capturing All Active Windows: This captures all windows that are currently open and running.
- Capturing the Current Active Window: This captures only the window you are currently working in or have selected.
Locating the Print Screen Key on Your Keyboard
Before you can start taking screenshots, you need to find the Print Screen key on your keyboard. Its location can vary slightly depending on whether you are using a desktop or a laptop.
On desktop keyboards, the Print Screen key is usually found in the upper right area, often near the function keys and above the number pad. It might be labeled as Print Screen, PrintScreen, PrtScn, PrntScr, PrtScr, PrtSc, or a similar abbreviation. For simplicity, we’ll refer to it as PrtScr throughout this guide.
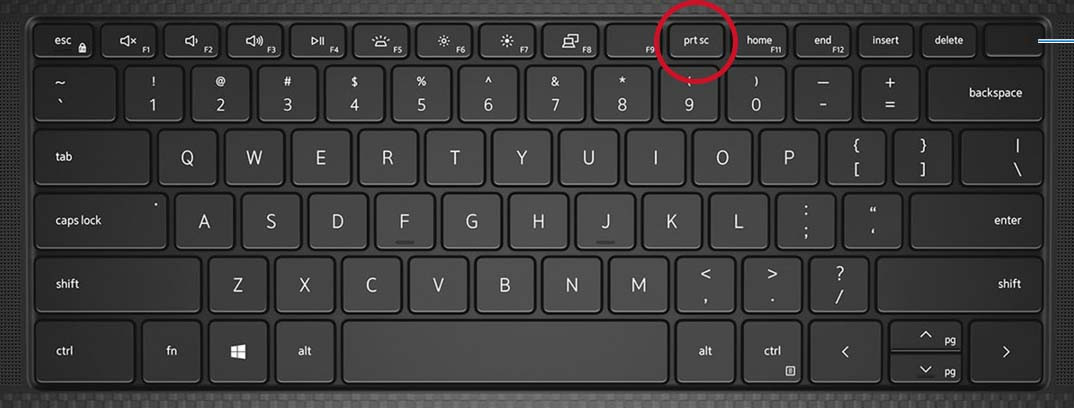 Illustration of the print screen key on Dell Precision 5550 mobile workstation keyboard
Laptop keyboards often place the Print Screen key on the Function Key row (F1, F2, F3, etc.). You might need to press the Fn (Function) key along with the appropriate Function key (often F10 or Insert) to activate the Print Screen function.
Illustration of the print screen key on Dell Precision 5550 mobile workstation keyboard
Some modern laptops feature capacitive (illuminated) Function Key rows. On these, you might need to press the Fn key to switch the function keys to their secondary functions, which may include Print Screen. Consult your laptop’s user manual for precise instructions if you have a capacitive function row.
Taking Screenshots in Windows 10 and Windows 11: Step-by-Step
Windows 10 and Windows 11 offer similar methods for capturing screenshots using the Print Screen key. Here’s how to use the different options:
1. Capture the Entire Screen and Save as a File
To capture a screenshot of your entire screen and automatically save it as a file:
- Press the Windows logo key + PrtScr keys simultaneously.
- The screen might briefly dim to indicate that the screenshot has been taken.
- The screenshot is automatically saved as a PNG file in the Screenshots folder, which is located inside your Pictures folder. You can access it through File Explorer.
2. Capture the Entire Screen to the Clipboard (for Pasting)
To capture a screenshot of your entire screen and copy it to the clipboard (without saving as a file immediately):
- Simply press the PrtScr key.
- Nothing will appear to happen visually. The screenshot is now copied to your clipboard, ready to be pasted.
- To use the screenshot, you’ll need to open an application like Paint, Microsoft Word, an email, or an image editor, and then paste the image by pressing Ctrl + V or right-clicking and selecting “Paste”.
3. Capture All Active Windows to the Clipboard
To capture all currently active windows:
- Press the PrtScr key. (This is the same action as capturing the entire screen to the clipboard). Windows intelligently captures all windows that are currently active.
- The screenshot of all active windows is copied to your clipboard.
- Paste it into an application as described in step 2 (using Ctrl + V).
4. Capture a Single Active Window to the Clipboard
To capture only the window you are currently working in:
- First, make sure the window you want to capture is active by clicking on it.
- Press the Alt + PrtScr keys together.
- Only the active window is captured and copied to your clipboard.
- Paste it into an application using Ctrl + V.
Printing Your Screenshot: From Digital to Physical
Now that you’ve captured your screenshot, let’s address the “print” part of “How Do I Print A Screenshot On A Pc?”. The Print Screen key itself doesn’t directly print anything. Instead, it captures a digital image that you can then print using other applications. Here’s how:
-
Paste Your Screenshot into an Application: After taking a screenshot to your clipboard (using PrtScr or Alt + PrtScr), you need to paste it into an application that can handle images and printing. Common choices include:
- Paint: A basic image editor included with Windows. Search for “Paint” in the Start Menu.
- Microsoft Word or other word processors: Suitable if you want to include the screenshot in a document.
- Image editing software: Like Adobe Photoshop or GIMP, for more advanced editing before printing.
-
Paste the Screenshot: Open your chosen application and press Ctrl + V (or right-click and select “Paste”) to insert the screenshot into a new document or image canvas.
-
Print the Screenshot:
- In Paint: Click on File in the top left corner, then select Print, and then Print again. You can adjust print settings like page orientation and size in the print dialog box.
- In Word or other word processors: Go to File, then Print. Again, you’ll have options to configure print settings.
- In image editing software: The print process is usually found under the File menu, often labeled as Print.
-
Adjust Print Settings (Optional): Before printing, you might want to adjust settings to ensure the screenshot prints as desired. This can include:
- Page Orientation: Portrait (vertical) or Landscape (horizontal).
- Paper Size: Choose the correct paper size for your printer (e.g., Letter, A4).
- Scaling/Fit: Adjust the size of the image on the printed page. You might want to “Fit to Page” or choose a specific percentage to scale the image.
- Print Quality: Select print quality settings depending on your needs and printer capabilities.
By following these steps, you can effectively capture screenshots on your PC and print them out for physical copies. Experiment with the different screenshot methods to find the quickest way to capture exactly what you need, and then use applications like Paint or Word to get your digital screenshots onto paper.