Capturing what’s on your computer screen, known as taking a screenshot or screen capture, is a fundamental skill for anyone using Windows. Whether you need to share information, create tutorials, or simply save a visual record of something, the Print Screen key is your quick solution. Once you capture your screen, Windows conveniently copies the screenshot to your clipboard, ready for use in various applications. Let’s explore how to effectively use the Print Screen key and its combinations to master screen capturing on your Windows device.
Understanding the Print Screen Key
The Print Screen key, often abbreviated as PrtScr, PrintScrn, or similar variations on different keyboards, is your gateway to capturing your screen’s content. Understanding its location and how it works is the first step to efficient screen grabbing.
Locating the Print Screen Key
On a standard desktop keyboard, you’ll typically find the Print Screen key nestled in the upper right section, often near the function keys and the scroll lock and pause/break keys. It’s usually a full-sized key labeled clearly, though abbreviations are common.
Laptop keyboards often place the Print Screen key within the function key row (F1, F2, F3…). In many cases, you’ll need to press the Fn (Function) key in combination with the designated function key (often F10 or similar) to activate the Print Screen function. This is because laptop keyboards are more compact, and keys often serve multiple functions.
It’s worth noting that some compact keyboards, especially on laptops, might integrate the Print Screen function with another key like Insert. In such cases, you’ll usually need to press Fn + Insert to take a screenshot. Always check your laptop’s user manual if you are unsure about the exact key combination.
Figure 1: Illustration of the print screen key on a Dell KM5221W wireless keyboard
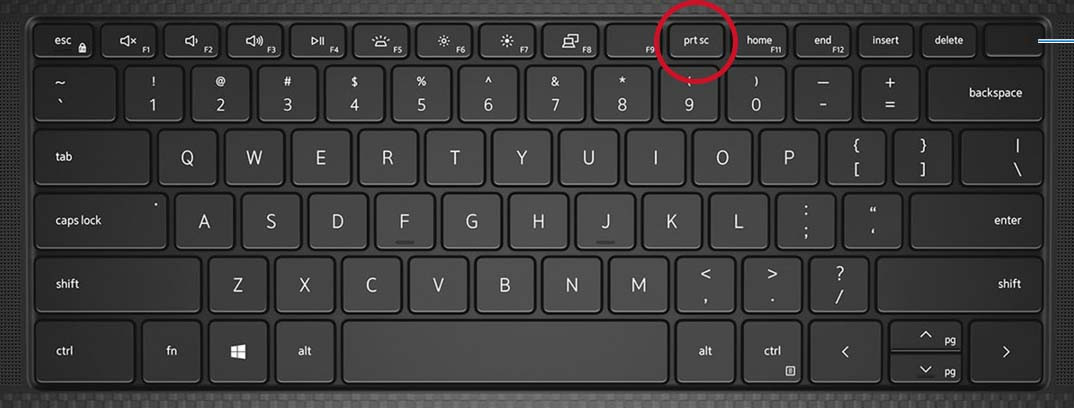 Print Screen key location on a Dell KM5221W wireless keyboard, highlighting the 'PrtScn' key in the upper right corner.
Figure 2: Illustration of the print screen key on a Dell Precision 5550 mobile workstation keyboard
Print Screen key location on a Dell KM5221W wireless keyboard, highlighting the 'PrtScn' key in the upper right corner.
Figure 3: Illustration of a laptop with a capacitive Function Key row
Print Screen key location on a Dell KM5221W wireless keyboard, highlighting the 'PrtScn' key in the upper right corner.
Print Screen Key Variations
Keep an eye out for these common variations in the Print Screen key label:
- Print Screen
- PrintScreen
- PrtScn
- PrntScrn
- PrntScr
- PrtScn
- PrtScr
- PrtSc
Regardless of the label variation, they all serve the same core function: initiating a screen capture.
How to Use the Print Screen Key in Windows 10 and Windows 11
Windows offers several ways to utilize the Print Screen key, allowing you to capture different parts of your screen depending on your needs. Here’s a breakdown of the most common methods for Windows 10 and Windows 11:
Capturing the Entire Screen
To capture everything visible on your screen, including all windows and taskbar, simply press the Print Screen (PrtScr) key. This action will copy a screenshot of your entire display to the clipboard.
For users on tablets or some laptops where a simple PrtScr press might not suffice, you can use the Windows logo key + PrtScr combination. On tablets specifically, pressing the Windows logo button + the volume down button simultaneously will also capture the entire screen and, notably, save the screenshot directly as a file in the “Screenshots” folder within your “Pictures” library. This is a handy shortcut for quickly saving full-screen captures.
Capturing All Active Windows
If you have multiple windows open and want to capture all of them as they appear on your screen, press the PrtScr key alone. This method is similar to capturing the entire screen, especially if you have windows arranged to fill the display.
Capturing a Single Active Window
Sometimes you only need to capture a specific window, such as an application or dialog box, without the rest of your screen. To do this, first, ensure the window you want to capture is active by clicking on it. Then, press the Alt + PrtScr keys together. This combination will capture only the currently active window and copy it to your clipboard.
Pasting and Utilizing Your Screenshots
After capturing your screen or a specific window using any of the Print Screen methods described above, the screenshot is temporarily stored on your clipboard. To use or save this screenshot, you need to paste it into an application.
Common applications for pasting and using screenshots include:
- Microsoft Paint: A basic image editor included with Windows. Perfect for quick edits, cropping, and saving screenshots as image files (PNG, JPG, etc.).
- Paint 3D: A more advanced version of Paint, also pre-installed on Windows, offering more editing features.
- Adobe Photoshop or GIMP: Professional image editing software for more complex manipulations and enhancements.
- Microsoft Word, PowerPoint, Email Clients: You can directly paste screenshots into documents, presentations, and emails to visually communicate information.
- Online Image Editors: Numerous web-based image editors allow you to paste from the clipboard for quick online editing.
To paste your screenshot, open your desired application and press Ctrl + V (or right-click and select “Paste”). The screenshot will appear in the document or image editor, ready for further action like editing, saving, or sharing.
For more advanced screen capturing needs, Windows offers the Snipping Tool and the Snip & Sketch app. These tools provide more flexibility, allowing you to capture specific regions of your screen, annotate screenshots, and offer more saving and sharing options. They are excellent alternatives when the basic Print Screen functionality isn’t enough.
Mastering the Print Screen key and its various combinations is an essential skill for any Windows user. It’s a quick, built-in way to visually capture and share information directly from your screen, enhancing your productivity and communication.