Wireless printing at Foley Library is now simpler than ever with PaperCut! This guide will walk you through the easy steps to upload and release your print jobs using the Gonzaga Printing system. Whether you’re printing a research paper, class notes, or any other document, follow these instructions to utilize wireless printing effectively on campus.
Step-by-Step Guide to Gonzaga Wireless Printing
Printing wirelessly at Gonzaga University’s Foley Library is a breeze. Just follow these steps to submit and release your print jobs from anywhere on campus or via VPN.
Accessing Web Print
To begin, navigate to Foley Library’s Wireless Print portal, powered by PaperCut. Remember, access to wireless print login is exclusively available when you are on campus or connected through the Gonzaga VPN.
Logging into PaperCut
Once you’ve accessed the Wireless Print portal, you will be prompted to log in. Use your standard Gonzaga username and password to access the PaperCut system.
Your username is the same as the part of your Gonzaga email address before the “@” symbol, and your password is the same one you use for Zagmail and other Gonzaga services.
Navigating to Web Print
After successfully logging in, you will be directed to the PaperCut user interface. On the left-hand side menu, locate and select Web Print. This section is where you will manage your wireless print jobs.
Submitting a Print Job
To start a new print job, click on the green Submit a Job button. This will initiate the process of uploading your document to the Gonzaga printing queue.
Selecting Print Options
You will now need to choose your print queue. Select the appropriate queue based on your printing needs. Options include:
- BW DUPLEX: For black and white, double-sided printing.
- BW SIMPLEX: For black and white, single-sided printing.
- CLR DUPLEX: For color, double-sided printing.
- CLR SIMPLEX: For color, single-sided printing.
Choose your desired print type by clicking the radial button to the left of the queue name. Once selected, click Print Options and Account Selection to proceed.
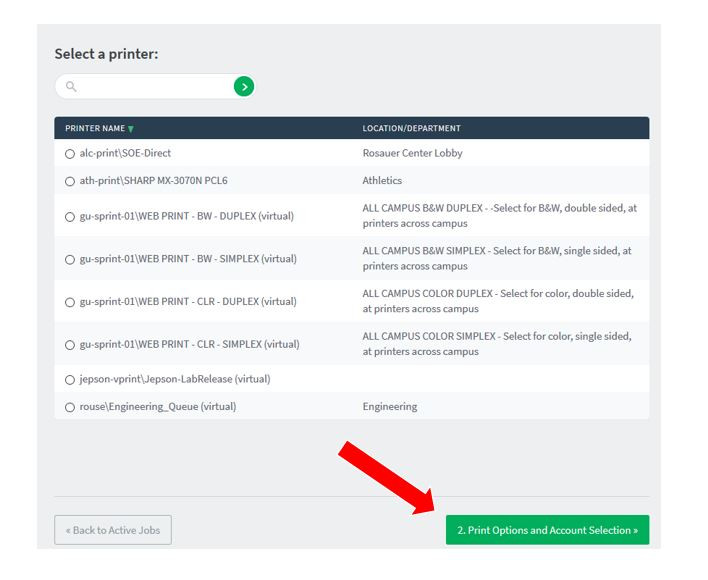 Red arrow pointing to Print Options and Account Selection button on Papercut site.
Uploading Documents
If you require multiple copies of your document, you can specify the number in the Copies box on this screen. After setting the number of copies, click Upload Documents to upload your file for Gonzaga printing.
Completing the Upload
To upload your document, click Upload from your computer to browse your files. Alternatively, you can drag and drop your file directly into the grey box provided. After your document is uploaded, click Upload & Complete located in the right corner of the screen.
Releasing Your Print Job
After completing the upload, you will see a Submitting or Held in Queue message in the PaperCut window. This indicates that your Gonzaga printing job has been successfully submitted and is now ready to be released from any of the library printers.
Note: In some cases, the print job status may remain at “submitting,” but rest assured, it should still be available for printing. The system is being refined to resolve this display issue.
To release your print job, simply go to any of the library printers and tap your ZagCard on the printer’s card reader. Your print job will then be released, and the printing charges will be deducted from your Bulldog Bucks account. Enjoy the convenience of Gonzaga printing at Foley Library!