
Woodcut printing stands as a captivating and age-old art form within the realm of printmaking. Its enduring appeal lies in its versatility, historical significance, and the relatively modest collection of tools and materials required to embark on this creative journey. If you’re seeking to describe the process for woodcut printing, this guide will illuminate the essential steps, materials, and techniques to create your first woodcut print in the comfort of your own home.
Understanding Woodcut Printmaking
Woodcut printmaking is rooted in the principle of relief printing. This technique involves meticulously carving an image directly into the surface of a wooden block. Ink is then applied to the raised, uncarved areas of the block. When paper is pressed against the inked block, the ink transfers, resulting in a print of the carved design. As the oldest form of relief printmaking, woodcut boasts a rich heritage, branching into distinct traditions across the globe. Notably, two prominent approaches have emerged: the Western and Eastern traditions. Eastern woodcut techniques trace their origins back to 9th-century China, while Western woodcut printing gained prominence in 14th-century Germany, coinciding with the groundbreaking invention of the printing press.
Japanese vs. European Woodcut: Key Differences
While both Japanese and European woodcut traditions share the fundamental principle of relief printing, their methodologies diverge significantly, primarily in the printing process itself. Western woodcut printmaking typically employs oil or water-based relief inks. These inks are rolled onto the carved woodblock and then transferred to heavyweight cotton paper, often utilizing a printing press to apply consistent pressure. Conversely, Mokuhanga, or Japanese woodblock printing, utilizes water-based paints, inks, or pigments. These are meticulously applied to the woodblock using specialized brushes known as sosaku or inking brushes. Printing in Mokuhanga is achieved through manual hand pressure. A unique tool called a ‘baren,’ a disc crafted from string and bamboo leaf, is used to gently rub the back of the paper, pressing it against the inked block. Notably, a printing press is never employed in traditional Mokuhanga. Color rendition in Japanese woodcut is achieved by layering multiple colors, printed block by block, to build up the final image. For a deeper exploration of this fascinating technique, refer to our dedicated article on Japanese woodcut printmaking. Throughout history, woodcut has been championed by celebrated artists worldwide. In the East, figures like Katsushika Hokusai and Kitagawa Utamaro are revered, while the West boasts masters such as Albrecht Dürer and Käthe Kollwitz.
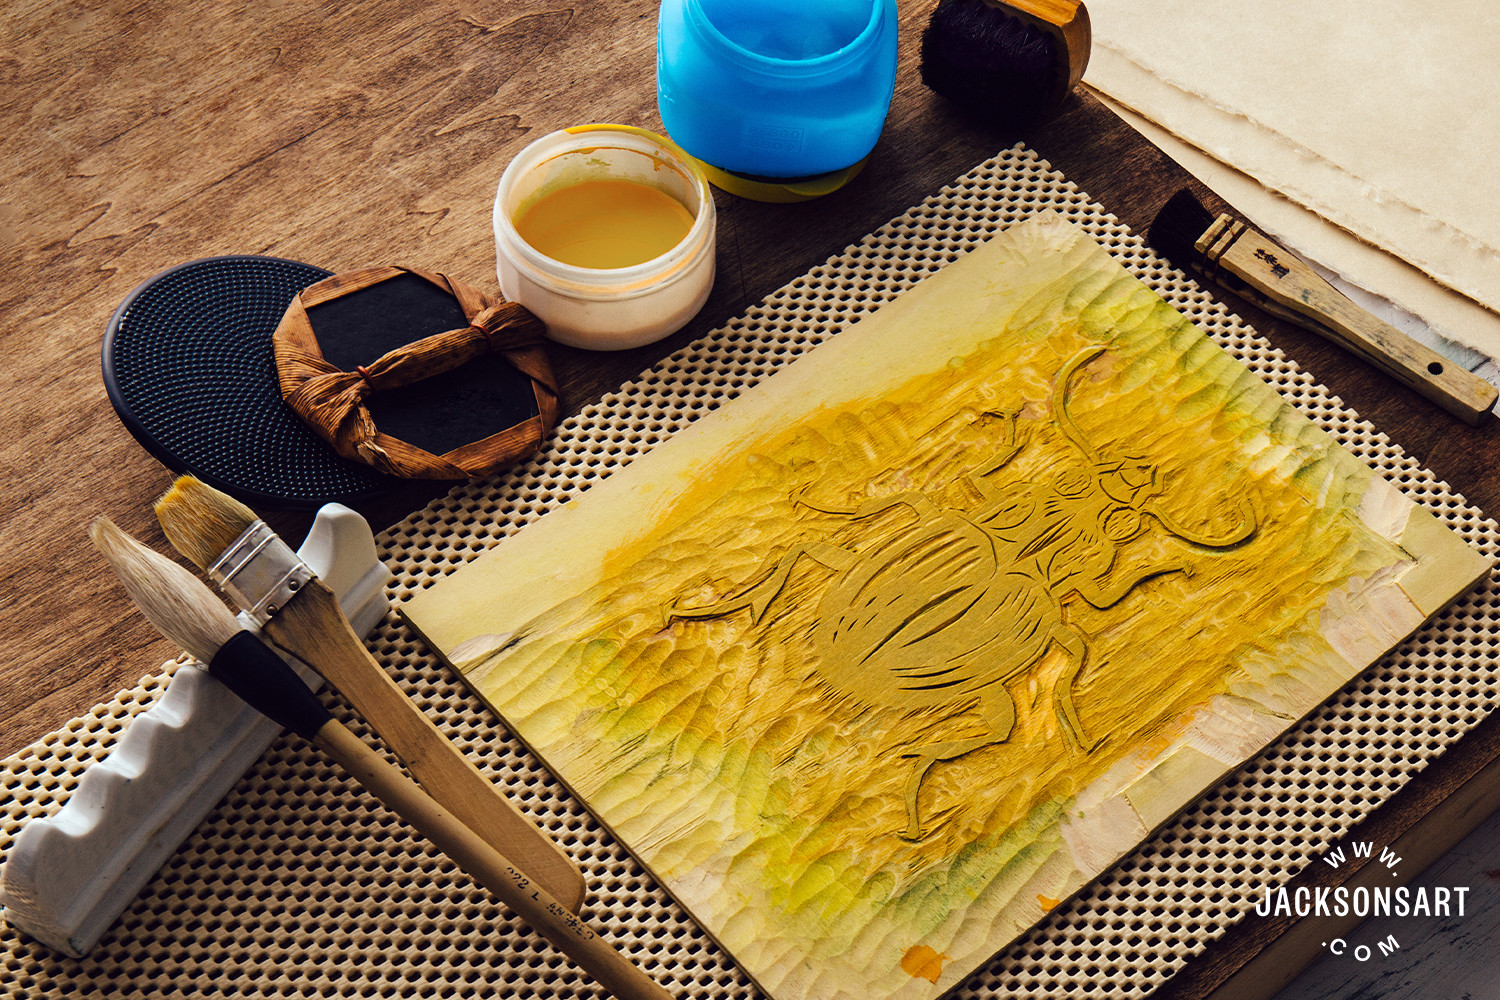 Mokuhanga Woodcut Printmaking Process
A detailed view showcasing the Mokuhanga woodcut printmaking process, highlighting the delicate application of water-based inks onto a woodblock using traditional brushes.
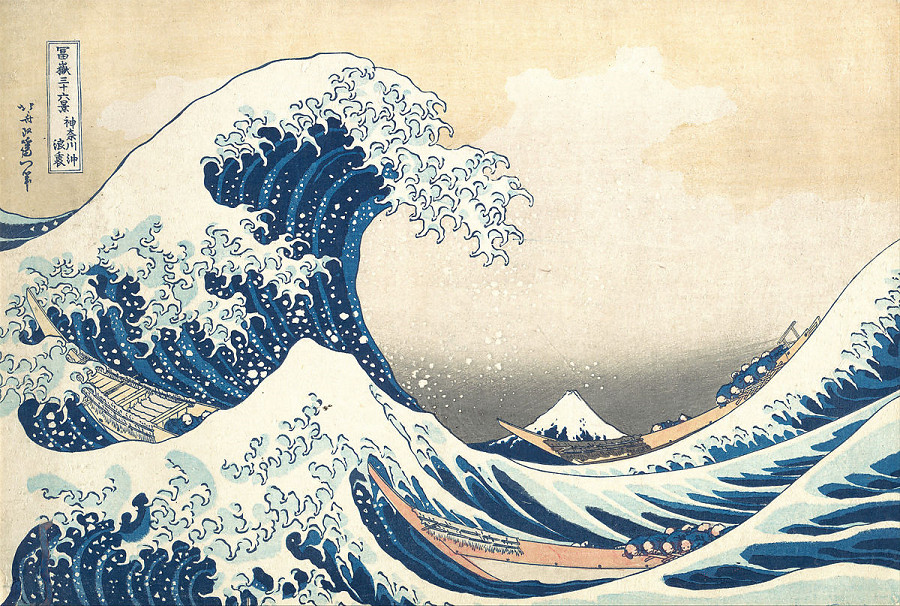 The Great Wave by Hokusai
Katsushika Hokusai’s iconic woodblock print, “The Great Wave,” exemplifies the dynamic range and expressive power attainable through Japanese woodcut techniques.
 Saint Christopher by Albrecht Durer
Albrecht Dürer’s “Saint Christopher,” a masterful example of early European woodcut, demonstrates the intricate detail and dramatic contrasts achievable with this method.
Essential Woodcut Printing Tools: A Beginner’s Checklist
To embark on your woodcut printing journey, assembling a set of essential tools is the first step. Here’s a breakdown of what you’ll need:
Soft Pencil and Transfer Paper
Prior to carving, transferring your design onto the woodblock serves as a crucial guide, streamlining the carving process. It’s important to remember that woodcut prints produce a reversed image. Therefore, for designs incorporating text or directional elements, the image needs to be flipped before transferring. To achieve this, sketch your design, trace it onto tracing paper, and then reverse the tracing onto the woodblock using carbon paper or a soft pencil transfer method. For the pencil method, simply rub soft pencil over the lines on the back of your tracing paper. Then, position the tracing paper face-down on the woodblock and rub over the back to transfer the pencil outline. Detailed instructions on image transfer techniques can be found here.
The Woodblock: Choosing the Right Surface
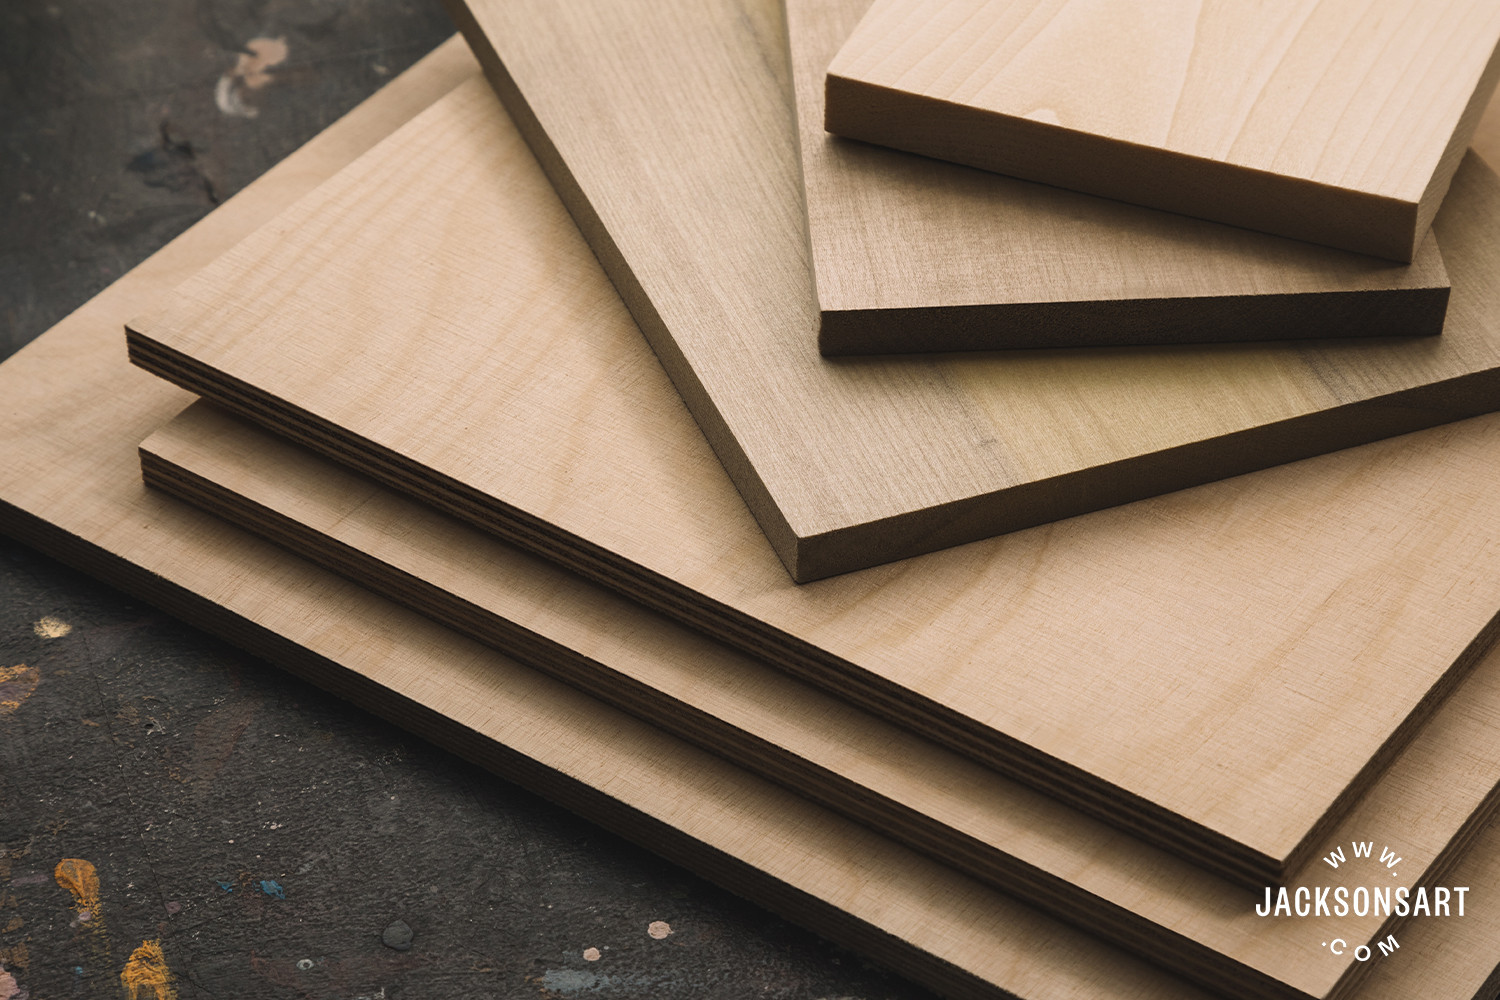
Jackson’s Baltic Birch 9 mm Plywood Wood Block
Japanese Magnolia 10 mm Side Grain Wood Block
The selection of wood for your block is a significant consideration in woodcut printmaking. Blocks are specially prepared to ensure consistent and even printing quality.
Jackson’s Baltic Birch Plywood: Jackson’s Baltic Birch plywood is crafted from dense, fine-grained wood. This characteristic facilitates clean and even carving, provided you employ sharp tools. Its 9mm thickness provides stability, preventing splitting or weakening during carving, assuming a standard carving depth of approximately 2-3mm. It’s available in a range of sizes, from compact 106 x 145 mm to larger 605 x 915 mm.
Jackson’s Japanese Magnolia Block: The Jackson’s Japanese Magnolia block, with a 10mm thickness, offers the unique advantage of being carvable on both sides, making it ideal for experimentation and maximizing material use. Magnolia wood is softer and smoother than birch plywood, rendering it particularly suitable for printing large, solid areas of color. It’s offered in two size options.
Japanese Katsura Block: The Japanese Katsura block is a premium choice, 13mm thick, and also carvable on both sides. Renowned for its exceptional quality, Katsura wood is perfect for intricate and finely detailed carving. Versatile in ink compatibility, Japanese Katsura blocks can be used with both water-based and oil-based inks, despite their traditional association with Mokuhanga.
Carving Tools: Precision and Control
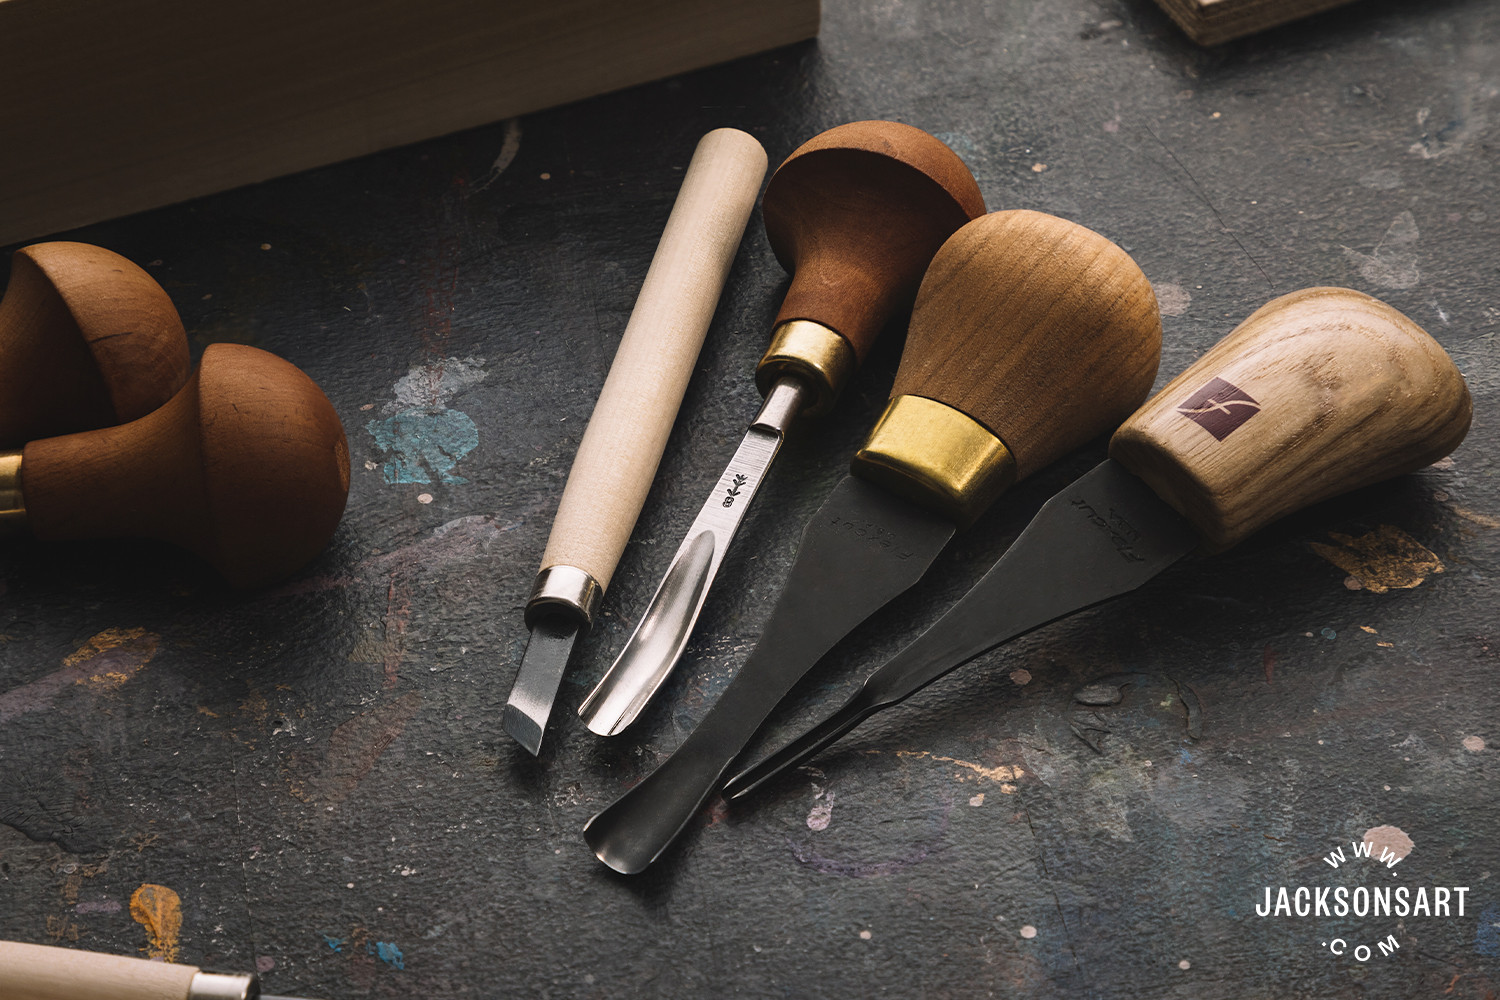
Flexcut Micro Palm Carving Tool Set, Set Of 4
Pfeil Linoleum And Block Cutters
Japanese Woodcarving Tool, Set Of 5 With Sharpening Stone
Essdee Lino Carving Tool Set, Handle With 5 Blades
Investing in good quality, sharp carving tools is paramount. Sharp tools not only enhance carving precision but also significantly minimize the risk of slippage across the wood surface, promoting safety and control.
Beginner-Friendly Sets: A simple and affordable set of woodcutting tools is an excellent starting point. The basic Jackson’s woodcut set includes five knives of varying sizes, each featuring sturdy, easy-to-grip wooden handles. Different blade shapes create distinct marks in the wood. For instance, V-shaped tools are ideal for fine lines, while larger U-shaped tools are designed for clearing broader areas around your design. Sets with 8, 10, or 12 tools offer a wider selection of blade sizes and profiles. Tool sizes are typically described using the blade type and width in millimeters (e.g., V-Straight Parting Chisel 6 mm).
Professional Grade Tools: For a long-term investment, consider higher-end carving tools. Quality tools, when properly maintained, can last a lifetime. Pfeil offers a comprehensive range of tools suitable for both linocut and woodcut, available individually and in sets. Their signature mushroom-shaped handles are ergonomically designed to fit comfortably in the palm of your hand. Pfeil tools are numbered (e.g., 1/8), with the number indicating the blade’s curvature and width in millimeters. Flexcut is another reputable brand, providing excellent quality tools in various sets, ranging from micro tools for intricate detailing to wider tools for clearing larger areas and tackling broader projects.
Sharpening Tools: Maintaining the Edge

Flexcut: Stripstrop: Carving Tool Sharpening Kit
India Sharpening Stone Double Sided Bench Stone, 25x51x204 mm
Round India Sharpening Stone Double Sided Oilstone, 25 mm Depth, 100 mm Diameter
Sharpening Stone Japanese Deluxe Multiform Waterstone 1000 Grit
Flexcut Slipstrop Carving Tool Sharpening Kit
Maintaining razor-sharp carving tools is not merely desirable—it’s essential. Dull tools are prone to slipping and skidding across the wood surface, compromising both control and safety. Colin Blanchard’s comprehensive guide on sharpening linocut tools offers valuable insights and techniques applicable to woodcut tools as well. For routine edge maintenance, the Flexcut slipstrop is a highly effective tool for keeping your blades in optimal condition.
Roller or Brayer: Inking Evenly
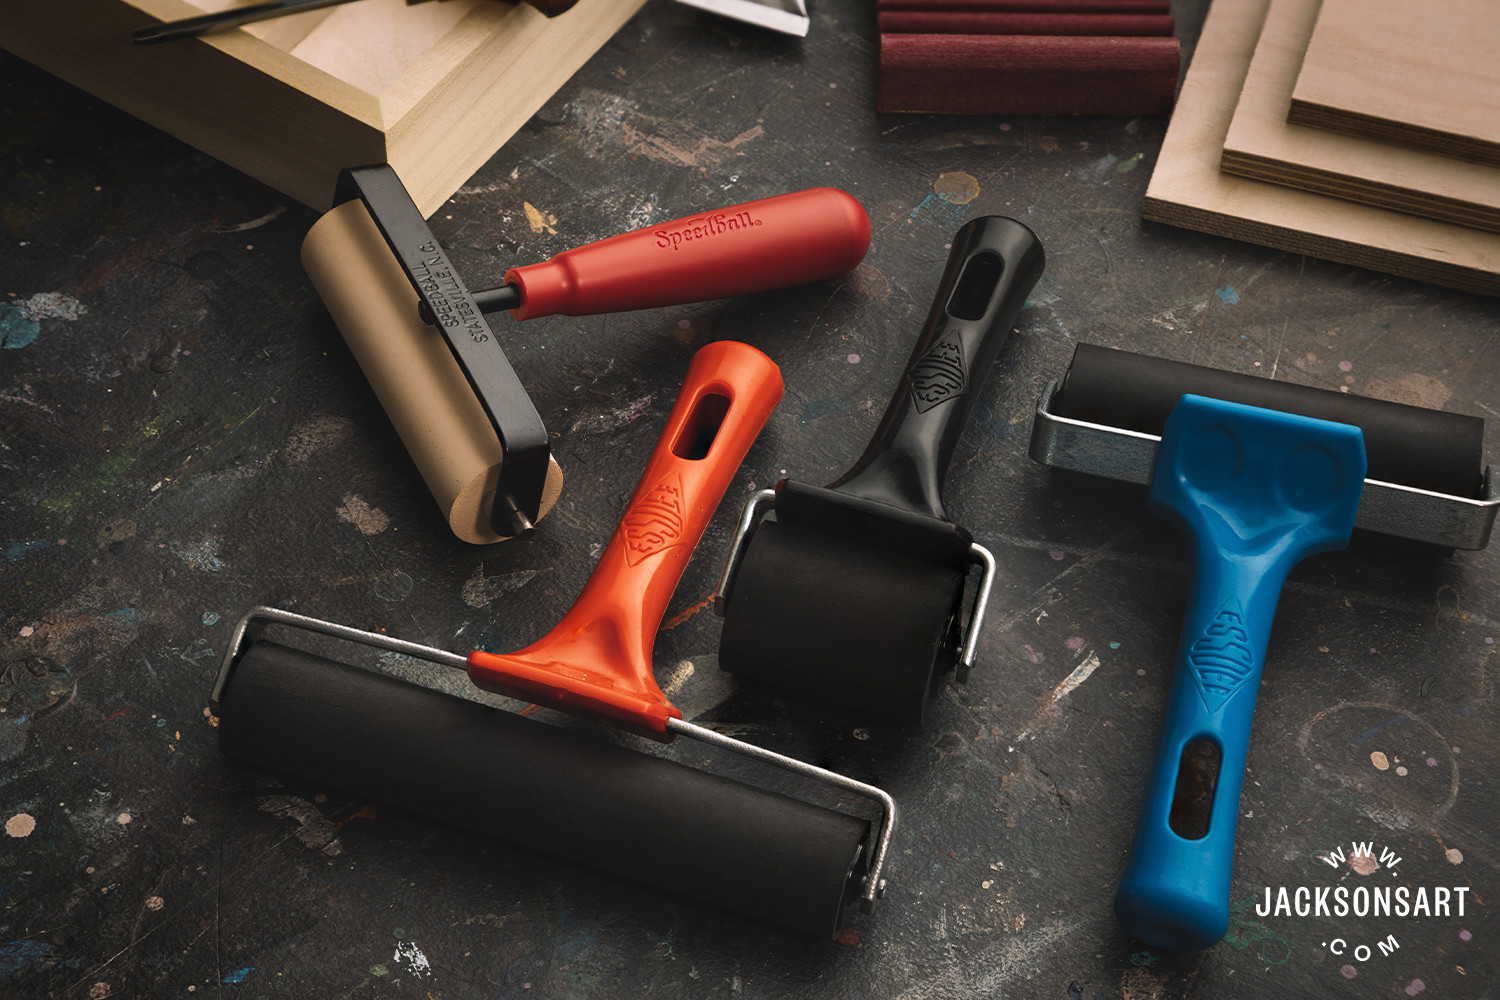 Woodcut Printmaking Rollers
Essdee Black Handle Professional Ink Rollers 60 Shore
Cold Wax Academy Soft Rollers / Brayers
Speedball Soft Rubber Rollers / Brayers
Japanese Hard Rubber Roller / Brayer
In woodcut printmaking, a roller or brayer plays a critical role in applying a thin, even layer of ink to the surface of the woodblock. Rollers are typically constructed from durathene or robust rubber and feature a sturdy handle for comfortable use. The ‘shore’ value associated with some rollers indicates their softness or hardness—rollers with a shore value over 50 are considered hard, while those under 50 are softer. For woodcut, a softer roller is generally recommended. Softer rollers conform better to the slightly uneven surface of a carved woodblock, ensuring more complete and consistent ink coverage. Essdee soft lino rollers and Japanese soft rubber rollers are available in various widths to accommodate different block sizes. Ideally, select a roller width that spans the entire width of your woodblock. However, a mid-sized roller (7-10cm) is a practical choice for beginners. Proper care and cleaning after each use will ensure your roller lasts for years to come.
Ink: Choosing the Right Type
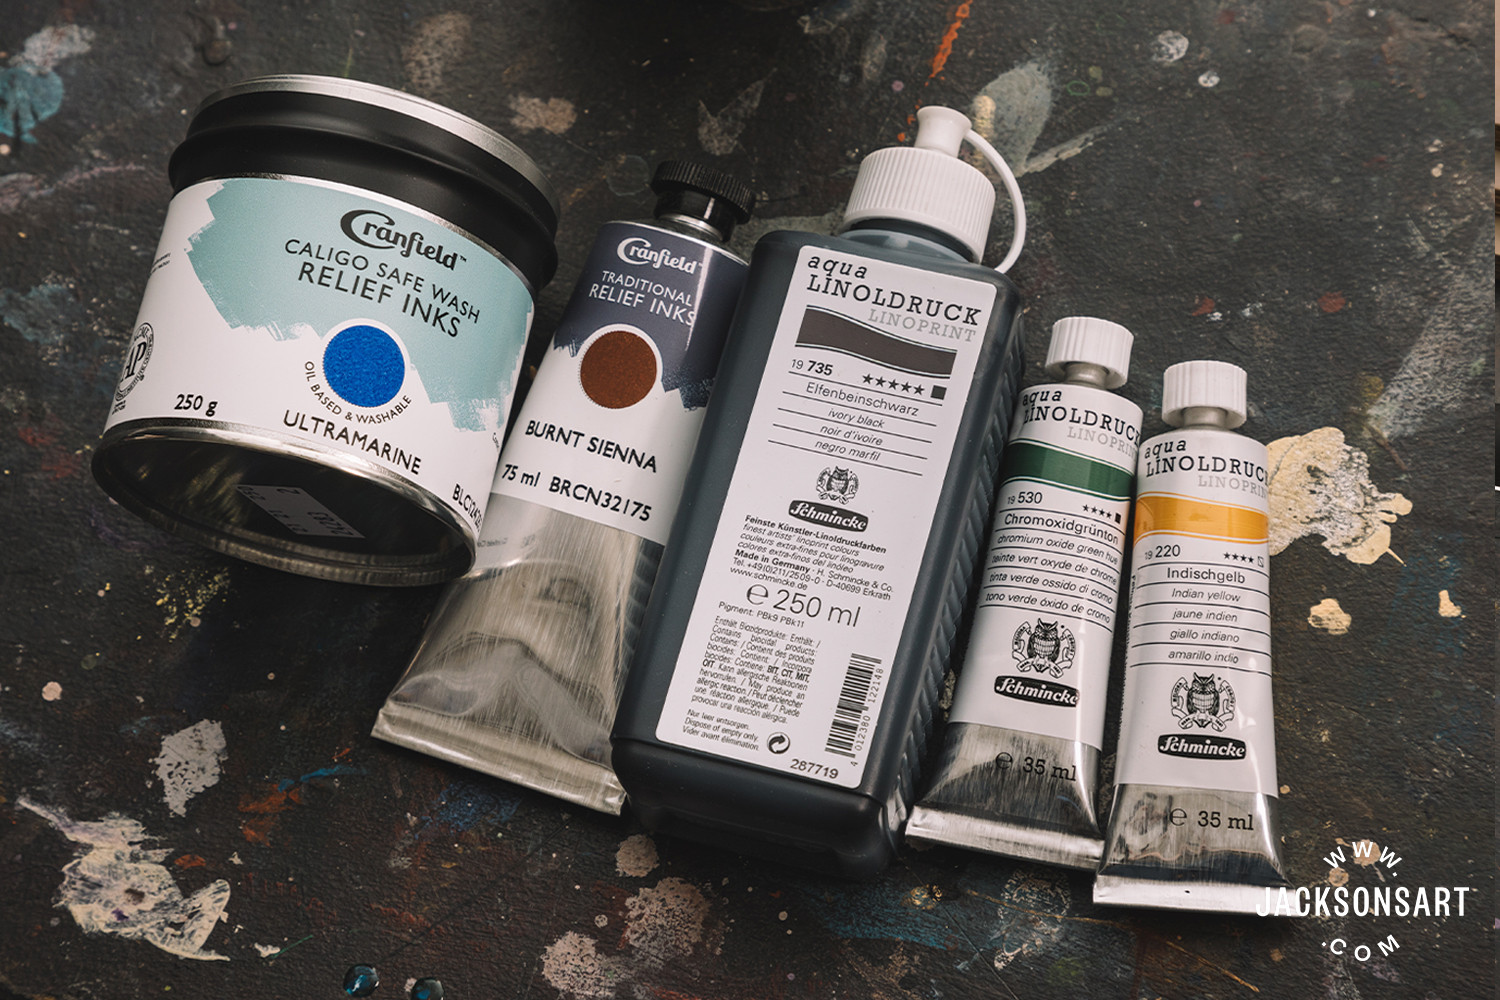
Selection of Woodcut Inks: L-R: Cranfield Caligo Safe Wash Relief Ink Ultramarine, Cranfield Traditional Relief Ink Burnt Sienna, Schmincke Lino Print Ink Ivory Black, Schmincke Lino Print Ink Chromium Oxide Green, Schmincke Lino Print Ink Indian Yellow
Cranfield Traditional Relief Ink 500 g Cool Yellow
Cranfield Traditional Relief Ink 75 ml : Light Green
Cranfield Safe Wash Etching Inks
Schmincke Aqua Linoprint Ink 20 ml Set Of 5
Woodcut printmaking necessitates the use of relief printing inks. These inks are specifically formulated to roll out smoothly and evenly, transferring cleanly to paper without excessive tackiness that could cause uneven prints. Relief inks are broadly categorized based on the binder used to suspend the pigment:
Water-based Inks: Water-based inks utilize natural binders like gum arabic and are water-soluble. Their easy cleanup with water and rapid drying time make them well-suited for beginner printmakers, younger artists, or those working at home. Schmincke Aqua linoprint is a high-quality, artist-grade water-based ink available in various sizes and a wide spectrum of colors.
Water-soluble Oil-based Inks: These inks offer the rich color saturation and buttery consistency of traditional oil-based inks, yet they can be cleaned up with soap and water. This eliminates the need for harsh solvents like white spirit or turpentine, making them a more user-friendly option for home studios or those seeking to avoid solvent exposure. Cranfield Caligo Safe Wash Relief Inks are a popular range of water-washable oil-based inks well-regarded for both home and studio use.
Oil-based Inks: Oil-based inks maintain a strong and enduring presence within the printmaking community. Their capacity to produce exceptionally rich, vibrant, and smooth colors remains a primary reason why many printmakers continue to favor them. Cleanup typically involves vegetable oil and newspaper or rags to remove the bulk of the ink, followed by a plant-based solvent like Gamsol for a more thorough cleaning. A final wipe with a glass cleaner or multi-purpose spray can address any residual greasiness. Cranfield Traditional Relief Inks are available in a wide array of sizes and 62 colors, offering extensive creative possibilities.
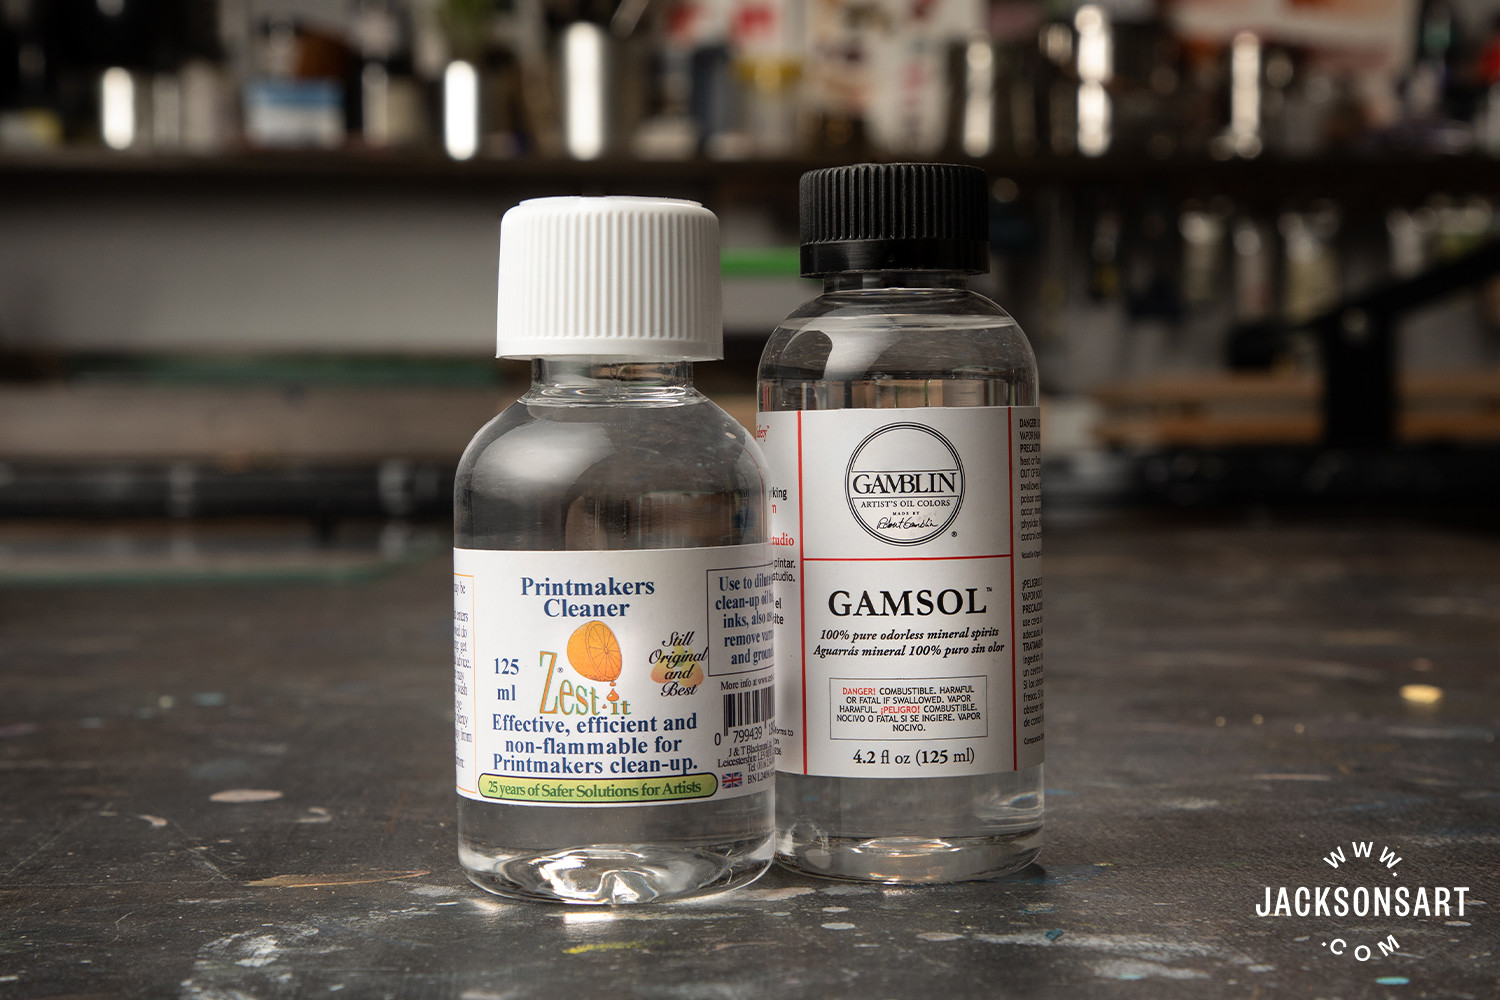 Woodcut Printmaking Solvents
Essential Solvents for Oil-Based Ink Cleanup: Zest-it Printmakers Cleaner and Gamblin Gamsol Odourless Mineral Spirit
Inking Slab: Achieving Ink Consistency
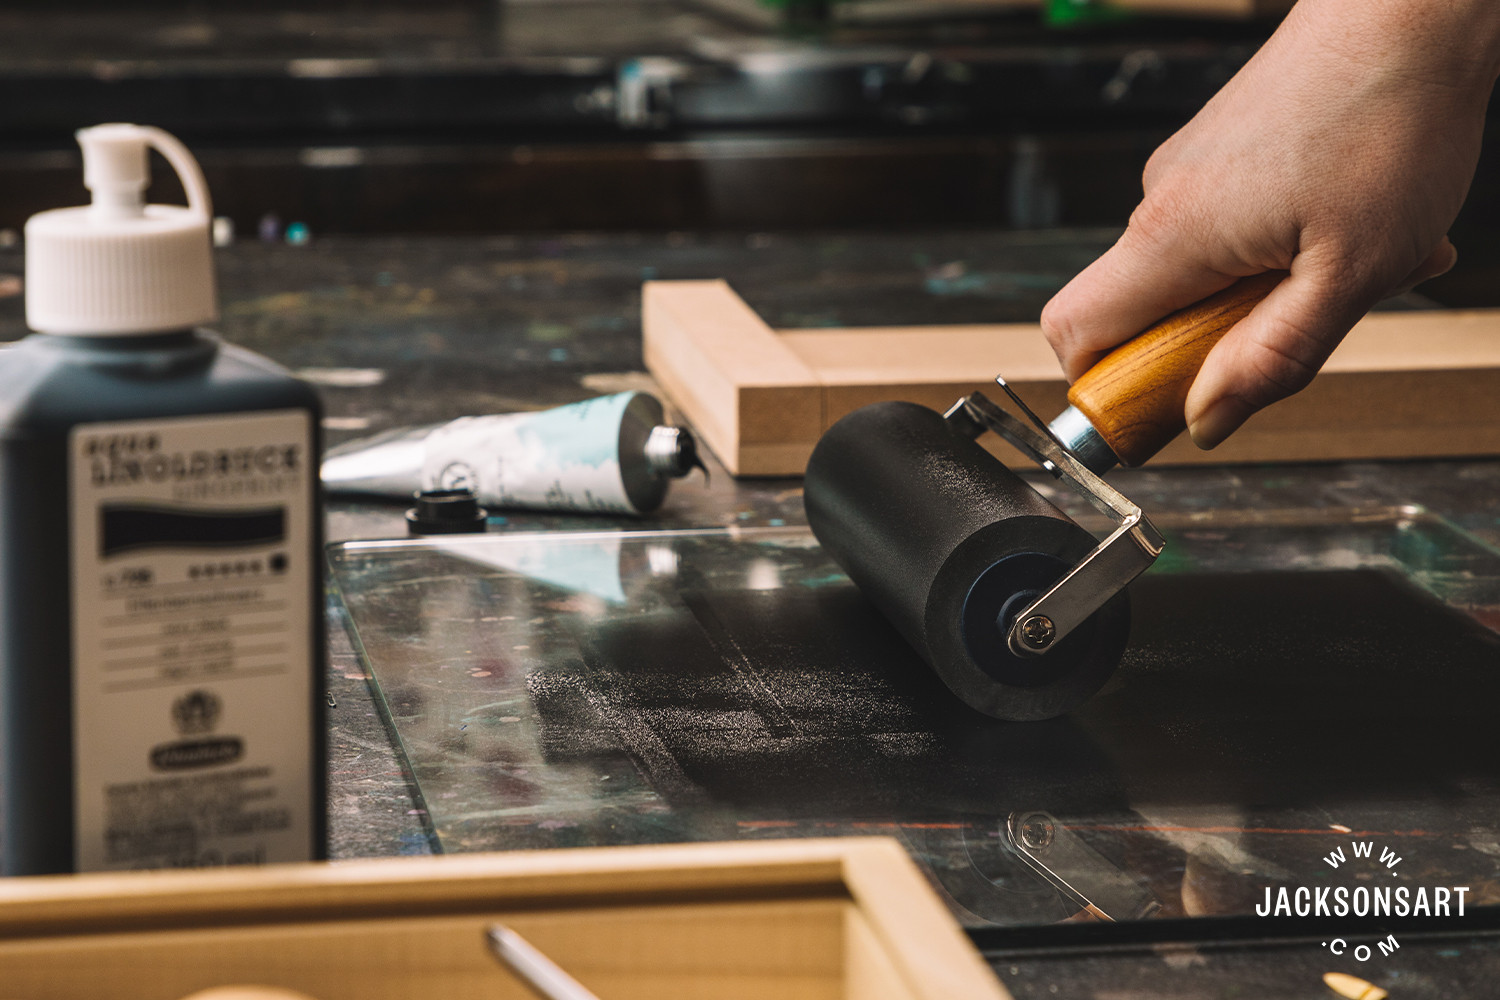 Woodcut Printmaking Inking Slab
Jackson’s Inking Slab
An inking slab is crucial for achieving an even and consistent ink distribution on your roller. Before inking the woodblock, a thin layer of ink is first rolled out on a smooth, non-absorbent, and level surface. Suitable surfaces include a dedicated inking slab, a glass chopping board, or an acrylic sheet. This step ensures the roller is uniformly coated with ink, leading to more even inking of the woodblock and ultimately, a better print.
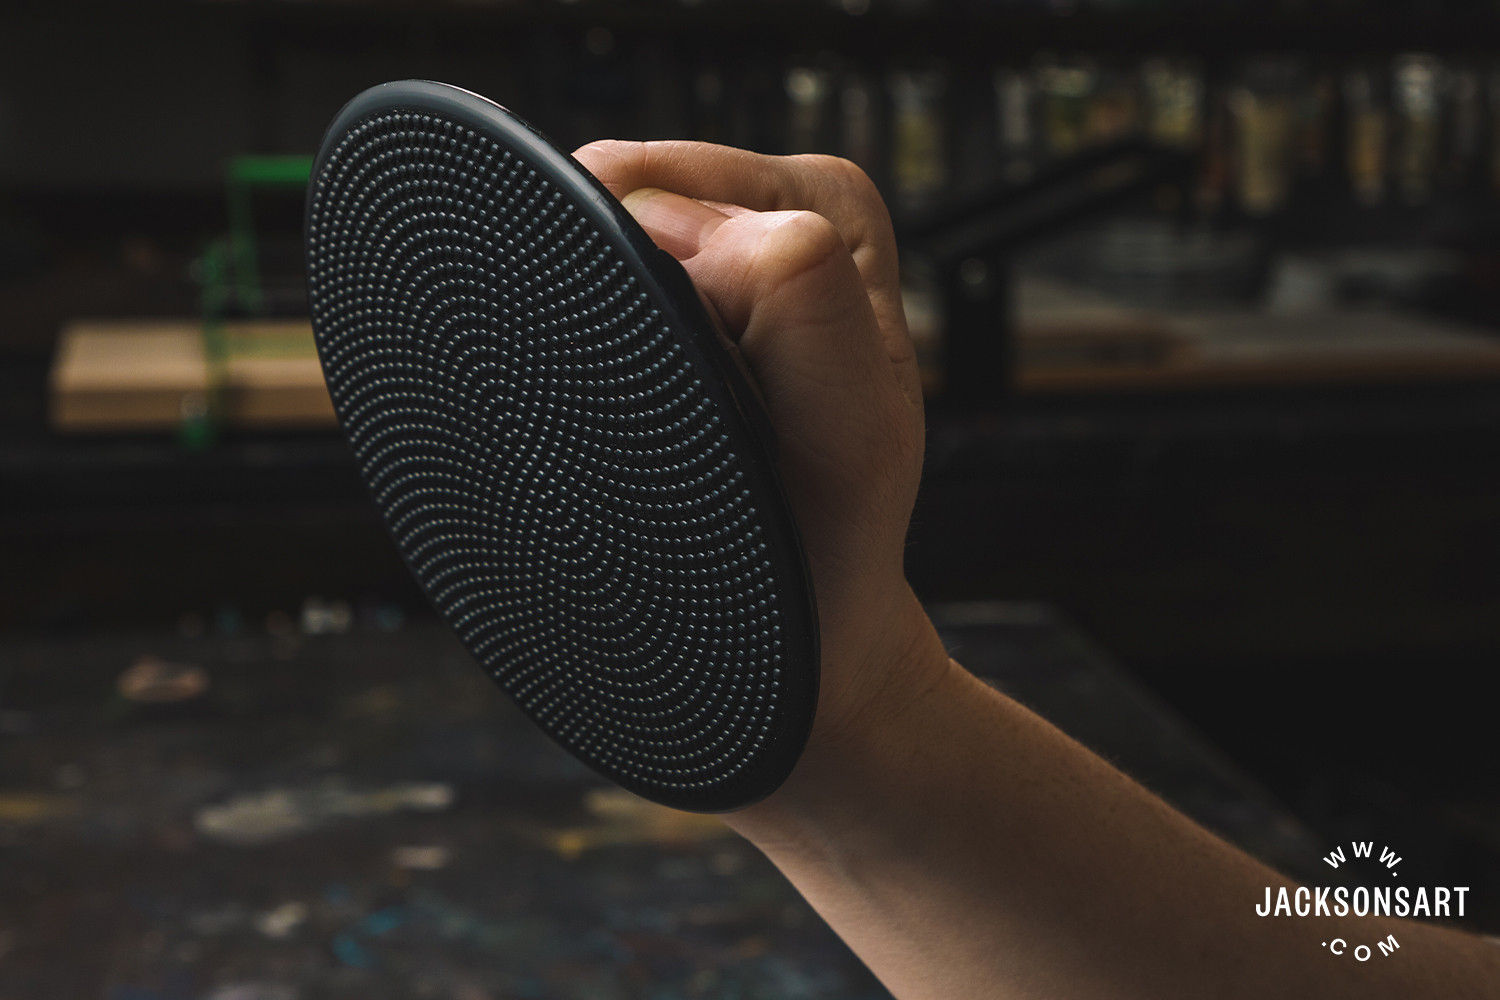
Printing Press or Baren: Applying Pressure
Japanese Baren
To effectively transfer the inked image from the woodblock to paper, pressure is essential. This pressure can be applied manually using a baren or mechanically with a printing press.
Baren: A baren is a hand-held tool specifically designed for applying pressure in printmaking. It’s typically a flat, round disc with a handle. To use a baren, position the paper face-down on the inked woodblock and rub the back of the paper firmly and evenly with the baren. A traditional Japanese baren comprises a coil of string backed with a round piece of card or board, all encased in a bamboo leaf with the ends twisted to form a handle. While high-quality barens can be expensive, more affordable options are readily available. While a spoon’s back can serve as a makeshift baren, a baren’s flat surface provides broader, more even contact. A spoon’s curved surface offers more concentrated pressure, which can be useful for selectively applying pressure to specific areas of a print. The Speedball baren is a robust and economical alternative, constructed from plastic and padded with foam. Japanese hard plastic barens with textured surfaces are another option to consider.
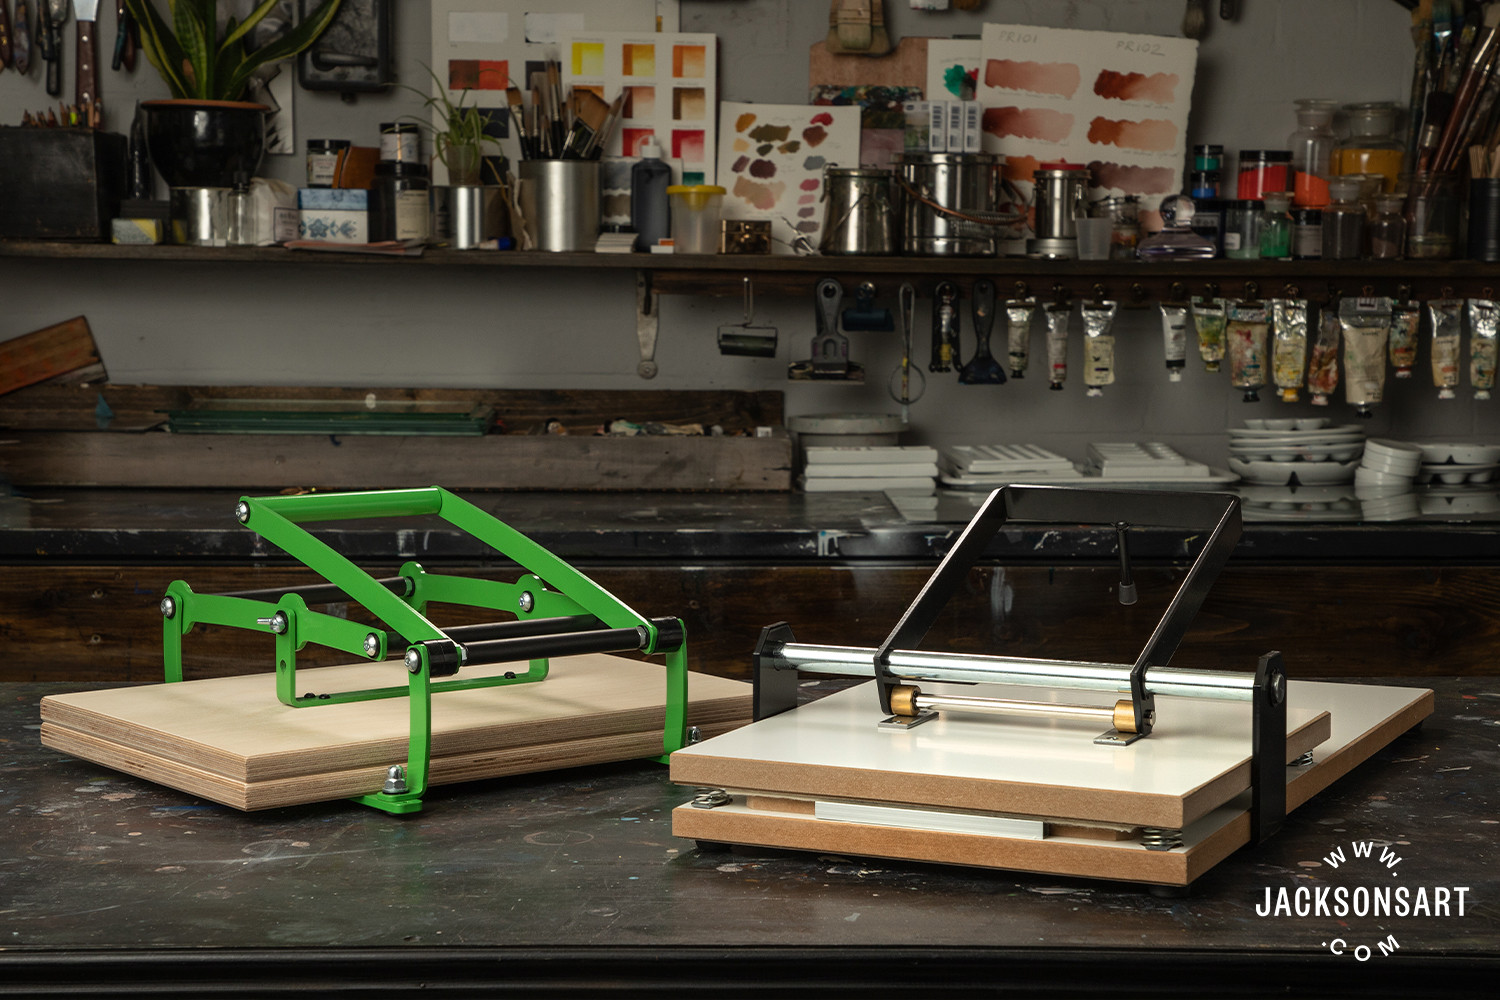
Fome Manual Lino/Wood Press and Pooki Press
Printing Press: For larger editions or more consistent print quality, especially in detailed work, a printing press is highly advantageous. The Pooki Press is a compact yet sturdy relief press suitable for beginners. It can accommodate paper sizes up to A3 and is compatible with both lino and woodcut printing. The Fome Manual Lino/Wood Press is another excellent entry-level press, known for its portability. Certain etching presses can also be adapted for woodcut printing, provided the cylinder height can be adjusted to accommodate the thickness of the woodblock. Always verify compatibility with the manufacturer if you are unsure.
Paper: The Printing Surface
The choice of paper profoundly impacts the final print. For relief printing, the paper must possess sufficient durability to withstand the printing process and a smooth surface to ensure consistent ink pickup. For initial test prints and experimentation, newsprint, basic cartridge paper, or printer paper are suitable—avoid papers with excessive texture or ‘tooth.’
Papers specifically designed for European and American relief printing are typically smooth, heavyweight, and crafted from cotton or wood cellulose. Japanese papers, in contrast, are known for being exceptionally thin, lightweight, and remarkably strong, often made from plant fibers other than wood pulp. For a comprehensive guide to printmaking papers, consult our article on printmaking papers.
Colour Techniques in Woodcut Printmaking
Introducing color into woodcut prints opens up a range of creative possibilities. Three primary methods are commonly employed:
Single Block, Multiple Colours
This technique involves applying different colors of ink to distinct areas of a single carved woodblock. A separate roller is used for each color to maintain color separation. The limitation of this method lies in achieving fine detail, as rollers are less precise for intricate color placement. For finer color detail, the Mokuhanga technique, which uses brushes for ink application, offers greater control.
Multiple Blocks for Multiple Colours
This approach necessitates carving a separate woodblock for each color intended in the final print. For a four-color design, four individual blocks would be carved. Each block carries the shapes corresponding to one specific color. In printing, the blocks are sequentially printed, layering colors to build up the complete image. The paper’s white (or base color) serves as an additional color element. Precise alignment, known as ‘registration,’ is crucial in multi-block printing to ensure accurate color placement and image cohesion. Many printmakers favor Ternes Burton registration pins for their accuracy and reliability in multi-block registration. Detailed guidance on creating multi-block prints can be found in our article on multi-block woodcut printmaking.
Reduction Woodcut: One Block, Layered Colours
The reduction method, sometimes called ‘suicide print,’ utilizes a single woodblock to create a multi-colored print. The process involves carving the block and printing the first color. Then, the same block is further carved, and the second color is printed over the first, and so on, for each subsequent color layer. Accurate registration is paramount at each stage. This technique is termed ‘reduction’ because with each color layer, more of the block is carved away, ‘reducing’ the printing surface for subsequent colors. It’s also nicknamed ‘suicide print’ due to its inherent risk. Mistakes in carving at any stage are irreversible and can potentially ruin an entire edition. Errors in printing later color layers can also limit the number of successful prints achievable.
The woodcut printing process offers a deeply rewarding artistic experience. The engagement with a natural, sustainable material, the act of carving a design, the application of ink, and the reveal of the printed image all contribute to its unique appeal. With a modest collection of essential tools, you can readily explore, experiment, and create your own editions of woodcut prints.
Printmaking at Jackson’s
Further Reading:
Hilary Daltry Re: Woodcut Prints without a Press
Everything You Need to Know About Printmaking Paper
Mokuhanha: Japanese Woodblock Printmaking
The Best Way To Transfer Images To Lino