
If you frequently need to print a specific portion of your Excel worksheet, defining a print area can save you time and effort. A print area allows you to select one or more ranges of cells that you want to print, excluding the rest of the worksheet. This is particularly useful when you only need to share or focus on a subset of your data. When you define and then print a worksheet with a print area, only the designated area will be printed. You have the flexibility to expand this print area as your needs evolve, or you can easily clear it to revert to printing the entire worksheet.
It’s important to note that an Excel worksheet can accommodate multiple print areas. Each print area you define will be printed as a separate page, giving you precise control over your printed output.
Setting a Print Area in Excel
Here’s how to define a print area in your Excel worksheet:
-
Select the Cells: Begin by selecting the specific cells on your worksheet that you wish to include in your print area. This is the data you want to focus on when printing.
Tip: To define multiple, non-contiguous print areas, simply hold down the Ctrl key while selecting each area you want to include. Each of these selected areas will print on a separate page.
-
Navigate to Page Layout: Go to the Page Layout tab on the Excel ribbon.
-
Set the Print Area: In the Page Setup group, locate and click on the Print Area dropdown menu. From the dropdown options, select Set Print Area.
 Set Print Area option in Excel Page Layout tab, used to define specific areas for printing
Note: Once you set a print area, it is saved with your Excel workbook. This means the next time you open and print this workbook, the defined print area will be active.
To visually confirm the print areas you’ve set and ensure they are correct, navigate to View in the ribbon and then select Page Break Preview in the Workbook Views group. This view clearly outlines your print areas with page break lines. Remember, the print area settings are saved when you save your workbook.
Adding Cells to an Existing Print Area
Need to expand your defined print area? You can easily add more cells, particularly if they are adjacent to the current print area. If you select and add cells that are not directly next to the existing print area, Excel will create a new, separate print area for those cells.
-
Select Additional Cells: On your worksheet, select the cells that you want to append to your existing print area.
Note: If the cells you are adding are not adjacent to the current print area, Excel will interpret this as a request for a new print area. Keep in mind that each print area in a worksheet is printed on a separate page. Only cells directly bordering the existing print area can be added to expand it.
-
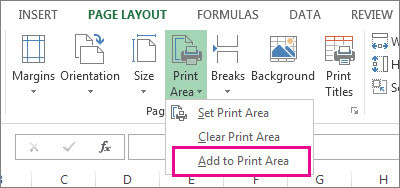
Add to Print Area: Go to the Page Layout tab, then in the Page Setup group, click Print Area. This time, from the dropdown menu, select Add to Print Area.
Set Print Area option in Excel Page Layout tab, used to define specific areas for printing
Similar to setting a print area, additions are also saved when you save your workbook, ensuring your print settings are retained.
Clearing a Print Area in Excel
If you no longer need a defined print area and want to print the entire worksheet again, you can easily clear the print area setting.
Important Note: If your worksheet has multiple print areas defined, clearing the print area will remove all of them at once, reverting the print settings for the entire sheet.
- Select any Cell on the Worksheet: Click on any cell within the worksheet for which you want to clear the print area. It doesn’t matter which cell you select as this action applies to the entire worksheet’s print settings.
- Clear Print Area: Navigate to the Page Layout tab, and in the Page Setup group, click Print Area. From the dropdown menu, select Clear Print Area. This action will remove any defined print areas, and Excel will default back to printing the entire worksheet.
Need Further Assistance?
For more in-depth help or to connect with other Excel users, you can explore the Excel Tech Community to ask experts and find solutions. You can also find support and discussions in Microsoft Communities for Excel related queries.