Printing directly from your iPad is easier than you might think, thanks to Apple’s AirPrint technology. If you’re wondering “Can You Print From An Ipad”, the answer is a resounding yes! This guide will walk you through the simple steps to print documents, photos, and more, right from your iPad to a compatible printer.
What is AirPrint and Do You Need It?
AirPrint is a feature built into iOS and iPadOS that allows you to print wirelessly to compatible printers without the need for additional drivers or software. It streamlines the printing process, making it incredibly convenient to get hard copies of your digital documents. Most modern wireless printers support AirPrint, making it a widely accessible feature.
How to Print from Your iPad Using AirPrint: A Step-by-Step Guide
Printing from your iPad is a straightforward process. Here’s how to do it:
Before You Start
First, ensure a couple of things are in place:
- AirPrint-enabled Printer: Make sure your printer supports AirPrint. You can usually find this information on the printer manufacturer’s website or the printer packaging.
- Wi-Fi Connection: Your iPad and printer need to be on the same Wi-Fi network. Check your Wi-Fi settings on both devices to confirm they are connected to the same network.
Printing Steps
Once you’ve confirmed the above, follow these steps to print:
-
Open the Document or Photo: Open the app containing the content you want to print. This could be Safari, Photos, Mail, Pages, or many other apps.
-
Find the Print Option: Look for the Share button or the Actions button within the app. It often looks like an upward-pointing arrow in a box. Tap this button.
-
Select Print: In the share sheet that appears, scroll down until you see the Print option, or a Print icon. Tap Print.
If you don’t see a print option, the app might not support AirPrint. Check the app’s help section for more information.
-
Choose Your Printer: Tap “No Printer Selected” to view a list of available AirPrint printers on your network. Select your AirPrint-enabled printer from the list.
-
Adjust Print Settings: Choose the number of copies you need, the page range, and other options like paper size and orientation, depending on your printer and the app you are using.
-
Print: Tap Print in the top right corner to send your print job to the selected printer.
Managing and Cancelling Print Jobs on Your iPad
Sometimes you might need to check the status of a print job or cancel it. iPadOS makes this easy too.
Viewing a Print Job
To see your current print jobs, you can quickly access the Print Center through the App Switcher. Open the App Switcher (usually by swiping up from the bottom of the screen and holding briefly, or double-clicking the Home button on older iPads), and look for Print Center. Tap it to view the print queue.
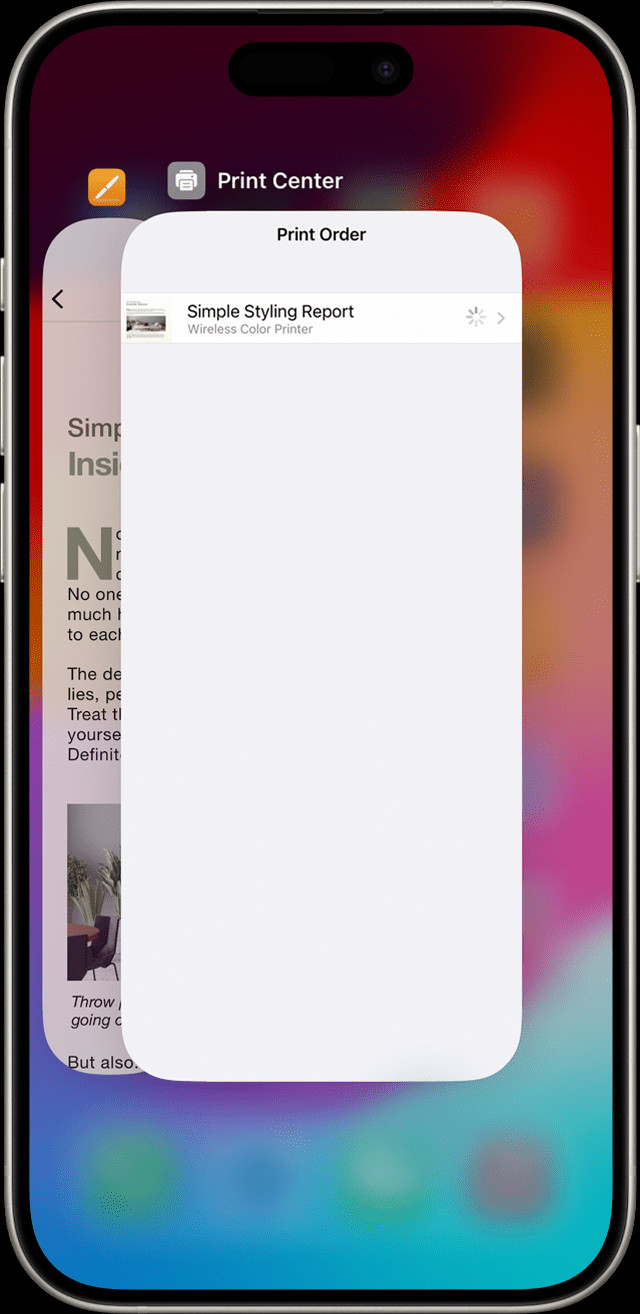 View print jobs in Print Center on iPad
Cancelling a Print Job
If you need to stop a print job, go to the Print Center as described above. Tap on the print job you want to cancel, and then tap Cancel Printing.
Printing from your iPad is designed to be a user-friendly experience. With AirPrint, you can effortlessly print documents and photos whenever you need them, directly from your Apple tablet. Enjoy the convenience of wireless printing!