
Adding a printer to your MacBook might seem like a tech hurdle, but it’s actually a surprisingly straightforward process. Whether you’re setting up a brand-new wireless printer or connecting a reliable USB model, macOS is designed to make it as user-friendly as possible. This guide will walk you through each simple step to add a printer on your MacBook, ensuring you can quickly get back to printing important documents, photos, and more.
Before diving into the setup, it’s worth a quick check to see if your printer is already discoverable. If both your printer and MacBook are connected to the same Wi-Fi network, your Mac might automatically detect it. To check, simply go to ‘File’ then ‘Print’ in any application, and click on the ‘Printer’ dropdown menu. Look for your printer in the list. If it’s not there, or if you’re adding a printer for the first time, just follow the steps below.
First things first, ensure your printer’s software is up to date. It’s always a good idea to visit your printer manufacturer’s official website and look for the support or downloads section. Search for your specific printer model to find any available software or driver updates. Installing the latest software can prevent compatibility issues and ensure optimal performance. Notably, if you’re using an AirPrint-enabled printer, you generally don’t need to worry about installing drivers, as AirPrint technology is natively supported by macOS.
Next, get your printer physically ready. Unbox your printer, carefully install the ink or toner cartridges as instructed, and load paper into the paper tray. Power on your printer and check its display for any error messages. Addressing any errors at this stage will ensure a smoother connection process.
Now, it’s time to connect your printer to your network or MacBook. For those using Wi-Fi printers, refer to your printer’s instruction manual for details on connecting it to your wireless network. You might find that some Wi-Fi printers require a temporary USB connection to your MacBook for the initial Wi-Fi setup. Once connected to Wi-Fi, you can disconnect the USB cable. If you’re using a USB printer, simply connect it directly to your MacBook using a USB cable.
With the printer prepared and connected, the final step is to add it to your MacBook’s list of available printers within macOS. Navigate to the Apple menu in the top-left corner of your screen, then select ‘System Settings’. In the System Settings window, click on ‘Printers & Scanners’ in the sidebar. (You might need to scroll down to find it).
If you don’t see your printer listed on the left side of the Printers & Scanners window, click the ‘Add Printer, Scanner, or Fax’ button located on the right.
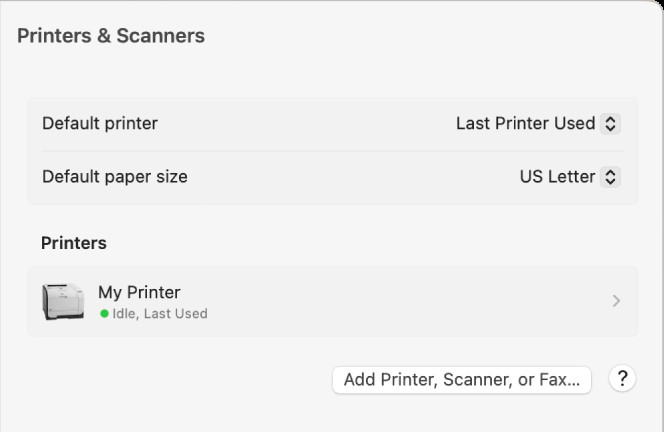 macOS Printers & Scanners settings panel, highlighting the Add Printer, Scanner, or Fax button for adding a new printer to the list of available printers.
A dialog box will appear, displaying a list of printers available on your local network. Find your printer in the list, select it, and then click ‘Add’. It might take a moment or two for your printer to appear in the list. If you see a prompt asking you to download new software, be sure to download and install it as instructed.
macOS is usually smart enough to detect if your printer has any special accessories, such as additional paper trays or a duplex unit for double-sided printing. If it can’t automatically detect these, a dialog will pop up, allowing you to manually specify them. Make sure the settings in this dialog accurately reflect your printer’s accessories so you can fully utilize all of its features.
For a quicker method to add a printer, especially for advanced users, you can use ‘Print Center’, which is located in the ‘Utilities’ folder within your ‘Applications’ folder. Once Print Center is open, simply choose ‘Printer’ > ‘Add Printer’ from the menu bar to start the printer setup process.
In conclusion, adding a printer to your MacBook is a straightforward sequence of steps: checking for existing connections, updating printer software, preparing the printer physically, establishing a network or USB connection, and finally, adding the printer through your Mac’s System Settings. By methodically following these instructions, you’ll be able to easily add a printer on your MacBook and start printing your documents with minimal fuss.