
Building a 3d Printed Iron Man Helmet with moving parts is an awesome project, especially when you incorporate servos to mimic the iconic helmet movements. However, like many DIY enthusiasts, you might run into snags, particularly with servo motors behaving unexpectedly. One common issue arises when using a mix of servo types, such as MG90S and SG90 servos, for different helmet mechanisms. Let’s dive into a troubleshooting scenario reported by a maker who’s facing this exact problem with their Iron Man helmet project.
The maker, new to Arduino, has invested considerable time but is struggling to get their servo setup working correctly in their 3D printed Iron Man helmet. They’ve wired up their helmet, which uses an Arduino Nano, a PCA9658 servo driver, MG90S servos, and SG90 servos, but are experiencing inconsistent behavior.
Here’s a breakdown of the hardware being used:
- Microcontroller: Arduino Nano
- Servo Driver: PCA9658
- Servos: 2x MG90S, 8x SG90
- Eyes: Flexible LED panels
The core issue is that while the MG90S servos operate as expected for both opening and closing actions, the SG90 servos only function correctly when moving to the open position. When instructed to close, these SG90 servos just keep spinning continuously, failing to reach the desired closed position.
To better understand the setup, here’s the wiring diagram provided by the user:
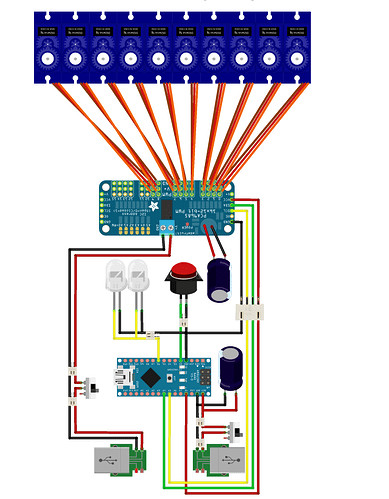 Wiring diagram for 3D printed Iron Man MK5 helmet project using Arduino Nano, PCA9658, MG90S and SG90 servos, illustrating servo motor connections for helmet mechanisms.
The code provided is designed to control these servos for the helmet’s opening and closing sequences. Let’s examine potential areas to investigate to resolve this servo spinning issue.
Potential Troubleshooting Areas for Your 3D Printed Iron Man Helmet Servos
When your SG90 servos are spinning continuously instead of moving to a set position, especially when MG90S servos in the same project are working fine, several factors could be at play. Here’s a step-by-step approach to diagnose and fix the problem:
1. Power Supply Issues
Servo motors, especially when you have multiple like in an Iron Man helmet project, can draw a significant amount of current. SG90 servos, while smaller, still require adequate power. If the power supply is insufficient, it can lead to erratic servo behavior, including continuous spinning.
- Check your power source: Ensure your power supply can provide enough current for all servos, the Arduino Nano, and the LED panels. A common mistake is powering everything directly from the Arduino’s 5V pin, which is often insufficient.
- Consider a separate power supply: For a project with 10 servos, using a dedicated external power supply for the servos is highly recommended. Make sure the grounds of the external power supply and the Arduino are connected.
2. Wiring Problems
Even with a wiring diagram, mistakes can happen. Incorrect wiring is a frequent cause of servo malfunction.
- Double-check your wiring: Carefully compare your wiring to the provided diagram and the PCA9658 datasheet. Ensure each servo is connected to the correct PWM output on the PCA9658, and that the polarity is correct (GND to GND, VCC to VCC, Signal to PWM).
- Inspect for loose connections: Loose wires can cause intermittent issues. Make sure all connections are secure. Consider using screw terminals or soldering for more reliable connections, especially in a project that might experience movement like a wearable helmet.
3. Servo Motor Malfunction
While less common, it’s possible that some of your SG90 servos are faulty.
- Test servos individually: Disconnect all servos except one SG90. Use a simple servo sweep code to test each SG90 servo individually, connected directly to the PCA9658. This will help you identify if any specific servo is inherently defective.
- Compare to a known working servo: If you have a spare SG90 servo, test it in place of one of the spinning servos to rule out a hardware failure.
4. Code Issues and Servo Parameters
The provided Arduino code includes servo control logic. While the code seems structured, there might be subtle issues causing problems with SG90 servos specifically.
- Servo Pulse Range (SERVOMIN and SERVOMAX): The code defines
SERVOMINandSERVOMAX. These values determine the pulse width range for servo control. SG90 and MG90S servos might have slightly different optimal ranges. While the code has comments about adjusting for SG90s, it’s worth verifying these values. Experiment with slightly adjustingSERVOMINandSERVOMAXvalues to see if it affects the SG90 behavior. getAngleToPulseFunction: This function maps angles to pulse widths. Ensure this mapping is correctly translating the desired angles to appropriate pulse widths for both servo types.- Servo Positions (e.g.,
servoCheeksClosed,servoCheeksOpen): The code uses integer values to define servo positions. It’s possible theservoClosedvalues for SG90s are causing them to try and move beyond their physical limits, leading to continuous spinning. Try slightly adjusting theseservoClosedvalues in the code, especially for the SG90 servos, to see if it resolves the issue. Incrementally increase theservoCheeksClosed,servoNoseSideClosed, etc., values for the SG90 servos and re-test. - Delay and Animation Speed (
animDelay): While less likely to cause continuous spinning, excessively short delays in servo movements might contribute to erratic behavior. Try increasinganimDelayslightly to see if it makes a difference.
5. PCA9658 Configuration
While the code initializes the PCA9658, there’s a possibility of misconfiguration or issues with the driver itself.
- Address Conflicts: If you have other I2C devices, ensure there are no address conflicts with the PCA9658. However, in this setup, it seems unlikely to be the primary issue if MG90S servos are working.
- Library Issues: Ensure you are using the correct and up-to-date Adafruit PWM Servo Driver library. While generally reliable, library issues can sometimes arise. Try re-installing the library or checking for updates.
By systematically checking these potential problem areas – power, wiring, servo hardware, code parameters, and PCA9658 configuration – you should be able to pinpoint why your SG90 servos are spinning continuously and get your 3D printed Iron Man helmet project back on track. Remember to test changes incrementally and document your findings to effectively troubleshoot and resolve the issue.
