
The dream of creating a personalized electric guitar using a 3D printer has resonated with makers and musicians alike. Imagine bringing a custom instrument to life right from your desktop. For many, including myself, the idea of a 3D printed electric guitar was initially met with skepticism. Could a 3d printed body withstand string tension? Would it produce a decent sound compared to traditional materials? These were just some of the questions swirling around the concept of a 3d Printed 3d Printer guitar. Online resources offered limited answers, often showcasing impressive-looking projects that lacked playability or practical instructions.
While not the first to explore this exciting intersection of music and technology, I felt compelled to develop a truly accessible and functional 3D printed electric guitar. Many existing designs seemed either too complex, expensive, or simply not very playable. This realization sparked a mission: to design a 3D printable electric guitar from the ground up, prioritizing ease of use and community accessibility.
Design Priorities: Keeping the 3D Printing Community in Mind
The core philosophy behind this project was to empower the 3D printing community. The goal was to create a design that anyone with a standard desktop 3d printer could easily replicate and enjoy. To achieve this, several key priorities were established:
- Simplicity: The design had to be straightforward, avoiding intricate assemblies and unnecessary hardware. The focus was on ease of printing and assembly, making it approachable for makers of all skill levels.
- Affordability: The project needed to be budget-friendly. The aim wasn’t to create a high-end instrument rivaling boutique guitars, but rather a cost-effective and fun project. If budget was no concern, purchasing a premium guitar would be the more direct route.
- Hardware Accessibility: Components needed to be easily sourced globally, ensuring that builders worldwide could obtain the necessary parts without difficulty.
- Printability on Common 3D Printers: Crucially, all parts had to fit within the build volume of an Original Prusa i3 MK3S+ (25×21×21 cm). This constraint was vital, as the MK3 series is a widely used and respected desktop 3d printer. Limiting the size to this footprint ensured broader accessibility within the 3D printing community.
- Playability and Tuning Stability: The final product had to be a genuinely playable instrument, capable of staying in tune across its entire range. It couldn’t be just a novelty item; it needed to function as a real guitar.
- Aesthetics: Beyond functionality, the guitar had to look visually appealing and unique, leveraging the design freedom offered by 3D printing.
Simplifying the Design for 3D Printing Success
The primary engineering challenge was addressing the immense force exerted by guitar strings on the body and neck. Estimates place this tension around 50 kg (110 lbs), varying slightly with string gauge. This force acts to bend the neck, pull the bridge off the body, and essentially fold the guitar in half.
The neck presented a clear solution: utilize a traditional wooden neck. While some might argue against a “partially 3D printed” guitar, the neck’s critical role in playability and intonation made a pre-fabricated wooden neck the most sensible choice. Wooden necks offer superior smoothness, straightness, durable metal frets, and an adjustable truss rod for neck relief – essential features difficult to replicate reliably with 3D printing, even though 3d printed necks are possible in principle.
The bridge, however, required more strategic thinking. The bridge anchors the strings to the body and transfers their vibrations. Examining common guitar bridge designs, one stood out as particularly well-suited for a 3D printed guitar: the Telecaster bridge.
Unlike many designs with small bridges secured by just a couple of screws, the Telecaster bridge features a large metal plate. This plate not only holds the strings but also integrates the bridge pickup and boasts up to five mounting holes with widely spaced screws. This design effectively distributes the string tension across a larger area of the 3d printed body, providing enhanced stability and reducing stress on the printed material.
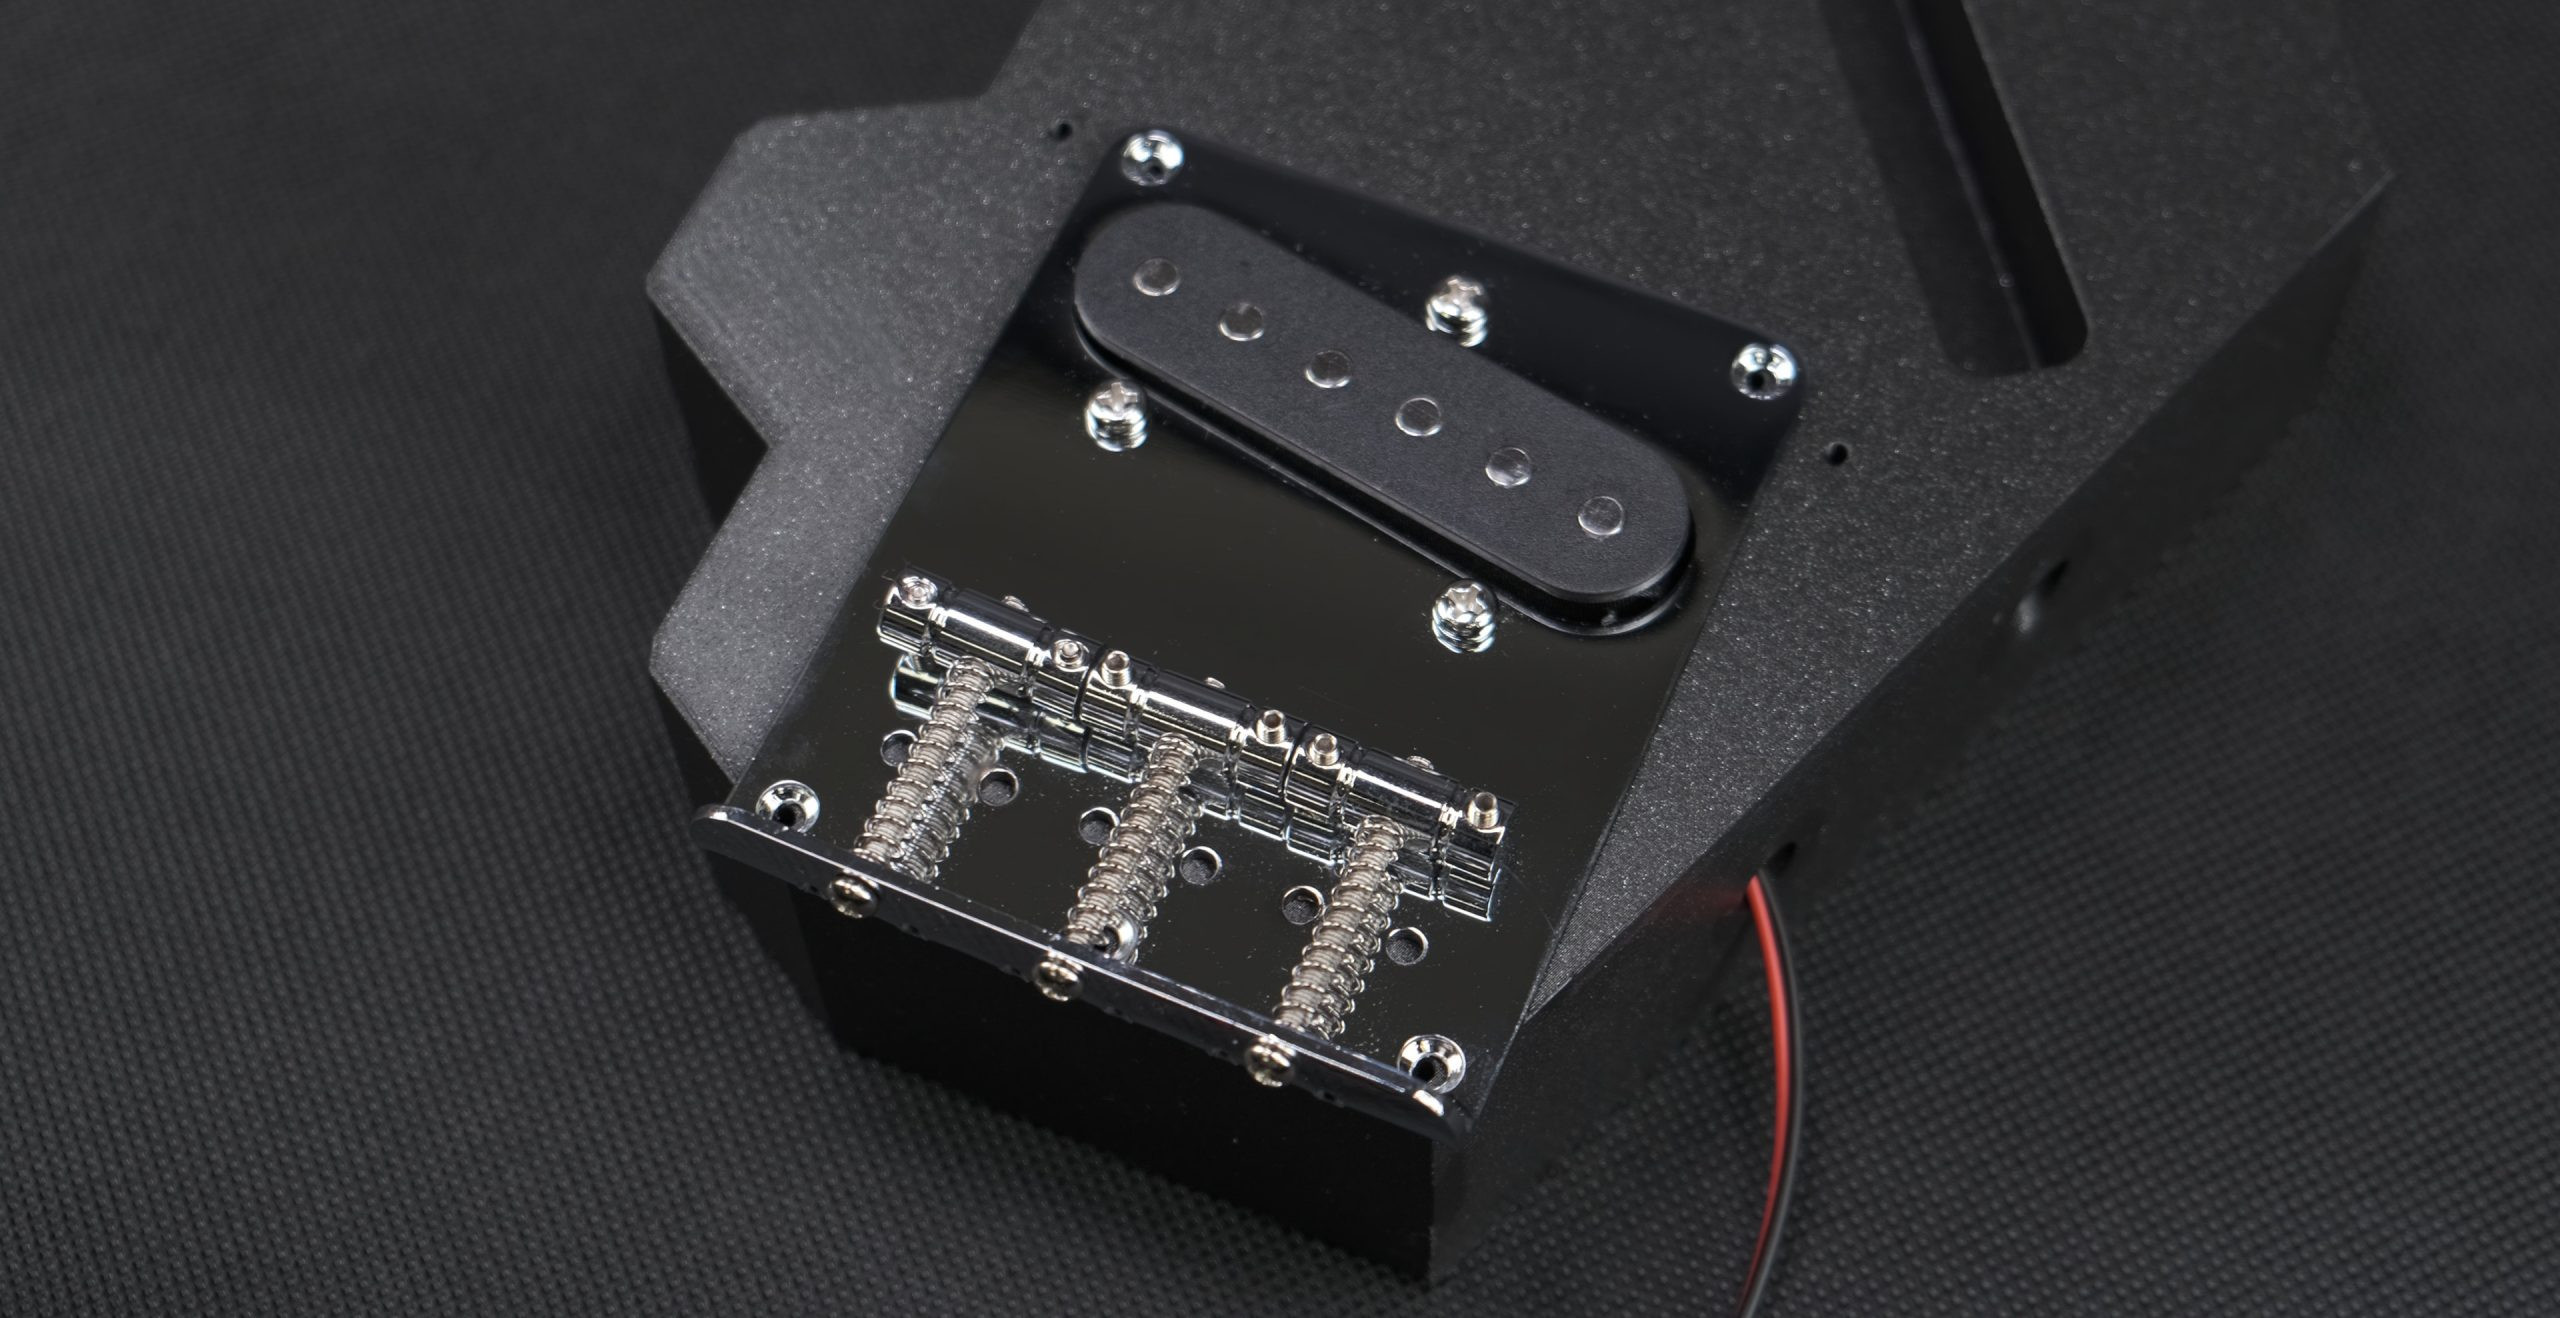
Image: A Telecaster bridge, highlighting its large metal plate and multiple mounting points, ideal for distributing string tension on a 3d printed guitar body.
Furthermore, the Telecaster’s single additional pickup simplifies wiring and design complexity. The volume and tone knobs, along with the pickup selector switch, are also mounted on a separate metal plate, further streamlining the build. This integrated approach significantly reduces the number of individual components to integrate into the 3d printed guitar body.
This project builds upon previous explorations into 3D printed musical accessories, such as 3D printed guitar picks, which proved surprisingly effective, and various 3D printed guitar accessories like capos and strap locks. These earlier experiments laid the groundwork for tackling a more ambitious 3d printed instrument.
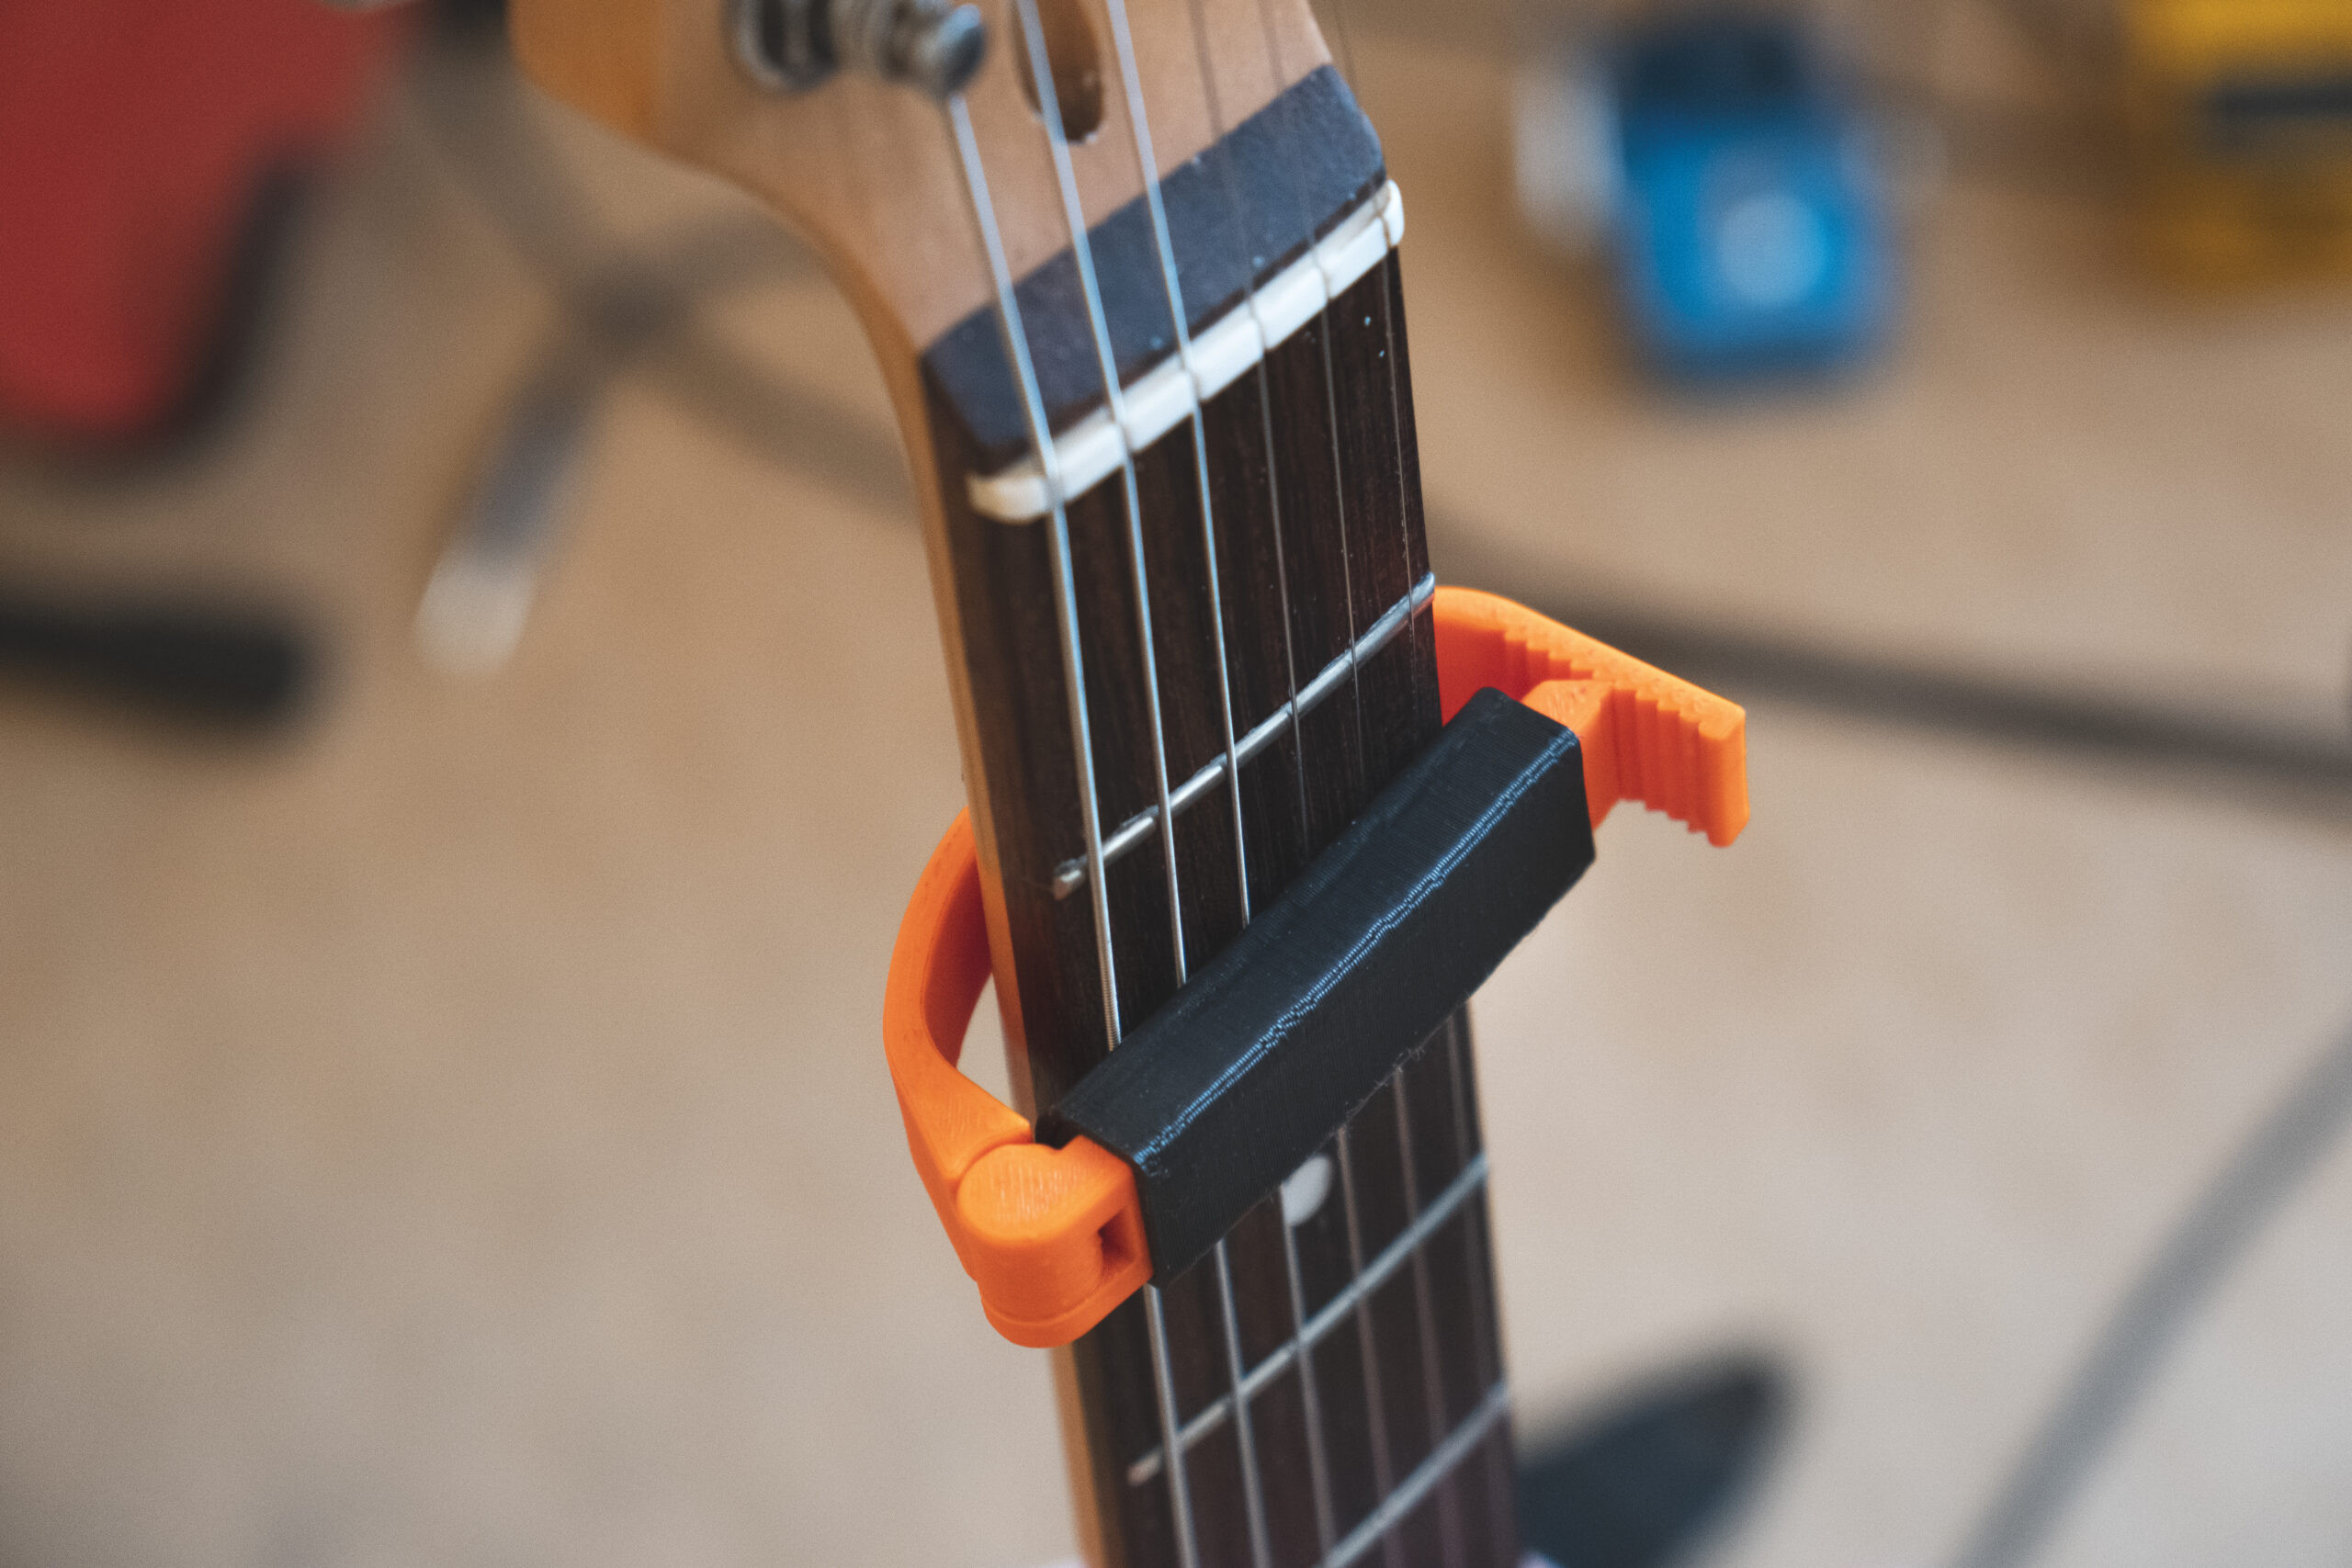
Image: A selection of 3D printed guitar accessories, showcasing the potential of 3D printing for musical instrument components.
Sourcing Affordable and Accessible Hardware
With the Telecaster hardware chosen, the next step was sourcing the components. Three primary options were considered:
- Salvaging parts from a cheap Telecaster guitar: Dismantling a functional guitar seemed wasteful unless a heavily damaged instrument with usable hardware and neck could be found.
- Purchasing individual parts: This is feasible, requiring a guitar neck with tuners, a standalone single-coil pickup, a bridge with an integrated single-coil pickup, a Telecaster control plate with switch and knobs, and an output jack.
- Using a Telecaster hardware kit: This option offers convenience and potentially cost savings.
Buying components individually can quickly become expensive, potentially costing several hundred dollars even for budget options. This led to the discovery of a game-changer: The Harley Benton Electric Guitar Kit T-Style. Priced at an astonishingly low $79, this kit includes all necessary hardware, pre-wired with simple connectors for easy assembly. Sold by Musikhaus Thomann, a major global music retailer based in Germany, the kit also fulfilled the requirement of worldwide shipping accessibility.
The affordability and convenience of this kit were undeniable. It simplified the project dramatically, transforming it into a “print the body and assemble the kit” endeavor. The Harley Benton kit includes a basic, unpainted wooden body, which is remarkable given the price. However, the focus shifted to replacing this body with a custom 3d printed version, leaving the kit body unused.
Designing the 3D Printable Guitar Body
Fusion 360 was used to design the guitar body, starting with accurately mapping the screw holes, neck mounting points, and electronics cavities. The included wooden body from the Harley Benton kit proved invaluable as a template. By photographing the body with a ruler, ensuring minimal perspective distortion using a zoom lens and distance, a scaled template was created within Fusion 360 using the “Calibrate” feature. Calibrating against the 50cm ruler in the image maximized accuracy.
Hole positions were traced in a 2D sketch, and digital calipers were used to verify distances and dimensions, compensating for minor perspective distortions, particularly for widely spaced features. Bridge placement was prioritized for precise alignment with the neck, ensuring proper string centering and intonation. The 12th fret position, the midpoint of the string length, was a critical reference point for bridge placement to guarantee accurate tuning. The Telecaster bridge’s adjustable range offered some tolerance, but precise initial placement was crucial.
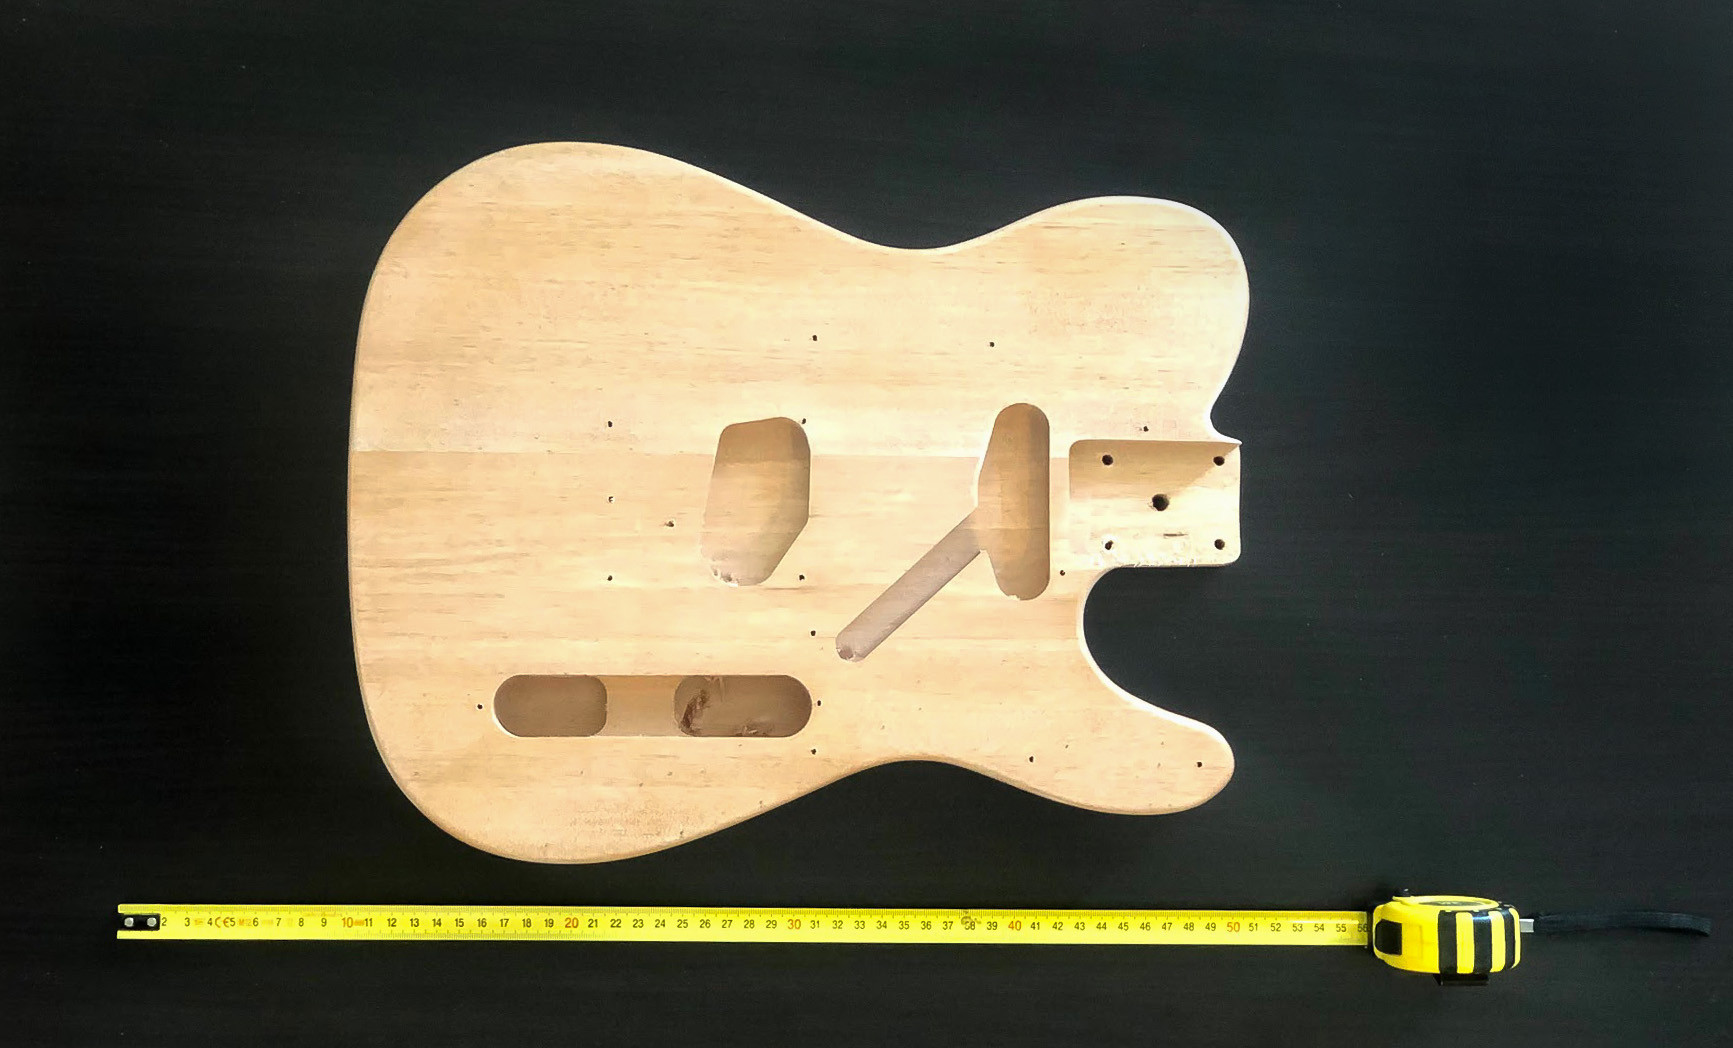
Image: Measuring the wooden guitar body from the Harley Benton kit to accurately map hardware placements for the 3d printed design.
While adhering to Telecaster hardware, the design aimed for a unique aesthetic, moving beyond a simple Telecaster shape. Inspiration was drawn from Fender Jazzmaster and Mustang guitars. The Spline tool in Fusion 360 facilitated creating a body shape inspired by these models.
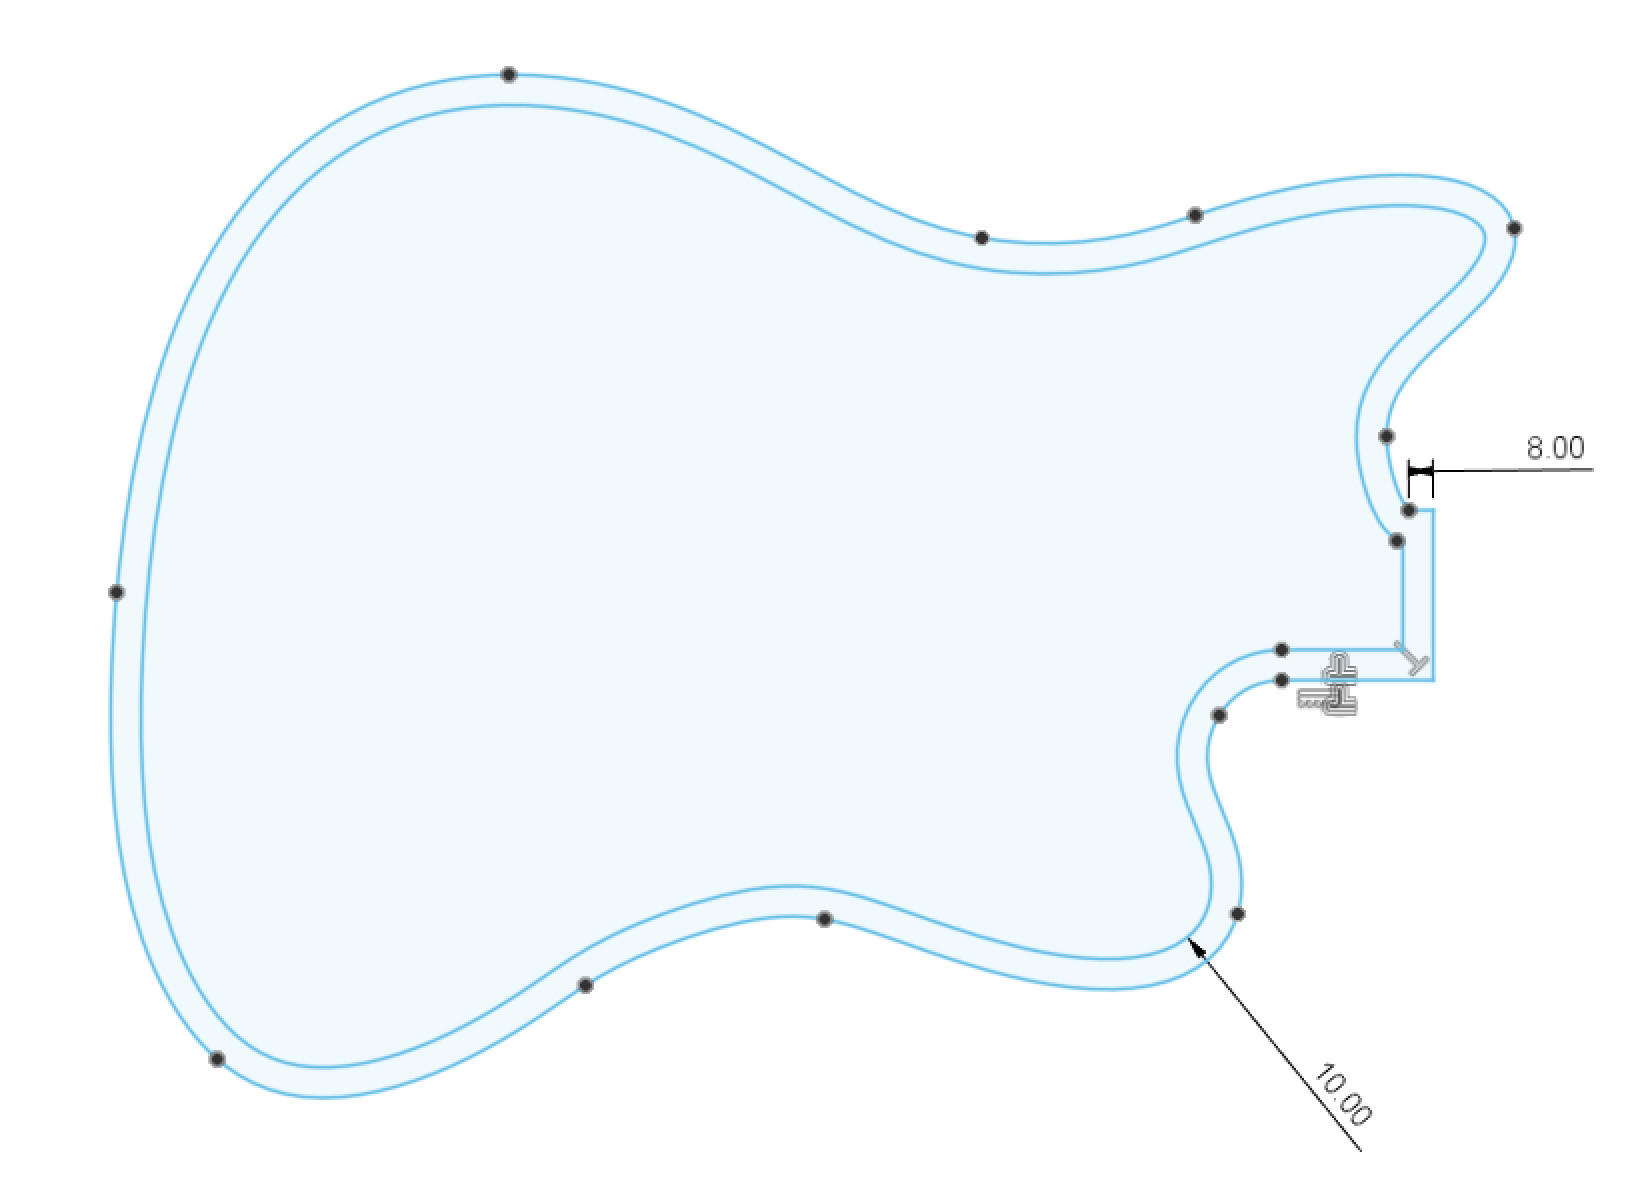
Image: The initial spline-based design for the 3d printed guitar body, inspired by Jazzmaster and Mustang shapes.
A standard guitar body thickness of 45mm was used for extrusion. Holes and slots for electronics were then extruded based on the template. “Tunnels” were subtracted to create pathways between cavities for wiring. The bridge would cover the bottom pickup slot, and a pickguard the top, allowing for slightly oversized slots. A larger hole connected to the control plate slot for the output jack. This completed the basic 3d printed guitar body model.
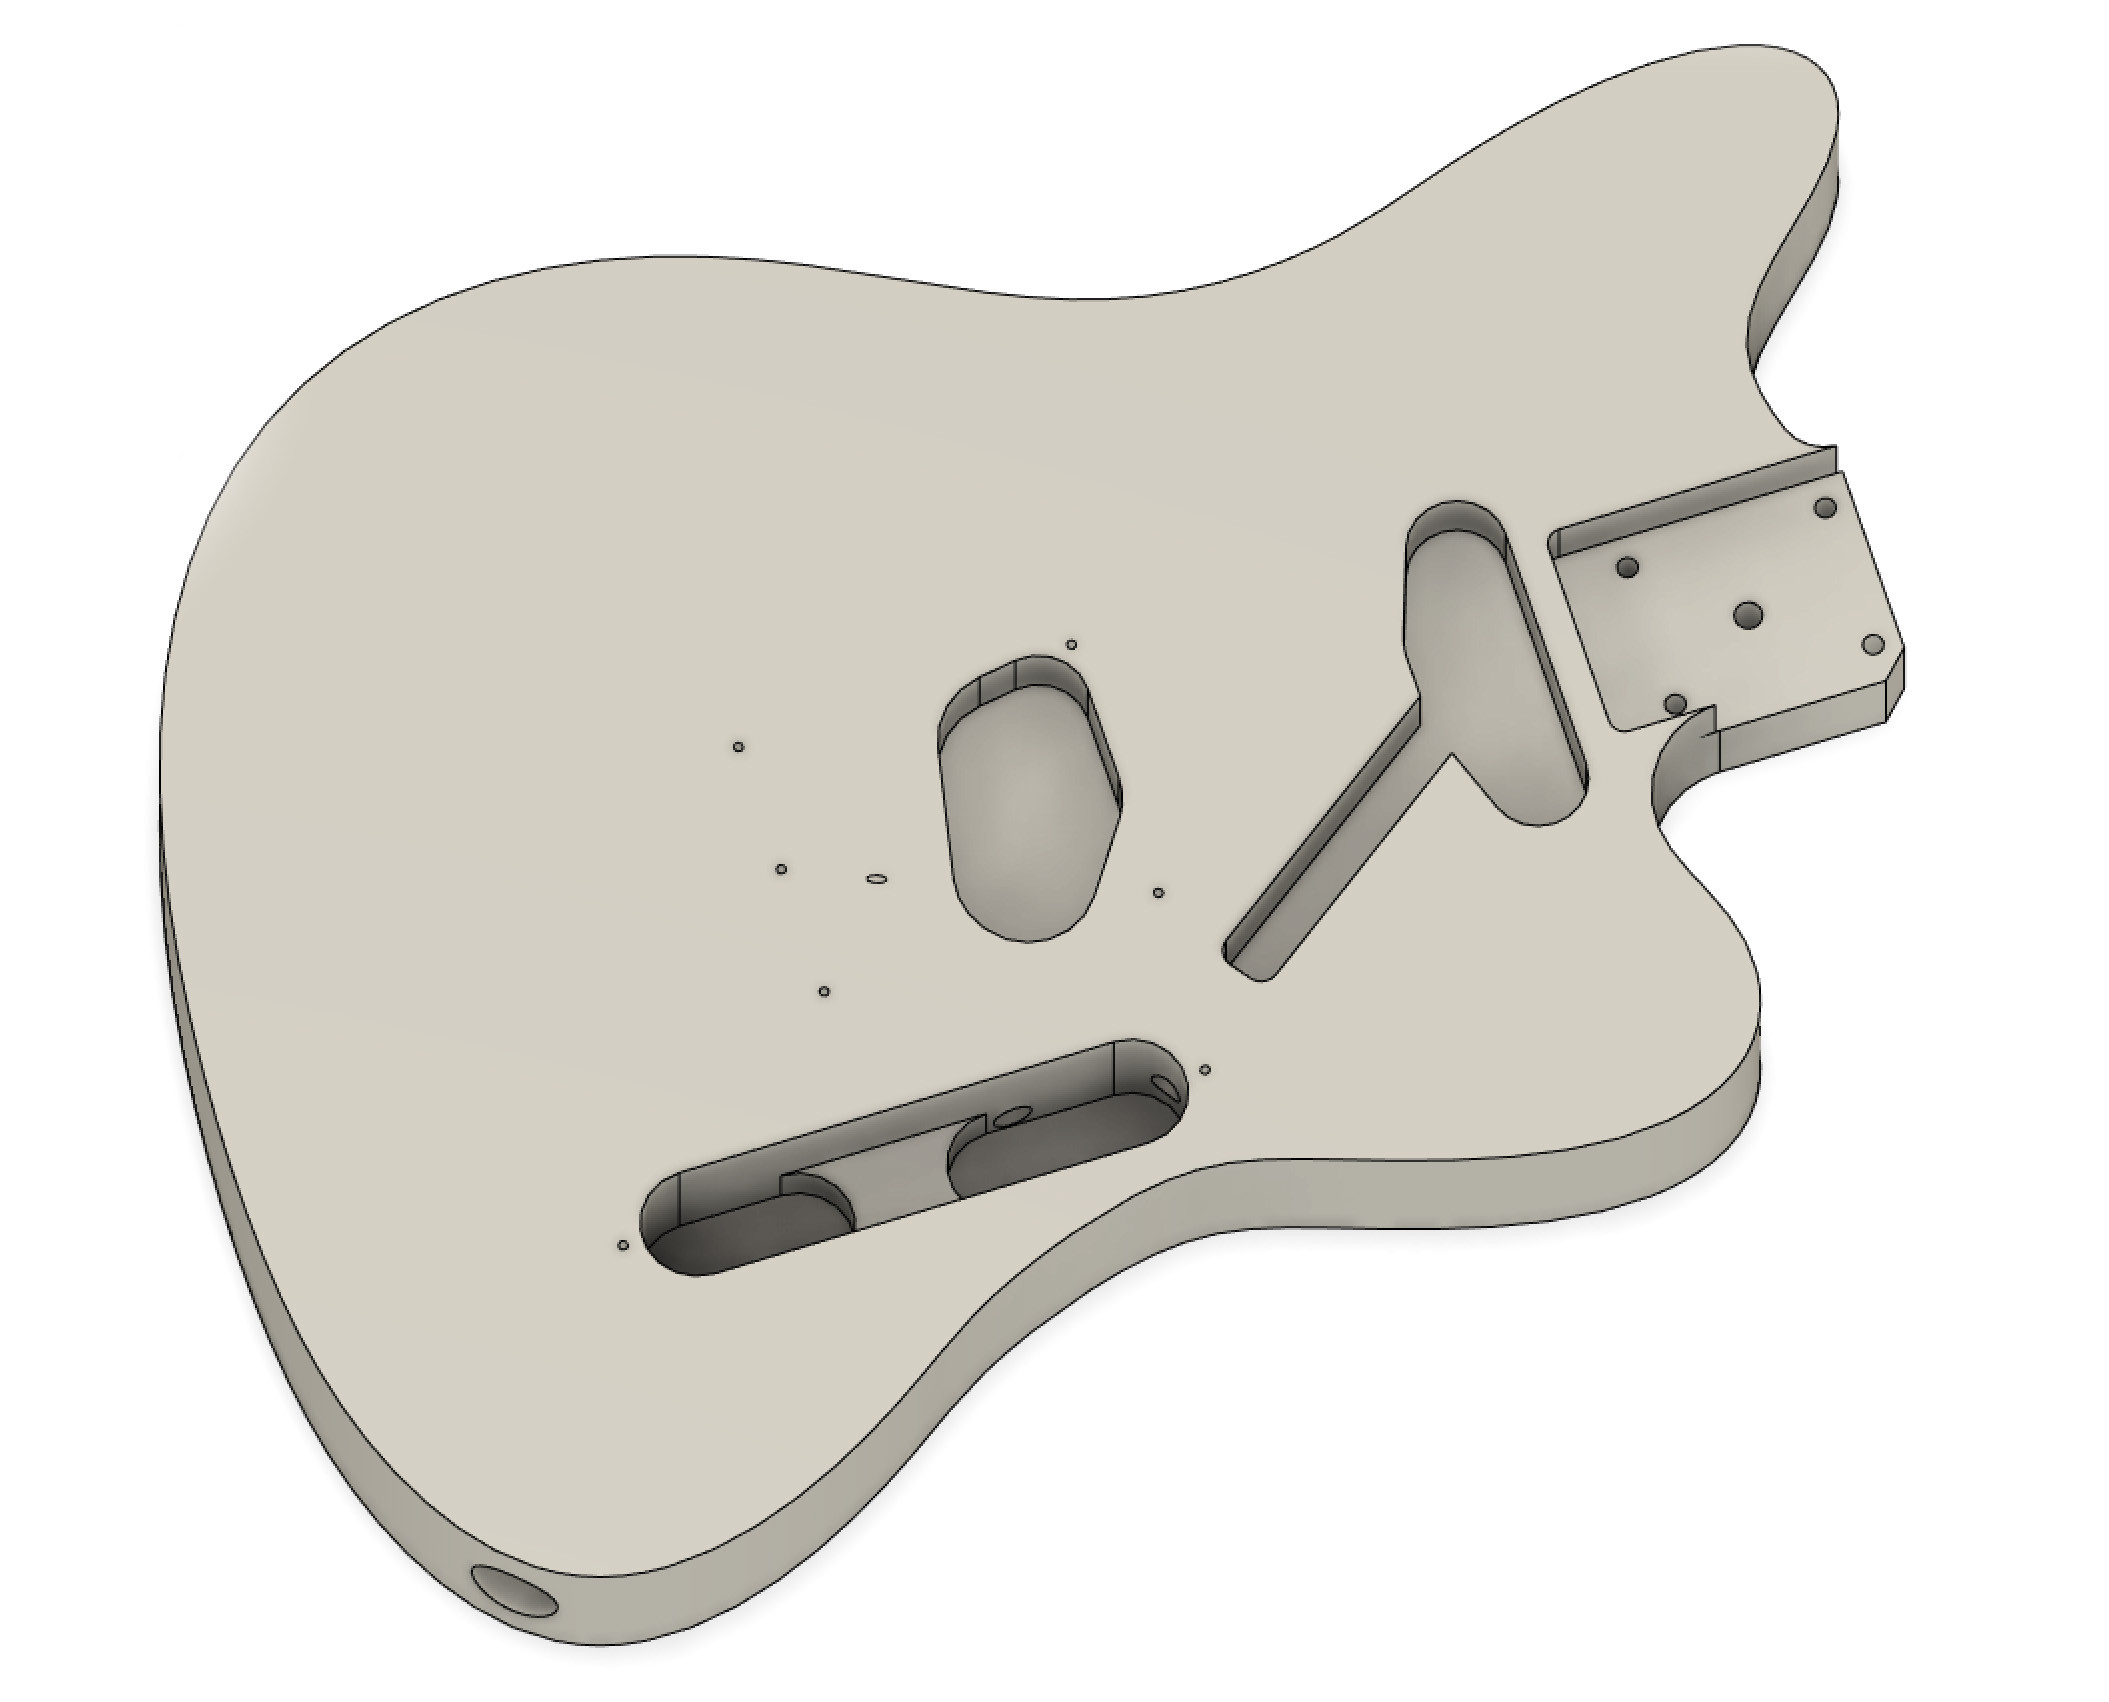
Image: Extruded basic shape of the 3d printed guitar body, showing initial cavity placements.
However, the model was too large for most desktop 3D printers, including even the Prusa XL. Splitting the model into printable sections became necessary. Beyond printability, the design felt somewhat plain. Leveraging 3D printing’s design freedom, cutouts were explored, leading to the incorporation of hexagons. Hexagons served both an aesthetic and functional purpose: creating visually interesting cutouts and providing natural segmentation lines for splitting the model into parts. A large chamfer along the top edge was added for playing comfort.
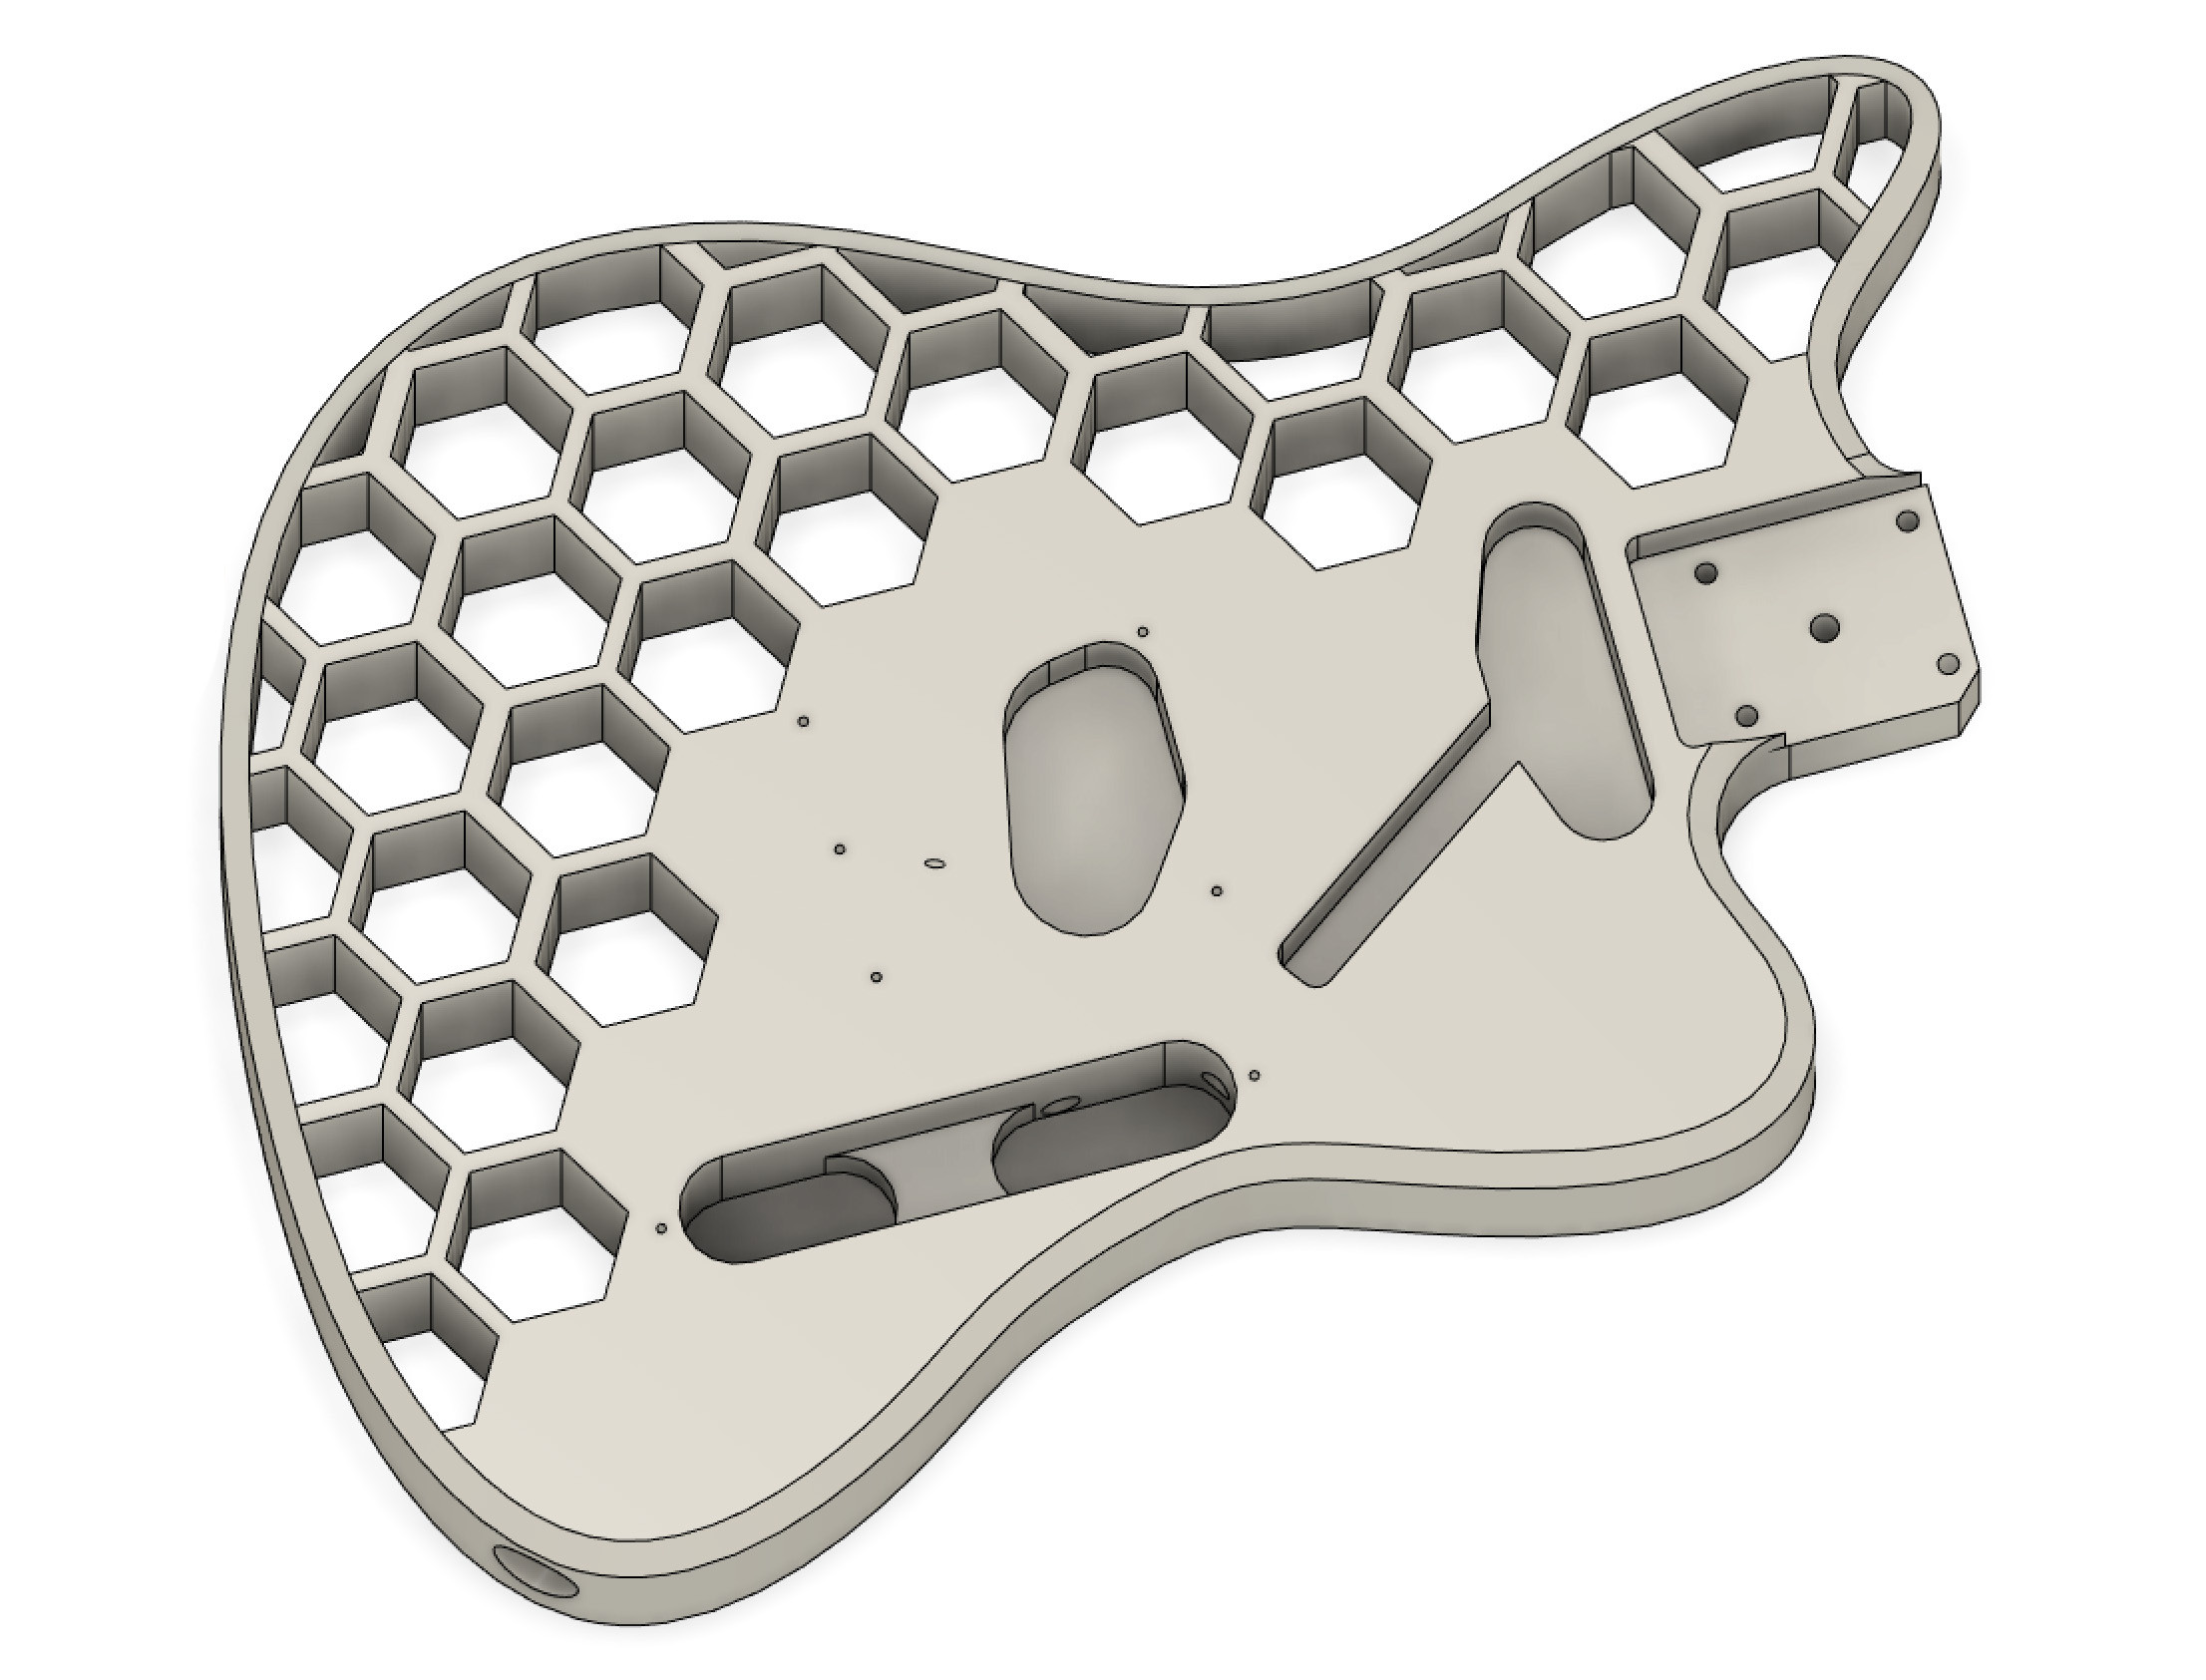
Image: The guitar body design incorporating hexagon cutouts and a top edge chamfer, adding visual interest and segmentation lines.
Sectioning the Design for Desktop 3D Printing
Considering the 50 kg string tension, a crucial design decision was to keep the section between the neck and bridge as a single, continuous 3d printed piece. Reinforcing connections in this critical stress area would have introduced unnecessary complexity.
Fortunately, by strategically utilizing the hexagon pattern and making a cut beneath the bridge mounting holes, this became achievable. This minimized the length of the central section. A further cut on the bottom left allowed for diagonal print orientation within the MK3 build volume, making the part printable without supports, although Organic supports in PrusaSlicer were used for a smoother finish on overhangs.
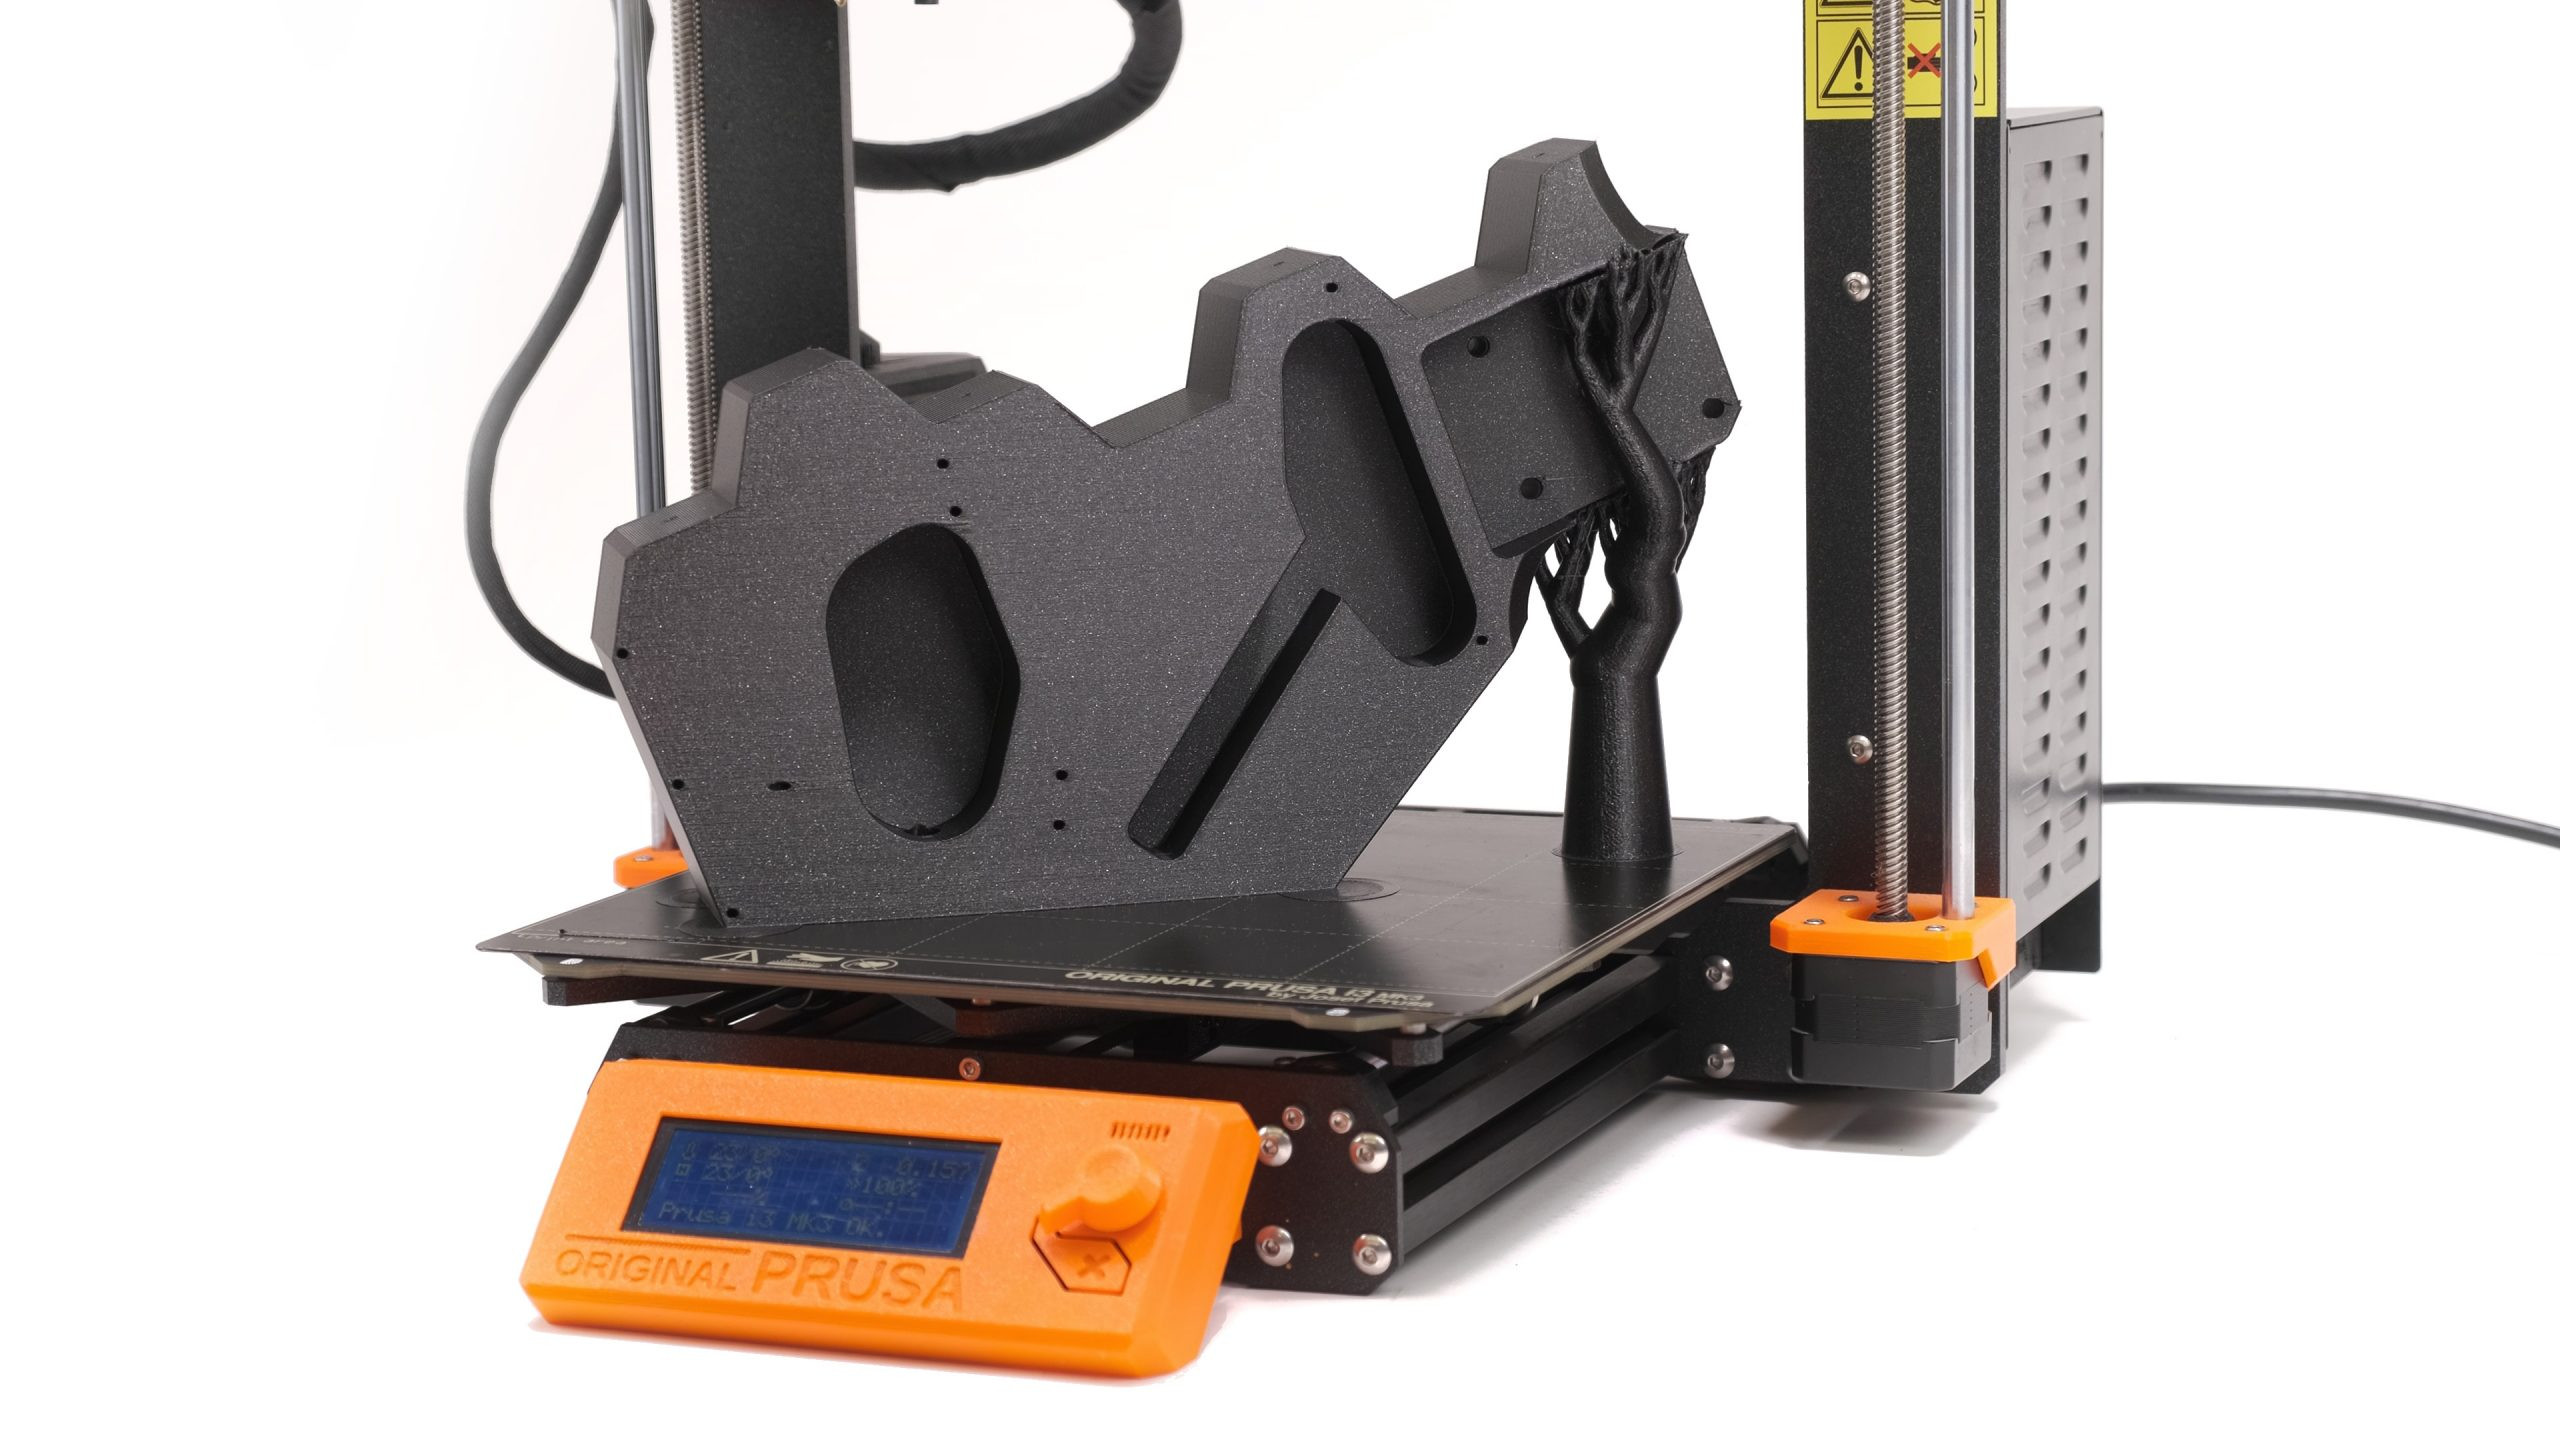
Image: The central body section oriented diagonally on the Prusa i3 MK3 print bed, demonstrating printability within the size constraints.
The remaining sections were split logically along hexagon lines to fit within the 25×21 cm print area. The bottom piece, without hexagons, was divided into two, and the top section into three. The pickguard, also serving as the top pickup mount, was defined by insetting the surrounding edges by 3mm.
Segmenting the body offered an additional aesthetic advantage: multi-color printing. Prusa Research’s signature black and orange color scheme was used, accented with a complementary teal blue for the small bottom-right piece, adding vibrancy to the design.
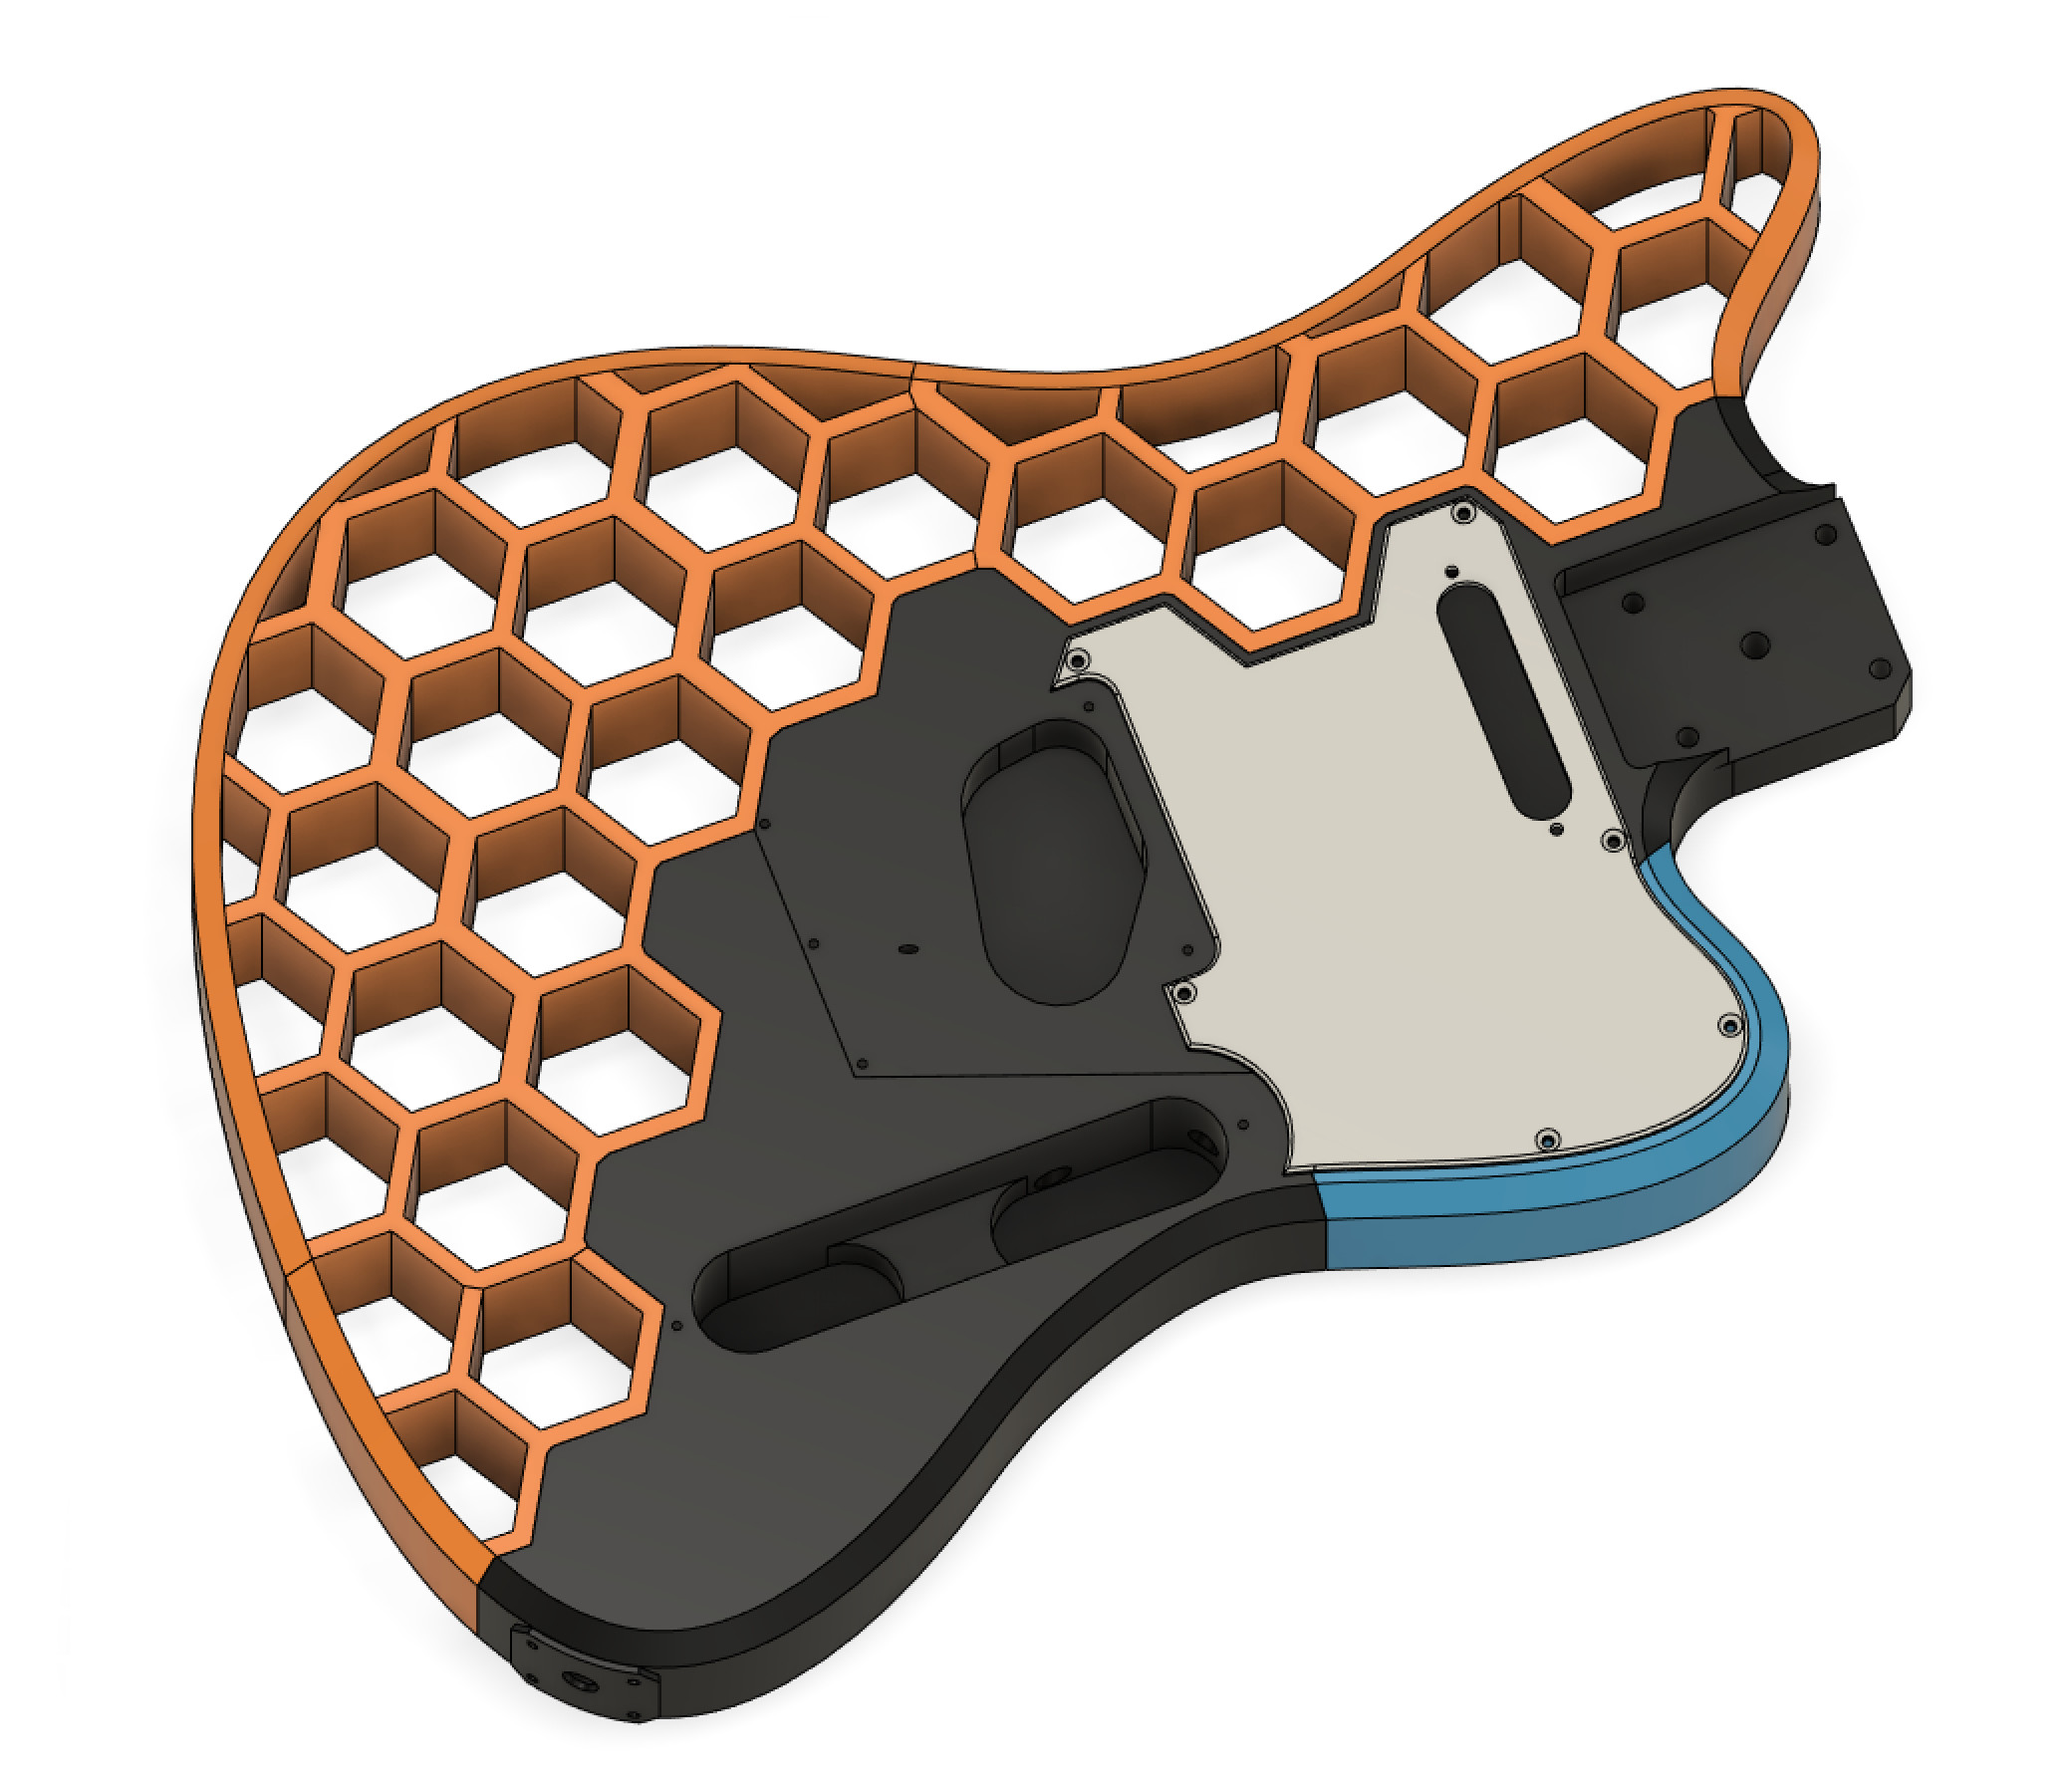
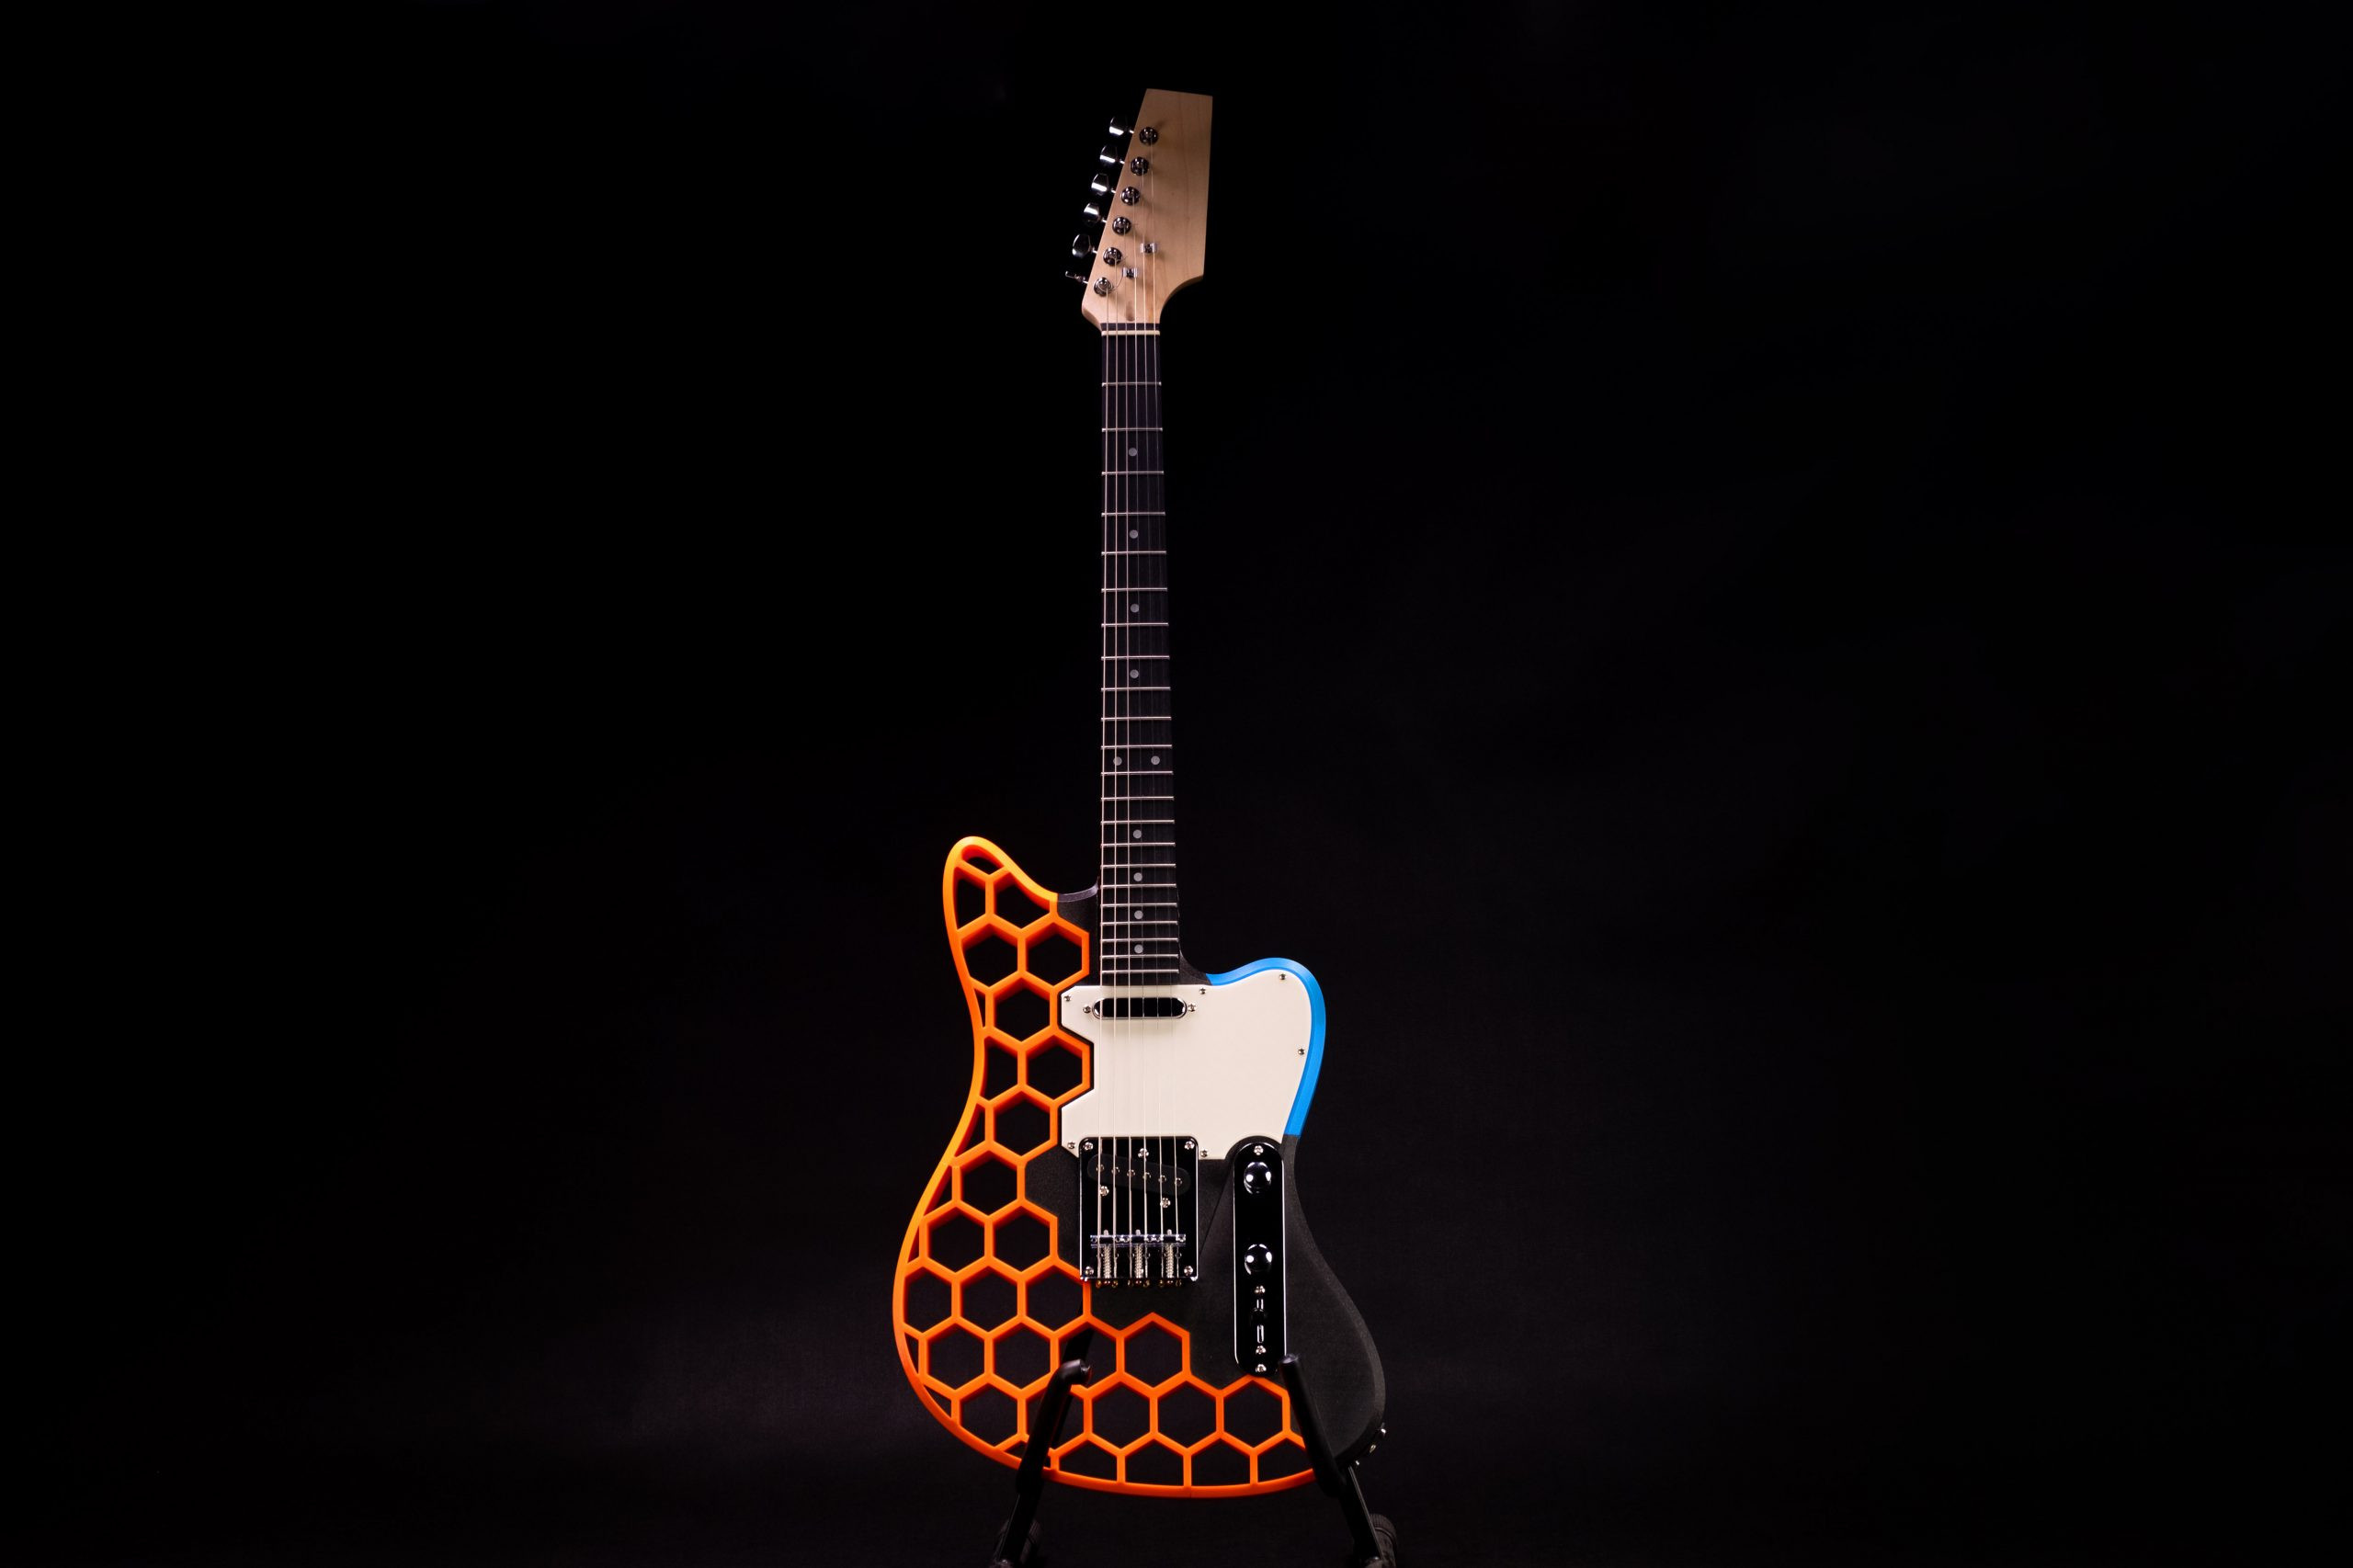
Image: The final Prusacaster 3d printed guitar design, showcasing the segmented body and planned color scheme.
This segmented, multi-color design, named the “Prusacaster,” was ready for 3D printing and assembly.
3D Printing and Assembling the Prusacaster
Material Selection for Structural Integrity
The central body piece bears the brunt of the string tension. While PETG might seem like a stronger material, stiffness (bending modulus) was paramount. Standard PLA, surprisingly, excels in stiffness, making it ideal for this application and aligning with the project’s goal of affordability and simplicity. Prusament PLA Prusa Galaxy Black was chosen for this critical part.
PLA’s lower temperature resistance is a consideration. While the substantial mass of the center piece can withstand direct sunlight for reasonable durations, prolonged exposure to extreme heat, such as inside a car on a hot day, could be problematic. For enhanced temperature resistance, stiffer, high-performance materials like Prusament PC Blend Carbon Fiber or Prusament PA11 Carbon Fiber are alternatives, albeit more expensive and requiring more advanced printing skills. Given Prague’s temperate climate, PLA proved sufficient. After a year of use, the PLA center piece remained structurally sound.
To verify fitment, a test print of the center piece using default PrusaSlicer settings confirmed accurate dimensions. The guitar neck and bridge were attached, strings were added, and remarkably, a functional, albeit minimalist, guitar emerged.
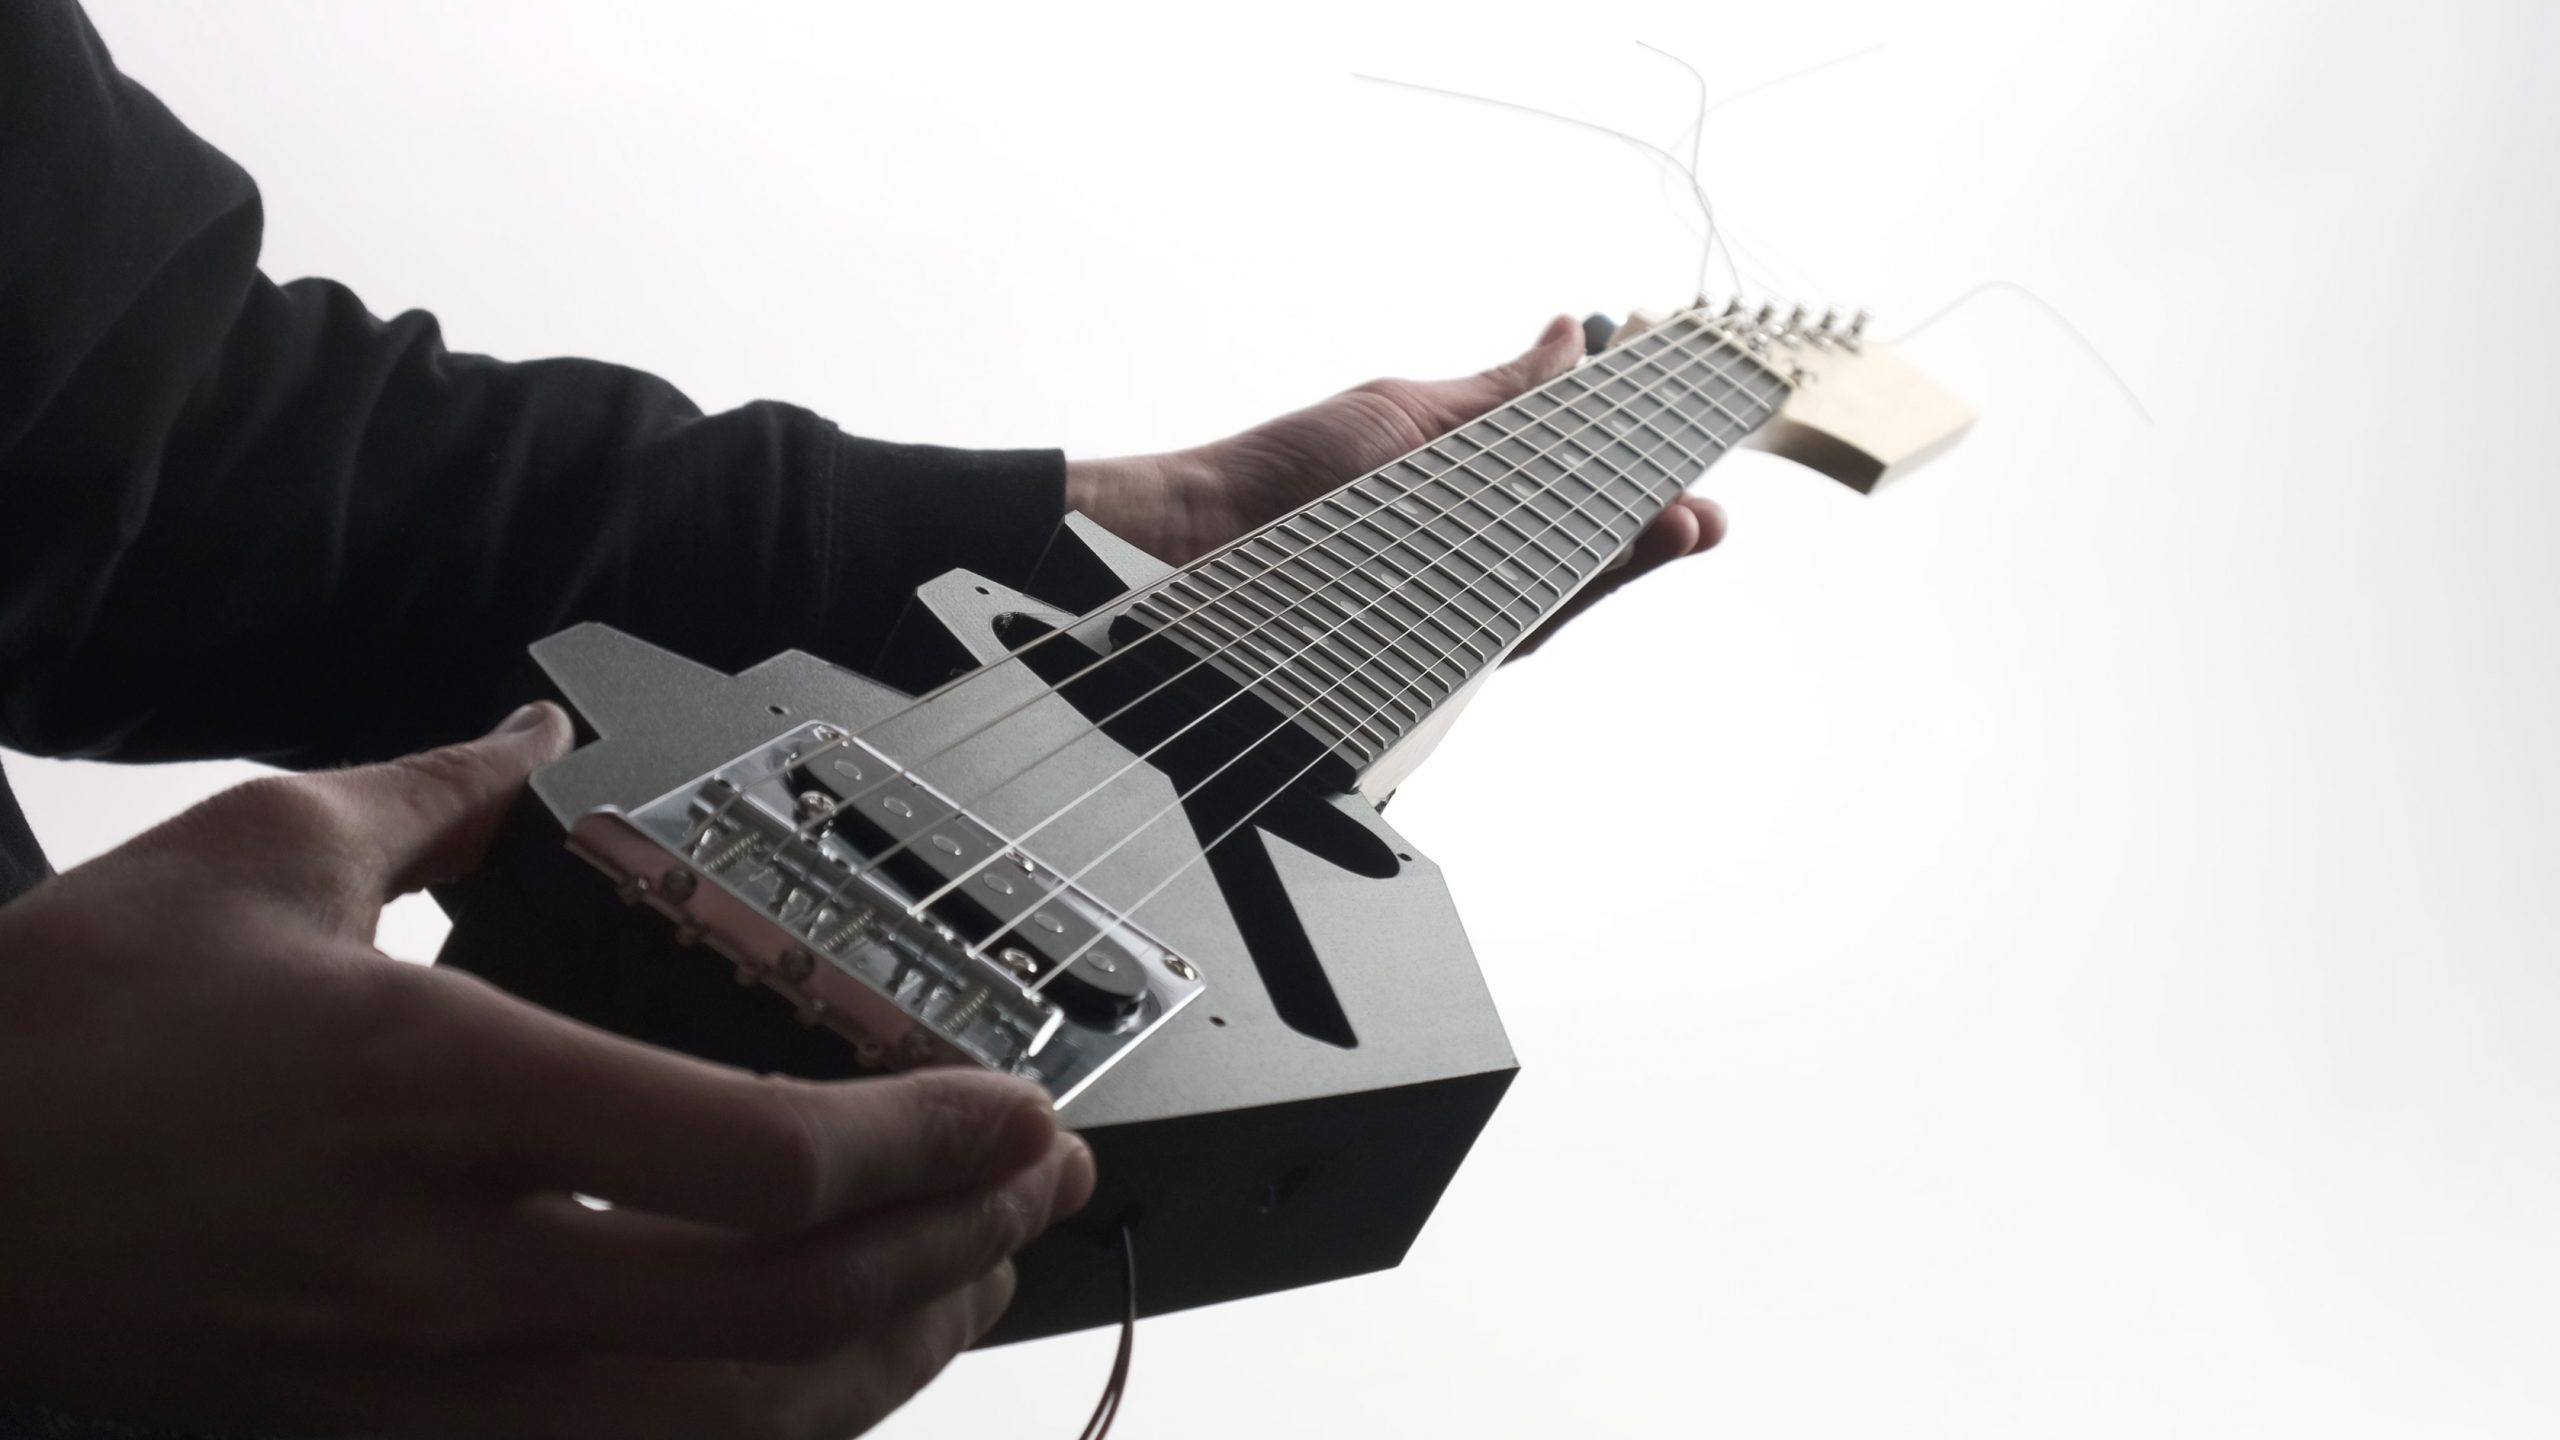
Image: The minimalist functional guitar with only the 3d printed center piece, neck, bridge, and strings, demonstrating initial playability.
Addressing Material Creep Under Tension
Material creep, the slow deformation of solid materials under sustained stress, was anticipated. This concern proved valid. After a month under string tension, slight bending of the PLA center piece was observed. This was attributed to the default PrusaSlicer profile’s 2-perimeter setting, suitable for general use but insufficient for high mechanical loads. Reprinting the center piece with 7 perimeters and 25% cubic infill completely resolved the creep issue.
String Gauge Considerations
Guitar strings are available in various gauges (thicknesses). Lighter gauge strings are easier to play and bend but are more prone to breakage and produce slightly less volume. Heavier gauge strings offer more volume and sustain but require more finger pressure and, crucially, exert greater tension on the guitar neck. Using thinner, 9-gauge strings can reduce stress on the 3d printed center piece.
Printing the Remaining Body Sections
The remaining body parts experience minimal stress beyond supporting their own weight and holding accessories. Material choice for these sections is less critical. Prusament PETG Prusa Orange was used for the top hexagon sections, Prusament PLA Galaxy Black for the bottom switch section, and Prusament PLA Azure Blue for the small bottom piece, all printed with default profiles.
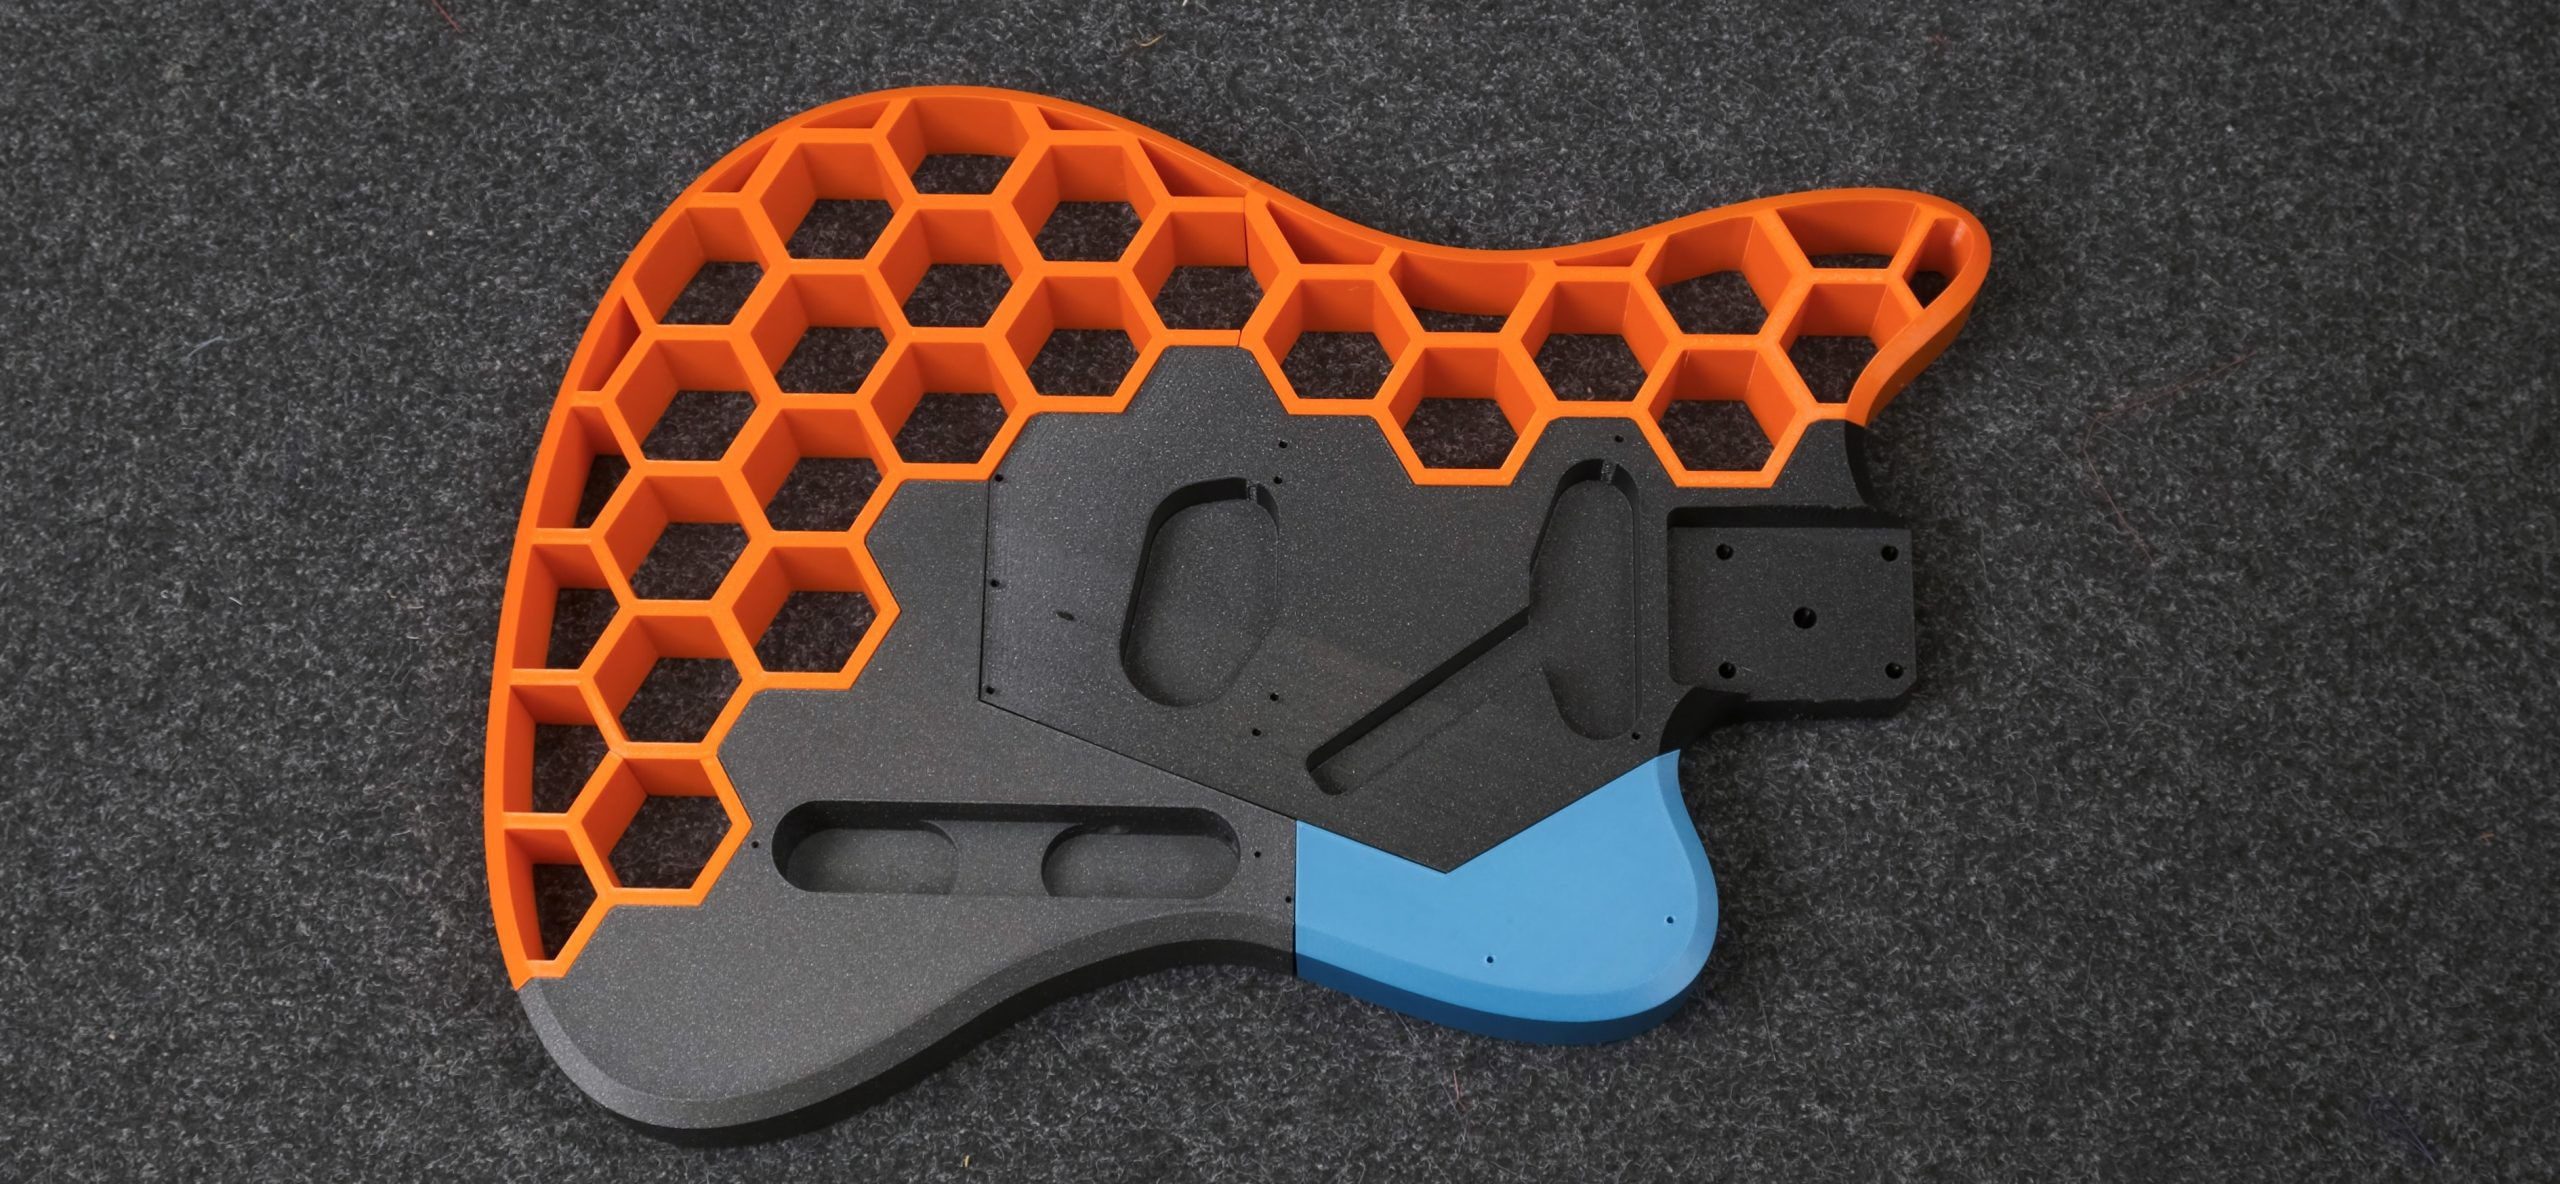
Image: All 3d printed parts of the Prusacaster, showcasing the multi-color segmented design ready for assembly.
Assembling the 3D Printed Guitar Body
The segmented body parts feature large contact surfaces with the center piece. Superglue provides ample adhesion. M3 screw holes in the hexagon pieces offer optional mechanical reinforcement, especially for strap button mounting, though access can be somewhat challenging.
Wiring the Electric Guitar Electronics
The Harley Benton T-style kit’s pre-wired electronics with JST connectors simplify assembly. Connecting the top pickup to the corresponding selector switch cables is crucial for correct switch operation.
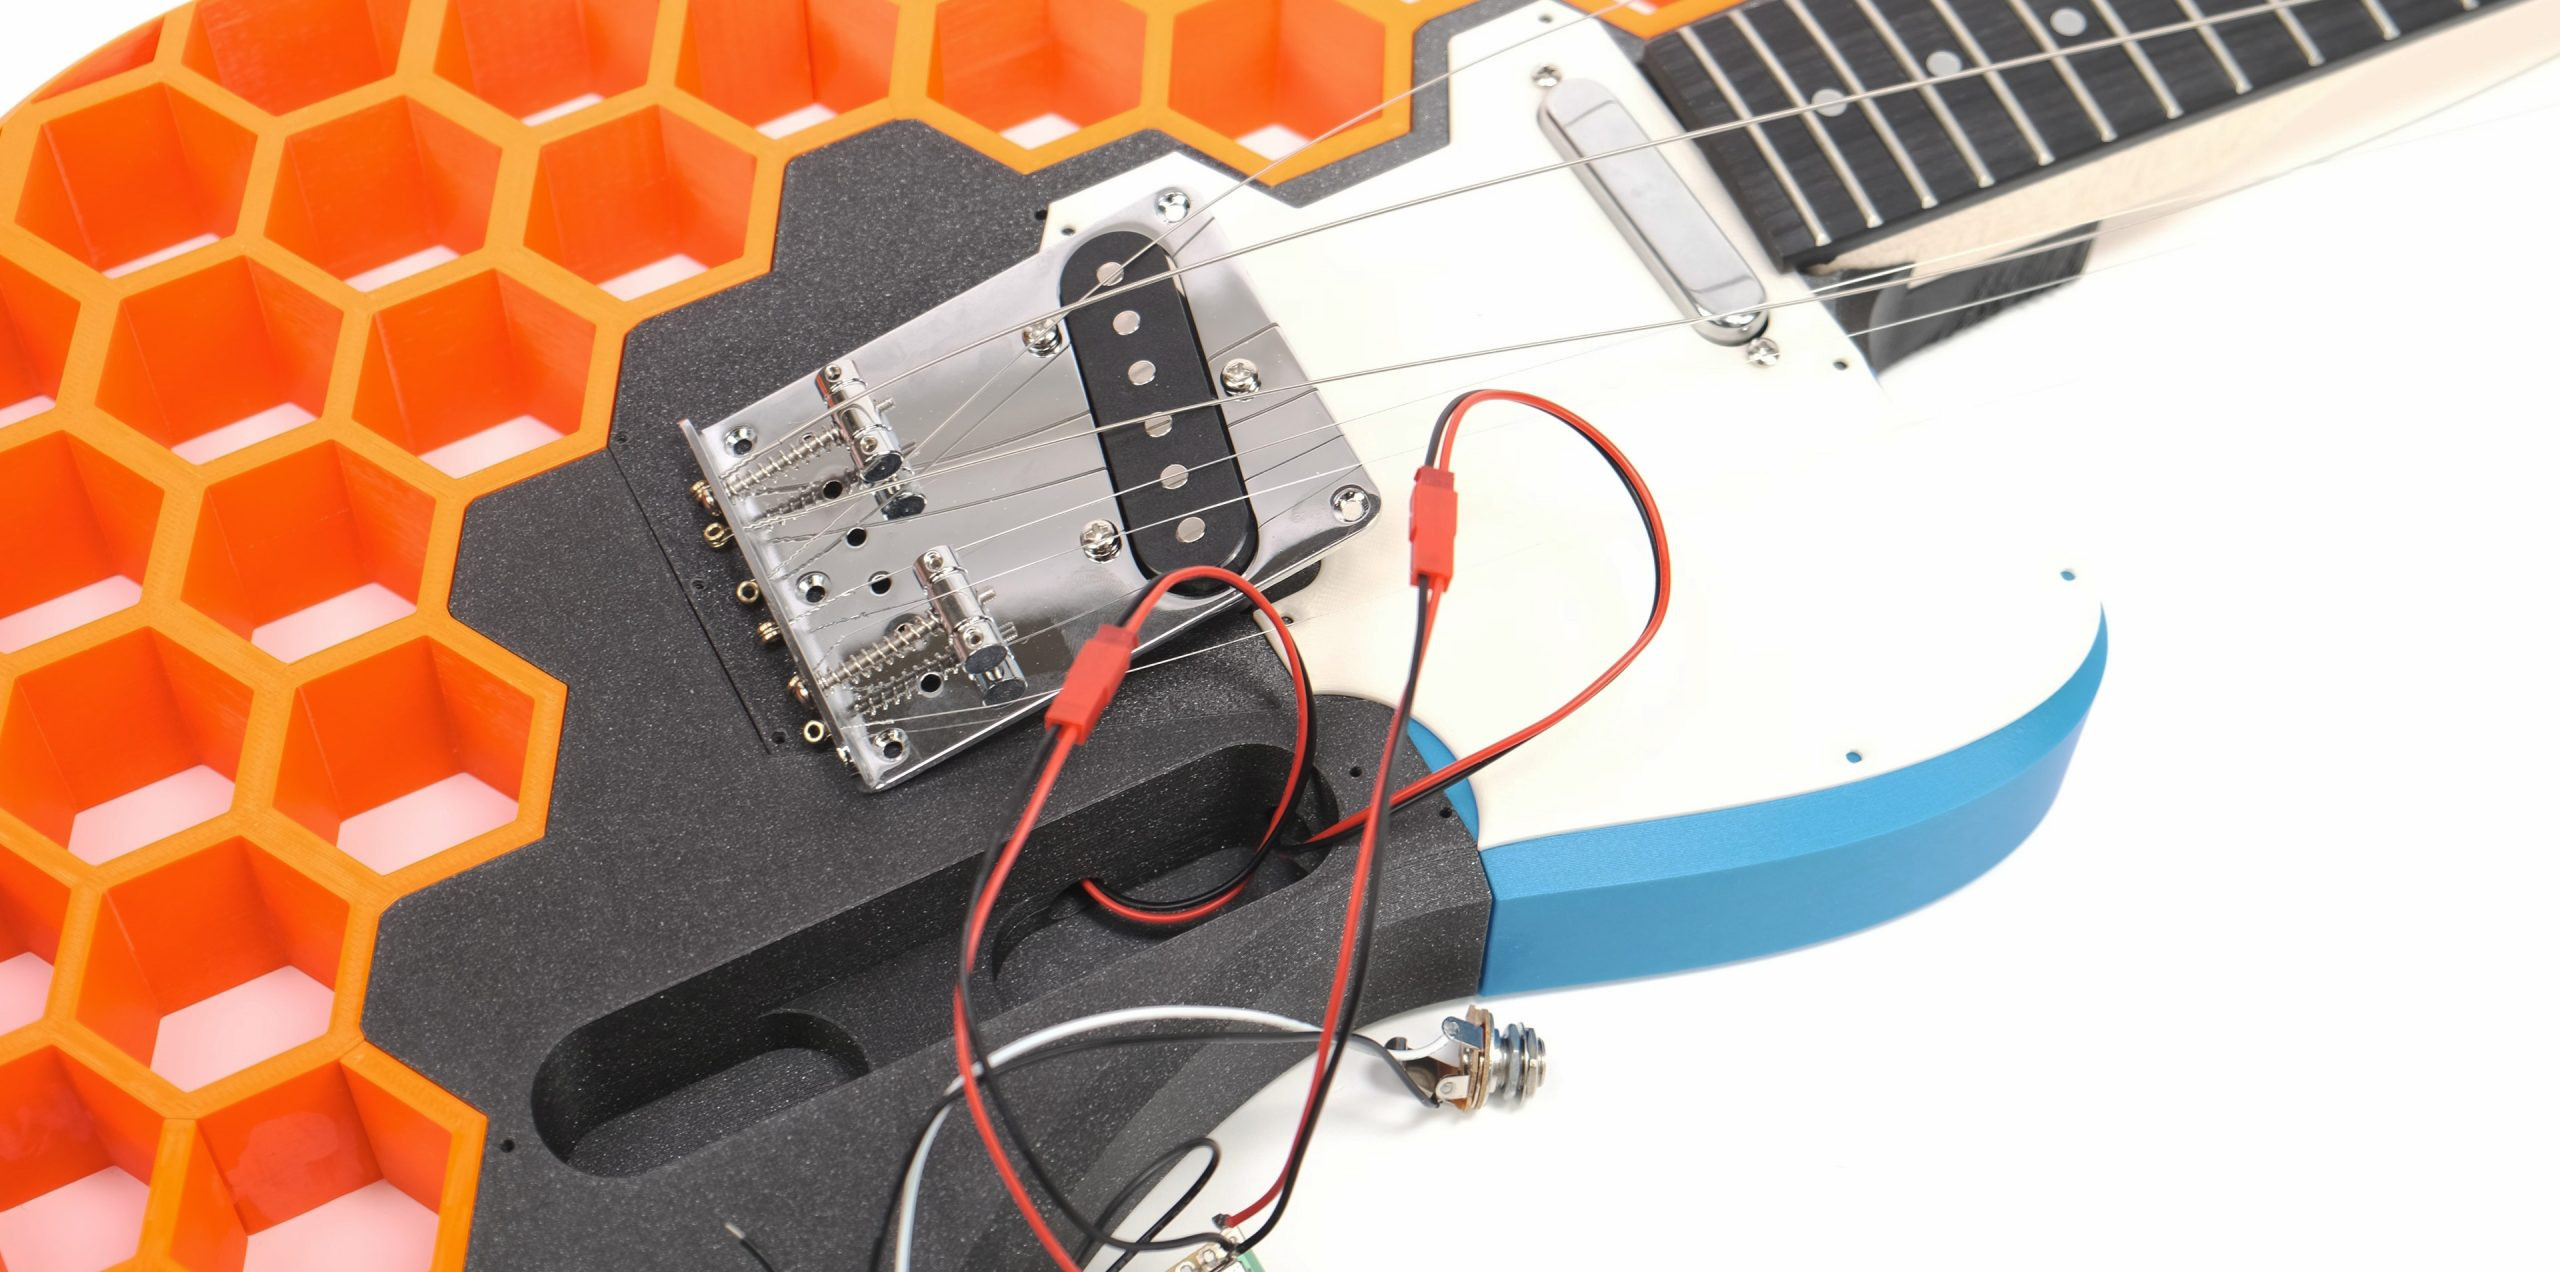
Image: The pre-wired electronics from the Harley Benton kit with JST connectors, simplifying the wiring process.
A standalone black wire in the kit serves as a string ground, essential for noise reduction. A channel in the center piece accommodates this wire, routing it under the bridge. Stripping insulation, loosening the bridge, threading the wire through, and re-tightening the bridge effectively grounds the strings, mitigating unwanted buzzing.
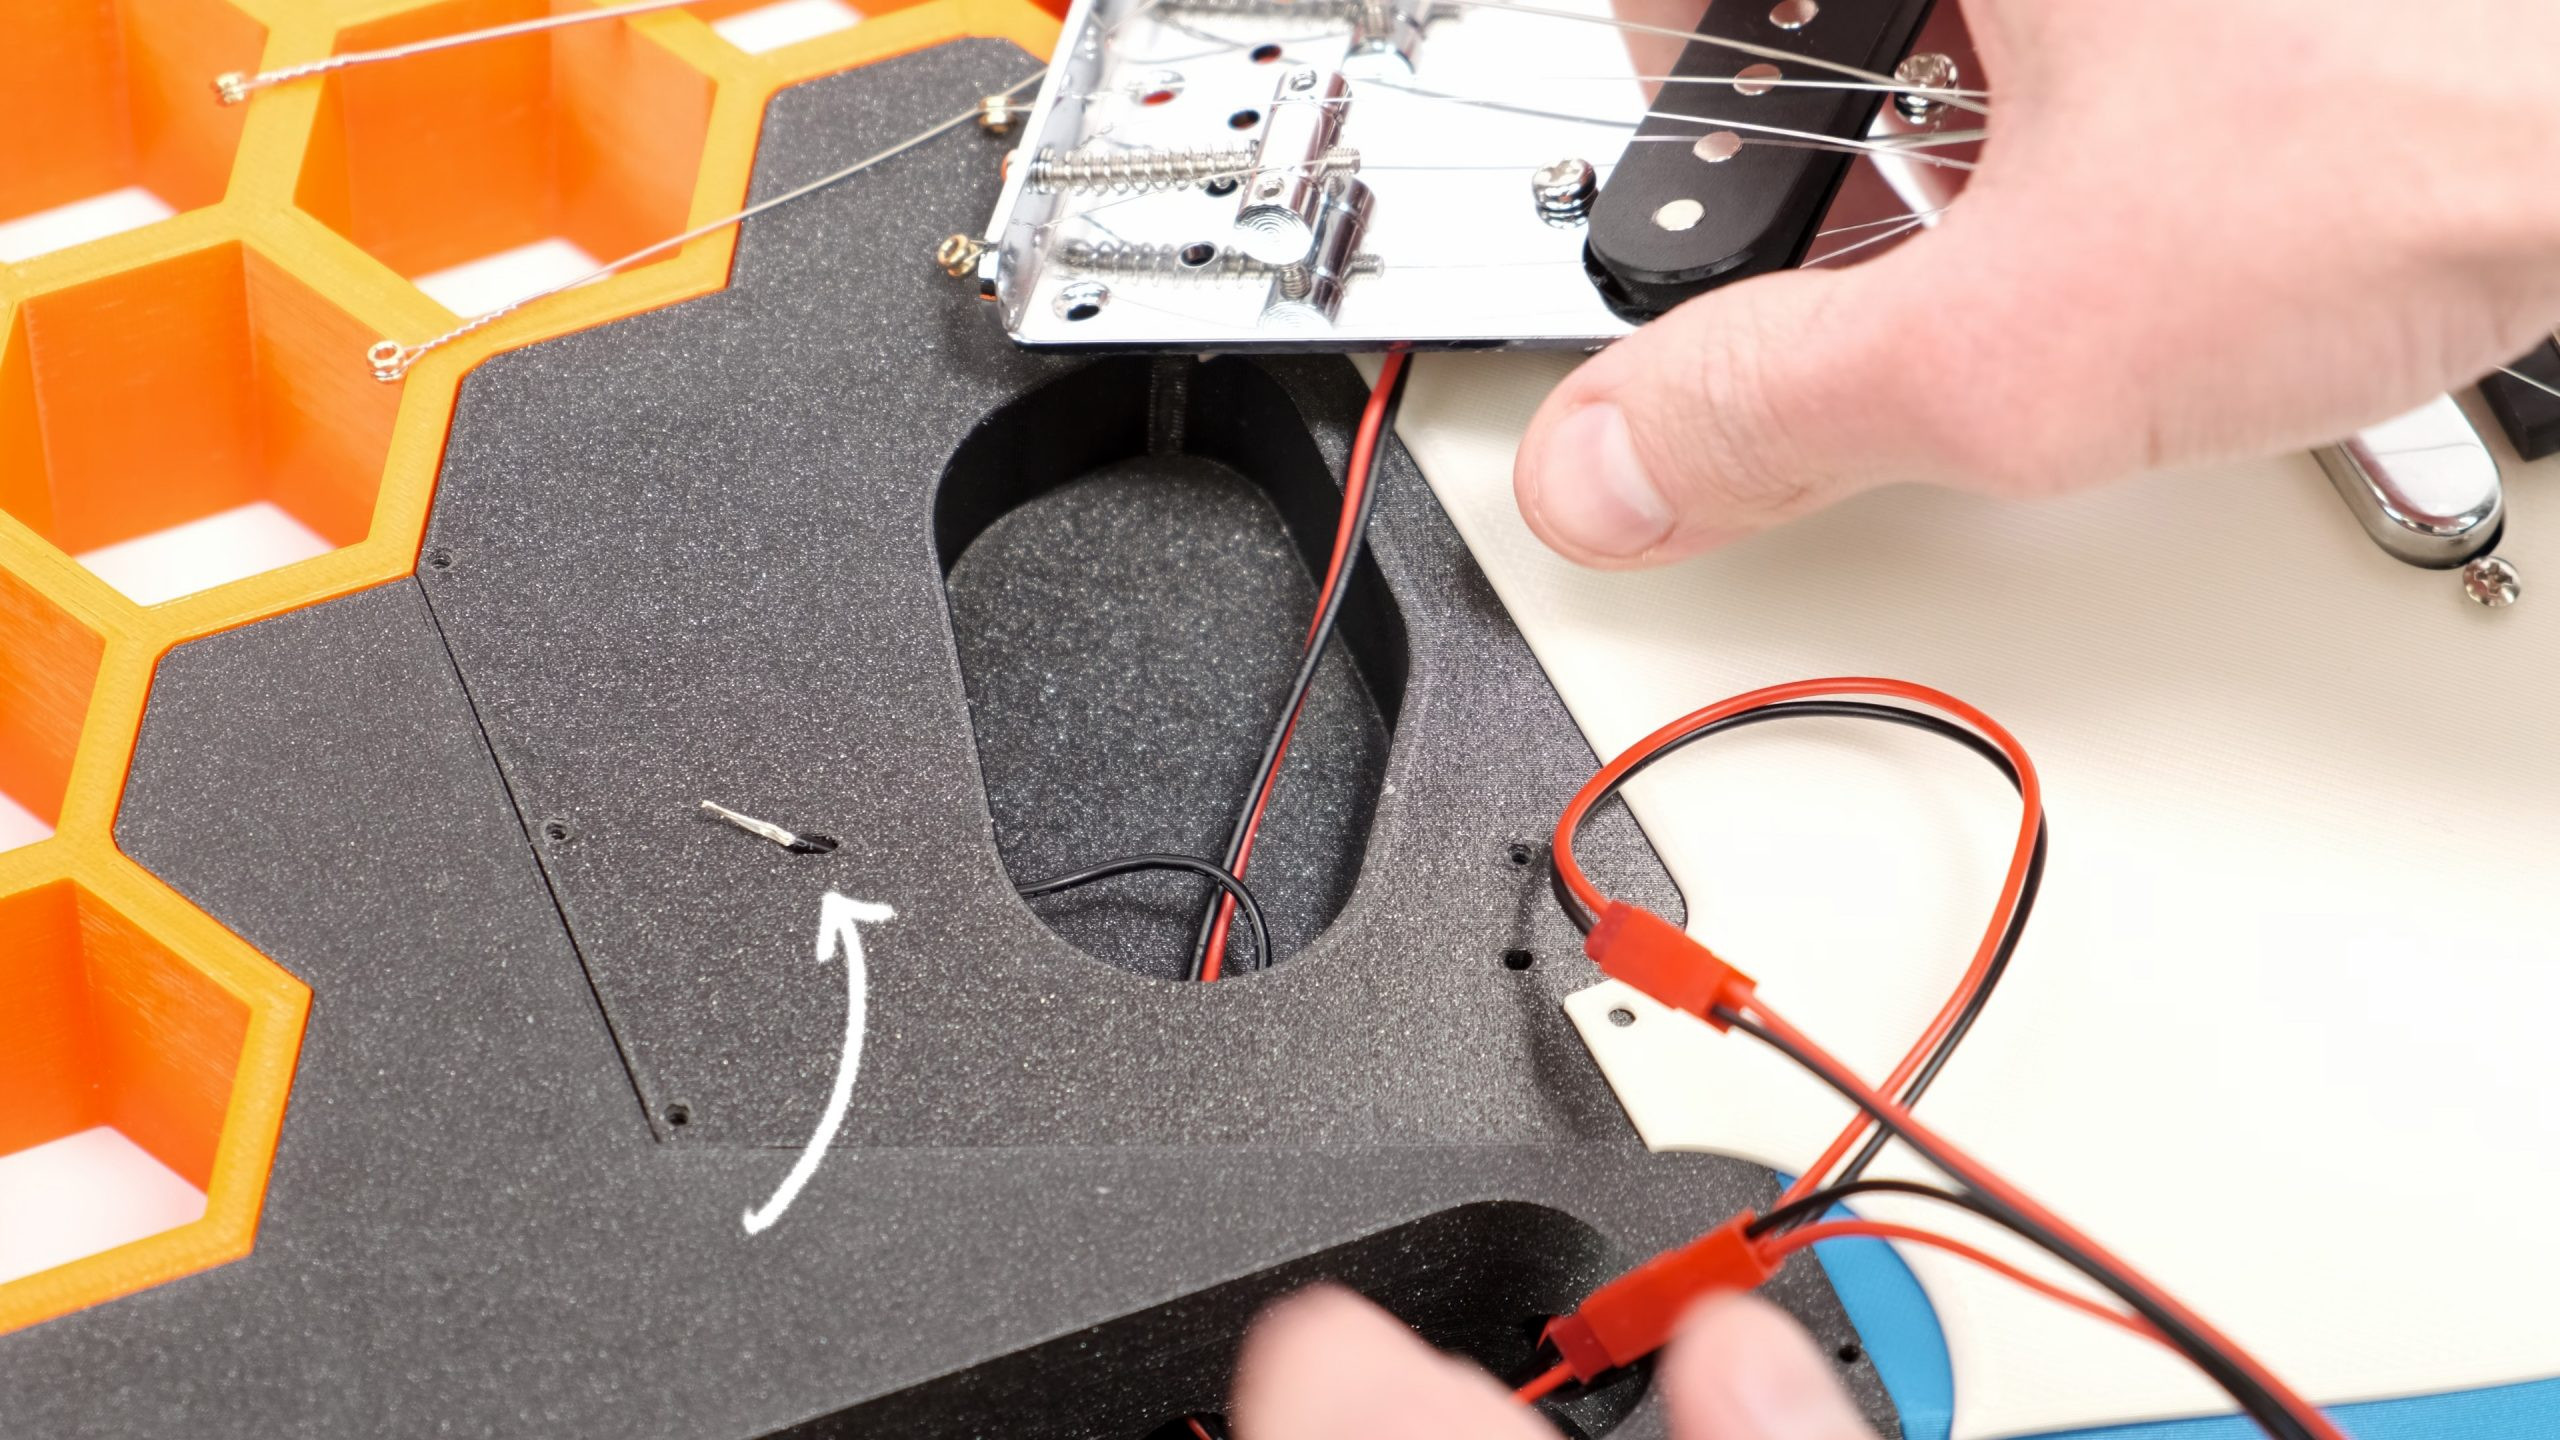
Image: Routing the ground wire under the bridge of the 3d printed guitar body to minimize electrical noise.
Final Guitar Setup: Intonation Adjustment
After assembly and stringing, tuning the guitar and setting the intonation is the final step. Intonation ensures accurate tuning across the fretboard. Compare the open string note to the 12th fret note. If the 12th fret note is significantly out of tune, intonation adjustment is needed. On the Telecaster bridge, saddle position adjustments are easily made using screws. If the fretted note is flat, move the saddle towards the neck; if sharp, loosen the string slightly and move the saddle towards the bridge. Telecaster saddles often serve two strings, requiring compromise for optimal intonation of both.
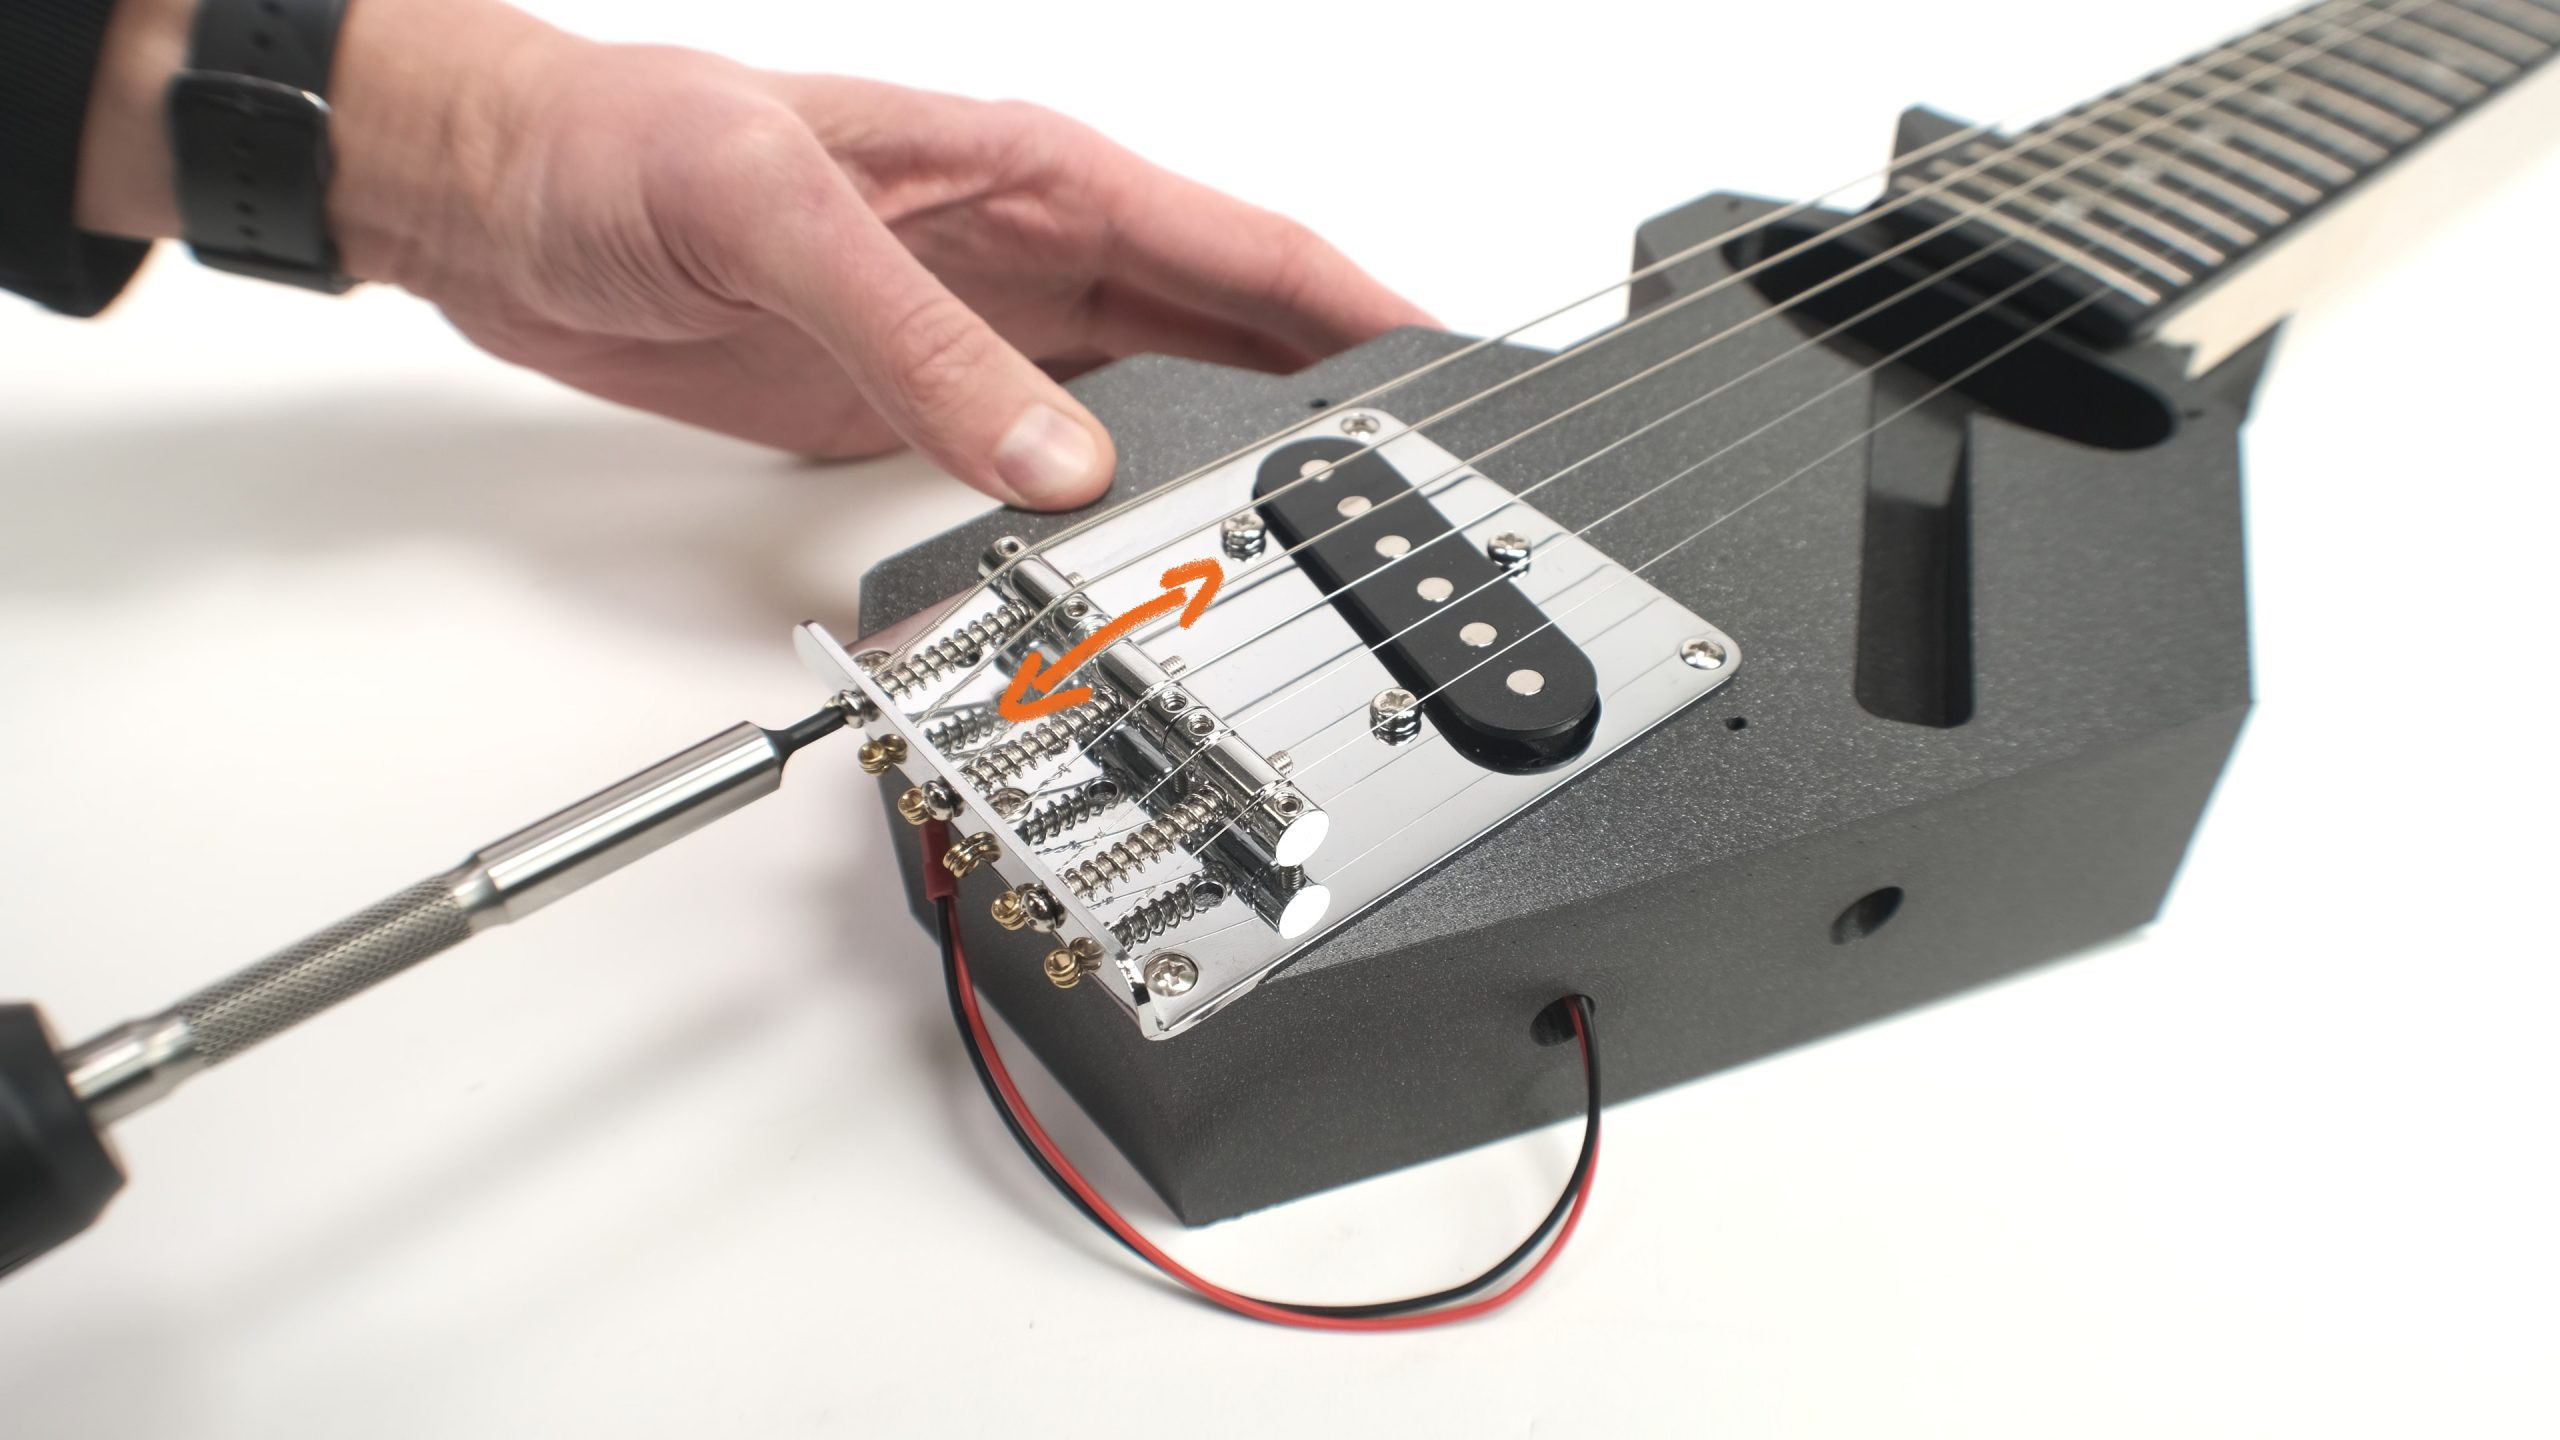
Image: Adjusting the intonation on the Telecaster bridge of the 3d printed guitar using saddle adjustment screws.
The Completed 3D Printed Prusacaster
Playability and Sound Quality
The 3D printed Prusacaster plays surprisingly well. Blindfolded, one might mistake it for a conventionally manufactured guitar. Tuning stability and intonation are excellent. While not expected to surpass high-end Telecasters due to budget components, the playability and sound quality are remarkable for its price point and construction method.
Download, Print, and Play Your Own Prusacaster!
The Prusacaster project successfully demonstrates the feasibility of creating a playable electric guitar using desktop 3D printing and readily available components. For those eager to build their own 3d printed 3d printer guitar, the 3D models are available for free download on Printables.com: Download the 3D model from Printables.com. STEP files and a DXF drawing of hole positions are also included.
This project invites you to explore the exciting possibilities of 3d printed instruments. Download the design, fire up your 3d printer, and embark on the rewarding journey of building your own Prusacaster. Enjoy the process and the music it brings!