
Embarking on a creative 3D printing project? Let’s explore how to bring a fascinating marine creature to life – an octopus! This guide delves into the exciting process of designing and 3D printing your very own articulated octopus, perfect as a decorative piece or a fun, flexible toy. We’ll walk through the design considerations, focusing on creating realistic, segmented tentacles and how to assemble them for a dynamic final product.
The inspiration for this project starts with an unconventional head – a Nespresso capsule holder. This repurposed item provides a unique and readily available starting point for our 3D printed octopus. From this base, the vision is to create eight tentacles, each starting robustly at the head and gracefully tapering towards the tips. To avoid a static, lifeless appearance, the design incorporates subtle bends at the end of each segment, mimicking the fluid movement of a real octopus in water. Straight, uniform tentacles simply wouldn’t capture the same organic essence.
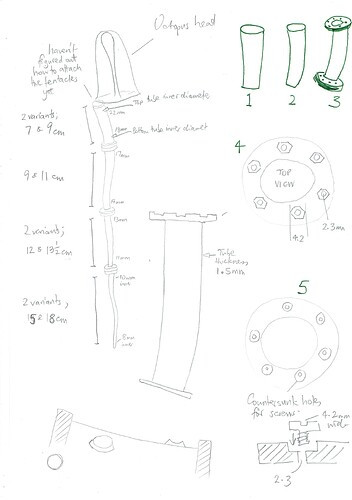
Considering the capabilities of standard desktop 3D printers, with a common print height limit around 25cm, a segmented tentacle design becomes practical. Each tentacle can be constructed from four individual segments. The segment closest to the head should be the thickest and shortest, with subsequent segments gradually decreasing in diameter and potentially length as you move towards the tentacle’s tip. Imagine each segment as slightly wider at the top, narrowing towards the bottom, creating a naturalistic taper. For example, the top segment could start with an internal diameter of 22mm and reduce to 18mm, the next segment from 17mm down to 14mm, and so on. For an added touch of visual appeal, consider filling these segments with small LED lights. When printed in translucent PLA, the gentle glow emanating from within can create a mesmerizing effect.
To connect these segments and allow for articulation, flanges are essential. Designing flanges at both the top and bottom of each segment allows for mechanical fastening. Small 2mm bolts and nuts can securely join the segments. Each flange, approximately 2.5mm thick, should include holes for these fasteners. Countersinking the bolt heads or nuts can create a cleaner, more professional finish. This can be achieved by incorporating either 4.2mm diameter countersink holes for bolt heads or hexagonal recesses for nuts to sit flush within the flange. Utilizing a patterned approach in your design software is key to achieving consistent and functional countersinks.
For a final touch of realism and to prevent an overly uniform appearance, consider varying the lengths of the top segments where the tentacles meet the head. Slightly different lengths, perhaps in the 7-9cm range, will ensure that the flanges don’t align perfectly, contributing to a more natural, less manufactured look.
 octopus
To summarize the design process, three key steps emerge:
- Tapered Tube Creation: Mastering the technique to design a tube that tapers smoothly from a larger internal diameter (X) to a smaller one (Y), while maintaining a consistent 2mm wall thickness, is fundamental.
- Adding Curves: Implementing a subtle bend at the end, or potentially both ends, of each tubular segment is crucial for achieving the desired organic aesthetic.
- Flange and Countersink Design: Adding functional flanges with integrated countersinks to each end of every segment is necessary for assembly and articulation.
Guidance on these specific design steps, particularly resources or tutorials focused on achieving tapered tubes, would be invaluable. Furthermore, any advice on optimizing the design – perhaps reducing the number of segments per tentacle to simplify printing, or best practices for printing features like top flanges that may require overhangs – would be greatly appreciated as this 3d Print Octopus project progresses. Your insights and suggestions are welcome!