Have you ever wanted a miniature action figure of yourself or a custom character? With the rise of 3D printing, this is now more achievable than ever. This guide will walk you through the process of creating your very own 3d Print Action Figure using free software and readily available online resources. No prior expertise in 3D modeling is needed to get started on this exciting DIY project.
First, you’ll need to source some 3D models to work with. A quick Google search for “free 3d model human figure” will reveal several websites offering body models. Two excellent resources are Artist-3D and Archive 3D. These platforms provide a variety of 3D models, often in 3DS format, which we can easily convert for our 3D printing project.
The 3DS format is commonly used by Autodesk’s 3D Studio. Fortunately, we can use a free software called NetFabb Basic (older versions are freely available) to open 3DS files and export them in OBJ format, which is compatible with MeshMixer, the software we’ll use for model manipulation.
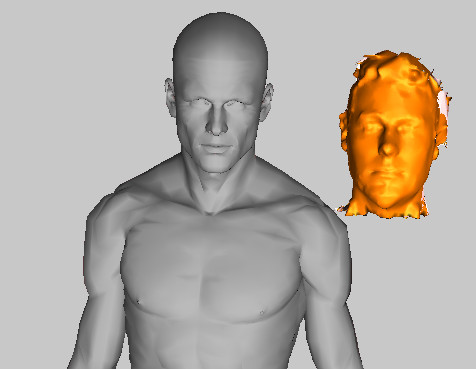
For this tutorial, we selected a body model from one of the mentioned websites. Once you’ve chosen and downloaded your body model, the next step is to prepare it for merging with a head model.
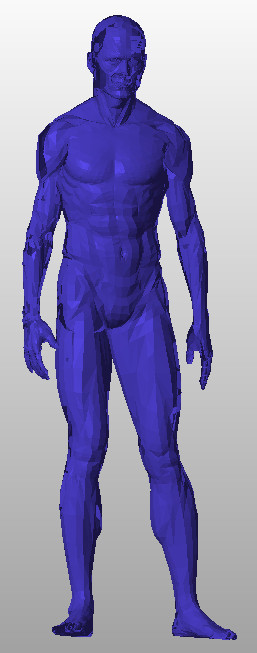 3D human body model selected from online resource
To begin, open NetFabb and import your downloaded 3DS body model. Then, export it immediately as an OBJ file. This conversion is crucial for compatibility with MeshMixer.
Next, launch MeshMixer. Import your head model into MeshMixer. When importing your head, ensure you select “Append” rather than “Replace“. This will add the head model to the scene alongside the body model, instead of replacing the existing body model.
Upon importing both models, you might notice a significant size difference between the head and body, as was the case in our example where the head was considerably larger. Instead of trying to enlarge the body, which can be complex and sometimes distort the model, it’s generally easier to scale down the head to match the body’s proportions.
 Initial view in MeshMixer showing head model much larger than body model
Scaling the head down to the correct size can take a few minutes and requires some patience. Use MeshMixer’s transformation tools to resize the head. You’ll need to constantly rotate, pan, and zoom to visually compare the head and body sizes and ensure they are proportionally correct. Continue transforming the head until it appears appropriately sized for the body. Position the head close to the body to better visualize the final assembly.
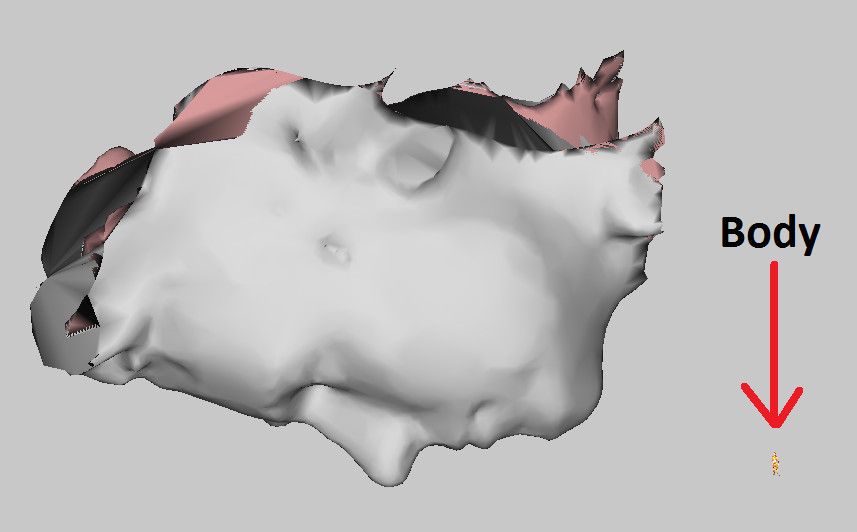
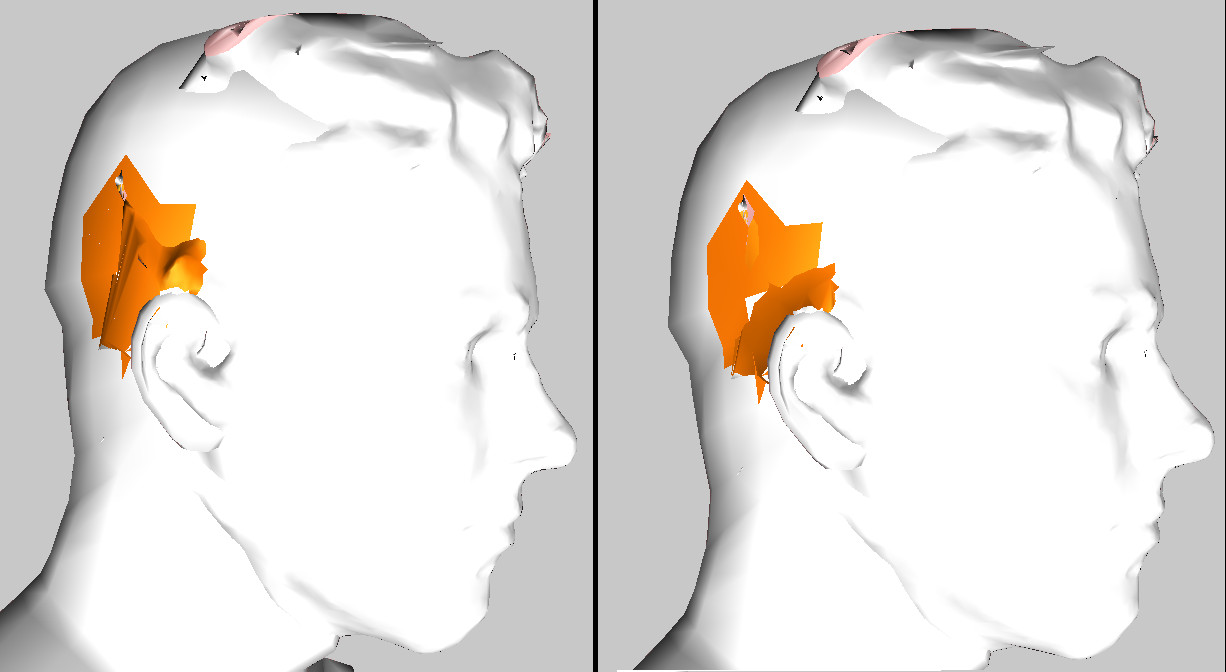
After resizing, the next step is to prepare the body model to receive the head. Select the body model and use the lasso selection tool to carefully highlight the face area of the stock body model, from the forehead down to the chin and cheek to cheek. Once the facial area is selected, use the “Discard” edit function to completely remove the selected face.
 Body model in MeshMixer with face area selected for removal
Ideally, the “Erase and Fill” tool could be used to create a flat, featureless face instead of a hole. However, complexities arising from independently modeled features like eyes and mouth in some base models may prevent this. Discarding the face ensures a clean surface for attaching the new head and prevents potential mesh conflicts, such as the body’s nose poking through the new face.
Now, carefully position the head onto the body. Use MeshMixer’s transform tools to adjust the scale, rotation, and location of the head until it sits correctly on the body. Referencing the body’s ears can be helpful in determining the proper depth and ensuring the head isn’t tilted. This step might require fine-tuning to achieve a natural and seamless fit.
Occasionally, when moving the head, parts of it might seem to detach or stay behind. This can happen even when selecting all parts of the head model. As long as the main part of the head is correctly positioned, these minor visual glitches usually do not cause printing issues.
Once the head is in place, you’ll likely notice areas where the body’s original geometry protrudes through the head, particularly around the jaw and forehead. To clean this up, select the body model again and use the lasso tool to select any protruding sections. Then, use the “Discard” tool to remove these overlapping parts. Similarly, you can refine the head model by discarding any parts of the neck, ears, or hair that intersect awkwardly with the body.
With both models prepped and positioned, it’s time to merge them into a single, unified model. Select one model, and then Shift+Click the other to select both. With both models selected (they should both appear highlighted), navigate to “Edit > Combine” in the MeshMixer menu to merge them.
After combining, you now have a single 3D model. Examine the areas where the head and body join, especially around the jawline, back of the head, and ears. If there are any awkward transitions or noticeable seams, use the “Erase and Fill” brush tool to smooth these areas. Apply the brush in small, controlled patches rather than large strokes for better precision.
 Smoothing the merged head and body model using Erase and Fill tool in MeshMixer
At this stage, feel free to further customize your 3d print action figure. MeshMixer offers various sculpting brushes and tools that you can use to add details like horns, adjust proportions, or refine the overall shape. Experiment and personalize your model to your liking!
Once you are satisfied with your model, it’s time to export it for 3D printing. Go to “File > Export” in MeshMixer. Export the model in OBJ format. While MeshMixer offers STL export, we’ll use OBJ first for an intermediary step with NetFabb.
Open NetFabb Basic again, and import the OBJ file you just exported from MeshMixer. Run NetFabb’s repair function on the model. This crucial step ensures that the model is “watertight” and free of errors that could cause printing problems. You might need to toggle between “default” and “simple” repair options within NetFabb to achieve a fully repaired model. After repair, export the model from NetFabb, this time in STL format.
Congratulations! You have successfully created a printable STL file of your custom 3d print action figure model! You are now ready for the final steps of 3D printing and painting your unique creation, bringing your digital design into the physical world. Get ready to see your personalized action figure come to life!