If you’re eager to bring your digital creations into the physical world through 3D printing, Tinkercad is an excellent platform to begin your journey. While advanced 3D modeling software like Fusion 360, SolidWorks, and Blender offer powerful features, they often come with a significant learning curve. Tinkercad stands out as a user-friendly, web-based CAD (Computer-Aided Design) program that empowers you to design and prepare models for 3D printing quickly and efficiently, regardless of your prior experience.
This comprehensive guide will walk you through the process of designing a practical project box using Tinkercad, specifically tailored to house an Arduino Pro Mini. While this project provides a tangible example, the skills and techniques you’ll learn are universally applicable. We encourage you to adapt the dimensions and design principles to create enclosures and custom parts for any of your electronics or DIY projects.
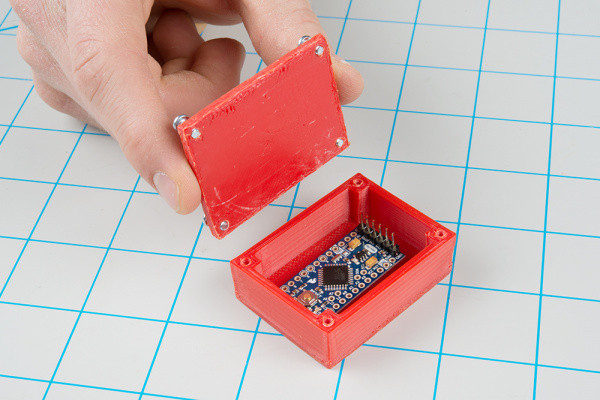 3D printed project enclosure designed using Tinkercad
Alt text: A clear photograph showcasing a 3D printed project enclosure designed in Tinkercad, highlighting its clean lines and functional design, ideal for housing electronic components.
Materials Needed
To follow along with the 3D modeling aspect of this tutorial, you won’t need any physical components. However, if you intend to 3D print the project box, you will require access to a 3D printer. This tutorial specifically demonstrates how to use the Cura LulzBot Edition slicing software for printing on a LulzBot printer, but the general principles apply to most FDM (Fused Deposition Modeling) 3D printers.
Note: If you don’t own a 3D printer, explore local resources such as makerspaces, schools, or libraries, which often provide public access to 3D printing facilities. Alternatively, online 3D printing services like Shapeways allow you to upload your design, have it printed professionally, and shipped directly to you for a fee.
Taking Accurate Measurements for Your 3D Print
One of the primary advantages of 3D printing custom enclosures is the ability to tailor the size precisely to your project’s needs. You can incorporate specific features like mounting holes, access ports for USB cables, power connectors, and more.
To begin, arrange your project components (electronics, PCBs, sensors, etc.) on a flat surface in the configuration that you envision for your enclosure. For this tutorial, we’ll design a box for an Arduino Pro Mini, but you can easily adapt the dimensions for your own projects. Use a ruler or, for greater precision, a set of calipers to measure the outer dimensions of your project – this is often referred to as the “footprint.” These measurements will define the minimum internal space required for your enclosure.
Note: Click on any image to enlarge it for a more detailed view.
First, measure the length of your project components. Remember, this could be anything you want to enclose, from circuit boards to mechanical parts or even non-electronic items.
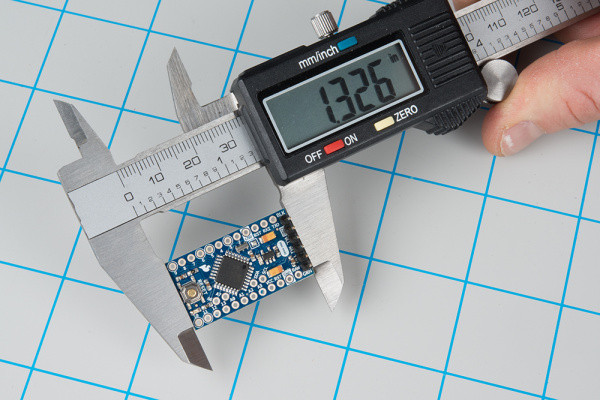 Using calipers to measure the length of the project piece(s)
Alt text: Close-up shot of digital calipers precisely measuring the length of an electronic component, demonstrating the process of obtaining accurate dimensions for 3D modeling.
Next, measure the width of your components.
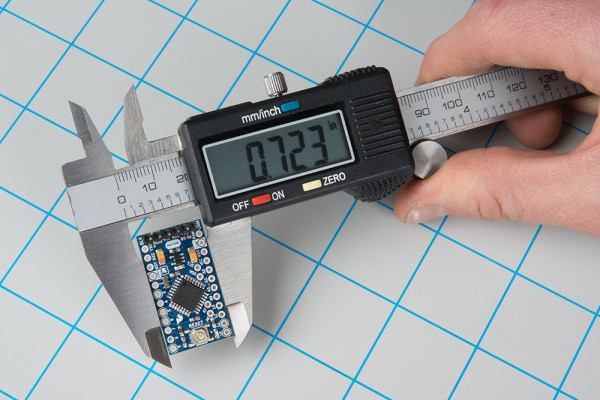 Using calipers to measure the width of the project piece(s)
Alt text: Image showing calipers measuring the width of a PCB, emphasizing the importance of width measurement for designing a snugly fitting 3D printed enclosure.
In this example, the Arduino Pro Mini’s footprint measures approximately 1.326 inches in length and 0.723 inches in width. This tutorial uses inches as the unit of measurement, consistent with many standard electronic component dimensions. However, Tinkercad allows you to work in millimeters or other units if you prefer. Finally, measure the maximum height of your components when stacked or arranged as they will be inside the enclosure.
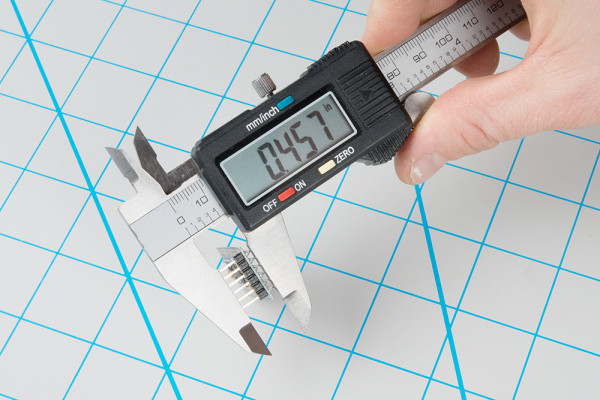 Using calipers to measure the height of the project piece(s)
Alt text: Calipers measuring the height of an Arduino Pro Mini with header pins attached, illustrating the height dimension crucial for ensuring vertical clearance within a 3D printed case.
The maximum height of the Arduino Pro Mini with headers is about 0.457 inches.
To ensure a comfortable fit and some clearance within the enclosure, it’s good practice to round up your measurements slightly. For this project box, we’ll use the following rounded dimensions for the internal cavity:
- Length: 1.4 inches
- Width: 0.8 inches
- Height: 0.5 inches
To securely attach a lid to our enclosure, we’ll incorporate screw holes into both the box and the lid. These will be designed to align perfectly when printed.
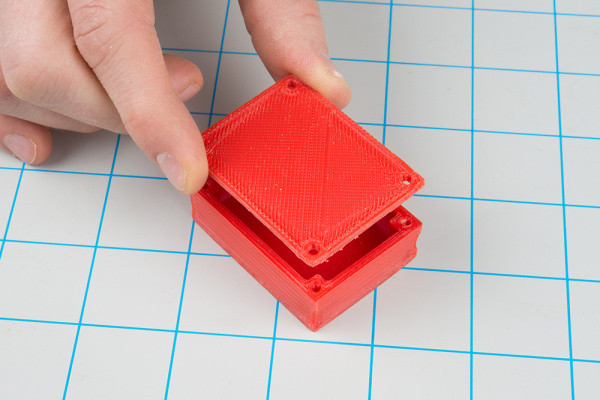 Lining up holes on the 3D printed lid with the rest of the box
Alt text: A 3D printed project box with its lid placed on top, screw holes neatly aligned, demonstrating the precision achievable with Tinkercad and 3D printing for creating functional enclosures.
While there are robust methods for screw attachment in 3D prints, such as heat-set inserts, for this straightforward enclosure, we’ll create holes slightly smaller than the screw diameter. This allows the screw threads to tap directly into the plastic. While not as strong as heat-set inserts, this method is sufficient for prototyping and general use. Self-tapping screws designed for plastic are ideal, but machine screws can also work.
For more detailed information on joining 3D printed parts with screws, including advanced techniques like heat-set inserts, resources like the 3DHubs article on threaded fasteners are invaluable.
For this project, we’ll use #4-40 screws to secure the lid. Referring to a tap and drill size chart (Michigan Tech provides a useful chart), we find that for #4-40 screws, a tap drill size of 0.0890 inches is recommended for the threads to grip the material in the base. For the lid, we want clearance holes, so we’ll use the free fit drill size of 0.1285 inches.
Considering the tolerances and potential for slight shrinkage in FDM 3D printing, especially with materials like ABS or PLA, it’s wise to oversize these holes by 0.01 to 0.02 inches. This accounts for material expansion and ensures screws fit properly without excessive force.
Rounding up the drill sizes and adding a small oversize margin, we get:
- Enclosure screw hole (tap): 0.0890 inches → 0.100 inches
- Lid screw hole (free fit): 0.1285 inches → 0.140 inches
With these measurements and screw considerations in mind, sketching out your enclosure and lid with dimensions is highly beneficial. This visual guide will streamline the modeling process in Tinkercad. To provide a bit more room and simplify dimensions, let’s round up our internal cavity dimensions to the nearest half inch. By incorporating corner posts (0.25 x 0.25 inches each) for screw placement, the overall enclosure footprint will neatly become 2.0 x 1.5 inches.
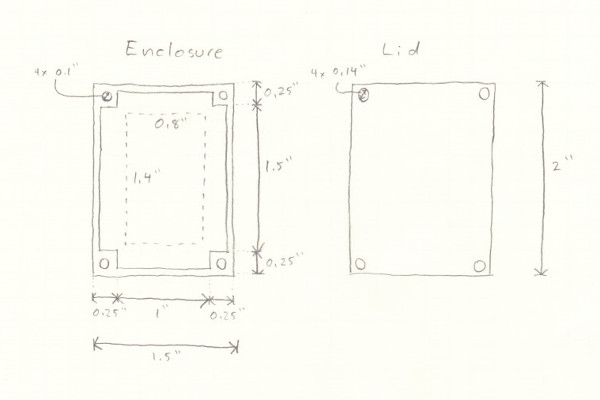 Sketch of dimensions of enclosure box and lid
Alt text: A detailed technical sketch illustrating the dimensions of the project enclosure box and its lid, including length, width, height, screw hole positions, and wall thicknesses, essential for CAD modeling.
We will use these finalized dimensions to begin modeling our project box in Tinkercad.
3D Modeling Your Enclosure in Tinkercad
Setting Up a New Design
Go to tinkercad.com and create a new account or log in if you already have one. Tinkercad is a browser-based application, so there’s no need to install any software.
Once logged in, ensure 3D Designs is selected on the left-hand menu and click the Create new design button.
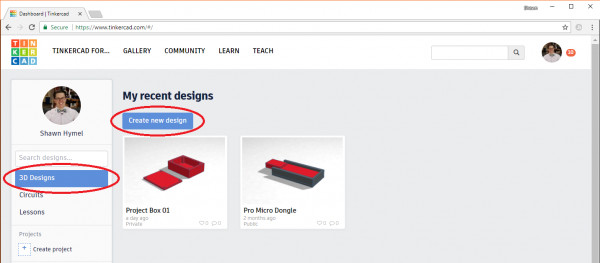 Creating a new design in Tinkercad
Alt text: Screenshot of the Tinkercad dashboard, highlighting the ‘Create new design’ button within the 3D Designs section, initiating a new project in the online CAD tool.
You’ll be presented with a blank workplane and a shapes panel on the right side. Tinkercad’s interface is designed for simplicity: you drag shapes onto the workplane, modify their dimensions and properties, and combine them to create complex models. To navigate the 3D space, right-click and drag to rotate the workplane view. Middle-click and drag to pan the view. Experiment with these controls to get comfortable with navigating the Tinkercad environment.
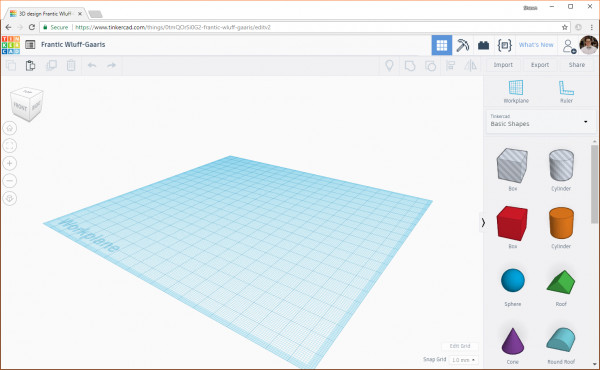 Rotating and panning the workplane in Tinkercad
Alt text: Animated screenshot demonstrating the rotation and panning functionalities in Tinkercad, showing how users can manipulate the view to inspect their 3D designs from different angles.
For this project, we’ll be working in inches. To change the units, click Edit Grid in the bottom right corner of the Tinkercad window. A pop-up window will appear with grid settings. Change the Units dropdown to Inches.
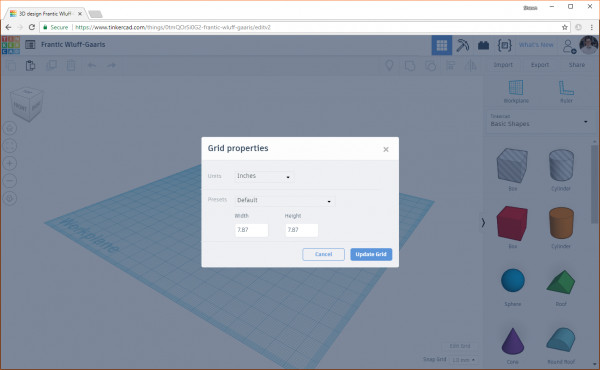 Change the units to inches in Tinkercad
Alt text: Screenshot showing the ‘Edit Grid’ settings in Tinkercad, with the ‘Units’ dropdown menu highlighted and set to ‘Inches’, customizing the workspace for imperial measurements.
Click Update Grid to apply the changes. In the top left corner, you’ll see the project name, which Tinkercad automatically assigns as a random sequence of words. Click on this name to rename your project to something more descriptive.
Laying the Foundation for Your Enclosure
From the shapes panel on the right, drag a red Box shape onto the workplane, placing it roughly in the center. This box will form the base of our enclosure.
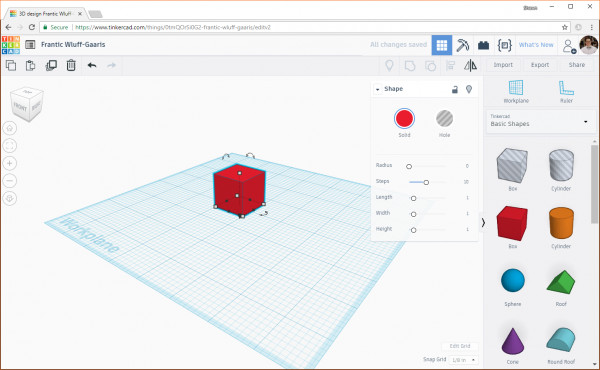 Adding a box to the workplane in Tinkercad
Alt text: Screenshot depicting a red box shape being dragged from the shapes panel onto the blank workplane in Tinkercad, initiating the design process by adding the first primitive shape.
Zoom in on the box using the zoom controls on the left side or your mouse wheel. Rotate and pan the workplane as needed for a clear view. With the box selected (indicated by the white handles), click on the Color swatch above the “Solid” label in the object properties panel. You can change the box’s color here for visual clarity within Tinkercad. This color change doesn’t affect the actual print color, which is determined by your 3D printer filament.
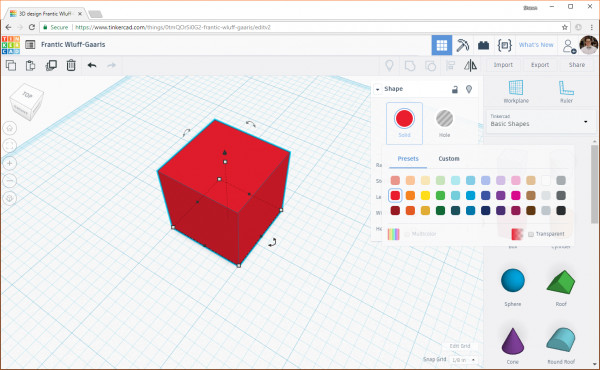 Change the color of an object in Tinkercad
Alt text: Screenshot demonstrating how to change the color of a selected object in Tinkercad using the color palette in the object properties panel, enhancing visual organization in the design workspace.
Click on one of the corner white handles of the box. The current footprint dimensions (initially 1 x 1 inch) will appear on the workplane.
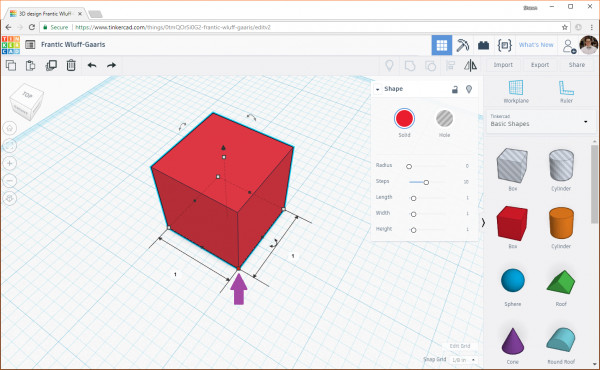 Clicking a node to edit the dimensions on an object in Tinkercad
Alt text: Screenshot showing a corner handle of a selected box in Tinkercad being clicked to reveal dimension inputs, preparing to modify the size of the shape.
Click on one of these dimension values to edit it.
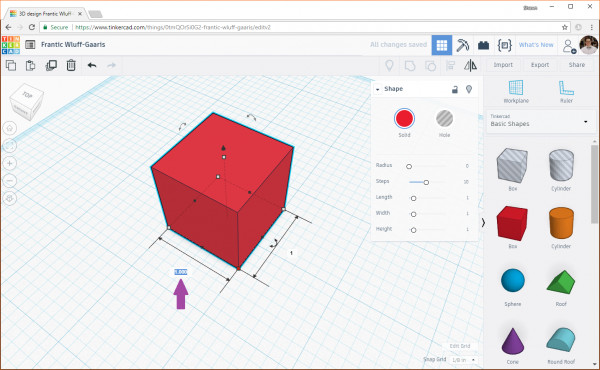 Editing the dimensions of a box in Tinkercad
Alt text: Screenshot illustrating the process of directly editing the dimension values of a box in Tinkercad, allowing precise control over the shape’s size.
Set the width dimension to 1.5 inches and press Enter. Then, click on the other dimension (length) and set it to 2.0 inches. Your cube will transform into a rectangular base.
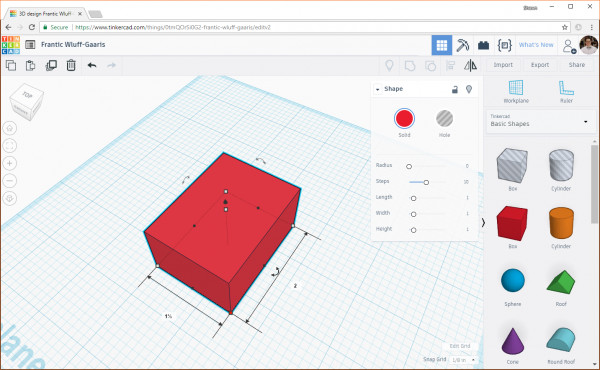 Changing the dimensions of a box in Tinkercad
Alt text: Screenshot showing a box in Tinkercad after its length and width dimensions have been modified to create a rectangular shape of specific size.
Next, click on the top center handle (the white box in the middle on top of your rectangular prism). This handle controls the height dimension.
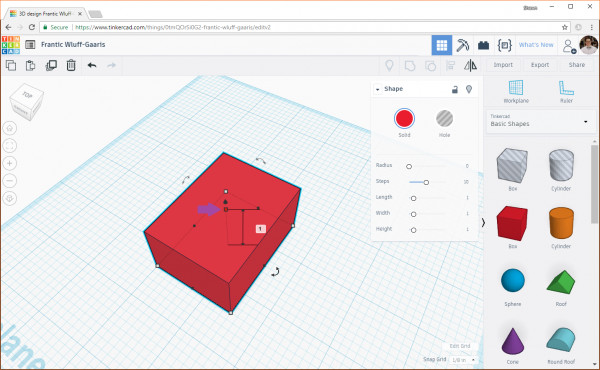 Clicking on the height node of a box in Tinkercad
Alt text: Screenshot highlighting the top center handle of a box in Tinkercad, used for adjusting the height of the 3D shape.
Click on the height dimension value (initially 1 inch) and change it to 0.1 inches. A wall thickness of 0.1 inches is generally robust enough for enclosures of this size.
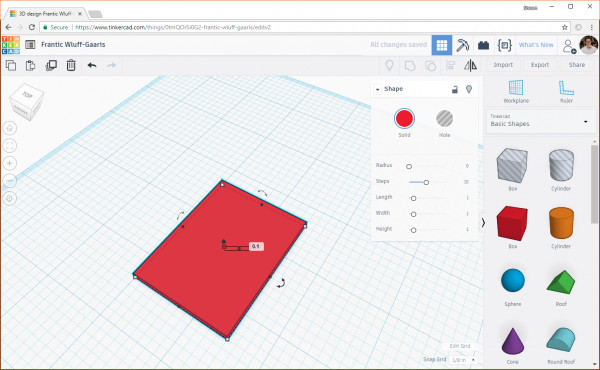 Changing the height of an object in Tinkercad
Alt text: Screenshot demonstrating the adjustment of the height dimension of a box in Tinkercad, reducing it to a thinner profile appropriate for enclosure walls or bases.
This thin box will serve as the base of our enclosure. We’ll build the screw posts and walls on top of it. Since the lid of our enclosure is similar in shape to this base, let’s duplicate this base to create the starting point for the lid. Select the box and click the Duplicate button in the top left toolbar.
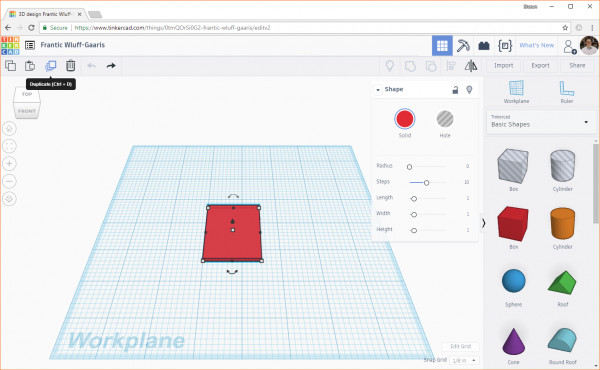 Duplicate an object in Tinkercad
Alt text: Screenshot indicating the ‘Duplicate’ button in Tinkercad’s toolbar, used to create a copy of the selected 3D object, streamlining the design process.
You’ll now have two identical boxes overlapping each other. Click and drag the duplicated box a few inches away, leaving a visible gap between them.
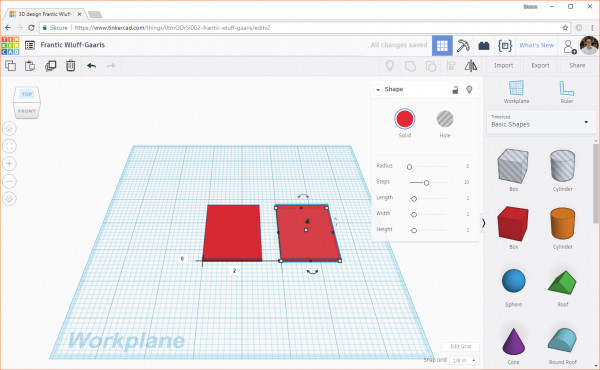 Moving the copied box in Tinkercad
Alt text: Screenshot showing a duplicated box being moved away from its original position on the Tinkercad workplane, separating the copy for further independent modifications.
At this stage, we have the foundations for both the base and the lid of our enclosure.
Creating Screw Holes in the Lid
Now, let’s add screw holes to the lid. In the shapes panel, above the solid red Box and orange Cylinder, you’ll find “hole” shapes – a striped box and a striped cylinder. These are negative shapes used to subtract material from solid objects, effectively creating holes, cavities, or notches.
Drag a gray striped Cylinder (Hole) onto the workplane. Change its width and length dimensions to 0.14 inches each. This corresponds to the clearance hole diameter for our #4-40 screws in the lid. The height of the hole cylinder isn’t critical as long as it’s taller than the lid’s thickness.
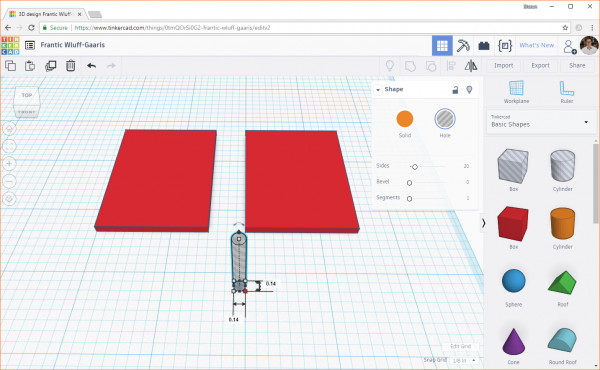 Creating a hole cylinder in Tinkercad
Alt text: Screenshot showing a striped cylinder ‘hole’ shape being added to the Tinkercad workplane, used for creating negative space or holes in solid 3D models.
To accurately position the hole cylinder in the corner of the lid, we’ll use the Align tool. Select both the cylinder and the second box (our lid base). You can do this by dragging a selection box around both objects or by holding Shift and clicking on each object.
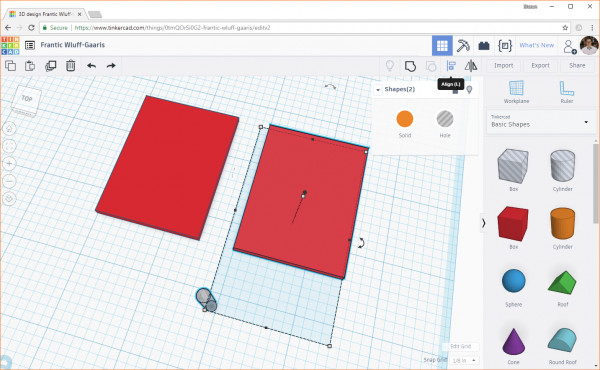 Selecting multiple objects in Tinkercad
Alt text: Screenshot demonstrating how to select multiple objects in Tinkercad by dragging a selection box around them, preparing to apply group operations or alignments.
In the top right toolbar, click the Align button. Alignment handles (black dots) will appear around the selected objects. Hover your mouse over these dots to preview how the objects will align if you click.
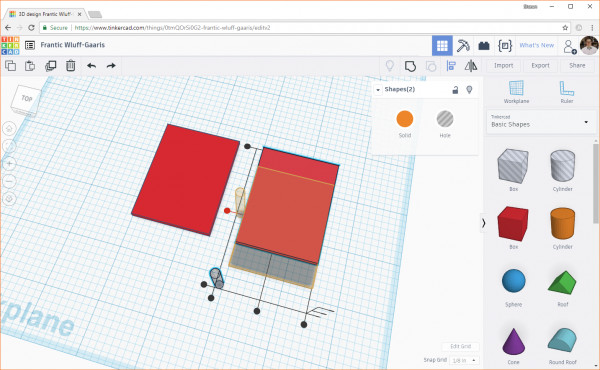 Moving objects with align in Tinkercad
Alt text: Screenshot showing alignment handles appearing around selected objects in Tinkercad after activating the ‘Align’ tool, used for precise positioning of shapes relative to each other.
To ensure only the cylinder moves relative to the box (and not vice versa), click on the box (lid base). The alignment handles will now only appear around the box, indicating it will remain stationary. Hover over the bottom black dot on the left side and click to align the bottom edges of the cylinder and box.
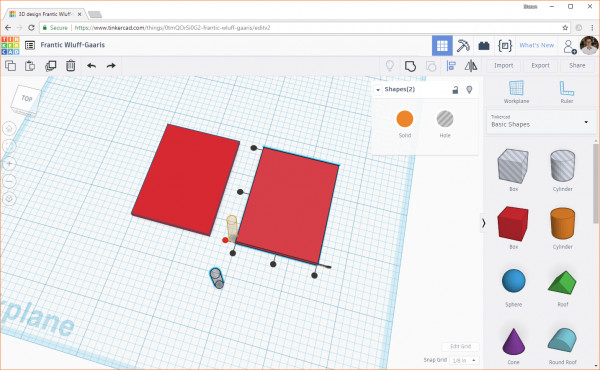 Aligning the cylinder with the box
Alt text: Screenshot demonstrating the alignment of a cylinder to a box in Tinkercad, specifically using the ‘Align’ tool to match their bottom edges for precise positioning.
Click the leftmost dot on the bottom edge of the box to align the left edges of the cylinder and box.
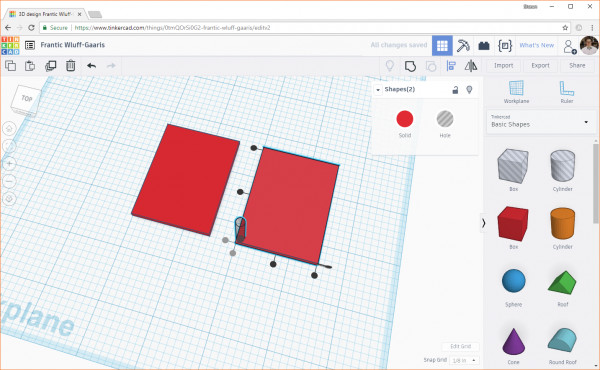 Aligning the left side of two objects in Tinkercad
Alt text: Screenshot showing the alignment of the left sides of a cylinder and a box in Tinkercad, using the ‘Align’ tool for accurate side-by-side placement of shapes.
If we were to subtract the cylinder now, the hole would be too close to the edge, potentially weakening the screw post. We need to move the cylinder slightly inward towards the center of the box.
The screw holes should be centered within the corner posts, which are designed to be 0.25 x 0.25 inches. This means the center of each post is 0.125 inches from each corner edge. Currently, the cylinder’s center is 0.07 inches from the corner edge. Therefore, we need to move the cylinder 0.055 inches (0.125 – 0.07 = 0.055) inwards from both sides to center it in the post.
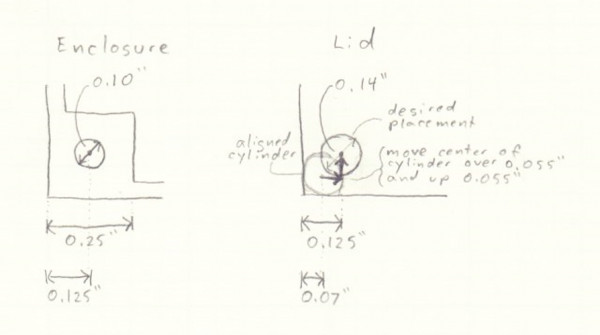 Diagram of holes lining up with enclosure and lid
Alt text: A diagram illustrating the precise positioning of screw holes within the corner posts of a 3D printed enclosure and lid, detailing the measurements required for accurate placement during design.
Click on the cylinder and begin dragging it towards the center of the box. Movement values in X and Y directions will appear.
 Manually moving a hole in Tinkercad
Alt text: Screenshot showing a hole shape being manually dragged in Tinkercad, with movement measurements displayed to aid in precise adjustments of position.
Click on one of the movement values to edit it numerically. Ensure you maintain the correct sign (positive or negative). We need to move the cylinder precisely 0.055 inches inwards from both sides. Change the values to -0.055 and 0.055 as shown (or 0.055 and -0.055 depending on the direction of movement).
 Entering precise measurements to move an object in Tinkercad
Alt text: Screenshot demonstrating the input of precise numerical values to move a 3D object in Tinkercad, ensuring accurate positioning based on specific measurements.
Duplicate the cylinder and use the Align tool again to align the duplicate to another corner of the lid base.
 Duplicating and aligning an object in Tinkercad
Alt text: Screenshot showing the duplication of a cylinder and its subsequent alignment to a different corner of a box in Tinkercad, efficiently replicating features across the design.
Move this cylinder inwards by 0.055 inches in both X and Y directions, as before. Repeat this process for the remaining two corners, ensuring each cylinder is positioned 0.055 inches from the adjacent walls.
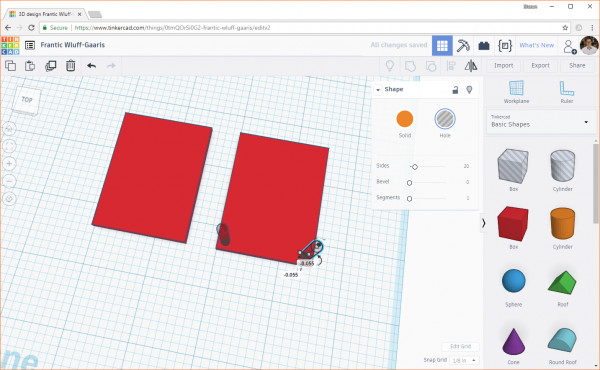 Moving an object by numbers in Tinkercad
Alt text: Screenshot illustrating the numerical adjustment of an object’s position in Tinkercad, ensuring precise movement by entering specific coordinate values.
You should now have four hole cylinders accurately positioned in each corner of the lid base.
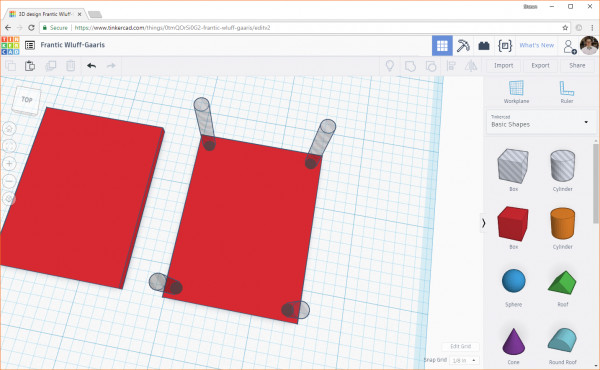 Four hole cylinders in the corner of a box
Alt text: Screenshot displaying four cylinder ‘hole’ shapes positioned in the corners of a box in Tinkercad, ready to be grouped to create screw holes.
Select the lid base and all four hole cylinders by dragging a selection box around them or Shift-clicking each. Make sure only the lid components are selected.
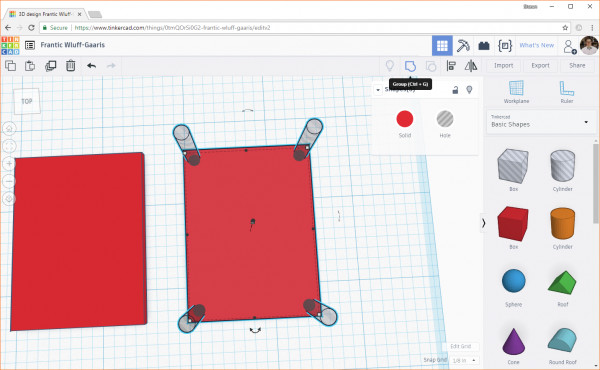 Selecting multiple objects in Tinkercad
Alt text: Screenshot showing multiple objects selected in Tinkercad, highlighted and ready for a group operation to combine or subtract shapes.
Click the Group button in the top right toolbar. This operation combines selected shapes. Hole shapes subtract from solid shapes, effectively “drilling” holes. You should now see the lid with four clean screw holes in the corners.
 Adding drill holes in Tinkercad
Alt text: Screenshot of a box in Tinkercad after a group operation has been performed with cylinder ‘hole’ shapes, resulting in the creation of clean, defined holes in the solid object.
Creating the Enclosure Posts
Next, we’ll create the screw posts on the base of the enclosure. First, we need to move the workplane. The workplane is the 2D surface where objects are created. We can reposition it to align with any surface of an existing object. By moving it to the top surface of our enclosure base, we can directly create the posts on top of the base, avoiding the need to move them vertically later.
Click the Workplane button in the top right toolbar. A workplane tool icon (square with a cone) will appear. Hover this icon over the top surface of the enclosure base. The square will align to the top surface, and the cone will indicate the positive Z-direction (upwards from the surface).
 Moving the workplane in Tinkercad
Alt text: Screenshot demonstrating the process of moving the workplane in Tinkercad by hovering the workplane tool over a surface, aligning the creation plane to that surface.
Click to place the workplane on the top of the base. It will turn yellow, indicating it’s a user-defined workplane, not the default blue workplane.
 New workplane in Tinkercad
Alt text: Screenshot showing the Tinkercad workplane repositioned and highlighted in yellow on top of a 3D object, indicating a user-defined plane for subsequent design operations.
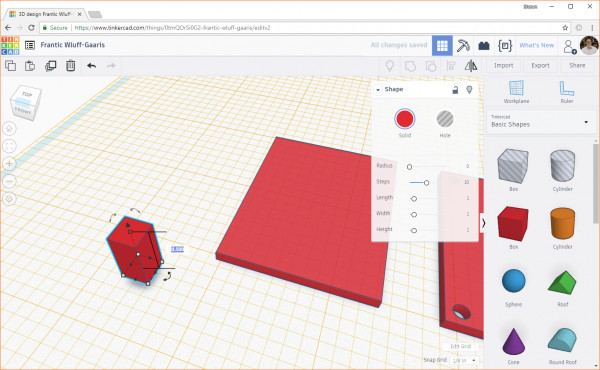
Drag another solid Box shape onto the new workplane. Change its length and width dimensions to 0.25 inches each. These will be our square posts.
 Making box posts in Tinkercad
Alt text: Screenshot illustrating the creation of a new box shape on a repositioned workplane in Tinkercad, setting the dimensions for a square post component.
Set the height of the post to 0.5 inches. This height determines the vertical space within the enclosure.
 Changing the height of the box
Alt text: Screenshot showing the adjustment of the height dimension of a box in Tinkercad, increasing it to create a taller post shape for a 3D design.
Use the Align tool to align the corner of the post with a corner of the enclosure base.
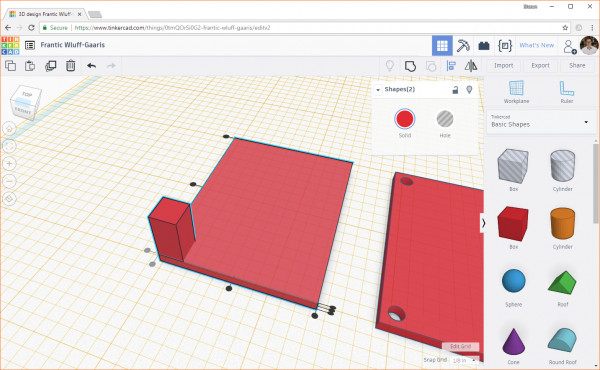 Aligning the box with a box corner in Tinkercad
Alt text: Screenshot demonstrating the alignment of a box shape to the corner of another box in Tinkercad using the ‘Align’ tool, ensuring precise corner-to-corner placement.
Duplicate the post three times and align each duplicate to the remaining corners of the base.
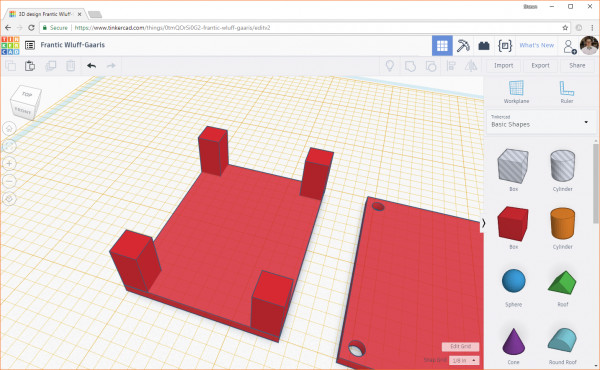 Posts in the corner of the enclosure
Alt text: Screenshot displaying four post shapes positioned in each corner of a box in Tinkercad, completing the corner structure of a 3D enclosure design.
Building the Enclosure Walls
Now, we’ll add walls to connect the posts and complete the enclosure. Drag a solid Box shape onto the workplane. Change its length and width dimensions to 1.0 inch and 0.1 inch, respectively. The enclosure’s width is 1.5 inches, and subtracting the width of two posts (2 x 0.25 inches) leaves 1.0 inch for the wall length. The 0.1-inch dimension is the wall thickness, consistent with the base and lid.
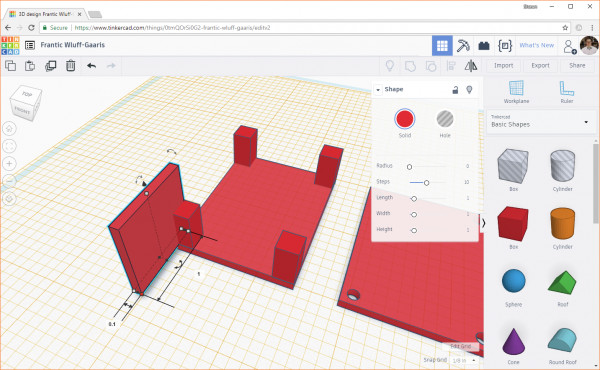 Constructed box wall in Tinkercad
Alt text: Screenshot of a box shape in Tinkercad with dimensions adjusted to create a wall segment, part of constructing a 3D enclosure design.
Set the height of this wall to 0.5 inches, matching the height of the posts.
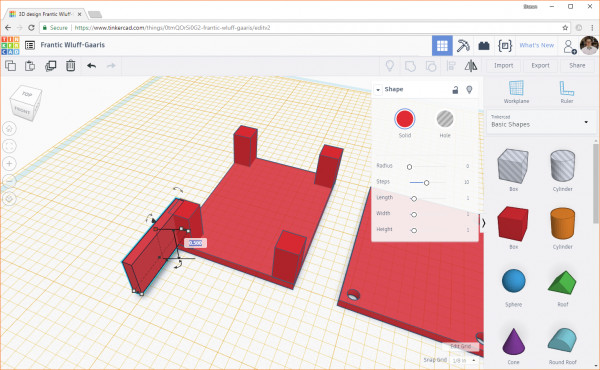 Changing the height of the walls
Alt text: Screenshot demonstrating the height adjustment of a box shape in Tinkercad, setting it to the desired wall height for a 3D enclosure.
Orient the wall to span between posts on the shorter side of the box. If needed, rotate the wall using the curved rotation handles. Rotate it 90 degrees or -90 degrees to align with the short side.
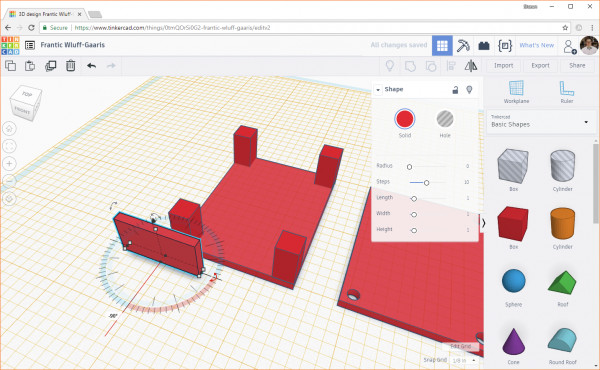 Rotate an object in Tinkercad
Alt text: Screenshot illustrating the rotation of a 3D object in Tinkercad using the rotation handles, allowing for orientation adjustments in the design workspace.
Select the wall and the enclosure base. Click the Align button. Click the base to set it as the reference object. Click the center dot on the short side to center the wall along the width of the base.
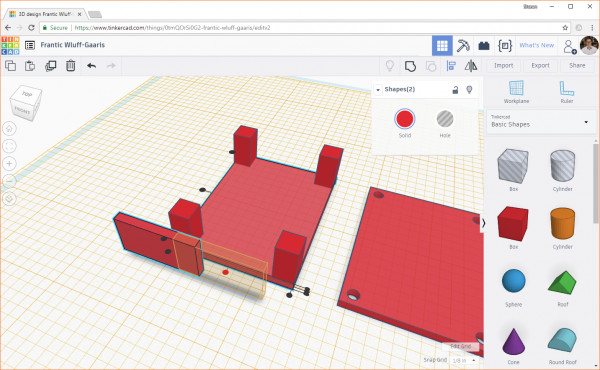 Using the Align tool to center an object in Tinkercad
Alt text: Screenshot demonstrating the use of the ‘Align’ tool in Tinkercad to center a wall segment relative to the base of a 3D enclosure design.
Click the leftmost dot on the bottom edge to position the wall between the posts on one side.
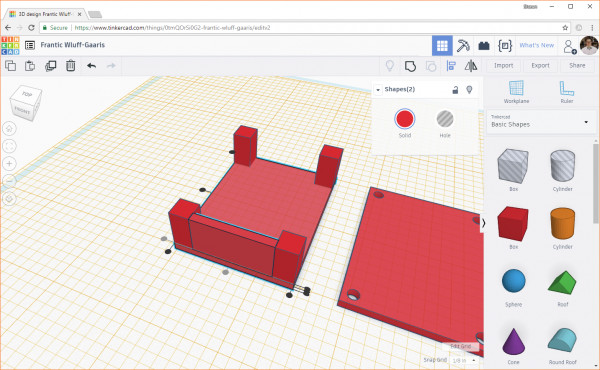 Using the Align tool in Tinkercad to line up two objects
Alt text: Screenshot showing the alignment of a wall segment between two posts of a 3D enclosure in Tinkercad, using the ‘Align’ tool for precise placement.
Duplicate the wall and use the Align tool to position the copy on the opposite short side, between the other pair of posts.
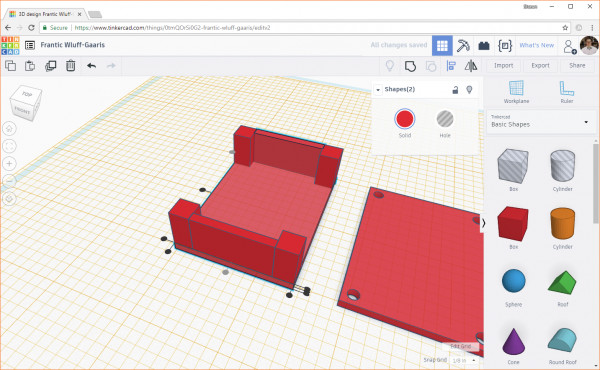 Duplicate the object in Tinkercad to create the opposite wall
Alt text: Screenshot demonstrating the duplication of a wall segment and its placement on the opposite side of a 3D enclosure in Tinkercad, efficiently creating symmetrical design elements.
Drag another Box shape onto the workplane. Set its length and width dimensions to 0.1 inch and 1.5 inches. The enclosure length is 2.0 inches, and subtracting the posts (2 x 0.25 inches) leaves 1.5 inches for the wall length. Set the height to 0.5 inches.
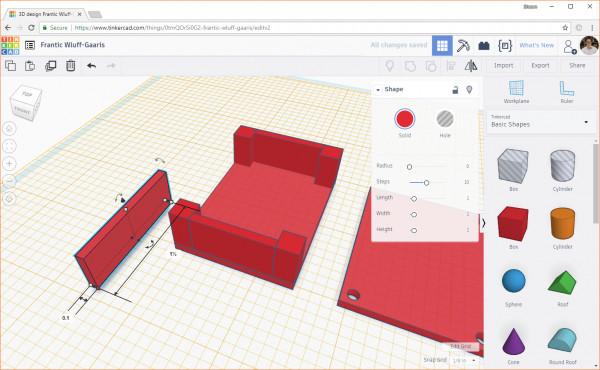 Creating a new wall object in Tinkercad
Alt text: Screenshot of a new box shape created in Tinkercad, with dimensions adjusted to form a longer wall segment for a 3D enclosure design.
Rotate this wall as needed and align it between the posts along the longer side of the enclosure.
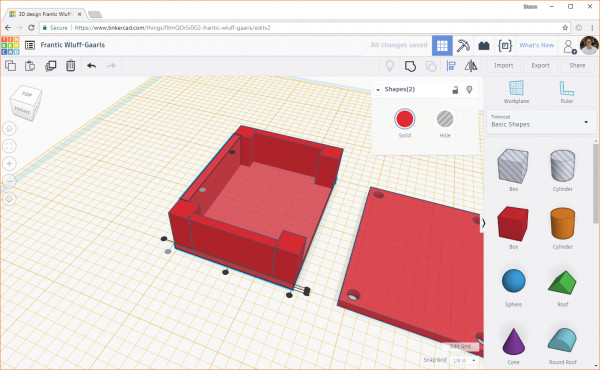 Rotating and aligning the wall with the rest of the design in Tinkercad
Alt text: Screenshot showing the rotation and alignment of a wall segment to fit between posts in a 3D enclosure design in Tinkercad, completing one side of the enclosure wall.
Duplicate this wall and move the copy to the other long side of the box, completing the enclosure walls.
 Completing the construction of the fourth wall in Tinkercad
Alt text: Screenshot displaying the completed fourth wall of a 3D enclosure in Tinkercad, with all wall segments and corner posts in place, forming the basic box structure.
Adding Screw Holes to the Posts
Drag a Cylinder (Hole) shape to the workplane. Change both its length and width dimensions to 0.1 inches. This will create the tap holes for our #4-40 screws in the posts.
 Adding a cylinder hole object to a design in Tinkercad
Alt text: Screenshot of a cylinder ‘hole’ shape being added to the Tinkercad workplane, intended for creating screw holes in a 3D design.
Note: The height of the hole cylinder should be sufficient to pass through the height of the posts. For our 0.5-inch posts, the default cylinder height is adequate.
Use the Align tool to center the cylinder hole in the middle of one of the posts.
 Aligning the cylinder hole object with a solid object in Tinkercad
Alt text: Screenshot demonstrating the alignment of a cylinder ‘hole’ shape to the center of a solid post in Tinkercad, preparing to create a centered screw hole.
Duplicate the cylinder hole three times and align each copy to the center of the remaining posts.
 alt text
Alt text: Screenshot showing four cylinder ‘hole’ shapes aligned to the centers of each post in a 3D enclosure design in Tinkercad, ready for creating screw holes.
Select one post and its corresponding cylinder hole. Click the Group button to subtract the hole from the post, creating the screw hole.
 Click the Group button in Tinkercad to subtract a hole object from a solid object
Alt text: Screenshot highlighting the ‘Group’ button in Tinkercad after selecting a post and a cylinder ‘hole’, initiating the subtraction process to create a screw hole in the post.
Repeat this grouping process for the other three posts and their respective cylinder holes.
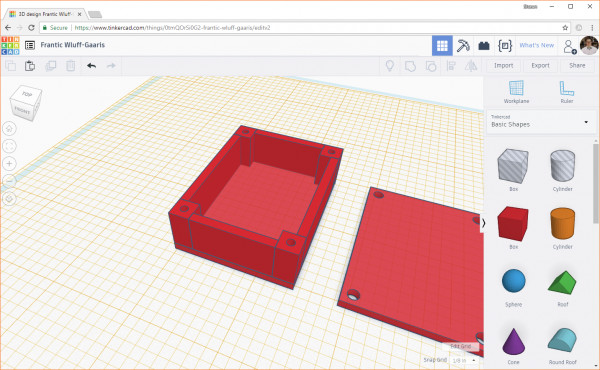 Drill holes in the posts to create screw holes in Tinkercad
Alt text: Screenshot displaying the completed screw holes in all four posts of a 3D enclosure in Tinkercad, achieved by grouping cylinder ‘hole’ shapes with the solid posts.
Rotate the view to confirm that the holes are drilled through the posts but not through the base. This is because we set the workplane on top of the base, and shapes created on this workplane extend upwards from it.
Finalizing and Exporting Your 3D Model
You could technically print the base and lid as separate objects now, but grouping the components of the base ensures they are treated as a single solid object by the slicer software.
To reset the workplane to its default position, click the Workplane button and then click anywhere on the default blue workplane.
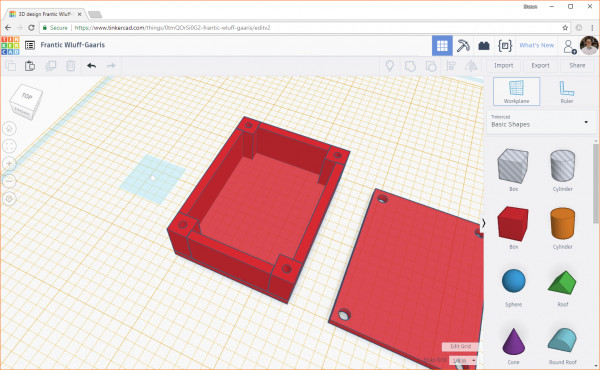 Reset the workplane in Tinkercad
Alt text: Screenshot demonstrating how to reset the workplane to its default position in Tinkercad by selecting the workplane tool and clicking on the original blue workplane.
Click to reset the workplane, and it should revert to blue.
 Wokplane returned to its original position in Tinkercad
Alt text: Screenshot showing the Tinkercad workplane returned to its default blue grid, indicating the workspace is reset for further design operations or export.
Select all components of the enclosure base (base plate, posts, and walls).
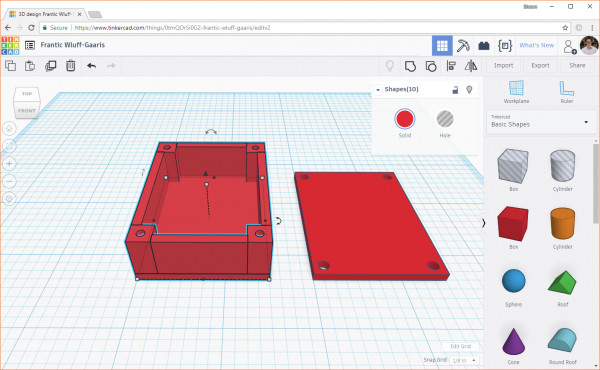 Highlighting all the components in the base of the enclosure in Tinkercad
Alt text: Screenshot highlighting all components of the base of a 3D enclosure design in Tinkercad, preparing to group them into a single solid object.
Click the Group button to combine them into a single solid shape.
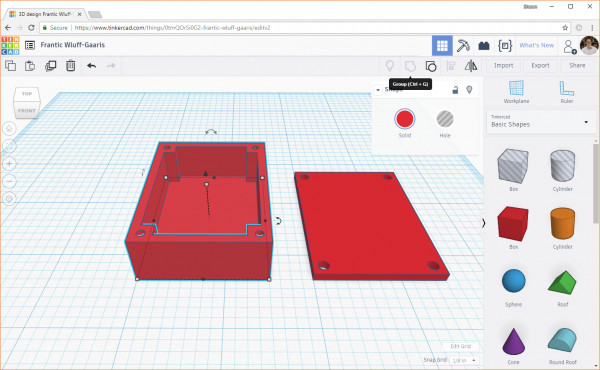 Multiple objects in Tinkercad grouped into one shape
Alt text: Screenshot showing multiple shapes in Tinkercad grouped together into a single cohesive object, simplifying the design and preparing it for export or further operations.
To verify screw hole alignment, you can temporarily move the lid onto the base and check the alignment visually. Use the Align tool to precisely position the lid on top of the base. You might need to slightly raise the lid in the Z-direction to prevent overlap.
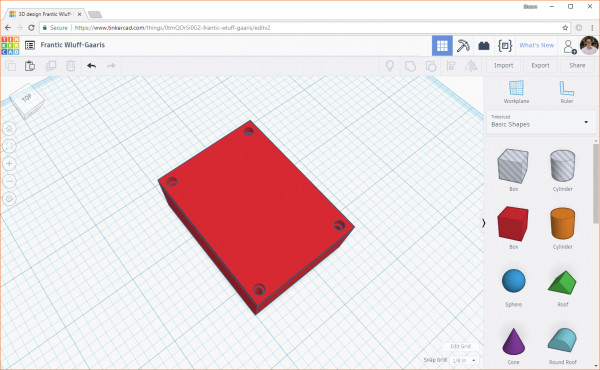 Verifying that the holes line up in Tinkercad
Alt text: Screenshot demonstrating the verification of hole alignment in a 3D enclosure design in Tinkercad by visually checking the alignment of lid and base screw holes.
Rotate the view around each hole to confirm alignment. Once verified, use the Undo button (Ctrl+Z or Cmd+Z) to separate the lid and base again.
To prepare your design for 3D printing, you need to export it as a .stl file, a standard format for 3D printing. Click the Export button in the top right corner of Tinkercad. In the export dialog, select .STL format. The file will be downloaded to your computer.
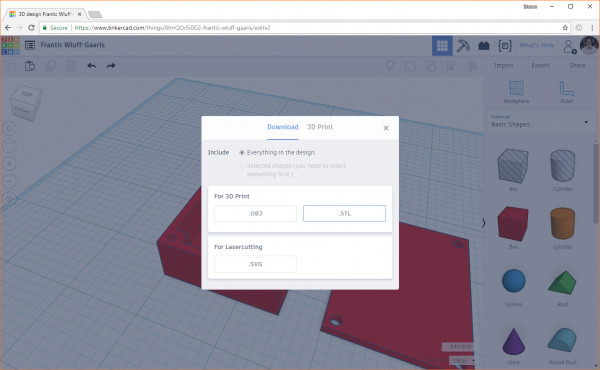 Export your design from Tinkercad as a .stl file to a Slicer program for 3D printing
Alt text: Screenshot showing the Tinkercad export dialog with ‘.STL’ file format selected, preparing a 3D model for slicing and 3D printing.
Preparing Your Model with a Slicer
A slicer program converts your 3D model (.stl file) into layers that a 3D printer can understand and print. It generates machine code (G-code) that controls the printer’s movements, temperature, and material extrusion.
Note: This tutorial uses Cura LulzBot Edition, designed for LulzBot printers. If you’re using a different printer, you’ll need a slicer compatible with your machine. Many slicers are available, including popular options like PrusaSlicer, Simplify3D, and others. This resource lists various slicer programs.
Download Cura LulzBot Edition from:
Install the software following the on-screen instructions.
When you first launch Cura, it may prompt you to select your 3D printer. If not, go to Settings > Printer > Add Printer…. Choose LulzBot TAZ 5 (or your LulzBot model) and click Add Printer.
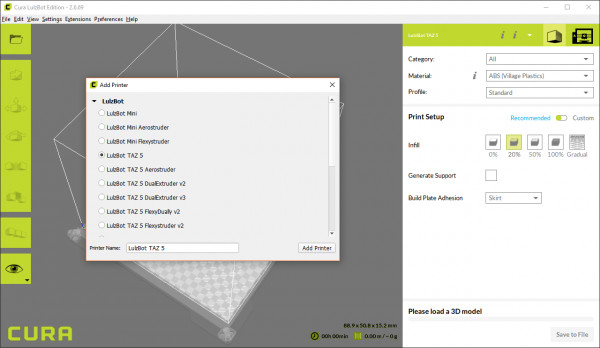 Selecting a printer from Cura LulzBot Edition
Alt text: Screenshot of Cura LulzBot Edition software interface, highlighting the printer selection dialog where users can choose their specific LulzBot 3D printer model.
Go to File > Open File(s)…, select your exported .stl file, and click Open.
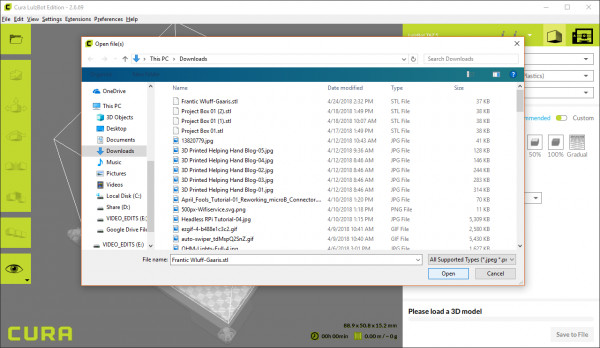 Opening a .stl file in Cura to slice
Alt text: Screenshot showing the ‘Open File(s)’ option in Cura’s file menu, used to import a .stl file of a 3D model into the slicer software for print preparation.
Your model will appear on the virtual print bed in Cura. You can drag it to reposition it on the bed, which is useful for printing multiple parts simultaneously.
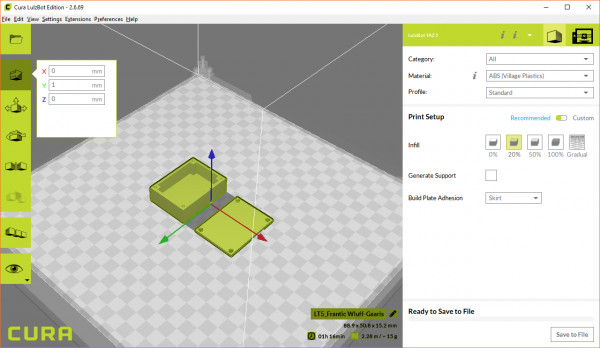 Moving the part to the middle of the print bed in Cura
Alt text: Screenshot displaying a 3D model positioned on the virtual print bed in Cura software, ready for slicing and preparation for 3D printing.
In the right-hand settings panel, under Category, ensure All is selected to view all settings. Under Material, choose the type of filament you’ll be using for printing. For example, if using ABS plastic from IC3D, select the appropriate profile.
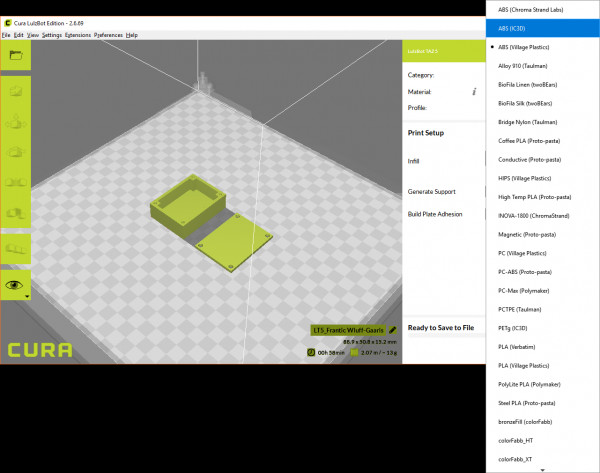 Selecting your material in Cura
Alt text: Screenshot of Cura’s settings panel showing the ‘Material’ dropdown menu, where users can select the type of 3D printing filament they will be using, such as ABS or PLA.
For Profile, you can use the High Speed setting for functional prints like enclosures. For aesthetic prints, consider Standard or High Quality.
For screw holes to tap effectively, set Infill to at least 50%. Infill is the density of material inside the printed part. 0% infill would result in a hollow print.
Disable Support for this enclosure design, as it doesn’t require support structures. Support material is used for overhanging features that would otherwise print in mid-air.
Under Build Plate Adhesion, while Skirt is a default option, for larger, flat prints with materials like ABS, Brim is recommended. A brim is an extra layer printed around the base of the part to improve bed adhesion and prevent warping. For more information on skirts, brims, and rafts, see this article.
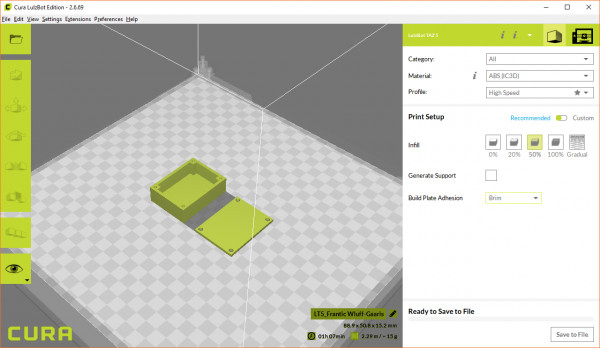 Configure settings to print our enclosure in Cura
Alt text: Screenshot of Cura’s print settings panel, configured for an enclosure print, showing material selection, infill percentage, support settings, and build plate adhesion type.
To print, you’ll need to save the G-code file to an SD card. Click Save to File in the lower right corner. Navigate to your SD card drive and save the G-code file. Remember the filename for printer selection later.
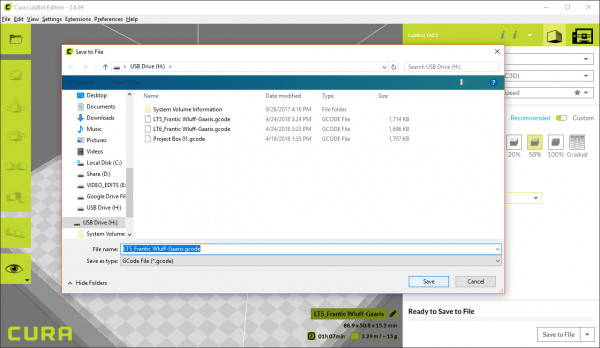 Export g-code from Cura for our 3D printer
Alt text: Screenshot indicating the ‘Save to File’ button in Cura, used to export the prepared G-code file to a storage medium like an SD card for 3D printing.
3D Printing Your Project Box
With the G-code file saved on your SD card, you’re ready to print!
Note: These instructions are for a LulzBot TAZ 5. Operation may vary for other 3D printer models. Consult your printer’s manual for specific printing instructions.
Before printing, choose your filament material. ABS and PLA are commonly recommended for beginners. Nick’s video provides a comparison of different 3D printing materials:
Preheating Your Printer
The extruder needs to reach the correct temperature to melt the filament, and the print bed needs to be heated to maintain temperature and prevent warping, especially with materials like ABS.
On your LulzBot TAZ, press the control knob to access the menu. Rotate to select Prepare and press again. Select Preheat PLA or Preheat ABS based on your filament type. Press again to start preheating.
Caution! Always preheat to the temperature recommended for your filament. Check your filament spool for material type and temperature recommendations.
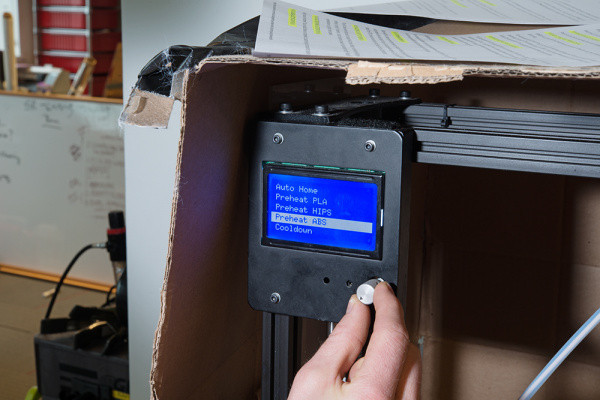 Preheat your 3D printer for your selected material
Alt text: Close-up photo of a LulzBot 3D printer’s control panel, showing the ‘Prepare’ menu option highlighted, used to initiate the preheating process for 3D printing.
Wait 5-10 minutes for the extruder and bed to reach the target temperatures. Monitor the LCD for current and target temperatures. Once they match, proceed to the next step.
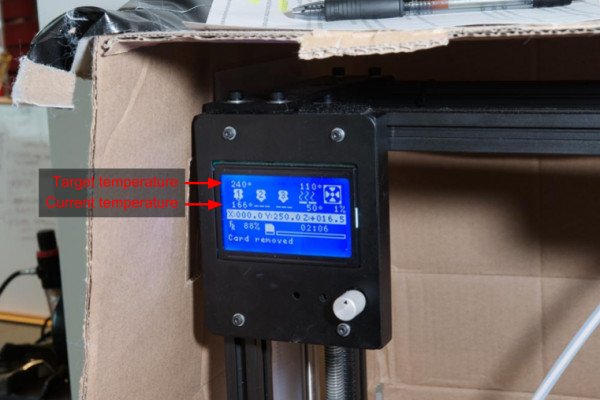 Monitoring the temperature rise while preheating a 3D printer
Alt text: LCD screen of a 3D printer displaying temperature readings during the preheating phase, showing the current and target temperatures for both the extruder and the print bed.
Optional: Changing Filament
After preheating, you can change filament if needed.
Important: When switching material types (e.g., ABS to PLA), preheat to the higher temperature material first (ABS). This helps clear the nozzle of the previous material before switching to the new material’s temperature.
To remove filament, gently squeeze the idler latch against the extruder bolt heads and flip it up. Rotate the idler assembly down for access to the filament feed.
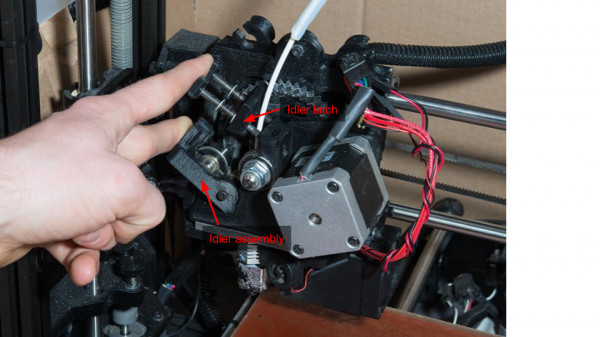 Opening the idler assembly to replace the filament in a LulzBot
Alt text: Photo showing the idler assembly of a LulzBot 3D printer being opened to access the filament path for material replacement, a step in filament change procedure.
Carefully pull the filament out of the extruder.
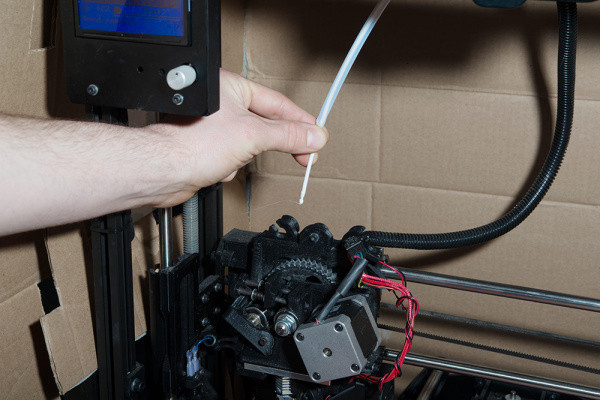 Exchanging the filament in a LulzBot TAZ 5 printer
Alt text: Photo of filament being manually pulled out of the extruder of a LulzBot TAZ 5 3D printer during a filament change operation.
Hold the spool and gently pull the filament out through the feed tube. Wrap it around the spool for storage.
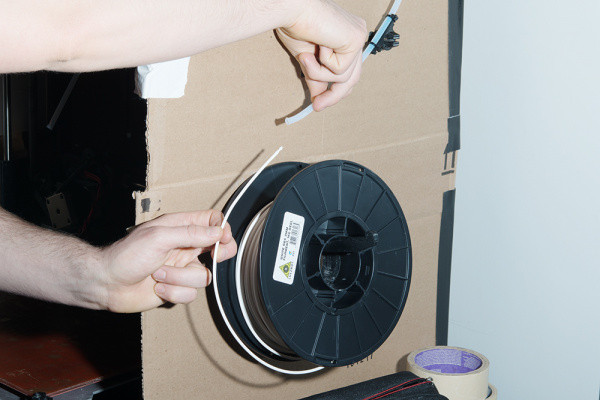 Pulling the filament out of a 3D printer
Alt text: Photo demonstrating the removal of filament from a 3D printer by pulling it out from the feed tube, part of the filament replacement process.
Load the new filament onto the spool holder. Feed the filament through the feed tube until it reaches the extruder.
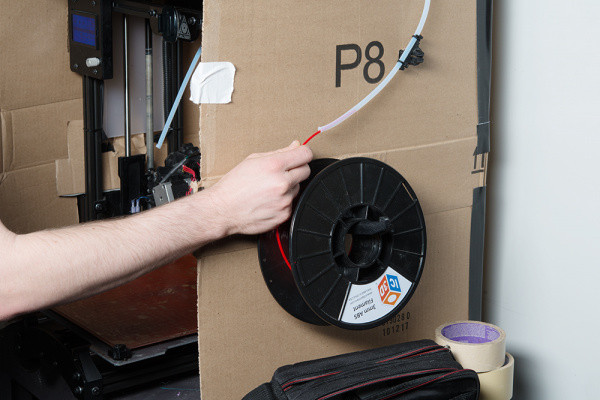 Feeding filament to a 3D printer
Alt text: Photo of new filament being fed into the feed tube of a 3D printer, initiating the filament loading process for 3D printing.
Insert the filament end into the extruder feed hole. Apply gentle pressure to manually feed it through. It should melt and extrude from the nozzle. Initially, you may see the old material/color extruding. Continue feeding until the new material color appears consistently (this may take 10-20 seconds).
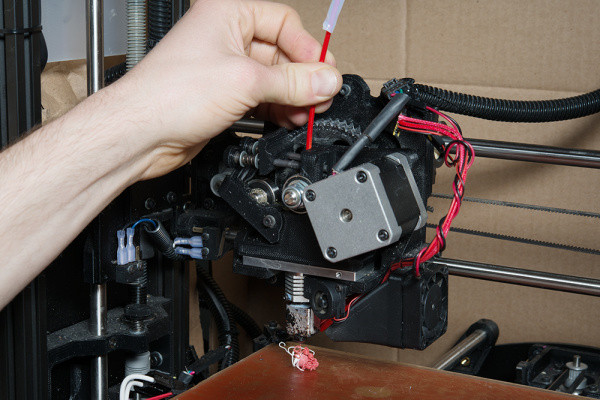 Changing filament colors in a 3D printer
Alt text: Photo showing new colored filament extruding from a 3D printer nozzle, indicating a successful filament change and purging of the previous material.
Use tweezers to remove extruded filament.
Danger! The nozzle is hot. Do not touch it directly.
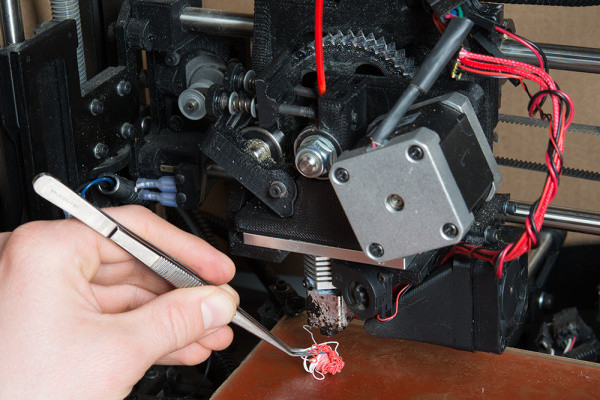 Removing excess material from a 3D printer after replacing material
Alt text: Photo of tweezers being used to carefully remove excess extruded filament from a hot 3D printer nozzle after a material change, ensuring a clean start for printing.
Return the idler assembly to its position (new filament should fit into the idler notch). Swing the idler latch down to secure it.
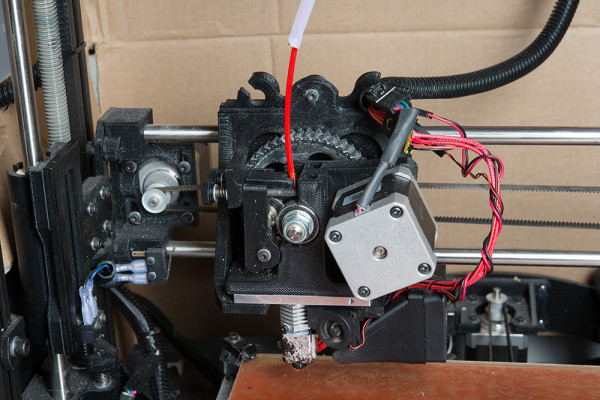 Lock the new material in place with the idler assembly and latch
Alt text: Photo showing the idler assembly and latch of a 3D printer being closed to secure the new filament in place, completing the filament loading process.
Starting the Print
Insert the SD card into the printer.
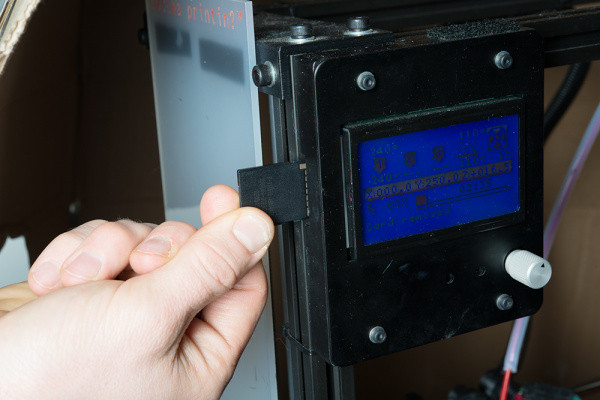 Insert the SD card in your 3D printer
Alt text: Photo of an SD card being inserted into the card slot of a 3D printer, loading the print file for initiating the 3D printing process.
Press the control knob, select Print from SD, and press again.
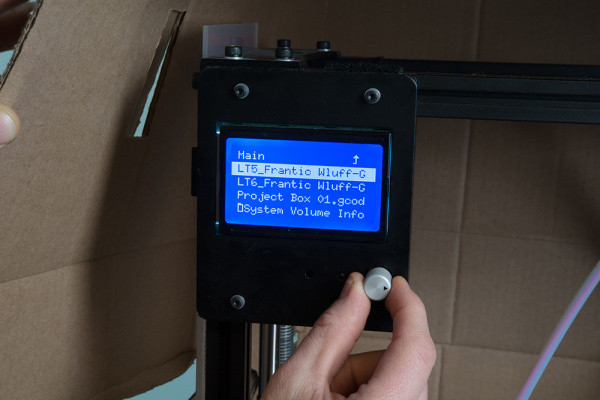 Select your file to print
Alt text: LCD screen of a 3D printer displaying the ‘Print from SD’ option highlighted in the menu, used to select and initiate printing from files stored on an SD card.
Select your .gcode file (verify filename) and press the knob. The printer will auto-calibrate and start printing.
Monitor the first few minutes of printing to ensure proper first layer adhesion. The skirt/brim may not print perfectly initially, but the object’s first layer should stick to the bed. Cancel print only if the object’s first layer fails to adhere.
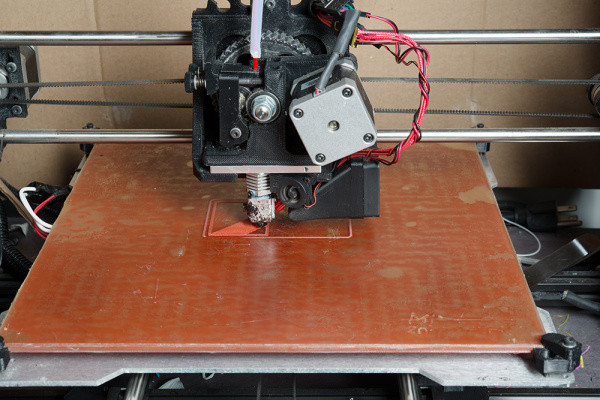 3D printer creating the skirt and first layer
Alt text: Time-lapse photo of a 3D printer laying down the initial skirt and first layer of a print, crucial for ensuring proper adhesion to the print bed.
The slicer or printer will estimate print time (around 1.5 hours for our box). Set a timer and check back later. After printing, allow the printer to cool down automatically. Use a flat object (clam knife) to carefully remove the printed parts from the bed.
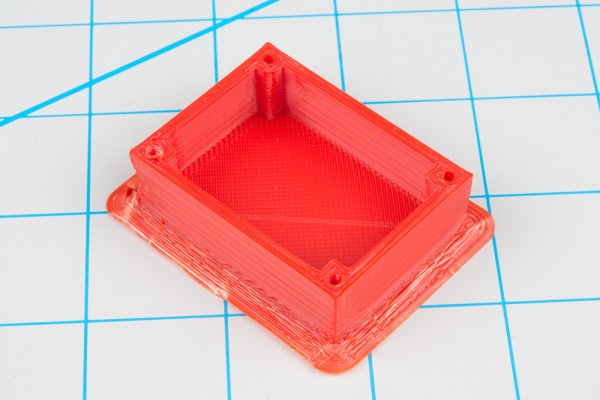 3D printed enclosure with brim
Alt text: Photo of a completed 3D printed enclosure still attached to the print bed, surrounded by a brim, showing the finished product fresh off the printer.
Assembling Your 3D Printed Box
Use a hobby knife or clippers to trim off any excess material like the brim. Sand rough edges if desired.
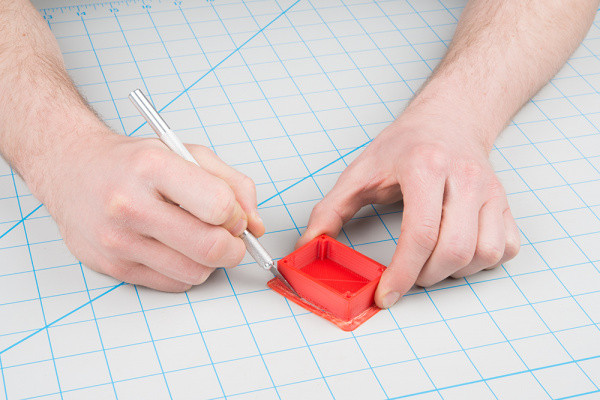 Trimming off the brim of a 3D printed object
Alt text: Photo of a hobby knife being used to trim away the brim from a 3D printed object, cleaning up the edges for a finished look.
Since we didn’t design mounting holes for the Arduino Pro Mini, use double-sided tape or hot glue to secure it inside the box. Servo tape works well. Cut a piece to fit the PCB back, remove the backing, and press the board into the box. Use multiple layers if needed for component clearance.
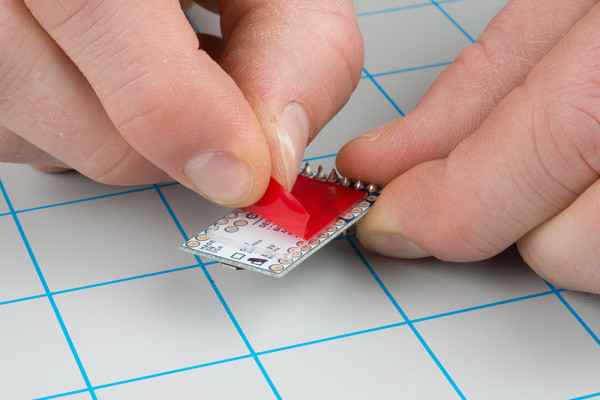 Applying servo tape to the back of an Arduino Pro Mini
Alt text: Photo of servo tape being applied to the back of an Arduino Pro Mini PCB, preparing it for mounting inside a 3D printed enclosure using adhesive.
Place the lid on the box and use #4-40 screws (ideally self-tapping, ~3/8 inch length, but 1/4 inch machine screws can work) to secure it. Tighten screws with a screwdriver.
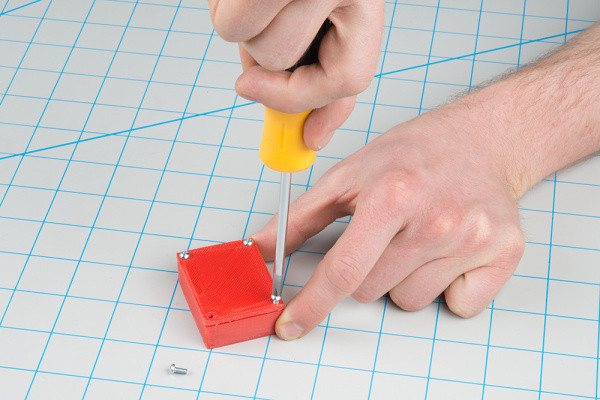 Securing the box lid with screws
Alt text: Photo of screws being used to fasten the lid onto a 3D printed project box, securing the enclosure and its electronic components.
Your custom-designed, 3D printed enclosure is complete!
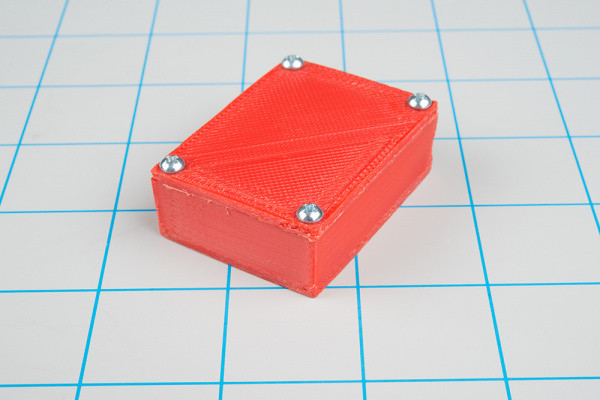 Completed 3D printed enclosure
Alt text: Final photo showcasing the fully assembled 3D printed enclosure, complete with lid and screws, demonstrating a successful DIY electronics project housing solution.
While this simple box is for a Pro Mini, you now have the foundation to design larger boxes, add ports, mounting holes, and customize enclosures for any project.
Troubleshooting Common 3D Printing Issues
3D printing, while increasingly accessible, can still present challenges. Refer to your printer’s manual for specific troubleshooting and maintenance.
Warping
Warping, or lifted corners, often occurs due to material cooling and shrinkage, especially with ABS.
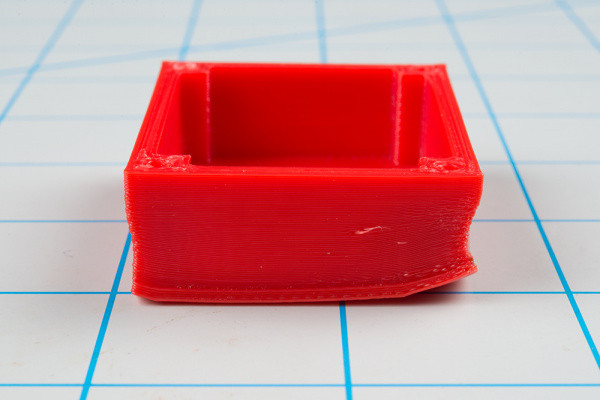 Warping on a 3D printed part
Alt text: Photo showing a 3D printed part with noticeable warping at the corners, a common issue in 3D printing caused by material shrinkage and cooling.
Try switching to PLA or using a brim or raft in your slicer settings.
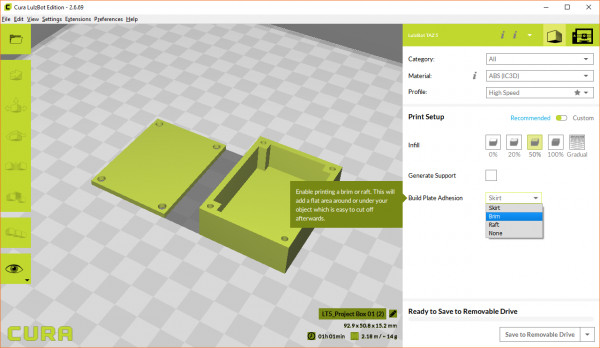 Choosing to add a brim in Cura
Alt text: Screenshot from Cura software highlighting the ‘Brim’ option in the build plate adhesion settings, a feature used to prevent warping in 3D prints.
A brim increases first layer adhesion, while a raft provides a base platform for prints with poor bed adhesion.
Uneven Bottom Surface
Bubbles on the print bed can lead to uneven prints.
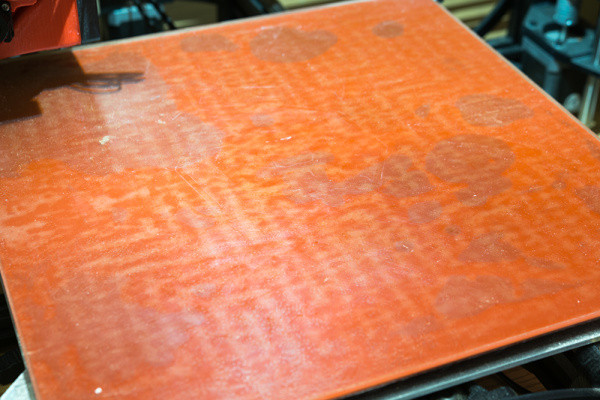 Bubbles on a 3D printer bed
Alt text: Close-up photo of bubbles forming on a 3D printer bed surface, indicating potential issues with bed adhesion and surface flatness for 3D printing.
Large bubbles usually indicate the PEI bed surface needs replacement. Consult your printer’s manual for bed replacement instructions.
Uneven or Peeling Layers
Drafts of cool air can cause uneven or peeling layers.
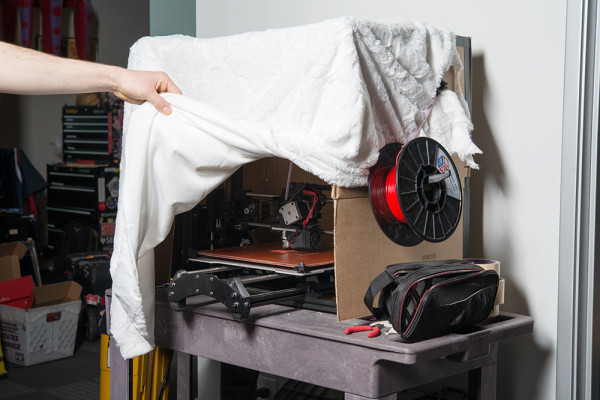 3D printer inside an enclosure to prevent air drafts
Alt text: Photo of a 3D printer enclosed in a protective housing to prevent air drafts, a common practice to improve print quality by maintaining consistent temperature.
Move your printer away from drafts or use an enclosure to maintain a stable printing environment.
Filament Not Extruding
Possible causes include:
- Incorrect extruder temperature.
- Filament blockage.
- Insufficient idler tension.
Ensure the extruder is at the correct temperature. Manually push filament to check for flow. Adjust idler latch tension to improve filament grip. If switching materials, preheat to the higher melting point material temperature to clear the nozzle.
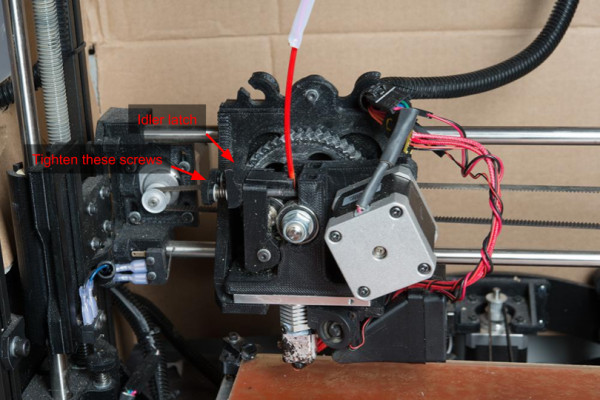 Tighten the screws on the idler latch on a TAZ 5 to get the filament to flow
Alt text: Close-up photo highlighting the screws on the idler latch of a LulzBot TAZ 5 3D printer, indicating adjustment points for filament tension to ensure consistent extrusion.
Further Troubleshooting
For more issues, consult printer-specific forums or online troubleshooting guides like:
Simplify3D – Print Quality Troubleshooting Guide
Expanding Your 3D Printing Skills
This tutorial provided a foundation for using Tinkercad and 3D printing. Experiment with Tinkercad to create your own designs and explore more advanced techniques.
For inspiration and further learning, check out these tutorials:
GPS Differential Vector Pointer
Interactive 3D Printed LED Diamond Prop
Getting Started with 3D Printing Using Tinkercad
Wireless Timing Project
Explore these blog posts for project ideas:
Enginursday: An Interactive, 3D Printed, LED Diamond Prop
Friday Product Post: Rise of the Machines!
Tinkering with Linear Motion: How to build a MicroMod Rail Car
Open Sauce Recap
Start designing and printing your own custom creations with Tinkercad and 3D printing!

