The Print Spooler is a Windows service that manages the printing process. It temporarily stores print jobs and sends them to the printer. Occasionally, the Print Spooler may encounter issues, leading to printing problems. Restarting the Print Spooler service can often resolve these issues and get your printer working again. This guide will show you how to easily restart the print spooler on various Windows versions to get you back to printing smoothly.
Restarting the Print Spooler on Windows 10 and Windows 11
For users with Windows 10 or Windows 11, the process to restart the print spooler is straightforward using the Services console. Here’s how to do it:
-
Access the Run dialog: Right-click the Start button located at the bottom left of your screen. In the menu that appears, select Run.
-
Open Services console: In the Run dialog box, type services.msc and click OK. This command will open the Services console, where you can manage various Windows services.
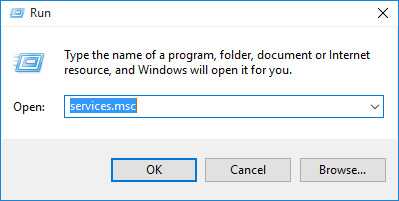 Run dialog box with services.msc entered
 -
Locate Print Spooler service: Scroll down the list of services until you find Print Spooler. Click on it to select.
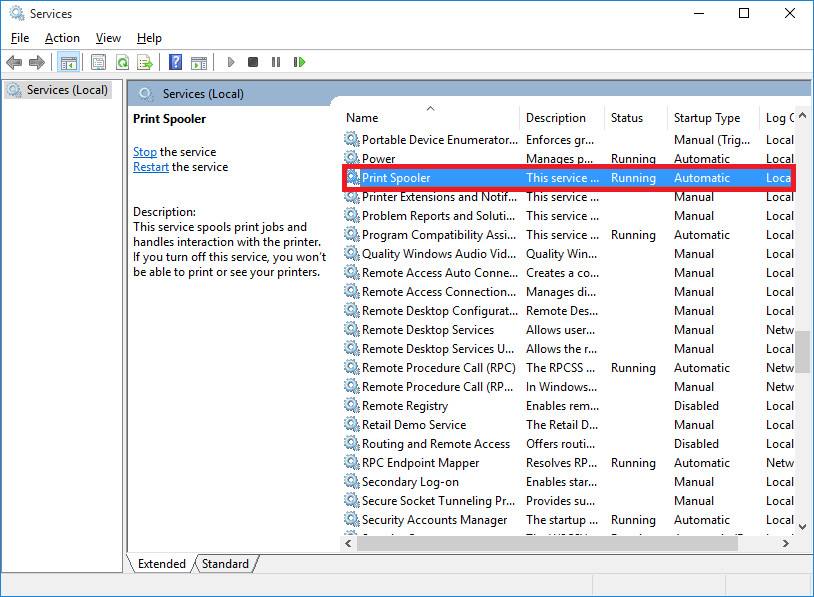 Print Spooler service highlighted in Services console
 -
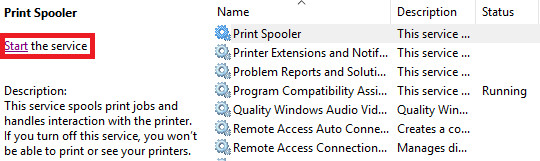
Restart the service: On the left side of the Services window, you will see options to manage the selected service. Click on Restart the service.
 Restart the service option highlighted for Print Spooler
 -
Wait for restart: Windows will now attempt to restart the Print Spooler service. You can observe the status changing and then returning to Running.
Once the status shows “Running” again, the Print Spooler service has been successfully restarted. Try printing again to see if your issue is resolved.
Stopping and Starting the Print Spooler on Windows 10 and Windows 11
Sometimes, a simple restart isn’t enough. In such cases, stopping and then starting the Print Spooler service can be more effective. Here’s how to do it on Windows 10 and 11:
How to Stop the Print Spooler
-
Locate Print Spooler service: Follow steps 1-3 from the “Restarting” section above to find and select the Print Spooler service in the Services console.
Print Spooler service highlighted in Services console -
Stop the service: Click on Stop the service located at the top-left of the window.
 Stop the service option highlighted for Print Spooler
 -
Verify service stopped: Windows will attempt to stop the service. Once stopped, the Status column for Print Spooler will be blank, indicating it is no longer running.
How to Start the Print Spooler
-
Locate Print Spooler service: Ensure Print Spooler is still selected in the Services console. If not, find and select it again.
Print Spooler service highlighted in Services console -
Start the service: Click on Start the service from the options on the left.
 Start the service option highlighted for Print Spooler
 -
Verify service started: Windows will attempt to start the service. Once started, the Status column for Print Spooler will show Running.
Alternatively, restarting your computer will automatically start the Print Spooler service if its Startup Type is set to Automatic, which is the default setting. You can check the Startup Type in the Services console.
Restarting the Print Spooler on Windows 8
If you are using Windows 8, the process is slightly different to access the Services console, but the steps to restart the Print Spooler are similar afterwards.
-
Access Search: Move your mouse cursor to the bottom-right or top-right corner of the screen to bring up the Charms bar. Click on the Search icon.
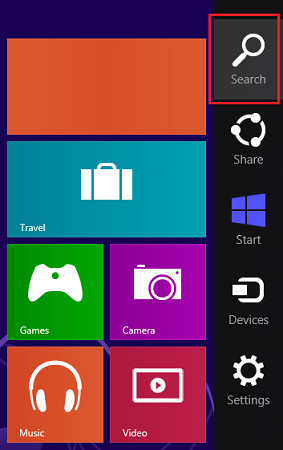 Search icon in Windows 8 Charms bar
 -
Open Local Services: In the Search bar, type Local Services. Click on Settings below the search bar, and then click on View local services. This will open the Services console.
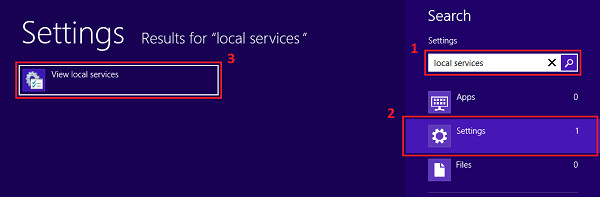 Local Services option in Windows 8 search settings
 -
Restart, Stop, or Start the service: Once in the Services console, follow the same steps as outlined for Windows 10 and 11 to locate, restart, stop, or start the Print Spooler service. The options and interface within the Services console are consistent across these Windows versions.
Restart the service option highlighted for Print Spooler
Restarting the Print Spooler on Windows 7
For Windows 7 users, accessing the Services console is similar to Windows 10 and 11.
-
Access Run: Click on the Start button, and then click on Run.
-
Open Services console: Type services.msc in the Run dialog box and click OK to open the Services console.
-
Restart, Stop, or Start the service: Within the Services console, find the Print Spooler service and use the Restart the service, Stop the service, or Start the service options as needed, just like in Windows 10, 11, and 8.
Restarting the Print Spooler is a common and effective first step in troubleshooting printer problems on Windows. By following these steps for your specific version of Windows, you can quickly manage the Print Spooler service and resolve many printing issues. If restarting the spooler doesn’t fix your problem, you may need to investigate other printer troubleshooting steps, such as checking printer drivers or hardware connections.