
Need to capture and print what’s on your screen in Windows 10? Taking a screenshot is a fundamental skill, whether you’re documenting an error message, sharing online content, or simply wanting a hard copy of something you see on your monitor. Windows 10 offers several built-in methods to capture your screen, and this guide will walk you through the easiest way using the Print Screen key, and how to get that digital image onto paper.
Understanding the Print Screen Key on Windows 10
The Print Screen key, often labeled as PrtScr, PrntScrn, or similar variations on your keyboard, is your gateway to capturing screenshots in Windows. Its location can vary slightly depending on whether you are using a desktop or a laptop.
On desktop keyboards, you’ll typically find the Print Screen key nestled in the upper right-hand corner, often near the F12 key and the Scroll Lock key.
Figure 1: Illustration of the print screen key on a Dell KM5221W wireless keyboard
 Dell KM5221W wireless keyboard print screen key location
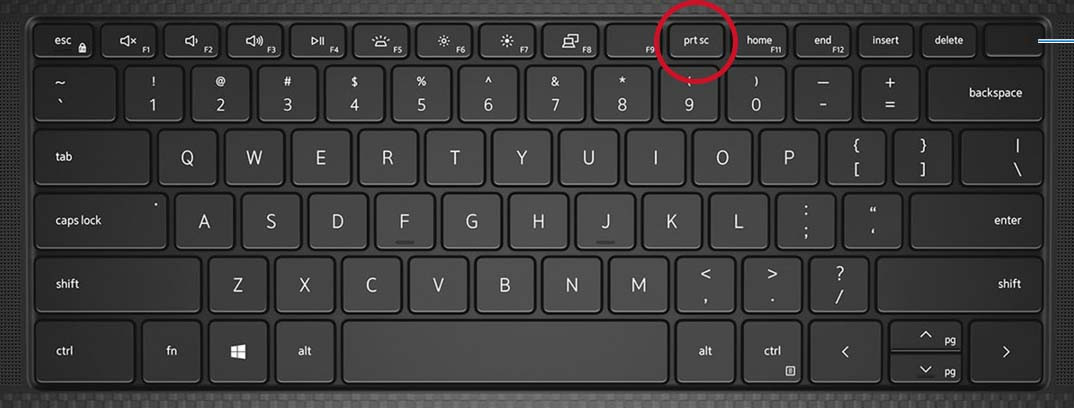
For laptop keyboards, the Print Screen key is commonly found within the Function key row (F1 to F12). You might need to press the Fn (Function) key in combination with the Print Screen key (often F10 or another F-key) to activate the screenshot function. Some laptops might even label the Print Screen function directly on a Function key. Refer to your laptop’s manual if you are unsure. Some compact laptop keyboards may require using Fn + Insert for Print Screen functionality.
Figure 2: Illustration of the print screen key on a Dell Precision 5550 mobile workstation keyboard
Dell KM5221W wireless keyboard print screen key location
Figure 3: Illustration of a laptop with a capacitive Function Key row
Now that you’ve located the Print Screen key, let’s explore how to use it to capture different types of screenshots in Windows 10.
Steps to Capture and Print a Screenshot on Windows 10
Windows 10 provides flexibility in capturing your screen. Here’s how to take different types of screenshots and prepare them for printing:
1. Capture the Entire Screen
To grab a snapshot of everything visible on your monitor, simply press the Print Screen key. Windows will automatically copy the entire screen image to your clipboard. For some tablets and devices, you may need to press the Windows logo key + PrtScr keys together, or the Windows logo button + volume down button. In these cases, the screenshot is often automatically saved as a file in your Pictures > Screenshots folder.
2. Capture All Active Windows
If you have multiple windows open and want to capture all of them as a single screenshot, just press the PrtScr key. Similar to capturing the entire screen, this will copy the image of all your active windows to the clipboard.
3. Capture a Single Active Window
To focus on just one window, first, make sure the window you want to capture is active (click on it). Then, press the Alt + PrtScr keys simultaneously. This command captures only the currently active window and copies it to your clipboard.
4. Pasting and Printing Your Screenshot
After capturing your screenshot using any of the methods above, the image is temporarily stored in your clipboard. To print it, you need to paste it into an application that allows printing images, such as:
- Paint: A basic image editor included with Windows.
- Microsoft Word or other word processors: Ideal if you want to add text or incorporate the screenshot into a document.
- Image editing software (like Photoshop or GIMP): For more advanced editing before printing.
Here’s how to paste and print using Paint as an example:
- Open Paint from the Windows Start Menu.
- Press Ctrl + V to paste the screenshot into Paint.
- (Optional) Use Paint’s tools to crop, annotate, or make other edits to your screenshot.
- Click File and then Print to send your screenshot to your printer.
The process is similar for other applications. Simply open your chosen application, paste the screenshot (Ctrl + V), and then use the application’s print function.
Beyond Print Screen: Exploring Other Screenshot Tools
While the Print Screen key is quick and easy, Windows 10 also offers more powerful screenshot tools like the Snipping Tool or Snip & Sketch. These tools allow for more control, such as capturing specific regions of your screen or annotating screenshots before saving or printing. Exploring these tools can further enhance your screenshot capabilities on Windows 10.
Conclusion
Printing a screenshot on Windows 10 is a straightforward process thanks to the Print Screen key. By understanding how to capture your entire screen, active windows, or a single window, and then pasting your capture into a printable application, you can easily create hard copies of your digital screen content. Whether for work, study, or personal use, mastering the Print Screen function is a valuable skill for any Windows 10 user.