What if I told you that you could unlock a world of artistic fun with something incredibly simple? Get ready for butterfly symmetry painting using Butterfly Print Outs! This amazing art activity is incredibly easy, captivating for all ages, and results in stunning, wall-worthy creations.
I still remember the pure joy on my child’s face as we unfolded our first butterfly, revealing the magical symmetrical design. It’s an experience that’s as rewarding for adults as it is for kids. Inspired by a humble cabbage butterfly in our garden, we embarked on this creative adventure to capture the delicate beauty and perfect symmetry of butterfly wings.
While we initially used watercolor paints, don’t limit yourself! Acrylic paints and even oil pastels can create fascinating variations. We even repurposed marbled paper from previous projects by cutting out butterfly shapes – a fantastic way to give leftover art materials a new life.
The core of this project is wonderfully straightforward: simply use a butterfly print out or template, apply paint to one side, fold it over, and press. It truly doesn’t get any simpler than that!
A vibrant butterfly symmetry painting created with watercolors, showcasing the beautiful, mirrored effect achieved using a simple folding technique.
To make things even easier for you, I’ve created a free butterfly template that you can print out (link below). You can trace around it, or encourage your kids to fold paper and cut out their own unique butterfly shapes.
Gather Your Supplies for Butterfly Print Out Symmetry Painting
Here’s everything you’ll need to dive into this captivating art project using your butterfly print outs:
- Paper: Copy paper, sturdy cardstock, or watercolor paper all work wonderfully.
- Paints: Watercolor palettes are great for washes, but acrylic or liquid watercolors offer bolder results. Consider Crayola washable kids paints for easy cleanup!
- Scissors: For cutting out your butterfly shapes from the print outs.
- Spoons or Paintbrushes: For applying the paint.
Step-by-Step Guide: Creating Butterfly Symmetry with Print Outs
Let’s bring these butterfly print outs to life with color and symmetry!
Step 1: Prepare Your Butterfly Print Outs
Start by using the FREE butterfly template available here. Print out as many as you need. Alternatively, fold paper in half and let kids draw and cut their own butterfly shapes for unique variations. Having a mix of sizes and shapes adds to the fun!
Three paper butterflies cut from a template, ready to be transformed into symmetrical paintings. These templates simplify the process, especially for younger children.
A helpful tip icon encouraging users to prepare multiple butterfly cutouts in advance to keep up with children’s enthusiasm for the art project.
Quick Tip: Cut out several butterfly print outs beforehand. Kids often love to create multiple prints in one go!
Step 2: Apply Paint to One Side
Close-up shot of applying vibrant watercolor paint to one half of a paper butterfly cutout using a paintbrush, preparing it for the symmetry folding process.
Apply paint generously to just one half of your butterfly print out. If using watercolors, make sure the wash is extra wet to aid in transferring the paint effectively when folded.
Step 3: Fold and Press
Action shot of folding a painted paper butterfly in half to create a symmetrical print. The hand pressing down ensures good paint transfer for a clear mirrored image.
Carefully fold your butterfly print out in half, using the center crease as a guide. Press firmly and rub your hand across the paper to ensure the paint transfers to the blank side.
Step 4: Unfold and Reveal the Symmetrical Magic
Now for the exciting reveal! Gently unfold your butterfly to witness the stunning symmetrical wings you’ve created.
A child’s hand gently opening a folded paper butterfly to reveal a beautiful and colorful symmetrical watercolor painting, showcasing the satisfying result of the simple technique.
Two completed butterfly symmetry paintings displayed side-by-side, highlighting the unique and artistic patterns created through the folding and paint transfer method.
Step 5: Repeat and Experiment
A collection of various butterfly symmetry paintings in different colors and patterns, demonstrating the enjoyable and repeatable nature of this art activity.
The beauty of this project is how easily you can repeat and experiment. We created so many butterflies; it became a joyful afternoon of artistic exploration!
Displaying Your Butterfly Print Out Masterpieces
Step 6: Create a Stunning Display
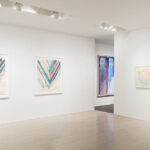
A wall display of numerous colorful butterfly symmetry paintings arranged together, creating a visually striking and vibrant art installation.
With a collection of these beautiful butterfly print out paintings, get creative with your display! Grouping them together on a wall creates an eye-catching art feature. You can also string them up to make a delightful butterfly garland.
More Ideas to Explore with Your Butterfly Print Outs:
Your butterfly symmetry paintings are fantastic on their own, but here are a few more ideas to expand the creative fun:
- Add Details: Use pastels or markers to add finer details to the butterfly wings. Older children can look at real butterfly images for inspiration and add realistic patterns. Or simply draw a cute face and add pipe cleaner antennae.
- Create a Larger Display: If you’ve made many butterflies, arrange them into a larger art installation on a wall or bulletin board.
- Butterfly Paper Crafts: Use your butterfly print out template to cut shapes from other interesting paper art projects you’ve done previously, like marbled paper, to create unique butterfly variations.
I’d love to hear about your butterfly symmetry painting adventures! Let me know if you try this project and share your creations.
For more spring-inspired art fun, be sure to check out our gorgeous spring birds art project!
Until next time, happy creating!