
Capturing what’s on your computer screen, known as taking a screenshot or screen capture, is a fundamental skill for anyone using Windows. Whether you need to share information, create tutorials, or simply record something important, the Print Screen key is your go-to tool. In Windows, the screenshot function is automatically managed through the Print Screen key, often labeled as PrtScr or similar variations on your keyboard. When you press this key, Windows captures an image of your screen and copies it to the clipboard, ready for you to use. This versatile key, sometimes used in combination with other keys, allows you to capture:
- The entire display visible on your screen.
- All windows that are currently active and open.
- Just the specific window you are currently working in.
Once captured, this image is ready to be pasted into various applications, from document editors and email drafts to image editing software like Paint, or even inserted directly into files. Let’s delve into how to effectively use the Print Screen key on your Windows device.
Locating the Print Screen Key on Your Keyboard
The Print Screen key’s location can differ slightly depending on whether you are using a desktop or a laptop computer.
On a standard desktop keyboard, you’ll typically find the Print Screen key situated in the upper right section, often near the function keys (F12) and the scroll lock key. Keep an eye out for labels such as Print Screen, PrtScn, PrntScr, PrtSc, PrtSc, PrtSc, or similar abbreviations. For simplicity, we will refer to it as PrtScr throughout this guide, encompassing all these variations.
It’s worth noting that some specialized keyboards might have unique layouts. For instance, the Dell Wireless Keyboard and Mouse combo, model KM3322W, integrates the Print Screen function with the Insert key. On this model, you would need to press the Fn (Function) key together with the Insert key to initiate a screen capture.
Figure 1: Illustration of the print screen key on a Dell KM5221W wireless keyboard
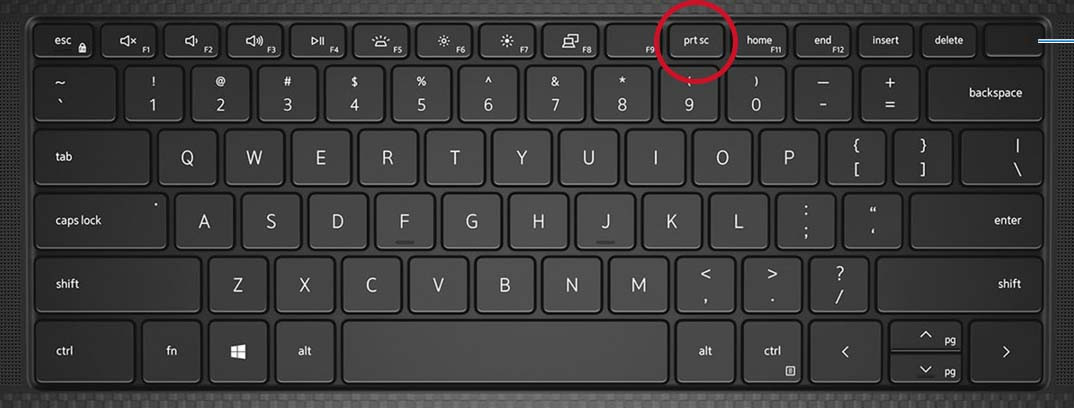 Print Screen Key Location on Dell KM5221W Wireless Keyboard
For laptop keyboards, the Print Screen key is commonly found within the Function key row, often sharing a key with another function, such as F10. To use it as a Print Screen, you will likely need to press the Fn key in conjunction with the designated Function key (e.g., Fn + PrtScr or Fn + F10).
Laptops equipped with capacitive or illuminated Function Key rows may require an additional step. You might need to press the Fn key first to switch the function keys to their secondary functions, which will then illuminate the PrtScr function. Once illuminated, you can press the PrtScr key, possibly with other keys as described below, to take your screenshot. If you’re unsure, consulting your laptop’s user manual can provide specific guidance for your model.
Figure 2: Print Screen Key on Dell Precision 5550 Mobile Workstation Keyboard
Print Screen Key Location on Dell KM5221W Wireless Keyboard
Figure 3: Example of a Laptop with Capacitive Function Keys
It’s important to remember that the precise operation of the Print Screen function can vary slightly between different Windows operating systems. Let’s explore how to use it effectively in Windows 10 and Windows 11.
How to Use the Print Screen Key in Windows 10 and Windows 11
Windows offers several ways to use the Print Screen key to capture different parts of your screen. Here are the common methods:
Capturing the Entire Screen
To take a screenshot of everything visible on your monitor, including all open windows and the taskbar:
- Press the Windows logo key + PrtScr key simultaneously.
For tablet users without a physical keyboard:
- Press the Windows logo button + the volume down button together.
When you use either of these methods, your entire screen is captured, and the image is automatically saved as a file in the Screenshots folder, which is located within your Pictures folder. This is a quick and easy way to save full-screen captures directly.
Capturing All Active Windows
If you want to capture all windows that are currently active and open on your screen, but without saving it directly as a file:
- Simply press the PrtScr key.
This action will capture a screenshot of all your active windows and copy it to the clipboard. You won’t see any visual confirmation that the screenshot has been taken, but it’s there, ready to be pasted.
Capturing a Single Active Window
To focus on just one window you’re currently using, such as a specific application window, and exclude everything else:
- First, click on the window you wish to capture to make sure it is the active window.
- Then, press the Alt + PrtScr keys together.
This will capture only the content of your currently active window and copy it to the clipboard.
Pasting and Utilizing Your Screenshots
After capturing your desired screenshot using any of the Print Screen methods, the next step is to use it. The screenshot is temporarily stored on your clipboard. To make it usable, you need to paste it into an application.
For basic use, image editors like Microsoft Paint (or Paint 3D) are ideal. You can also use more advanced software like Adobe Photoshop or GIMP if you need to edit or manipulate the image further. Here’s how to paste your screenshot:
- Open your chosen application (e.g., Paint).
- Create a new image document (if necessary, Paint usually opens with a blank canvas).
- Use the keyboard shortcut Ctrl + V (press and hold the Ctrl key, then press V) to paste the screenshot into the new document.
Once pasted, you can edit, annotate, crop, or save the screenshot in your preferred image format (like JPEG, PNG, etc.).
For more advanced screenshot options and editing tools directly within Windows, consider using the Snipping Tool or the Snip & Sketch tool (which replaces the Snipping Tool in newer Windows versions). These tools offer more control over the capture area and provide basic annotation features before saving or sharing your screenshots.