
Printing Excel spreadsheets might seem straightforward, but understanding the nuances can save you time and paper. Whether you’re using Excel for the web or the desktop application, knowing the right steps ensures your spreadsheets print exactly as you intend. This guide will walk you through the process of How To Print Excel Spreadsheets effectively, focusing on Excel for the web, and touch upon features available in the desktop version for more advanced needs.
Printing a Worksheet in Excel for the Web
Excel for the web offers a streamlined printing experience. For optimal results, always use the Print command within Excel itself, rather than relying on your browser’s print function. This ensures proper formatting and avoids potential issues. You have the flexibility to print an entire worksheet or just a specific selection of cells.
To print a worksheet, follow these simple steps:
- Select your print area: If you want to print only a portion of your worksheet, click and drag to select the desired range of cells. To print the entire worksheet, simply don’t make any selection.
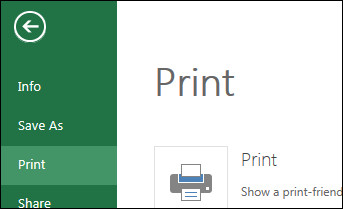
- Navigate to Print: Click on File in the Excel ribbon, then select Print, and finally click Print again.
- Choose Print Options: A print preview screen will appear. If you initially selected a range of cells but now wish to print the entire worksheet, ensure that Entire Workbook is selected in the print options before proceeding.
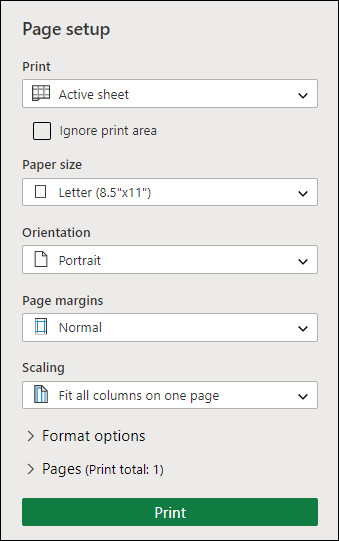 Print setup screen
Adjusting Your Print Selection
Sometimes you might need to modify the area you’ve selected for printing. Excel for the web allows you to easily preview and change your print selection before finalizing the print job.
Here’s how to adjust your print area:
- Select a new range: On your worksheet, click and drag to select the new set of cells you want to print.
- Go to Print again: Select File > Print > Print.
- Verify “Current Selection”: In the Print Options, confirm that Current Selection is chosen if you intend to print only the newly selected area.
- Preview and Print: Review the print preview to ensure it reflects your desired output. If it looks correct, click Print.
To alter the print selection further, simply close the print preview by clicking the “X” and repeat these steps with a different cell selection. Remember, to revert to printing the whole worksheet, ensure Entire Workbook is selected in the print options.
For more advanced print settings, Excel for the web offers an Open in Excel option. This allows you to open your spreadsheet in the desktop application, where you can access a wider range of printing features, such as setting multiple print areas.
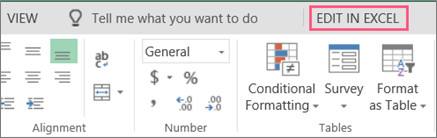 Button to Edit in Excel
Printing Worksheets with Hidden Rows and Columns
When you print an Excel spreadsheet in Excel for the web, any hidden rows or columns are automatically excluded from the printout. If you need to include these hidden elements in your printed document, you must first unhide them.
Hidden rows or columns are often indicated by missing header labels in the row or column headings or by double lines appearing in place of single lines between headers.
To unhide rows or columns and include them in your print:
- Select the surrounding headers: Identify the headers encompassing the hidden rows or columns. For example, to unhide rows 3, 4, and 5, you would select the row headers from row 2 to row 6.
- Unhide: Right-click on the selected headers. From the context menu, choose Unhide Rows (or Unhide Columns if you are unhiding columns).
- Print as usual: Go to File > Print > Print.
- Confirm settings: In the Print Options box, ensure Entire Sheet is selected to print the entire worksheet, including the now unhidden rows and columns. Then, click Print.
Important Note: Row and column labels (like 1, 2, 3 or A, B, C) are not visible in the print preview or the final printout in Excel for the web.
Printing an Entire Workbook
If your Excel for the web workbook contains only a single worksheet, the process to print the worksheet, as described above, is sufficient. However, when dealing with workbooks that have multiple worksheets, you’ll need to print each worksheet individually. Excel for the web does not offer a direct “print entire workbook” option in one go.
To print all worksheets in a multi-sheet workbook, you must navigate to each sheet by clicking on its sheet tab and then printing that worksheet separately.
 sheet tabs
If you’re unsure whether your workbook contains any hidden worksheets, you can easily check:
- Right-click a sheet tab: Right-click on any existing sheet tab within your workbook.
- Check for “Unhide”: If the Unhide option is available in the context menu, it indicates that there are one or more hidden worksheets in your workbook. Select Unhide to view and unhide these sheets.
- Unhide and Print: After selecting Unhide, a dialog box will list the hidden worksheets. Choose the worksheet you want to unhide and click OK. The sheet tab for the unhidden worksheet will then become visible, allowing you to select it and print it as you would any other worksheet.
Printing a Table from Your Spreadsheet
Often, you might only need to print a specific table within a larger worksheet. Excel for the web makes this possible, provided your table is within the size limit of 10,000 cells. For larger tables, you would need to use the Excel desktop application for printing.
Here’s how to print just a table:
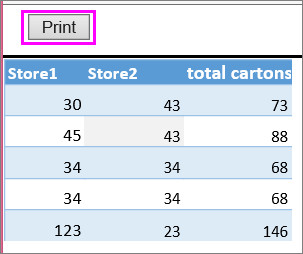
- Select the entire table: Click on the first cell of your table and then scroll to the last cell to select all cells within the table. For tables with many columns, a quicker method is to select the first cell, press and hold the Shift key, and then select the last cell. This will select the entire rectangular range of your table.
- Go to Print: Select File > Print > Print.
- Choose “Current Selection”: In the print options, ensure Current Selection is selected. This option tells Excel to only print the cells you have selected, which in this case, is your table.
- Preview and Print: Review the print preview to make sure only your table is shown. If satisfied, click Print. If adjustments are needed, close the preview and modify your selection as necessary.
 Print selected cells
 Print preview of table
For enhanced table printing, you might want to print with gridlines. While Excel for the web’s basic print options are limited, you can learn how to print a table with gridlines using more advanced features, often found in the desktop application.
Page Numbers in Printed Spreadsheets
Unfortunately, Excel for the web does not directly support inserting, viewing, or printing page numbers on your worksheets. This is a feature that is primarily available in the Excel desktop application.
If you require page numbers on your printed spreadsheets, you will need to use the Open in Excel button to open your workbook in the desktop application. From there, you can add page numbers in the headers or footers of your worksheet through the Page Layout view. After adding page numbers, you can then print your worksheet from the Excel desktop application, ensuring page numbers are included in your output.
Conclusion
Printing Excel spreadsheets in Excel for the web is generally a straightforward process for basic needs. By following these steps, you can effectively print worksheets, selected areas, tables, and manage hidden rows and columns. For more advanced printing options like page numbers, headers, footers, and gridline customization, leveraging the Excel desktop application through the “Open in Excel” feature provides a comprehensive solution. Understanding these methods ensures you can always get your Excel data from screen to paper exactly as required.
See also
Print gridlines in a worksheet