
Capturing what’s on your computer screen, known as taking a screenshot or screen capture, is a fundamental skill for PC users. Whether you need to share information, create tutorials, or simply save a moment from your screen, the Print Screen function in Windows is your go-to tool. Once you press the Print Screen key, Windows conveniently copies a snapshot of your screen to the clipboard, ready for you to use. You can capture your entire display, all active windows, or just the window you’re currently working in. From there, pasting your screenshot into applications like documents, emails, or image editors such as Paint becomes a breeze, allowing for easy sharing and editing. Let’s explore how to effectively use the Print Screen feature on your PC.
Finding the Print Screen Key on Your Keyboard
Before you can start capturing your screen, it’s crucial to locate the Print Screen key on your keyboard. Its position and label might vary slightly depending on whether you’re using a desktop or a laptop.
Desktop Keyboards:
On most desktop keyboards, the Print Screen key, often abbreviated as PrtScr, PrntScrn, PrintScreen, or similar, is situated in the upper right-hand area. Look for it near the function keys (F1, F2, etc.) and the number pad. Keep an eye out for these common variations: PrintScreen, PrntScrn, PrntScr, PrtScn, PrtScr, or PrtSc. For simplicity, we’ll refer to it as PrtScr throughout this guide.
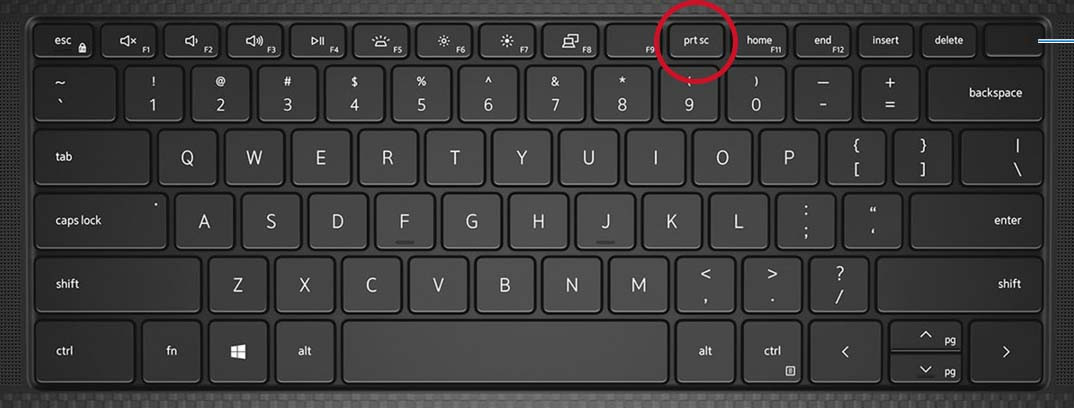 Illustration of the print screen key on a Dell KM5221W wireless keyboard
Laptop Keyboards:
Laptop keyboards often integrate multiple functions into fewer keys to save space. The Print Screen key is commonly found within the Function key row (F1 to F12). You’ll typically need to press the Function (Fn) key in combination with the designated PrtScr key, which is often F10.
For laptops with illuminated or capacitive Function Key rows, you might need to press the Fn key first to activate the function keys, and then press the PrtScr key along with any other required keys to take your screenshot. If you’re unsure, your laptop’s user manual will provide specific details.
It’s also worth noting that some compact laptop keyboards might not have a dedicated Print Screen key at all. In these cases, the Print Screen function is usually activated by pressing and holding the Fn key together with the Insert key.
Illustration of the print screen key on a Dell KM5221W wireless keyboard
Illustration of the print screen key on a Dell KM5221W wireless keyboard
Different Ways to Print Screen on Windows 10 and Windows 11
The Print Screen key offers several options for capturing different parts of your screen in Windows 10 and Windows 11:
1. Capture the Entire Screen:
To capture a screenshot of everything visible on your monitor(s), simply press the PrtScr key by itself. For some laptops, you might need to press Fn + PrtScr.
Alternatively, for Windows tablets, you can press the Windows logo button + the volume down button simultaneously to capture the entire screen. Screenshots taken using the Windows logo key + PrtScr or Windows logo button + volume down methods are automatically saved as image files in the “Screenshots” folder within your “Pictures” library.
2. Capture All Active Windows:
If you want to capture all windows that are currently open and active on your screen, press the PrtScr key alone. This will capture a snapshot of your entire workspace, including all open applications.
3. Capture a Single Active Window:
To capture only the specific window you are currently working in, first, make sure that window is active by clicking on it. Then, press the Alt + PrtScr keys together. This method is useful when you only need to share or save information from one application window without capturing the entire screen or other open windows.
4. Using the Windows Key + Shift + S Shortcut (Snipping Tool):
For more control over your screenshots, Windows offers a built-in tool called the Snipping Tool, which can be quickly accessed using the keyboard shortcut Windows key + Shift + S. This shortcut darkens your screen and brings up a small toolbar at the top, allowing you to choose from different snip types:
- Rectangular Snip: Drag a rectangle around the area you want to capture.
- Freeform Snip: Draw a freehand shape around the area you want to capture.
- Window Snip: Click on the window you want to capture.
- Full-screen Snip: Captures the entire screen, similar to the standard PrtScr key.
Screenshots taken with the Snipping Tool are copied to your clipboard, and a notification will appear allowing you to further edit, save, or share the snip using the Snip & Sketch application.
Pasting and Utilizing Your Screenshots
Once you’ve captured your screen using any of the Print Screen methods, the screenshot is temporarily saved to your clipboard. To use or edit this screenshot, you need to paste it into another application. Here’s how:
-
Open an Application: Launch an image editor like Microsoft Paint, Paint 3D, or more advanced software like Adobe Photoshop or GIMP. You can also paste screenshots into document editors such as Microsoft Word, email clients, or even messaging apps.
-
Paste the Screenshot: In your chosen application, use the keyboard shortcut Ctrl + V (or right-click and select “Paste”) to paste the screenshot from your clipboard into a new document or image.
-
Edit and Save (Optional): If you pasted your screenshot into an image editor, you can now crop, annotate, add text, or make other modifications as needed. Once you are satisfied, remember to save your edited screenshot to your desired location and format (e.g., JPEG, PNG).
Exploring Beyond Basic Print Screen: Advanced Tools
While the Print Screen key is incredibly useful for quick captures, Windows also offers more advanced screenshot tools like the Snipping Tool and Snip & Sketch for greater flexibility and editing options. For users needing even more features, numerous third-party screenshot applications are available, offering functionalities such as scrolling screenshots, screen recording, annotation tools, and direct uploading to cloud services. Exploring these tools can significantly enhance your screen capture capabilities on your PC.
Troubleshooting Print Screen Issues
If you find that the Print Screen key isn’t working as expected, here are a few things to check:
- Keyboard Functionality: Ensure your Print Screen key and the Fn key (if required) are functioning correctly. Try testing other keys to rule out keyboard issues.
- Driver Problems: Outdated or corrupted keyboard drivers can sometimes cause issues. Consider updating your keyboard drivers through Device Manager.
- Conflicting Applications: In rare cases, certain applications might interfere with the Print Screen function. Try closing recently installed or running applications to see if that resolves the issue.
- Restart Your PC: A simple restart can often fix temporary software glitches that might be preventing Print Screen from working correctly.
Conclusion
Mastering the Print Screen function on your PC is an essential skill that boosts your productivity and communication. From quickly capturing your entire screen to precisely snipping specific areas, Windows offers a range of built-in options to suit your screenshot needs. Experiment with the different methods outlined in this guide to find the most efficient way to capture and share information from your screen. Start practicing today and elevate your PC proficiency!