Experiencing black dots appearing on your printed pages can be frustrating. This issue is often related to your printer’s toner cartridge. This guide will walk you through a simple, step-by-step process to diagnose and potentially fix this problem, focusing on a “Dot To Dot To Print” approach to identify the cause.
First, let’s investigate if the issue stems from a foreign particle on your toner cartridge.
Step 1: Measure the Distance Between Dots
A key indicator of a toner cartridge issue is the spacing between the black dots. If the distance from the center of one dot to the center of the next dot is approximately 25.5 mm (about 1 inch), it strongly suggests that there might be a foreign particle adhering to the developer roller of your toner cartridge. This particle repeatedly makes contact with the paper as the roller turns, resulting in the consistent dot pattern you are seeing on your prints.
Step 2: Run a Cleaning Page
Many HP printers have a built-in cleaning function that can sometimes dislodge minor debris. Access your printer’s settings through the HP Printer Assistant or HP Device Toolbox. Look for the option to run a “clean page”. After running the cleaning cycle, print a supply page or a test page to see if the black dots have disappeared. This simple step can often resolve issues caused by loose particles.
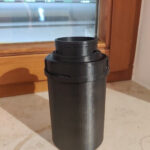
Step 3: Inspect the Toner Cartridge Developer Roller
If the dots persist after running a cleaning page, the next step is to manually inspect the toner cartridge. Print a test page that exhibits the black dot defect. Place this page on a flat surface. Carefully remove the toner cartridge from your printer and place it next to the printed page. Align the cartridge in a way that corresponds to the dot pattern on the page. Inspect the developer roller of the toner cartridge, which is usually a cylindrical part. Look closely for any small foreign particles, such as toner clumps, paper dust, or other debris, that might be stuck to the roller at the point corresponding to the dots on your printed page.
Step 4: Gently Clean the Developer Roller
If you identify a foreign particle on the developer roller, you can attempt to gently remove it. Use a soft, dry, lint-free cloth or tissue paper. Very carefully and lightly wipe the affected spot on the developer roller to dislodge the particle. Focus only on the specific area where you observed the debris. Avoid applying excessive pressure or using any cleaning solutions, as this could damage the roller. After cleaning, reinstall the toner cartridge and print another supply test page. In most cases, cleaning the developer roller will eliminate the black dots from your prints.
By following these “dot to dot to print” troubleshooting steps, you should be able to identify and resolve the issue of black dots on your printed pages, ensuring clean and professional printouts. If the problem continues after these steps, it might indicate a more complex issue, and further professional printer maintenance or toner cartridge replacement might be necessary.