
If you’re diving into the world of 3D printing, or even if you’re a seasoned maker tackling a particularly intricate design, starting with 3d Printing Testing is a step you shouldn’t skip. Think of it as a crucial warm-up for your 3D printer, regardless of whether you’re using one of the best 3D printers on the market. These tests are designed to reveal your printer’s capabilities, ensuring you don’t waste valuable filament and time on projects that might not turn out as expected.
3D printing testing allows you to meticulously analyze your printer’s performance across various critical aspects. You can evaluate how it handles challenging geometries like overhangs and bridges, assess its precision with holes and intricate details, and fine-tune essential settings such as temperature, print speed, layer height, and retraction. For those pushing the boundaries with high-speed printers, test prints can even help determine the optimal speed settings. While any 3D model can technically serve as a test, certain models are specifically engineered for comprehensive 3D printer testing. Below, we delve into six of the most effective test models for 3D printing, each designed to put your machine through its paces and ensure optimal print quality.
1. 3D Benchy: The All-Purpose Benchmark
 3D Benchy 3D Printing Test Model
(Image credit: Tom’s Hardware)
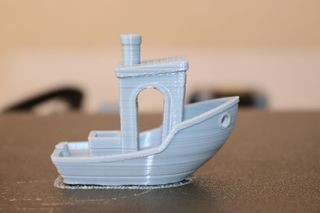
The 3D Benchy is arguably the most recognized and widely used benchmark model in the 3D printing community for rigorous 3D printing testing. Conceived by Creative Tools, this model is readily accessible from the 3D Benchy official website and various STL file-sharing platforms like Thingiverse, Printables, and Cults3D. Downloading it is straightforward: simply visit the official website, choose your preferred platform, and access the STL file.
For effective 3D printing testing with the Benchy, it’s crucial to print it at its original scale (1:1) without altering any default settings initially. Its complex geometry is intentionally designed to challenge your printer, making it an ideal tool for troubleshooting and fine-tuning. Despite its compact size, the Benchy incorporates a range of features for comprehensive testing. It includes overhangs at various angles, perfect for assessing your printer’s bridging capabilities and overhang performance.
 3D Benchy Overhang Test
(Image credit: Tom’s Hardware)
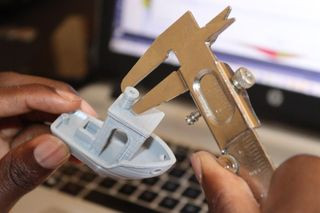
Furthermore, the 3D Benchy features precisely dimensioned circular holes and rectangular windows, along with specific measurements for each section as detailed in the official brochure. After completing the 3D printing testing, measuring these features allows you to evaluate the dimensional accuracy of your 3D printer. Discrepancies between the printed dimensions and the design specifications indicate areas for calibration.
 3D Benchy Fine Detail Test
(Image credit: Tom’s Hardware)
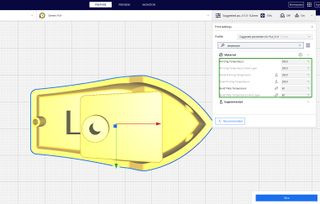
Beyond geometry and dimensions, the 3D Benchy also serves as an excellent model for temperature and cooling performance evaluation during 3D printing testing. By visually inspecting the overall print quality – noting surface smoothness, roughness, or any imperfections – you can gauge whether your printer’s temperature control and cooling system are optimally configured. Adjustments to slicer settings may be necessary to rectify issues like rough surfaces or blobs, ensuring smoother and more consistent prints.
 Cura Remove All Holes Option for 3D Benchy
(Image credit: Tom’s Hardware)
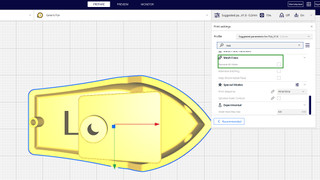
The small, protruding holes and wheel-like structures on the Benchy are specifically designed to test your machine’s ability to handle fine details and intricate designs. Successful 3D printing testing of these sections indicates well-configured printer settings. However, if these features appear smaller or less defined than expected, it might signal underlying issues requiring attention and further calibration. For example, ensure that “Remove All Holes” option in Cura or similar slicer software is unchecked if you want to accurately assess hole printing capabilities.
2. Calibration Cube: Ensuring Dimensional Accuracy
The XYZ calibration cube is a fundamental model for 3D printing testing, specifically designed to assess and fine-tune the dimensional accuracy of your 3D printer. This simple yet effective cube, often found on platforms like Thingiverse, has precise dimensions, typically 20mm on each side.
After 3D printing testing with the calibration cube, the crucial step is to measure its dimensions using calipers or other precise measurement tools. Comparing these measurements to the intended 20mm dimensions reveals the accuracy of your printer’s movements. This test is vital for understanding the precision of your stepper motors and the overall dimensional fidelity of your prints. Significant deviations indicate a need for calibration to ensure that printed parts match the intended design size.
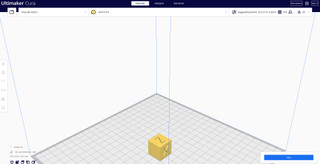 Calibration Cube Orientation for 3D Printing Testing
(Image credit: Tom’s Hardware)
Proper orientation in your slicer is key to accurate 3D printing testing with the calibration cube. Ensure that the labeled axes (X, Y, Z) are aligned parallel to the directions you intend to measure. In most slicer software, the model imports in the correct orientation, minimizing setup.
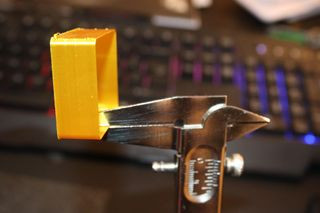
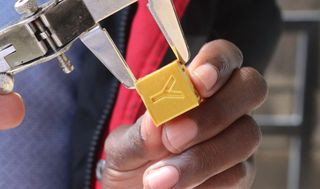 Measuring Calibration Cube for 3D Printing Testing
(Image credit: Tom’s Hardware)
Measure each side of the printed cube – length, width, and height – and record these values.
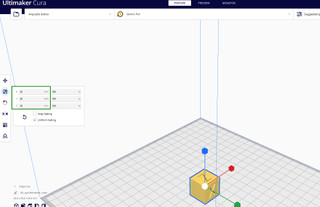 Calibration Cube Dimensions in Slicer Software
(Image credit: Tom’s Hardware)
Compare your measured values with the intended dimensions set in your slicer. Ideally, they should be within a close tolerance. Significant discrepancies revealed through 3D printing testing indicate that your printer requires fine-tuning to achieve dimensional accuracy. Beyond calibration, the cube can also highlight issues like under- or over-extrusion and even problems related to steps per millimeter calibration, making it a versatile tool for 3D printer maintenance and optimization.
3. All-in-One 3D Printer Test: A Comprehensive Assessment
 All-in-One 3D Printer Test Model
(Image credit: Tom’s Hardware)
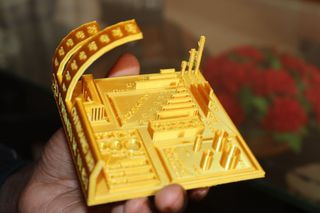
As its name implies, the all-in-one 3D printer test is designed for comprehensive 3D printing testing, evaluating your printer’s performance across a wide range of challenges. This model incorporates features to test overhangs, bridging, supports, hole accuracy, temperature sensitivity, and more, all in a single print. Upon downloading and slicing the file, it is generally recommended to print with 100% infill and without supports to truly assess the printer’s raw capabilities.
 Examining All-in-One 3D Printer Test Print
(Image credit: Tom’s Hardware)
After completing the 3D printing testing, meticulously examine each section of the model. This hands-on inspection allows you to identify specific areas where your printer might be struggling. By observing how the printer handles each feature, you can pinpoint potential issues and determine the necessary adjustments.
For instance, during 3D printing testing with this model, you might observe stringing in certain sections.
 Stringing Issue in 3D Printing Test
(Image credit: Tom’s Hardware)
Stringing, the formation of thin strands of filament between printed parts, often indicates incorrect retraction or temperature settings. Observing this issue during 3D printing testing signals that you need to fine-tune retraction speed and temperature settings in your slicer software to eliminate stringing and improve print quality. This comprehensive test print provides valuable insights into optimizing various printer parameters.
4. Retraction Test: Eliminating Stringing
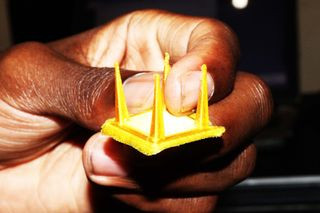
The retraction test model is specifically designed for 3D printing testing focused on optimizing retraction settings and eliminating stringing. Available on platforms like Thingiverse, this model typically consists of tall, thin towers or similar spaced geometries. These structures force the printer to make frequent travel moves across open space, making stringing issues readily apparent.
Stringing occurs when molten filament oozes from the nozzle during travel moves between print features. This results in unwanted thin strands of plastic across the open spaces in your print, degrading the surface quality and aesthetic. Effective retraction – the process of pulling the filament back into the nozzle when the printer is not extruding – is crucial to prevent stringing.
 Stringing in Retraction Test Print
(Image credit: Tom’s Hardware)
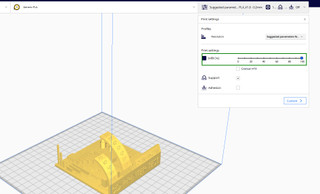
If your 3D printing testing reveals stringing, the first step is usually to adjust the retraction speed. Increasing the retraction speed in your slicer settings often helps by pulling the filament back more quickly, minimizing oozing during travel moves.
 Adjusting Retraction Speed for 3D Printing Testing
(Image credit: Tom’s Hardware)
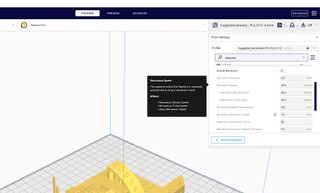
If increasing retraction speed alone doesn’t fully eliminate stringing, you can also try increasing the retraction distance. Retraction distance determines how much filament is pulled back. Experimenting with these two settings – speed and distance – during 3D printing testing allows you to find the optimal retraction configuration for your specific printer and filament, effectively resolving stringing issues.
 Improved Retraction Test Print After Adjustment
(Image credit: Tom’s Hardware)
Through iterative 3D printing testing and adjustments, you can achieve clean prints free from stringing, even in models with significant travel movements.
5. Smart Compact Temperature Calibration Tower: Finding the Ideal Temperature
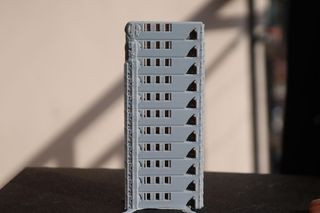 Temperature Calibration Tower for 3D Printing Testing
(Image credit: Tom’s Hardware)
The smart compact temperature calibration tower is an invaluable tool for 3D printing testing focused on temperature optimization for both your 3D printer and the specific filament you are using. This model allows you to visually assess print quality across a range of temperatures within a single print job, making it easy to identify the ideal temperature range for optimal results. The tower is designed with distinct segments, each printed at a progressively increasing temperature. This segmented approach simplifies the process of evaluating print quality at each temperature increment.
The designer recommends printing the temperature tower with a 15% infill and a 0.2mm layer resolution, and crucially, without supports. This setup allows for a clear evaluation of temperature effects without added complexities. After 3D printing testing with the temperature tower, carefully examine each segment.
6. Flowrate Calibration Print: Optimizing Extrusion
 Flowrate Calibration Test Print
(Image credit: Tom’s Hardware)
The flowrate calibration print is another essential 3D printing testing model, specifically designed to calibrate your 3D printer’s flow rate. Flow rate, measured in millimeters per second, dictates the volume of filament extruded from the nozzle per unit of time. Accurate flow rate calibration is critical for print quality and printing speed. An incorrectly calibrated flow rate can lead to issues like over-extrusion or under-extrusion, both of which negatively impact print quality. A flow rate that is too low will result in slower print times and potentially prints with gaps or weak layers. Conversely, an excessively high flow rate can cause over-extrusion, leading to blobs, poor surface finish, and dimensional inaccuracies.
If you are experiencing issues such as oozing, over-extrusion, or generally poor print quality, 3D printing testing with a flow rate calibration model is crucial for troubleshooting. By printing and analyzing this model, you can identify and rectify flow rate inaccuracies.
These six models represent just a starting point in the world of 3D printing testing. Numerous other test prints are available, each designed to address specific aspects of printer performance. If you’re targeting a particular issue, you can select a specialized test model to focus your troubleshooting efforts. However, for a comprehensive general assessment of your machine, starting with simpler tests like the calibration cube and progressively moving to more complex models like the 3D Benchy and the all-in-one test is a recommended approach. The beauty of 3D printing testing is that most test prints are relatively quick, often taking only minutes to a few hours to print. This minimal time investment can save you significant time and material in the long run by ensuring your printer is properly calibrated and ready to produce high-quality prints.
MORE: Best 3D Printers
MORE: Best Budget 3D Printers
MORE: Best Resin 3D Printers