
Capturing what’s on your computer screen, known as taking a screenshot or screen capture, is a common task for many users. Windows operating systems offer a built-in and straightforward method for this using the Print Screen Button On Keyboard. Once you press this button, or a combination of keys involving it, a snapshot of your screen is instantly copied to your clipboard. This allows you to then paste the screenshot into various applications, from document editors and email clients to image editing software like Paint. Alternatively, you can directly insert the captured image into a document or file.
Understanding the Print Screen Button
The print screen button on your keyboard is your quick access tool for capturing your digital workspace. Depending on the keys you press in conjunction with the Print Screen key, you can capture different areas of your screen:
- The entire screen: Captures everything visible on your monitor.
- All active windows: Captures all currently open windows.
- The current active window: Captures only the window you are currently working in.
After capturing, the screenshot is temporarily stored on your clipboard, ready to be pasted into another application for viewing, editing, or saving.
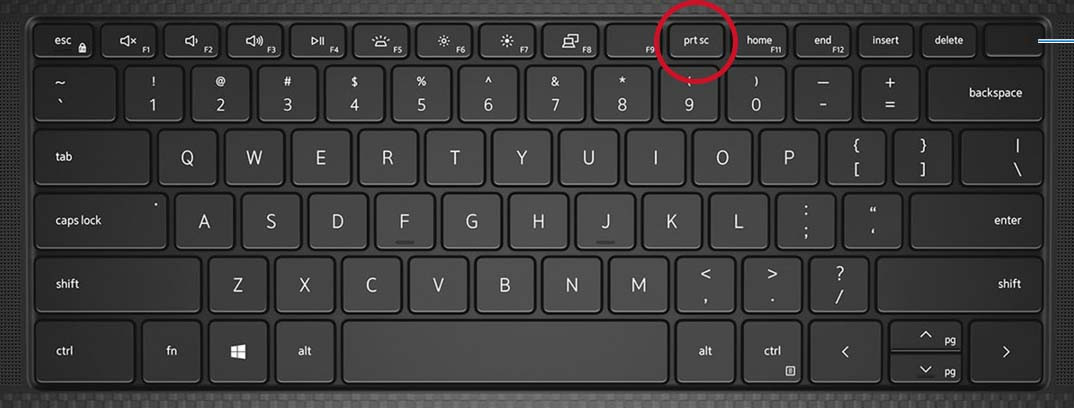
Locating the Print Screen Button on Your Keyboard
Finding the print screen button on keyboard is usually quite simple, though its label might vary slightly depending on your keyboard model.
On desktop keyboards, you can typically find the print screen button in the upper right-hand corner. It’s often located near the function keys (F12, Delete, Insert) and the scroll lock key. Keep an eye out for these common labels:
- Print Screen
- PrintScreen
- PrtScn
- PrntScrn
- PrtScr
- PrntScr
- PrtSc
For the sake of simplicity, we will use PrtScr throughout this guide to refer to all variations of the print screen button label.
It’s worth noting that some specialized keyboards, like the Dell Wireless Keyboard and Mouse combo KM3322W, might not have a dedicated PrtScr key. In such cases, you’ll usually need to press the Fn (Function) key and the Insert key simultaneously to perform the print screen function.
 Print screen key on a Dell KM5221W wireless keyboard
On laptop keyboards, the print screen button is also generally found within the Function key row (F1 to F12). Often, it shares a key with another function, such as Insert or another function key. To activate the print screen function, you will likely need to press and hold the Fn key while pressing the designated PrtScr key (often F10 or similar).
Laptops with capacitive Function Key rows (those with illuminated function icons that change) require you to press the Fn key first to switch the function keys to their standard functions, which should then illuminate the PrtScr function. Once illuminated, you can use the PrtScr key as described below. Always refer to your laptop’s user manual for precise instructions if you’re unsure.
Print screen key on a Dell KM5221W wireless keyboard
How to Use the Print Screen Button in Windows 10 and Windows 11
The print screen button functionality is consistent across recent Windows versions, including Windows 10 and Windows 11. Here’s how to capture different types of screenshots:
Capturing the Entire Screen:
To take a screenshot of your entire display and automatically save it as a file, press the Windows logo key + PrtScr key together. If you are using a tablet, you can achieve the same result by pressing the Windows logo button + the volume down button simultaneously. Screenshots captured using this method are automatically saved to the Screenshots folder within your Pictures library.
Capturing All Active Windows:
For a quick screenshot of all currently open windows, simply press the PrtScr key. This will copy the image of all your active windows to the clipboard.
Capturing a Single Active Window:
If you only need to capture the window you are currently working in, first ensure that window is active by clicking on it. Then, press the Alt + PrtScr keys together. This action will copy a screenshot of only the active window to your clipboard.
Using Your Screenshot After Capture
Once you’ve used the print screen button on keyboard to capture your screen, the next step is to utilize that screenshot. Since the image is copied to your clipboard, it’s ready to be pasted into another application.
To use or edit your screenshot, open an image editing application like Microsoft Paint (which comes standard with Windows) or more advanced software like Adobe Photoshop. In the image editor, create a new image document (if necessary) and then use the keyboard shortcut Ctrl + V (paste) to insert the screenshot into the application. From there, you can edit, annotate, crop, or save your screenshot in various image formats.
For users who need more advanced screenshot options, such as capturing specific regions of the screen or adding annotations directly, Windows also includes the Snipping Tool. The Snipping Tool offers greater flexibility and features compared to the basic print screen function, and can be accessed through the Windows search bar.
Conclusion
The print screen button on keyboard is a fundamental and highly useful tool for anyone working with Windows. Whether you need to quickly share something you see on your screen, create visual documentation, or simply save a moment from your digital world, mastering the print screen button and its various shortcuts will significantly enhance your productivity. From capturing the entire screen to just a single window, this simple key provides a fast and effective way to take screenshots on your Windows computer.