
Embarking on a creative 3D printing journey? Let’s explore the fascinating process of designing and assembling a 3d Printed Octopus, focusing on crafting realistic tentacles with segmented flexibility. This project utilizes a unique approach, repurposing a Nespresso capsule holder as the octopus’s head, and delves into the intricacies of creating tapered, segmented tentacles that mimic natural movement.
The core idea revolves around constructing eight tentacles, each starting robustly at the head and gracefully thinning towards the tips. Instead of opting for simple straight tubes, the design incorporates subtle bends at the end of each segment, just a few degrees, to simulate the fluid motion of an octopus in water. This gentle curvature adds a touch of realism, preventing the tentacles from appearing static and lifeless.
Considering the printer’s capacity to handle prints up to 25cm, each tentacle is envisioned to be composed of four interconnected segments. The segment closest to the head is designed to be shorter and thicker, gradually decreasing in diameter as we move down the tentacle’s length. Each segment features a wider top and a narrower bottom, creating a natural taper. For instance, the topmost segment of a tentacle starts with an internal diameter of 22mm, reducing to 18mm at the base. Subsequent segments continue this tapering, perhaps starting at 17mm and narrowing to 14mm, and so forth. The plan is to fill these segments with small LED bulbs, which will beautifully illuminate through the chosen translucent PLA material, adding an enchanting visual element to the 3d printed octopus.
These tapered segments, each with a delicate curve, need a robust joining mechanism. To achieve this, flanges are designed at both the top and bottom of each segment. These flanges, approximately 2.5mm thick, are intended to be bolted together using 2mm bolts and nuts. To ensure a clean and functional assembly, the flanges will incorporate either 4.2mm holes for countersunk bolt heads or hexagonal recesses for the nuts to sit flush. This detail, potentially achieved using a patterned design in the 3D modeling software, is crucial for a professional finish.
To further enhance the natural aesthetic and avoid a rigid, uniform appearance, the topmost segments of the tentacles are designed with slight variations in length, ranging from 7 to 9cm. This intentional difference ensures that the flanges of all eight tentacles do not align perfectly, contributing to a more organic and less manufactured look for the 3d printed octopus.
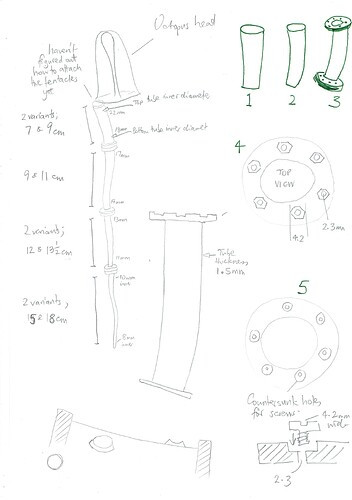 3d printed octopus tentacle design using segments and flanges
The project breaks down into key design challenges that are common in 3D modeling for functional parts:
Step 1: Creating Tapered Tubes: The initial hurdle is mastering the creation of tubes that taper smoothly from a larger internal diameter (X) to a smaller one (Y), while maintaining a consistent wall thickness of 2mm. This requires precision in 3D modeling to ensure structural integrity and printability.
Step 2: Incorporating Gentle Bends: Adding subtle curves to the ends of the tubular segments is essential for achieving the desired organic tentacle movement. Techniques for bending and shaping tubes within the 3D modeling environment need to be explored.
Step 3: Designing Flanges with Countersinks: Creating flanges at the ends of each segment, complete with countersunk features for bolts and nuts, is vital for assembly. This step involves designing precise holes and recesses that accommodate standard hardware, ensuring a secure and aesthetically pleasing joint.
Guidance on tackling Step 1, specifically techniques and tutorials for creating tapered tubes in 3D modeling software, would be immensely helpful to move this 3d printed octopus project forward. Suggestions regarding alternative approaches, such as reducing the number of segments per tentacle to simplify assembly, or advice on handling overhangs during printing—especially for the top flanges—are also welcome. Overhangs, as pointed out, might require support structures during printing to ensure the flanges are formed correctly.
This detailed exploration into creating a 3d printed octopus with segmented, flexible tentacles highlights the blend of creative design and technical 3D printing considerations. Any insights or recommendations to refine these steps and bring this aquatic creation to life would be greatly appreciated!