
Printing specific sections of your Excel worksheet can save ink and paper, focusing only on the data you need. Excel’s “Print Area” feature allows you to define exactly what parts of your sheet get printed, ignoring the rest. This is incredibly useful for reports, summaries, or when you only need to share a portion of your data. Let’s walk through how to set, adjust, and clear print areas in Excel to streamline your printing process.
Setting a Print Area in Excel
The most basic function is setting a print area. This designates a specific section of your worksheet to be printed. Here’s how to do it:
-
Select the Cells You Want to Print: Begin by highlighting the exact range of cells you want to include in your printout. This could be a single cell, a row, a column, or a block of cells. Click and drag your cursor to select the desired area.
-
Navigate to the Page Layout Tab: In the Excel ribbon at the top, click on the “Page Layout” tab. This tab contains all the tools you need to adjust how your worksheet looks when printed.
-
Set the Print Area: Within the “Page Setup” group on the Page Layout tab, you’ll find the “Print Area” dropdown menu. Click on “Print Area” and then select “Set Print Area”.
 Set Print Area Option in Excel
Alt text: Screenshot showing the “Print Area” dropdown menu under the “Page Setup” group in Excel’s “Page Layout” tab, with “Set Print Area” highlighted.
Once you set the print area, Excel remembers this setting, even after you save and reopen your workbook. Only the defined print area will be printed until you change or clear it.
Expanding Your Print Area: Adding More Cells
Need to add more data to your print area? Excel allows you to expand your existing selection easily. Here’s how:
-
Select the Additional Cells: Highlight the new cells you want to include in your print area. These cells should ideally be adjacent to the current print area for a seamless print layout.
-
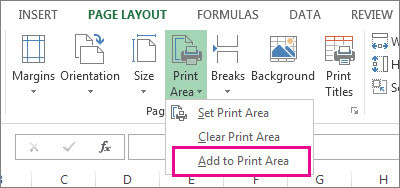
Add to Print Area: Go back to the “Page Layout” tab, “Page Setup” group, and click on the “Print Area” dropdown menu again. This time, select “Add to Print Area”.
Set Print Area Option in ExcelAlt text: Excel interface displaying the “Print Area” dropdown menu under the “Page Setup” section of the “Page Layout” tab, with “Add to Print Area” option selected.
It’s important to note that if you select cells that are not directly next to the existing print area, Excel might create a separate, new print area. Each print area is printed on a separate page. To ensure a continuous printout, add only adjacent cells to expand your defined area.
Clearing a Print Area in Excel
If you no longer need a specific print area and want to print the entire worksheet again, clearing the print area is simple:
-
Click Anywhere on the Worksheet: Ensure that you are on the worksheet for which you want to clear the print area. You can click on any cell within the worksheet.
-
Clear Print Area: Navigate to the “Page Layout” tab, “Page Setup” group, and click on the “Print Area” dropdown menu. Select “Clear Print Area”.
Set Print Area Option in ExcelAlt text: Screenshot illustrating how to clear a print area in Excel, highlighting the “Clear Print Area” option under the “Print Area” menu in the “Page Setup” group of the “Page Layout” tab.
Clearing the print area will remove all defined print areas from the current worksheet, reverting it back to printing the entire sheet. Remember that clearing the print area is worksheet-specific. If you have multiple worksheets with set print areas, you’ll need to clear them individually.
Conclusion
Mastering the “Set Print Area” feature in Excel gives you greater control over your printed output. Whether you’re focusing on specific data points or creating concise reports, defining your print area ensures you print exactly what you need. By following these simple steps to set, add to, and clear print areas, you can enhance your efficiency and save resources when printing from Excel.