
Do you need to print only a specific part of your Excel worksheet? Microsoft Excel offers a handy feature called “Print Area” that allows you to designate exactly which portion of your spreadsheet gets printed, saving you ink and paper when you don’t need the entire sheet. This guide will walk you through how to set, adjust, and clear print areas in Excel, ensuring you print precisely what you intend every time.
Setting a Print Area in Excel
The print area feature is perfect for when you have a large spreadsheet but only need to print a summary table, a specific data range, or a chart. Here’s how to define a print area:
-
Select the Range: On your Excel worksheet, begin by highlighting the cell range you wish to include in your print area. This is the portion of your worksheet that will be printed.
Tip: To select multiple, non-contiguous areas as separate print areas (each printing on its own page), press and hold the Ctrl key while selecting each range you want to include.
-
Navigate to Page Layout: Go to the Excel ribbon and click on the Page Layout tab.
-
Set the Print Area: In the Page Setup group, find and click the Print Area dropdown menu. Select Set Print Area from the options.
 Set Print Area Button Location
Excel will now outline the selected area with a dashed line, visually indicating the defined print area. This setting is saved with your workbook, so you won’t have to reset it each time you open the file.
-
Verify in Page Break Preview (Optional): To visually confirm your print area and see page breaks, navigate to the View tab on the ribbon. In the Workbook Views group, click Page Break Preview. This view clearly shows the print area and how it will be divided into pages if it spans multiple pages.
Expanding Your Print Area in Excel
Need to add more data to your existing print selection? Excel makes it easy to expand your print area to include additional cells. Here’s how:
-
Select Additional Cells: On your worksheet, select the new cells you want to add to the current print area. Remember, you can only add adjacent cells to an existing print area. Adding non-adjacent cells will create a separate, new print area.
-
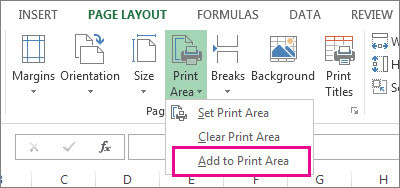
Go to Print Area Options: Navigate back to the Page Layout tab, and in the Page Setup group, click on the Print Area dropdown menu again.
-
Add to Print Area: This time, choose Add to Print Area from the dropdown options.
Set Print Area Button LocationExcel will update the print area to include the newly selected cells. Verify the expanded print area using the Page Break Preview if needed.
Clearing a Print Area in Excel
If you no longer need a specific print area and want to print the entire worksheet again, you can easily clear the defined print area. Note that clearing the print area will remove all set print areas from the current worksheet.
-
Select Any Cell on the Worksheet: Simply click on any cell within the worksheet that has the print area you wish to clear.
-
Clear Print Area: Go to the Page Layout tab, and in the Page Setup group, click the Print Area dropdown menu. Select Clear Print Area.
Excel will remove the defined print area, and the entire worksheet will now be considered for printing.
By mastering the print area feature in Excel, you gain greater control over your printed documents, ensuring you only print the essential information you need. This not only saves resources but also makes your printed reports and summaries more focused and effective.