
Many users are discovering the efficiency gains of using an external keyboard with shortcuts within the File menu of Microsoft 365 applications on Windows. For individuals with mobility challenges or visual impairments, these keyboard shortcuts are not just about speed—they offer an essential, more accessible alternative to touchscreens and mice.
The File menu in Microsoft 365 apps serves as your backstage pass to managing files, accounts, and application settings. Whether you are in a standard view or actively editing a document, the shortcuts detailed below provide direct access to these crucial functions. Often referred to as the ‘Backstage view’, the File menu handles all the behind-the-scenes operations of your Microsoft 365 experience.
Note:
- The keyboard shortcuts provided in this guide are based on the U.S. keyboard layout. Users of other keyboard layouts may find slight discrepancies.
- A plus sign (+) in a shortcut indicates that keys should be pressed simultaneously.
- A comma (,) in a shortcut signifies pressing keys sequentially.
- To quickly locate a specific shortcut, utilize the search function (Ctrl+F) and enter your keywords.
Understanding the File Menu Shortcut
Accessing the File Menu
From any normal, editing, or Inbox view within your Microsoft 365 application, simply press Alt + F. This command instantly opens the File menu.
The File menu is structured into various sections, sometimes referred to as tabs or pages, each housing a set of related options. The number of these sections can vary depending on the specific Microsoft 365 application you are using.
Navigating with KeyTips: Your File Menu Keyboard Guide
Each page and option within the File menu is associated with a KeyTip. These KeyTips are essential for efficient navigation, allowing you to select options, delve into settings, and open dialog boxes without needing to memorize or input full keyboard shortcuts each time.
KeyTips are displayed as letters, numbers, or combinations thereof, encased in small square boxes that appear over the File menu pages and options.
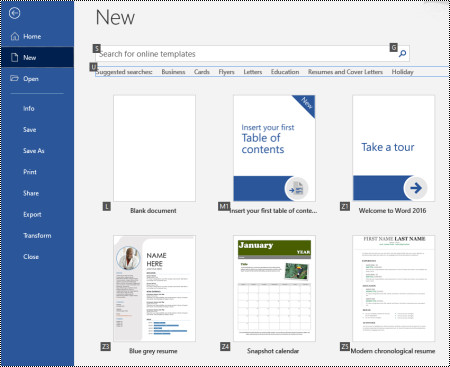 New page KeyTip in the File menu of Word for Windows
Tip: If KeyTips are not visible, press the Alt key. A grayed-out KeyTip indicates an unavailable option.
Using KeyTips for Navigation:
- Begin by pressing Alt + F to open the File menu. KeyTips will then appear over the menu page options.
- Press the key on your keyboard that corresponds to the letter in the KeyTip of the desired page. For example, to access the New page in Word, press N. The selected page will open, and a new set of KeyTips will be displayed for the options within that page.
- To choose an option on the current page, press the keyboard key that matches its KeyTip letter. For instance, on the New page in Word, pressing S will take you directly to the Search field for online templates.
For users utilizing screen readers, navigating the File menu and landing on a KeyTip-enabled option will trigger an announcement that includes the option name followed by its complete shortcut. For example, upon reaching the Print button, Narrator will announce: “Print button, Alt, F, P, P.”
The tables below are structured to first present the full shortcut for accessing a page, followed by rows detailing the KeyTips available on that specific page.
Essential File Menu Shortcuts for Daily Use
This section highlights the most frequently used shortcuts for accessing options within the File menu across Microsoft 365 applications.
| Action | Shortcut |
|---|---|
| Open the File menu. | Alt+F |
| Within the File menu, utilize these shortcuts: | |
| Access the Home page to view recent, pinned, and shared files; create new files from scratch or templates; and search for files—all in one centralized location. | H |
| Open the New page to start a blank file or explore available templates. | N |
| Save the current file using default settings. This option is available when AutoSave is disabled. | S |
| Open the Save As dialog box, allowing you to save the file under a different name or in an alternative location. | A, 1 or A, O |
| Access the Print page to configure printing preferences and print the current file. | P |
| Exit the File menu and return to your previous view (normal, editing, or Inbox). | Esc |
Creating New Microsoft 365 Files Quickly
This table outlines the shortcuts for creating new Microsoft 365 files using options found on the New page of the File menu.
Quick Tip: For an even faster way to create a new blank file or email, press Ctrl + N.
| Action | Shortcut |
|---|---|
| Open the New page. | Alt+F, N |
| On the New page, these shortcuts apply: | |
| Create a new file from a template listed in the app’s template gallery. | Z, then number (1-9) or letter (A-P), then C (e.g., Z, 1, C) |
| Search for templates online. | S, type search terms, Enter |
| Perform a predefined template search based on type. | U, then number (1-7) (e.g., U, 1) |
Managing Files: Opening, Listing, and Searching
The following shortcuts are designed for efficient file management—listing, opening, and searching for Microsoft 365 files via the Open page of the File menu. You can also use these shortcuts to navigate to and open folders in various save locations, including your local PC or OneDrive.
Quick Tip: To instantly open a file and view a list of your recently accessed files, press Ctrl + O.
| Action | Shortcut |
|---|---|
| Open the Open page. | Alt+F, O |
| On the Open page, utilize these shortcuts: | |
| Search within your recent files. | R, E, type search terms |
| Display a list of your recent files. | R, Y, 2 |
| Display a list of your recent folders. | R, Y, 3 |
| View files shared with you or files you’ve shared. | Y, 1 |
| Access files and folders on your company OneDrive. | S, 1 |
| View SharePoint sites you frequently use and follow. | S, 2 |
| Access files and folders on your personal OneDrive. | K |
| Display navigation options and files/folders on your local device. | C |
| Open the standard Windows Open dialog box to browse for files and folders. | O |
| Recover a recently closed document that was not saved. | U, locate file, Enter |
Saving and Renaming Your Microsoft 365 Files
This table details the shortcuts for saving and renaming Microsoft 365 files, accessible via the File menu’s Save page or Save As page, from either the normal or editing view.
Quick Tip: For a fast save of your file, press Ctrl + S.
| Action | Shortcut |
|---|---|
| Save the file using default settings. Available when AutoSave is off. | S |
| Open the Save or Save As page. | A |
| Within the Save or Save As page, use these shortcuts: | |
| Add a cloud storage location for saving files. | A, A |
| Rename the current file. | A, Y, 3 |
| Save a copy of the file to the Documents folder on your PC. | A, C, Y, 8 (to Documents), then Alt+A, Y, 5 to save. |
| Open the Save As dialog box to save with a different name or location. | A, 1 or A, O |
Printing Microsoft 365 Files Efficiently
This section focuses on shortcuts for printing Microsoft 365 files, utilizing the Print page in the File menu, accessible from normal or editing views. This is where understanding the Print Shortcut Key within the File menu becomes crucial for quick and efficient printing.
Quick Tip: To immediately print a file with default settings, press Ctrl + P, P.
| Action | Shortcut |
|---|---|
| Open the Print page. | Alt+F, P |
| On the Print page, use these shortcuts: | |
| Access the printer selection menu. | I |
| Open the menu to select printing range (all pages, current page, custom range). | A |
| Set a custom printing range by page or slide numbers. | S |
| Set the page orientation (portrait or landscape). | O |
| Define the paper size for printing. | L |
Exporting, Creating PDFs, and Changing File Types
The following table lists shortcuts for altering file types and creating PDF or XPS versions of your Microsoft 365 files through the Export page of the File menu.
| Action | Shortcut |
|---|---|
| Open the Export page. | Alt+F, E |
| On the Export page, these shortcuts are available: | |
| Create a PDF or XPS file from your current Microsoft 365 file. | A |
| Change the file type of your Microsoft 365 file. | C, choose type, save |
| In PowerPoint, open the Send to Microsoft Word dialog to create handouts. | H, A |
Managing File Security and Information
This table provides shortcuts for securing and managing your Microsoft 365 files using options on the Info page of the File menu.
| Action | Shortcut |
|---|---|
| Open the Info page. | Alt+F, I |
| On the Info page, these shortcuts help you: | |
| Copy the file path. | C |
| Open the file’s location in File Explorer. | F |
| Open the Protect Document menu to manage editing permissions. | P |
| Inspect the document for hidden properties and personal information before publishing. | I, I |
Transforming Word Documents to Web Pages
This table lists the shortcut for converting a Word document into a Microsoft Sway web page using options within the File menu.
| Action | Shortcut |
|---|---|
| Open the Transform to Web Page dialog box. | Alt+F, M |
Accessing Your Microsoft 365 Account Information
The following table details shortcuts for accessing your Microsoft 365 account information. This includes options to change your profile picture and check for Microsoft 365 updates via the Account page of the File menu (labeled Microsoft 365 Account in Outlook).
| Action | Shortcut |
|---|---|
| Open the Account or Microsoft 365 Account page. | Alt+F, D |
| On the Account or Microsoft 365 Account page, use these shortcuts: | |
| Change your account profile picture. | C |
| Sign out of your current account. | E |
| Switch to a different user account. | S |
| Check for and install available Microsoft 365 updates. | R, U |
Managing Your Outlook Email Account
This section covers shortcuts for managing your Outlook email account settings. You can access options to manage account settings and set up automatic replies (out-of-office messages) via the Account Information page of the File menu in Outlook.
| Action | Shortcut |
|---|---|
| Open the Account Information page. | Alt+F, I |
| On the Account Information page, these shortcuts are available: | |
| Access the email account settings menu. | S |
| Open the Automatic Replies dialog box to set up an out-of-office message. | O |
| Open the dialog box for adding a new account to Outlook. | D |
| Empty the Deleted Items folder. | T, Y |
| Open the Rules and Alerts dialog to manage incoming emails and notifications. | R |
Customizing Microsoft 365 App Settings and Options
This table provides shortcuts for opening the Options dialog box and accessing various settings and options within your Microsoft 365 applications. Depending on the app, you can manage settings like spell checking or personalize the app’s appearance.
| Action | Shortcut |
|---|---|
| Open the Options dialog box. | Alt+F, T |
| Within the Options dialog box, these shortcuts are useful: | |
| In Outlook, toggle the Play a sound option for new emails. | M, Tab, P, Spacebar to toggle |
| Access Proofing options to adjust spelling and grammar settings. | P |
| Change the overall Microsoft 365 theme. | G, Tab, T |
Providing Feedback on Microsoft 365 Apps
The following shortcuts enable you to send feedback on Microsoft 365 applications via the Feedback page in the File menu.
| Action | Shortcut |
|---|---|
| Open the Feedback page. | Alt+F, K |
| On the Feedback page, these shortcuts are available: | |
| Open the feedback form for sending positive feedback (“I Like Something”). | L |
| Open the feedback form for sending negative feedback (“I Don’t Like Something”). | D |
| Open the webpage to suggest a new feature or improvement. | S |
Further Resources
Make your content accessible to everyone
Keyboard shortcuts for Outlook
Use keyboard shortcuts to create PowerPoint presentations
Use keyboard shortcuts to deliver PowerPoint presentations
Accessibility Support
Microsoft is dedicated to providing an inclusive experience for all users. For disability-related technical assistance, please reach out to the Microsoft Disability Answer Desk. Their support team is proficient in various assistive technologies and offers assistance in English, Spanish, French, and American Sign Language. Visit the Microsoft Disability Answer Desk site for contact information specific to your region.
For government, commercial, or enterprise users, please contact the enterprise Disability Answer Desk.