Running out of ink can be a frustrating interruption, especially when you need to print important documents or cherished photos. Fortunately, replacing the ink in your Epson printer is a straightforward process that you can easily do at home. This guide will walk you through the steps for various Epson printer series, ensuring you can quickly get back to printing. Before you begin, it’s crucial to have your replacement ink cartridges ready. Remember to only unpack the new cartridges when you’re prepared to install them, and keep the old ones in place until then to prevent your printer’s print head nozzles from drying out.
Let’s dive into the process of how to replace ink in your Epson printer, broken down by different Epson series for clarity.
Step-by-Step Guide to Replacing Ink Cartridges in Your Epson Printer
The method for replacing ink cartridges can slightly vary depending on your Epson printer model. We’ll cover the most common series to make sure you find the instructions relevant to your printer.
For Expression Home Series Printers Without an LCD Panel
If your Epson Expression Home printer doesn’t have an LCD screen, follow these steps:
-
Power On Your Printer: Ensure your Epson printer is turned on.
-
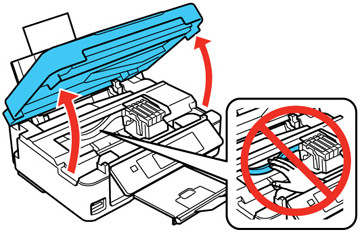
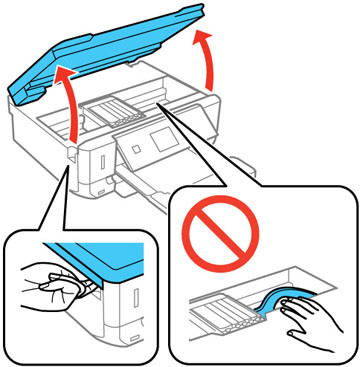
Lift the Scanner Unit: Open the scanner unit of your printer.
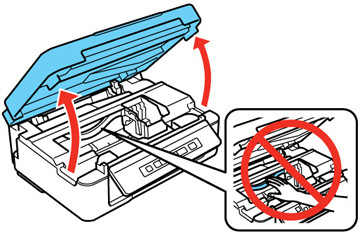 Lift scanner unit of Epson printer
Caution: Do not manually move the print head as this could damage your printer. Also, avoid touching the flat white cable inside the printer.
-
Press the Stop Button: Press the Stop button (represented by a triangle inside a circle).
- Identifying Low or Expended Cartridges: If any cartridges are low or empty, the print head will move to indicate the cartridge position. Press the Stop button again to check for other low or expended cartridges. Once all are identified, the print head will move to the replacement position.
 Ink cartridge replacement position in Epson printer
- Replacing Cartridges Before Empty: If you wish to replace a cartridge before it’s empty, press and hold the Stop button for 6 seconds. The print head will then move to the replacement position.
-
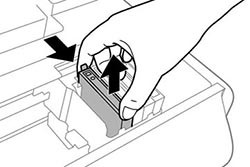
Remove the Old Cartridge: Squeeze the tab on the cartridge and gently lift it straight up to remove it from the printer.
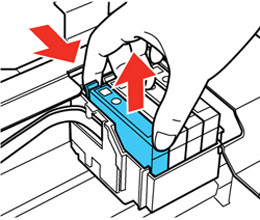 Squeeze tab to remove Epson ink cartridge
 -
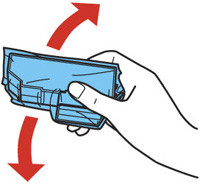
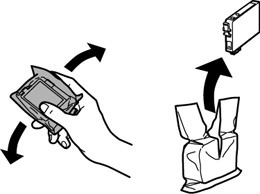
Prepare the New Cartridge: Before opening the new ink cartridge package, shake it gently four or five times. This helps to ensure the ink is properly mixed.
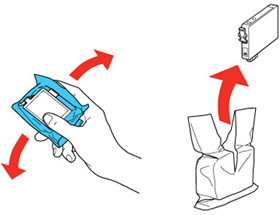 Shake new Epson ink cartridge before opening
 -
Unpack the New Cartridge: Remove the new cartridge from its packaging.
-
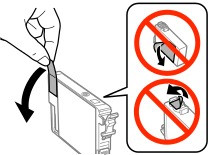
Remove Yellow Tape: Take off the yellow tape from the side of the new ink cartridge.
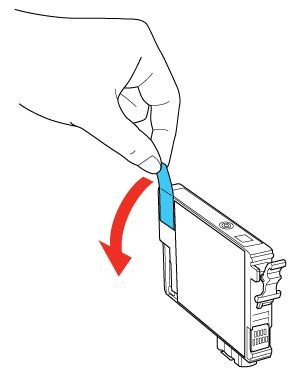 Remove yellow tape from new Epson ink cartridge
 -
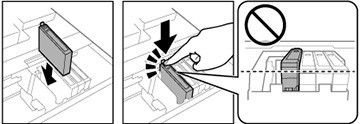
Install the New Cartridge: Insert the new cartridge into the correct holder and push it down until you hear a click, ensuring it is securely in place.
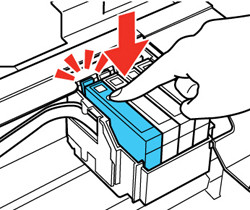 Click new Epson ink cartridge into place
 -
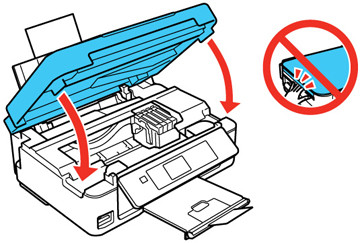
Lower the Scanner Unit: Close the scanner unit of your Epson printer.
 Lower scanner unit of Epson printer after ink replacement
 -
Finalize Ink Replacement: Press the Stop button again. The print head will return to its home position, and the printer will begin charging the ink. This process usually takes about 1.5 minutes. Wait until the power light stops flashing and remains steady, indicating ink charging is complete.
Caution: Never turn off your Epson printer while the power light is flashing, as this can waste ink and potentially disrupt the replacement process.
For Expression Home Series Printers With an LCD Panel
For Epson Expression Home printers equipped with an LCD screen, the process is slightly adjusted:
-
Turn On Your Printer: Power on your Epson printer.
- LCD Prompts: If an ink cartridge is expended, a message will appear on the LCD screen indicating which cartridges need replacing. Press the OK button and select “Replace now”.
- Replacing Before Prompt: If you’re replacing a cartridge before receiving a prompt, press the Home button, navigate to “Setup,” then “Maintenance,” and finally select “Ink Cartridge Replacement.” Press the OK button to proceed.
-
Lift the Scanner Unit: Open the scanner unit.
 Lift scanner unit for Epson Expression Home printer with LCD
Caution: As before, avoid manually moving the print head or touching the internal flat white cable.
-
Remove the Old Cartridge: Squeeze the tab and lift the cartridge straight up to remove it.
Squeeze tab to remove Epson ink cartridge -
Prepare the New Cartridge: Gently shake the new ink cartridge four or five times before opening.
Shake new Epson ink cartridge before opening -
Unpack the New Cartridge: Remove the cartridge from its packaging.
-
Remove Yellow Tape: Remove the yellow tape from the side of the cartridge.
Remove yellow tape from new Epson ink cartridge -
Install the New Cartridge: Insert the new cartridge into the holder and press down until it clicks.
Click new Epson ink cartridge into place -
Lower Scanner and Start: Close the scanner unit and press the Start button.
 Close scanner and press start button on Epson printer
For Expression Photo or Premium Series Printers
For users of Epson Expression Photo or Premium series printers, the ink replacement steps are as follows:
-
Check CD/DVD Tray: Ensure the CD/DVD tray is not inserted into the printer.
-
Power On and Navigate LCD: Turn on your printer.
- LCD Message: If a cartridge is expended, you’ll see a message on the LCD. Note the cartridges to be replaced, press OK, and select the ink cartridge replacement option.
- Manual Replacement via LCD: If replacing before a prompt, press the Home button, select “Setup” > “Maintenance” > “Ink Cartridge(s) Replacement,” and press the Start button.
-
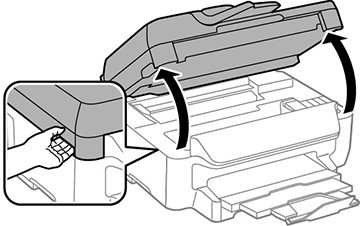
Lift the Scanner Unit: Open the scanner unit.
 Open scanner unit of Epson Expression Photo printer
Caution: Avoid moving the print head manually or touching the flat white cable.
-
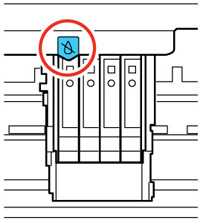
Unlock and Remove Cartridge: Push in the blue tab to unlock the cartridge you’re replacing, then lift the bottom of the cartridge to remove it.
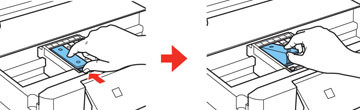 Unlock and remove Epson ink cartridge using blue tab
 -
Recap Used Cartridge (Optional): Use the cap that came with the new cartridge to recap the used one if you plan to dispose of it later carefully.
 Recap used Epson ink cartridge
 -
Shake Black Ink Cartridge (BK Only): If replacing the Black (BK) cartridge, gently shake the new cartridge four or five times before unwrapping. This is not necessary for Photo Black (PBK) or other color cartridges.
Caution: Do not shake cartridges after opening as ink may leak.
 Shake black ink cartridge before opening
 -
Unpack New Cartridge: Remove the new cartridge from the package.
Caution: Avoid touching the gold IC chip and ink supply port on the cartridge as this may prevent normal operation.
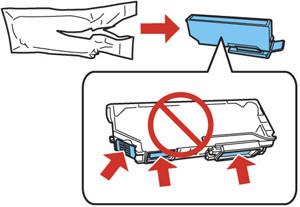 Unpack new Epson ink cartridge carefully
 -
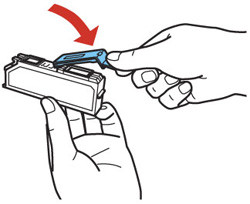
Remove Cap from New Cartridge: Take the cap off the new cartridge and store it in case you need it later.
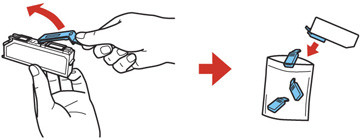 Remove cap from new Epson ink cartridge and store
 -
Insert New Cartridge at Angle: Insert the new cartridge at a slight angle into the holder, as shown, and then press down on the bottom until it clicks into place.
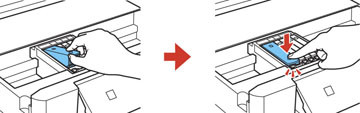 Insert new Epson ink cartridge at an angle
 -
Close Scanner and Wait: After replacing all necessary cartridges, close the scanner unit. The printer will start priming the ink, which may take a few minutes. A completion message will appear on the LCD screen when the ink replacement is finished.
For WorkForce Series Printers
Replacing ink in Epson WorkForce series printers involves these steps:
-
Power On and LCD Navigation: Turn on your printer.
- LCD Prompt: If a cartridge is expended, a message will appear. Note the cartridges, select “Proceed,” and follow the on-screen instructions.
- Manual Replacement via LCD: To replace before a prompt, press the Home button, go to “Setup” > “Maintenance” > “Ink Cartridge Replacement,” and press the Colour button.
-
Lift Scanner Unit: Open the scanner unit.
 Open scanner unit of Epson WorkForce printer
Caution: Do not touch the flat white cable inside the printer.
-
Remove Old Cartridge: Squeeze the tab on the cartridge and lift it straight up to remove it.
 Remove Epson WorkForce ink cartridge
 -
Shake and Unpack New Cartridge: Gently shake the new cartridge four or five times, then remove it from the package.
 Shake and unpack new Epson WorkForce ink cartridge
 -
Remove Yellow Tape Only: Crucially, remove only the yellow tape from the new cartridge.
 Remove only yellow tape from Epson WorkForce ink cartridge
 -
Install New Cartridge: Insert the new cartridge into the holder and push down until it clicks.
 Install and click new Epson WorkForce ink cartridge
 -
Close Scanner and Wait: Close the scanner unit. The printer will start priming the ink. Wait until you see a completion message on the LCD screen.
Replacing Ink Cartridges Using Your Computer
Epson also provides software utilities to guide you through the ink replacement process directly from your computer.
Windows
-
Access Printer Preferences: From your application, click “Print” from the “File” menu. Select your Epson printer icon, and click “Properties” or “Printing Preferences.”
-
Navigate to Maintenance/Utility: In the Epson preferences window, click on the “Maintenance” or “Utility” tab.
-
Ink Cartridge Replacement: If you need to replace ink, click the “Ink Cartridge Replacement” button in the “Maintenance” or “Utility” tab. Follow the on-screen prompts.
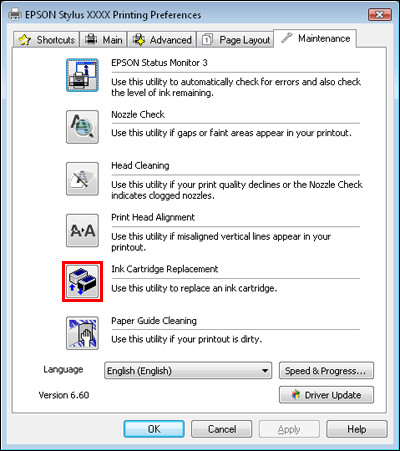 Ink Cartridge Replacement button in Epson printer utility for Windows
macOS
-
Open EPSON Printer Utility: Double-click the “EPSON Printer Utility3” icon, usually found in the “Applications” folder on your Macintosh hard drive. Alternatively, for some versions:
- Go to “Print” from your application’s “File” menu, select your Epson printer, and choose “Print Settings” from the pull-down menu.
- Click the Utility icon in the print settings window. For older macOS versions (10.3, 10.4), use “Printer Setup Utility” in “/Applications/Utilities”.
-
Select Printer (if prompted): If asked, choose your printer from the Printer List and click “OK.”
-
Ink Cartridge Replacement: Click the “Ink Cartridge Replacement” button in the Epson preferences window and follow the on-screen instructions.
Epson Printer Utility 3 Ink Cartridge Replacement Button Epson Printer Utility 4 Ink Cartridge Replacement Button  Ink Cartridge Replacement button in Epson Printer Utility 4 for macOS
Troubleshooting Tips
- Ink Light or Error Messages: If the ink light is on or you see an error message about incorrect ink cartridge installation after replacement, it’s possible a cartridge isn’t recognized. Ensure it’s properly clicked into place and that you’ve removed all the yellow tape. Restarting the printer may also help.
Replacing ink in your Epson printer doesn’t have to be daunting. By following these series-specific steps, you can easily maintain your printer and ensure it’s always ready to deliver high-quality prints. Remember to always use genuine Epson ink cartridges for optimal performance and longevity of your printer.