
Achieving high-quality 3D prints often hinges on overcoming challenges presented by overhangs. For enthusiasts and professionals alike, understanding how to manage these tricky geometries is crucial, whether you are printing at home or seeking reliable Printing Nearby services. This guide delves into the essential techniques to optimize your 3D printing process, specifically focusing on printing overhangs without supports, enhancing both the aesthetic and structural integrity of your creations.
Understanding Overhangs and Their Challenges
In 3D printing, an overhang refers to any part of a model that extends outward beyond the support of the layer below. The severity of an overhang is measured by its angle relative to the vertical plane. Steeper angles, especially those below 45 degrees, pose significant challenges because the printer is essentially extruding molten filament into thin air. Without proper settings and techniques, this can lead to sagging, drooping, and a significant reduction in print quality.
The original article, focused on the Bath_Boat model and Prusa printers, highlighted that even models with seemingly problematic overhangs (20° to 25°) can be printed successfully. The key is to meticulously tune your printer settings and understand the interplay of several factors.
Key Factors Affecting Overhang Quality
Successfully printing overhangs, especially when aiming for printing nearby perfection without supports, requires careful consideration of the following elements:
Heat Management: The Balancing Act
Heat is a double-edged sword in 3D printing. While necessary to melt and fuse the filament layers, excessive heat can be detrimental to overhangs. Consider these heat sources:
- Hotend Temperature: The temperature of your hotend directly affects how quickly the extruded filament cools. Lowering the hotend temperature, within material-specific limits, can help the filament solidify faster and reduce sagging.
- Bed Temperature: The heat radiating from the bed can keep lower layers warm, which may be helpful for adhesion but can also contribute to heat buildup in overhangs.
- Accumulated Plastic Heat: Dense infill, multiple perimeters, and solid layers increase the thermal mass of the print, retaining heat and potentially softening overhangs.
Cooling: Passive and Active Strategies
Effective cooling is paramount for successful overhang printing. It allows the freshly extruded filament to solidify rapidly, maintaining its intended shape.
- Passive Cooling (Time): Allowing sufficient time for each layer to cool before the next layer is printed is crucial. Reducing print speed naturally increases passive cooling time.
- Active Cooling (Fan): Part cooling fans are essential for directing airflow onto the extruded filament, accelerating the cooling process. However, excessive cooling can lead to warping or curling, especially with materials like ABS. The optimal fan speed is material-dependent and requires careful calibration.
Print Speed: Precision Over Pace
Print speed significantly impacts overhang quality. Default speeds are often too fast for intricate overhang sections, leading to inaccurate perimeter placement and sagging.
- Slowing Down Perimeters: Reducing the print speed specifically for perimeters, especially external perimeters, in overhang areas allows for more precise filament deposition and improved layer adhesion. This is critical for achieving clean and structurally sound overhangs.
Extrusion Width: Providing a Foundation
Extrusion width plays a subtle yet important role in overhang support. The principle is that each layer needs to adhere to the layer below. For overhangs, this purchase is minimal, but adjustments can help.
- Increased Extrusion Width (Slightly): While counterintuitive, slightly increasing the extrusion width (e.g., to 50% of nozzle diameter as suggested in the original article, though this might be a typo and should be 0.5mm for a 0.4mm nozzle, meaning 125%) for overhang sections can provide a slightly wider base for subsequent layers to adhere to. However, excessive width can lead to other issues, so moderation is key.
Layer Height: Fine-Tuning Vertical Resolution
Layer height influences the staircase effect on curved surfaces and overhangs.
- Lower Layer Heights: Using smaller layer heights (e.g., 0.1mm to 0.25mm) can improve overhang quality by creating finer steps and allowing each layer to have slightly better support from the layer below. However, extremely thin layers can also be problematic, potentially weakening overhangs. Finding the optimal balance is crucial.
Practical Adjustments for Overhang Optimization: Learning from the Bath_Boat Example
The original article effectively demonstrates how to apply these principles using the Bath_Boat model and PrusaSlicer. Here are key takeaways and settings adjustments that can be generalized for other models and printers, especially when you are seeking results comparable to professional printing nearby services:
-
Initial Layer Optimization:
- Disable “Ensure vertical shell thickness”: This setting can sometimes add unnecessary material in overhang areas, exacerbating heat buildup and curling. Disabling it can improve overhang quality in certain cases.
- Temperature Reduction: Slightly lower hotend and bed temperatures, especially for materials like PETG, can improve cooling and reduce warping. Experiment to find the lowest temperature that still provides good layer adhesion.
- Reduced Layer Height: Using a lower initial layer height (e.g., 0.1mm) can improve adhesion and the foundation for subsequent overhang layers.
- Disable Elephant’s Foot Compensation: While helpful for bed adhesion, elephant’s foot compensation can sometimes negatively impact the initial overhang layers, especially at shallow angles.
-
Height Range Modifiers (HRM): Targeted Settings:
- Extrusion Width Adjustment: Use HRMs to selectively adjust extrusion width for overhang sections. A slight increase (e.g., from 0.45mm to 0.55mm with a 0.4mm nozzle) can provide better support for overhanging layers.
- Speed Reduction: Apply HRMs to reduce print speeds for perimeters and external perimeters in overhang regions. Slower speeds enhance precision and cooling time.
- Bottom Layer Control: In some cases, slicers may incorrectly identify overhang areas as bottom layers and add solid infill, which can trap heat and cause curling. HRMs can be used to set “Bottom Layers” to 0 in these specific height ranges, preventing unnecessary material deposition and improving overhang cooling.

Bow of the Bath Boat model printed with optimized overhang settings.
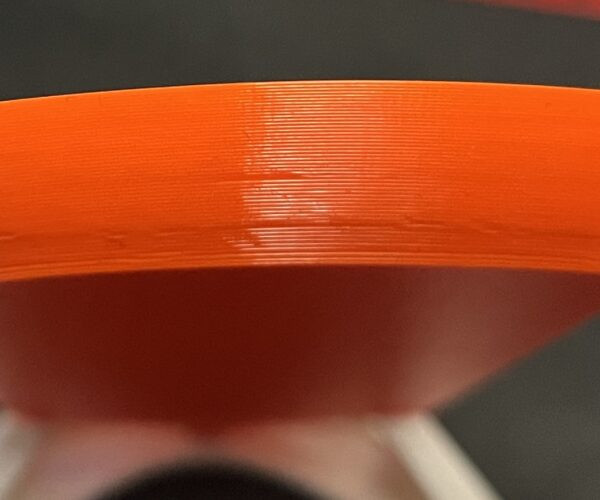
Starboard side of the Bath Boat showcasing clean overhangs.
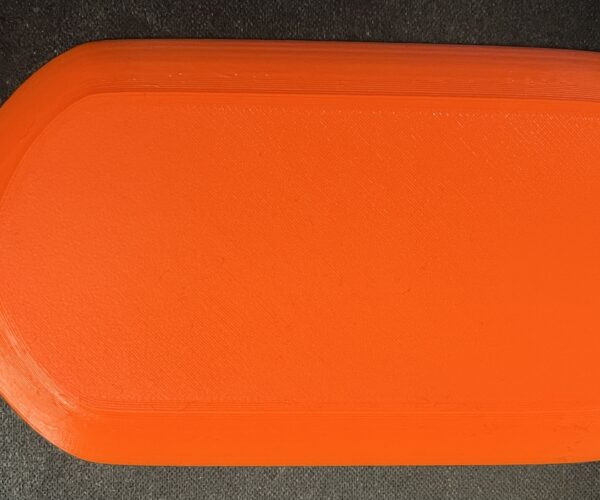
Stern view of the 3D printed Bath Boat, highlighting successful overhang printing.
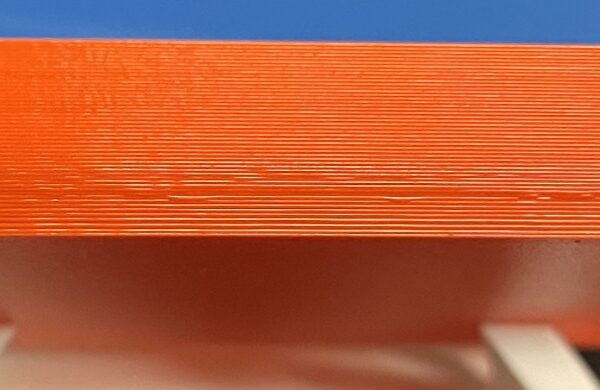
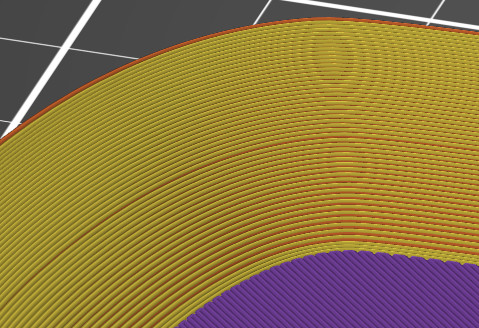
Close-up view demonstrating the quality of printed overhangs on the Bath Boat model.
- Adhesion Aids: For challenging materials or intricate overhangs, consider using bed adhesion enhancers like Layerneer Bed Weld or Magigoo. These can improve first-layer adhesion and reduce warping, particularly with materials like ABS and PETG, allowing for lower bed temperatures and better overhang cooling.
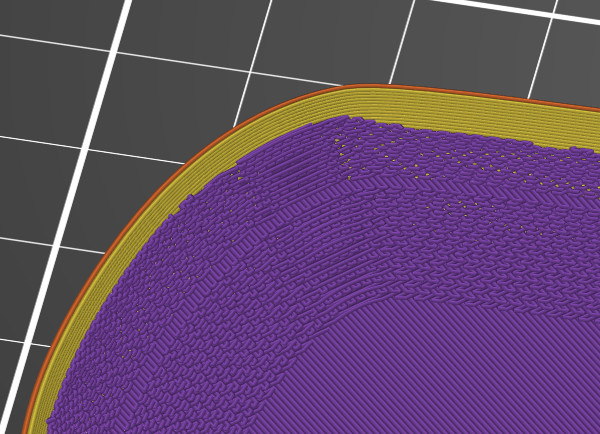
Visual example of “Ensure vertical shell thickness” setting ON, potentially adding unnecessary material to overhang areas.

Visual example of “Ensure vertical shell thickness” setting OFF, demonstrating cleaner overhang printing.
Result of optimized settings with “Ensure vertical shell thickness” and bottom layers turned off in specific height ranges, resulting in improved overhang quality.
Conclusion: Achieving Overhang Mastery and Finding Local Printing Solutions
Mastering overhangs in 3D printing is an iterative process that requires experimentation and fine-tuning. By understanding the key factors—heat management, cooling, speed, extrusion, and layer height—and applying targeted settings adjustments, you can significantly improve the quality of your prints, even for models with challenging overhangs.
While these techniques empower you to achieve impressive results at home, there are times when seeking professional assistance is beneficial. If you require high-volume printing nearby or need access to specialized materials or large-format printing, exploring local 3D printing services can be a valuable option. These services often possess advanced equipment and expertise to handle complex projects and deliver consistently high-quality results, freeing you from the intricacies of print optimization and allowing you to focus on design and application.
By combining your own optimized printing techniques with the resources available from printing nearby services, you can unlock the full potential of 3D printing and bring your most ambitious ideas to life.
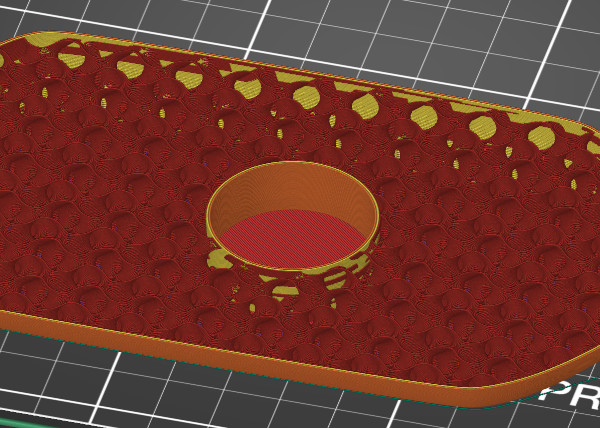
Illustration of center of mass concept for optimizing boat stability, applicable to various 3D printed functional parts.
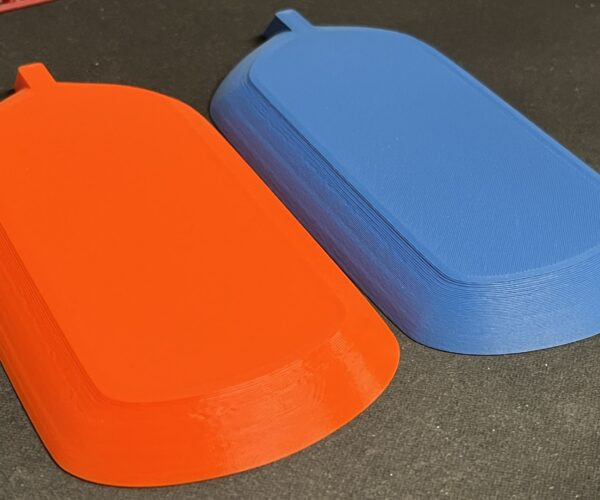
Side-by-side comparison of PETG and PLA prints, showcasing material differences and potential overhang performance variations.