Taking a screenshot on your PC is a fundamental skill, whether you’re a student, professional, or simply navigating the digital world. Screenshots are incredibly useful for a multitude of reasons, from capturing important information and troubleshooting technical issues to preserving evidence of online interactions. This guide will provide you with a detailed walkthrough on How To Do A Screen Print On Pc, covering both Windows and Mac operating systems, ensuring you can easily capture your screen whenever needed.
Understanding Screenshots
Before diving into the methods, let’s clarify what a screenshot is. Essentially, a screenshot, also known as a screen capture or screen grab, is a digital image of your computer screen. It captures exactly what is displayed on your monitor at a given moment, allowing you to save and share this visual information. Screenshots are invaluable tools for:
- Documenting Information: Quickly save online articles, recipes, instructions, or any on-screen text for offline access or future reference.
- Technical Support: Easily show technical support teams the exact error messages or interface issues you are experiencing.
- Creating Tutorials: Illustrate steps in guides and tutorials by visually showing each stage of a process.
- Preserving Online Interactions: Capture chat conversations, social media posts, or any online content for your records.
- Cyberbullying Evidence: As highlighted in the original context, screenshots are crucial for documenting instances of cyberbullying and online harassment.
Now, let’s explore the various methods for taking screenshots on your PC.
How to Screenshot on a Windows PC
Windows offers several built-in methods to capture your screen, catering to different needs and levels of complexity.
1. Using the Print Screen (PrtScn) Key
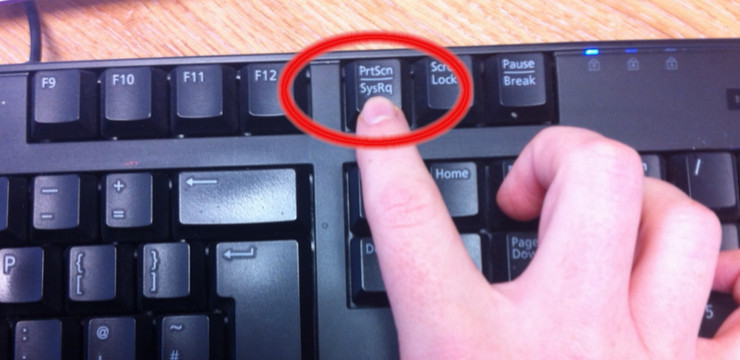
The most basic and widely known method is using the Print Screen key, often labeled as PrtScn, Print Scrn, or similar. This key is typically located in the upper-right corner of your keyboard.
-
Capture the Entire Screen: Simply press the PrtScn key. This action copies an image of your entire screen to the clipboard. To view and save the screenshot, you need to paste it into an image editing program like Paint, or a document editor like Microsoft Word.
- Steps:
- Press the PrtScn key.
- Open Paint (search for “Paint” in the Windows search bar).
- Press Ctrl + V (or right-click and select “Paste”) to paste the screenshot into Paint.
- Edit or crop the image if needed.
- Save the image (File > Save As).
 PrtScn Key Location on Keyboard
 - Steps:
-
Capture the Active Window: To capture only the currently active window (the window you are currently working in), press Alt + PrtScn keys simultaneously. This will copy a screenshot of just that window to the clipboard. Follow the same pasting and saving steps as above.
- Steps:
- Press Alt + PrtScn keys together.
- Open Paint or another image editor.
- Paste the screenshot (Ctrl + V).
- Edit and save as needed.
- Steps:
2. Using the Snipping Tool
For more control and editing options right after capturing, Windows provides the Snipping Tool. This built-in utility offers different snipping modes and basic annotation features.
-
Accessing Snipping Tool: Search for “Snipping Tool” in the Windows search bar and open the application.
-
Snipping Modes: Click on “Mode” to choose from different capture types:
- Free-form Snip: Draw a freehand shape around the area you want to capture.
- Rectangular Snip: Drag a rectangle to select the area to screenshot.
- Window Snip: Capture a specific window by clicking on it.
- Full-screen Snip: Capture the entire screen (similar to the PrtScn key).
-
Taking a Snip: Select your desired mode and click “New.” Your screen will dim, and you can then select the area you want to capture. The screenshot will open in the Snipping Tool window.
-
Editing and Saving: The Snipping Tool provides basic annotation tools like a pen and highlighter. Use these to mark up your screenshot if needed. Click the “Save Snip” button (disk icon) to save the image.
PrtScn Key Location on Keyboard
3. Using the Windows Key + Print Screen Shortcut (Screenshot to File)
For a quicker method that automatically saves your screenshot as a file, use the Windows Key + PrtScn shortcut.
- Steps:
- Press the Windows Key + PrtScn keys simultaneously.
- Your screen will briefly dim, indicating a screenshot has been taken.
- The screenshot is automatically saved as a PNG file in the “Screenshots” folder within your “Pictures” library.
This method is incredibly efficient for quickly capturing and saving full-screen screenshots without needing to paste into another program.
4. Using the Game Bar (Windows Key + G)
Windows Game Bar, primarily designed for gaming, also includes a screenshot feature that can be used for any application.
- Accessing Game Bar: Press Windows Key + G to open the Game Bar.
- Taking a Screenshot: In the Game Bar overlay, locate the “Capture” widget (it looks like a camera icon). Click the “Screenshot” button (camera icon) to capture the current screen.
- Finding Screenshots: Game Bar screenshots are saved in the “Captures” folder within your Videos library.
This method is particularly useful if you prefer using overlays for quick access to screen capture functionality.
How to Screenshot on a Mac
macOS also provides straightforward methods for taking screenshots, utilizing keyboard shortcuts and a dedicated utility.
1. Keyboard Shortcuts for Screenshots on Mac
Mac relies heavily on keyboard shortcuts for screen capturing, offering various options.
-
Capture the Entire Screen: Press Shift + Command + 3 keys together. This will take a screenshot of your entire screen and automatically save it as a PNG file on your desktop.
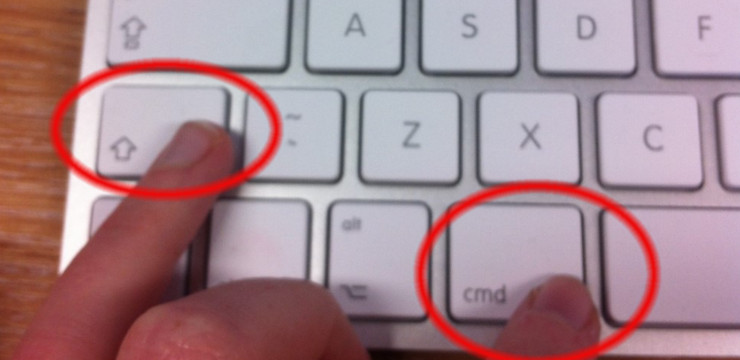 Mac Screenshot Keys: Command, Shift, 3
 -
Capture a Selected Portion of the Screen: Press Shift + Command + 4 keys together. Your cursor will change to a crosshair. Drag the crosshair to select the area you want to capture. Once you release the mouse button, a screenshot of the selected area will be saved as a PNG file on your desktop.
-
Capture a Specific Window: Press Shift + Command + 4, then press the Space bar. The cursor will change to a camera icon. Click on the window you want to capture. A screenshot of that window will be saved to your desktop.
2. Using the Grab Utility (macOS Mojave and earlier) / Screenshot Utility (macOS Catalina and later)
For more advanced options and control, macOS provides the Grab utility (in older versions) and the Screenshot utility (in newer versions).
-
Accessing Grab/Screenshot Utility:
- Grab (Older macOS): Find “Grab” in the Utilities folder within Applications, or use Spotlight search (Command + Space bar, then type “Grab”).
- Screenshot (Newer macOS): Press Shift + Command + 5. This opens the Screenshot utility toolbar at the bottom of your screen.
-
Screenshot Utility Options: The Screenshot utility toolbar offers various capture options:
- Capture Entire Screen: (First button – camera icon)
- Capture Selected Window: (Second button – window icon)
- Capture Selected Portion: (Third button – dashed rectangle icon)
- Record Entire Screen: (Fourth button – record icon)
- Record Selected Portion: (Fifth button – dashed rectangle with record icon)
- Options: Click “Options” for settings like save location, timer, and showing mouse cursor.
-
Taking a Screenshot/Screen Recording: Select your desired option from the toolbar and follow the on-screen instructions. Screenshots and screen recordings are saved based on your chosen settings (default is desktop).
Mac Screenshot Keys: Command, Shift, 3
Screenshots on Smartphones and Tablets
While this guide focuses on PCs, it’s worth briefly mentioning screenshots on smartphones and tablets, as the original article touched upon this. Methods vary by device and operating system, but commonly involve pressing a combination of buttons:
- Android: Typically Power button + Volume Down button simultaneously.
- iOS (iPhone/iPad):
- With Home Button: Power button + Home button simultaneously.
- Without Home Button: Power button + Volume Up button simultaneously.
Screenshots on mobile devices are usually saved directly to your photo gallery or camera roll.
Conclusion
Mastering how to do a screen print on PC – or rather, how to take screenshots on your PC – is an essential digital literacy skill. Whether you’re using Windows or macOS, the methods outlined above provide you with the tools to efficiently capture your screen for various purposes. From simple full-screen captures to more refined selections and annotations, these techniques empower you to document, share, and preserve digital information effectively. Practice these methods to become proficient in screen capturing and enhance your digital workflow.