Animal prints are a timeless trend in fashion, continuously appearing on runways season after season. Designers are captivated by these playful patterns, and you too can bring this wild aesthetic to your designs. This tutorial will guide you through the simple steps of drawing cheetah print, inspiring you to incorporate this striking pattern into your fashion illustrations and designs. Let’s explore the exciting world of animal-inspired creativity!
Step 1: Sketching Initial Spots
Begin by outlining the area where you want to apply the cheetah print. Think about the scale and density of the pattern in your design. Lightly sketch circles to represent the placement of the spots. Remember, for a natural look, vary the sizes of your circles. Inconsistent sizes will prevent the pattern from appearing too uniform and artificial.
Notice in the example image how some circles are partially off the edge of the garment outline. This technique adds depth and a more realistic, three-dimensional quality to your fashion drawing. Also, consider how clothing naturally folds and drapes, sometimes obscuring parts of the pattern, like under a belt. Incorporating these realistic elements elevates your design.
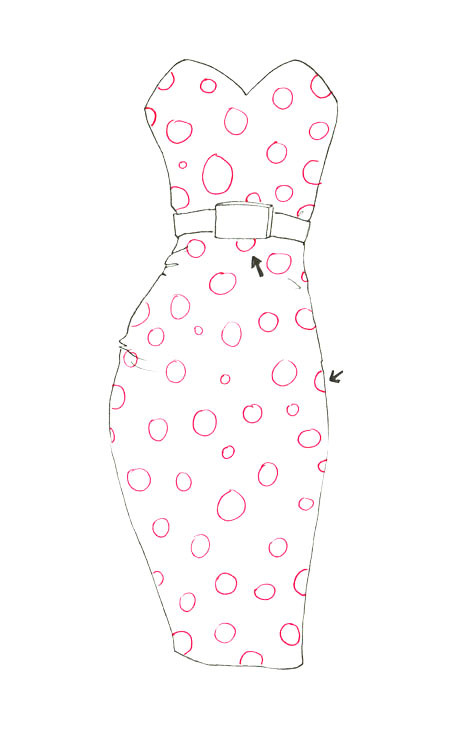 Initial circles for cheetah print spots, varying in size and placement to mimic natural patterns.
Step 2: Defining the Cheetah Spots – Shape One
Now, transform those simple circles into recognizable cheetah spots. Using the circles as a foundation, begin to refine their shapes. Cheetah spots are characterized by their solid, rounded forms. Slightly distort the circular shapes, but ensure you maintain a size close to your initial circles. Avoid drastically altering the size as consistency is key to a cheetah print. Select circles that are reasonably spaced apart; overcrowding the spots can make the pattern appear cluttered.
This first spot shape is essentially a slightly irregular, solid dot. This shape works particularly well for smaller spots but can be adapted for larger areas as well.
Once you are satisfied with the shapes, fill them in completely with a dark color, typically black or dark brown for a classic cheetah look. Don’t strive for perfect, clean lines. In fact, a slightly textured, hand-drawn fill will enhance the natural, organic feel of the cheetah print.
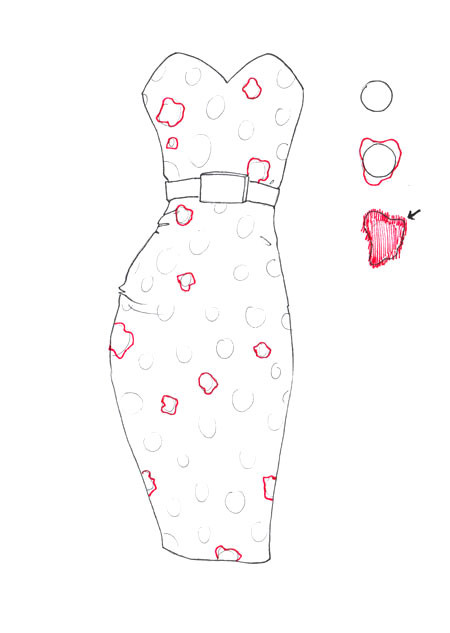 First stage of cheetah print spots, solid dark shapes derived from initial circles, showing varied and organic outlines.
Step 3: Introducing the ‘C’ Shape Spot
Cheetah print patterns often incorporate a ‘C’ or crescent-like shape to add variety and visual interest. Referring back to your initial circles, introduce this new shape. Draw a distorted arch or ‘C’ shape, following the general placement of some of the circles. Rotate this ‘C’ shape at different angles throughout the pattern. This variation in orientation is crucial for creating a dynamic and engaging cheetah print. Observe how in the example, this ‘C’ shape, like the circles in step one, interacts with the garment’s edges, contributing to the realistic depiction. Fill these newly drawn ‘C’ shapes with the same dark color as the previous spots.
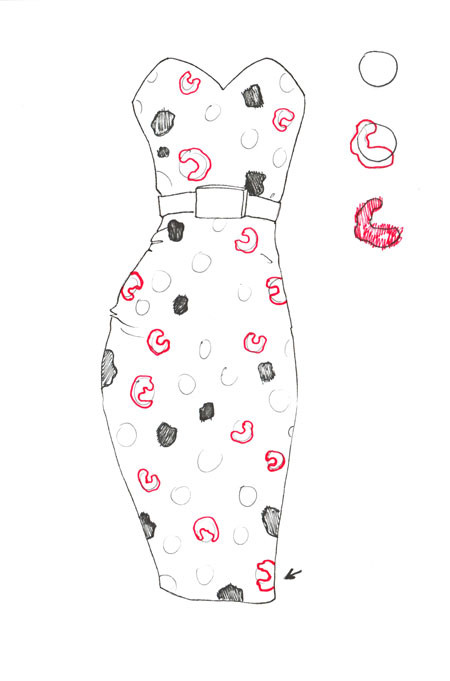 Adding 'C' shaped cheetah spots, rotated at different angles to enhance pattern dynamism and natural look.
Step 4: Creating ‘Twin’ Spots for Detail
Another characteristic spot found in cheetah patterns is the ‘twin’ spot. Develop this shape by starting with a ‘C’ shape as in the previous step. Then, add a mirrored reflection on the opposite side of the original circle. This reflection can be slightly different in size, width, or overall form compared to the initial ‘C’ shape; perfect symmetry is not necessary and can even detract from the natural look. Fill these ‘twin’ spots with your dark color, integrating them seamlessly into the evolving cheetah print.
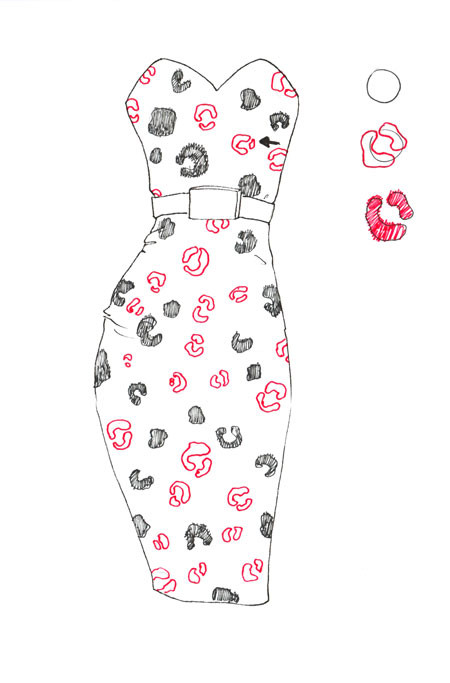 Developing 'twin' cheetah spots by mirroring 'C' shapes, adding complexity and visual texture to the pattern.
Step 5: Applying the Base Color
With a variety of cheetah spots now filling your design, take a step back and assess the overall pattern. Are there any areas that appear too sparse or crowded? If needed, add a few more spots to achieve a balanced distribution. Once you are satisfied with the spot arrangement, it’s time to apply the base coat of color to the entire design area. While traditional cheetah print utilizes warm yellows and golden browns, don’t hesitate to experiment with unconventional color palettes. Imagine a cheetah print in shades of pink, cool blues, or sophisticated greys – the color choice is entirely yours and can dramatically alter the mood and style of your design. Embrace your creative freedom!
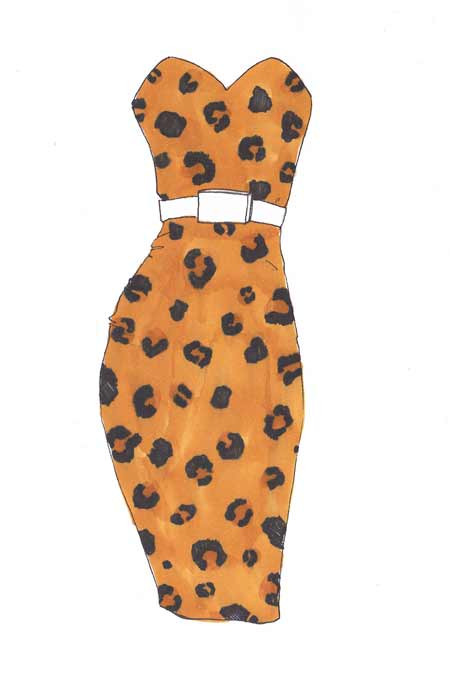
 Applying a base color to the cheetah print area, showing the pattern integrated with a background hue for a complete look.
Step 6: Adding Depth with Inner Spot Details
For an extra touch of realism and depth, you can add inner detailing to some of the ‘C’ and ‘twin’ shaped spots. Using a color slightly darker than your base coat, carefully fill in the inner curves of these shapes. Again, avoid overly precise coloring. A slightly imperfect, textured fill will enhance the hand-drawn aesthetic. This step is optional; if you are pleased with the look of your cheetah print at this stage and prefer a flatter, less detailed style, you can certainly skip it. This detail is for those aiming for a more refined and realistic representation.
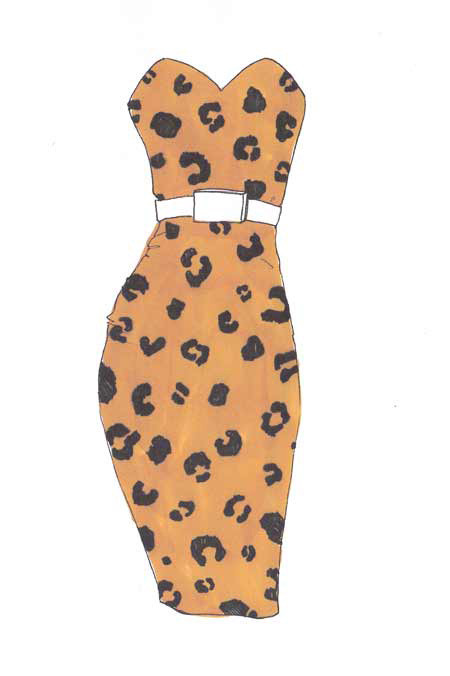
 Adding inner details to cheetah spots with a darker shade to enhance depth and create a more realistic texture.
Drawing cheetah print is a fast and enjoyable process! Now that you’ve mastered this technique, why not explore other animal prints? You can find inspiration and tutorials for various textile patterns here. To further enhance a cheetah-inspired fashion piece, consider adding a leather jacket to your design for a touch of edgy sophistication.
Have fun experimenting with this captivating animal print and let your imagination run wild!
Happy drawing!