
Printing Avery labels from Word using Excel data is straightforward. This guide from amazingprint.net will walk you through the process, ensuring your labels are perfectly aligned and professionally printed. By using mail merge, you’ll save time and effort, creating custom labels for various applications such as addressing envelopes, organizing files, or labeling products.
1. What Is Mail Merge and How Does It Help with Avery Labels?
Mail merge is a powerful tool in Microsoft Word that allows you to create personalized documents, such as Avery labels, by combining data from a spreadsheet or database. It is a useful and effective tool to create personalized labels. This is particularly useful when you need to print many labels with different addresses or information. By linking your Excel data to a Word document, you can automatically populate each label with the correct information.
1.1. Benefits of Using Mail Merge for Avery Labels
- Time-Saving: Automates the process of creating multiple labels with personalized information.
- Accuracy: Reduces the risk of manual data entry errors.
- Consistency: Ensures all labels have a uniform appearance.
- Customization: Allows for easy customization of label content and design.
- Efficiency: Streamlines the printing process, saving time and resources.
1.2. Common Uses for Avery Labels Printed with Mail Merge
- Address Labels: Quickly create address labels for mailing campaigns or personal correspondence.
- Shipping Labels: Generate shipping labels with recipient and return addresses.
- Product Labels: Design and print labels for products with information such as name, description, and barcode.
- File Folder Labels: Organize files and documents with clear, descriptive labels.
- Name Badges: Create personalized name badges for events or conferences.
- Inventory Labels: Manage inventory with labels that include product codes, quantities, and locations.
2. What Do I Need to Get Started?
Before you begin, make sure you have the following:
- Microsoft Word: Ensure you have a version of Microsoft Word installed on your computer.
- Microsoft Excel: Your data should be organized in an Excel spreadsheet with columns for each field you want to include on the labels (e.g., Name, Address, City, State, Zip Code).
- Avery Labels: Purchase the correct Avery label sheets that match your printer and project requirements.
- Printer: A working printer that supports label printing.
2.1. Setting Up Your Excel Spreadsheet for Mail Merge
The first step in using mail merge for Avery labels is to set up your Excel spreadsheet correctly. Here’s how to do it:
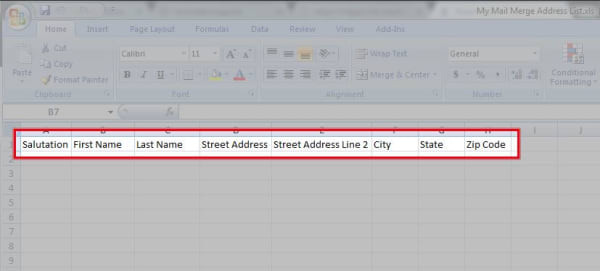
- Column Headers: Ensure each column has a clear and descriptive header. These headers will be used as field names in Word.
- Data Consistency: Keep your data consistent across all rows. For example, ensure all phone numbers have the same format.
- One Sheet: Place all your data on a single sheet within the Excel file.
- Remove Empty Rows/Columns: Delete any empty rows or columns to avoid errors during the mail merge process.
 formatting mail merge excel spreadsheet
Alt text: Properly formatted Excel spreadsheet for mail merge with clear column headers such as Name, Address, City, and Zip Code.
2.2. Choosing the Right Avery Label Template in Word
Selecting the correct Avery label template in Word is crucial for proper alignment. Here’s how to find and choose the right template:
- Identify Your Avery Product Number: Look for the product number on your Avery label packaging. It is usually a four- or five-digit number.
- Open Word and Start a New Document: Open Microsoft Word and create a new, blank document.
- Go to the Mailings Tab: Click on the Mailings tab in the Word ribbon.
- Start Mail Merge: In the Start Mail Merge group, click Start Mail Merge and select Labels.
- Label Options: In the Label Options dialog box, select Avery US Letter in the Label vendors dropdown menu.
- Find Your Product Number: Scroll through the list of product numbers and select the one that matches your Avery label package.
- Click OK: Once you’ve selected your product number, click OK to load the template.
3. How to Perform Mail Merge for Avery Labels in Word: A Step-by-Step Guide
Here’s a detailed guide on how to perform mail merge for Avery labels in Word:
3.1. Step 1: Start the Mail Merge Wizard
- Go to the Mailings Tab: Open Microsoft Word and go to the Mailings tab.
- Start Mail Merge: Click on Start Mail Merge in the Start Mail Merge group.
- Step by Step Mail Merge Wizard: Select Step by Step Mail Merge Wizard from the dropdown menu. This will open the Mail Merge pane on the right side of your Word window.
Alt text: Starting mail merge in Microsoft Word by selecting the Step by Step Mail Merge Wizard option.
3.2. Step 2: Select the Document Type
- Choose Labels: In the Mail Merge pane, select Labels as the document type and click Next: Starting document at the bottom of the pane.
Alt text: Selecting the “Labels” option in the Mail Merge Wizard in Microsoft Word.
3.3. Step 3: Choose the Starting Document
- Label Options: Click on Label options… to specify the label product number.
- Avery US Letter: In the Label Options window, make sure that the Printer Information is set to Page printers, Tray is set to Default Tray, and Label vendor is set to Avery US Letter.
- Select Product Number: Scroll to your product number, click on it, and click OK.
- Next: Select Recipients: Click Next: Select recipients at the bottom of the Mail Merge pane.
Alt text: Selecting Avery US Letter as the label vendor and specifying the Avery product number in Word’s Mail Merge options.
3.4. Step 4: Select Recipients
- Use an Existing List: Choose the Use an existing list option.
- Browse for Excel File: Click Browse… to locate and open your Excel file containing the data.
- Select Table: A window will ask you to select a table. Leave Sheet1$ selected and click OK.
- Mail Merge Recipients: Review your Mail Merge Recipients to ensure the data is correct, then click OK.
- Next: Arrange your labels: Click Next: Arrange your labels at the bottom of the Mail Merge pane.
Alt text: Browsing for the Excel file containing the mailing list to use for the mail merge process in Word.
3.5. Step 5: Arrange Your Labels
- Insert Merge Fields: Click More items… in the Mail Merge pane. The Insert Merge Field window will open.
- Choose Columns: Select the columns you want to merge and in what order by clicking on each field and then clicking Insert one at a time. For example, click on First Name and then click Insert, then click on Last Name and then Insert, and so on.
- Close Insert Merge Field Window: Once every field is added, click Close.
- Add Spaces and Line Breaks: In the first label, click between each field to add spaces, line breaks, and commas as needed.
- Update All Labels: Click Update All Labels to apply these changes to the entire sheet.
- Next: Preview your labels: Click Next: Preview your labels at the bottom of the Mail Merge pane.
Alt text: Verifying the mailing list in the Mail Merge Recipients dialog box to ensure data accuracy before arranging labels.
3.6. Step 6: Preview Your Labels
- Preview the First Sheet: Preview the first sheet to make sure the data appears correctly on the labels.
- Adjust if Necessary: If there are any other spaces, line breaks, or characters you need to add, click on Previous: Arrange your labels to go back to the previous step and make adjustments.
- Next: Complete the merge: If everything looks correct, click on Next: Complete the merge at the bottom of the Mail Merge pane.
Alt text: Arranging the mailing list data fields on the labels using the Insert Merge Field option in Microsoft Word.
3.7. Step 7: Complete the Merge
- Edit Individual Labels: Click Edit individual labels… to open the Merge to New Document window.
- Merge to New Document: Be sure All is selected and click OK. This should create the fully merged document.
Alt text: Previewing the labels after arranging the mailing list to ensure proper layout and data alignment.
Alt text: Selecting the Edit Individual Labels option to finalize the mail merge and prepare for printing.
Alt text: All data will be merged and previewed for final adjustments before printing Avery labels from Word.
3.8. Step 8: Print Your Labels
- Print the Document: Go to File > Print to open the print dialog.
- Select Your Printer: Choose your printer from the list of available printers.
- Adjust Printer Settings: Check your printer settings to ensure they are correct for label printing. This may include selecting the correct paper tray or specifying the paper type as labels.
- Print: Click the Print button to print your Avery labels.
4. How to Mail Merge Without Using the Step-by-Step Wizard
If you prefer not to use the Step-by-Step Mail Merge Wizard, you can also perform mail merge directly from the Mailings tab:
- Go to Mailings Tab: Click on the Mailings tab at the top of the screen.
- Start Mail Merge: Click Start Mail Merge, then Labels.
- Select Avery US Letter: Select Avery US Letter in the dropdown menu next to Label vendors.
- Choose Product Number: Select your Avery product number and click OK.
Alt text: Starting a mail merge in MS Word by selecting the Labels option and choosing Avery US Letter as the vendor.
4.1. Step 2: Select Recipients
- Select Recipients: Click Select Recipients and Use Existing List.
- Browse for Excel File: Browse your files to find your Excel spreadsheet and click Open.
4.2. Step 3: Arrange Your Data
- Address Block or Insert Merge Field: Click Address Block or Insert Merge Field to arrange your data how you want it to appear on the labels.
- Update Labels: Click Update Labels to apply the formatting to all of the labels.
4.3. Step 4: Preview and Finish
- Preview Results: Click Preview Results to see the layout of the first label.
- Finish & Merge: If it looks right, click Finish & Merge to apply this to all the labels.
- Edit Individual Labels: If you have multiple sheets of labels, select Edit Individual Labels, then make sure All is selected, and click OK. This will generate the other sheets of labels from the merged data.
5. What Are Some Tips for Perfect Avery Label Printing?
Here are some tips to ensure your Avery labels print perfectly every time:
5.1. Check Printer Settings
- Paper Type: Ensure your printer settings are set to Labels or a similar option to optimize the printing process for label sheets.
- Print Quality: Set the print quality to High for best results, especially if your labels contain images or fine details.
- Paper Size: Confirm that the paper size is set to Letter (8.5 x 11 inches) or the appropriate size for your label sheets.
5.2. Test Print
- Print a Test Sheet: Before printing on your actual Avery labels, print a test sheet on plain paper to check the alignment and layout.
- Hold Against Label Sheet: Hold the test print against your label sheet to see if the text and images align correctly.
- Adjust as Needed: If there are any alignment issues, adjust the margins or field positions in your Word document and print another test sheet until it’s perfect.
5.3. Use the Correct Template
- Verify Product Number: Double-check that you have selected the correct Avery product number in Word to match your label sheets.
- Download Template: If you’re unsure, download the specific template for your product number from the Avery website (amazingprint.net) to ensure accuracy.
5.4. Handle Label Sheets Carefully
- Avoid Creasing: Store your Avery label sheets in a flat, dry place to prevent creasing or damage.
- Load Properly: Load the label sheets into your printer according to the printer’s instructions, usually with the label side facing down.
- Print One Sheet at a Time: Avoid loading multiple label sheets at once, as this can cause misfeeds or jams.
5.5. Data Accuracy
- Review Data: Always review your data in the Excel spreadsheet to ensure there are no errors or inconsistencies.
- Correct Mistakes: Correct any mistakes before starting the mail merge process to avoid printing incorrect information on your labels.
5.6. Software and Driver Updates
- Update Software: Keep your Microsoft Word and Excel software up to date to ensure compatibility and access to the latest features and bug fixes.
- Update Printer Driver: Ensure your printer driver is up to date to maintain optimal performance and avoid printing issues.
5.7. Preventing Smudging
- Laser Printer: If you are using a laser printer, allow the labels to cool down before handling them to prevent smudging.
- Inkjet Printer: For inkjet printers, use smudge-resistant ink and allow the labels to dry completely before applying them.
6. What Are Common Issues and How to Troubleshoot Them?
Even with careful preparation, you might encounter some issues when printing Avery labels using mail merge. Here are some common problems and how to troubleshoot them:
6.1. Misalignment
- Problem: Labels are not aligned correctly on the sheet.
- Solution:
- Check Template: Verify that you have selected the correct Avery product number in Word.
- Adjust Margins: Adjust the margins and field positions in your Word document.
- Test Print: Print a test sheet on plain paper and hold it against the label sheet to check alignment.
6.2. Data Not Merging Correctly
- Problem: Some or all of the data from the Excel spreadsheet is not appearing on the labels.
- Solution:
- Check Merge Fields: Ensure that you have inserted all the necessary merge fields into the label template.
- Verify Data Source: Confirm that the Excel file is correctly linked to the Word document.
- Review Data: Check your data in the Excel spreadsheet for any errors or inconsistencies.
6.3. Labels Smudging
- Problem: Ink smudges on the labels after printing.
- Solution:
- Use Smudge-Resistant Ink: Use smudge-resistant ink cartridges for inkjet printers.
- Allow Drying Time: Allow the labels to dry completely before handling them.
- Check Printer Settings: Ensure your printer settings are optimized for label printing.
6.4. Printer Jams
- Problem: Label sheets get stuck in the printer.
- Solution:
- Load Label Sheets Correctly: Load the label sheets into your printer according to the printer’s instructions.
- Print One Sheet at a Time: Avoid loading multiple label sheets at once.
- Clean Printer: Clean your printer regularly to remove any dust or debris that may cause jams.
6.5. Incorrect Font or Formatting
- Problem: The font or formatting on the labels is not what you expected.
- Solution:
- Check Font Settings: Check the font settings in your Word document to ensure they are correct.
- Adjust Formatting: Adjust the formatting (e.g., font size, bold, italics) in the label template as needed.
- Update All Labels: Click Update All Labels to apply the formatting changes to all labels.
6.6. Blank Labels
- Problem: Some labels print blank.
- Solution:
- Check Data Source: Verify that the Excel spreadsheet contains data for all recipients.
- Review Merge Fields: Ensure that the merge fields are correctly placed in the label template.
- Update All Labels: Click Update All Labels to refresh the label template with the data.
7. What Are Advanced Mail Merge Techniques for Avery Labels?
For more complex labeling projects, consider these advanced mail merge techniques:
7.1. Conditional Formatting
- What It Is: Applying different formatting to labels based on specific criteria in your data source.
- Example: Highlighting labels with overdue invoices in red.
- How to Implement: Use Word’s Rules feature under the Mailings tab to set up conditional formatting.
7.2. Filtering Data
- What It Is: Selecting a subset of data from your Excel spreadsheet to include in the mail merge.
- Example: Only printing labels for customers in a specific state.
- How to Implement: Use the Edit Recipient List option in Word to filter the data based on specific criteria.
7.3. Adding Images and Logos
- What It Is: Incorporating images or logos into your Avery labels.
- Example: Adding your company logo to product labels.
- How to Implement: Insert the image into the label template and adjust its size and position as needed. Make sure the image is linked to a specific field in your Excel data source if you want it to vary for each label.
7.4. Using Barcodes and QR Codes
- What It Is: Adding barcodes or QR codes to your Avery labels for inventory management or product tracking.
- Example: Generating unique barcodes for each product in your inventory.
- How to Implement: Use a barcode generator to create the barcodes or QR codes, then insert them into your label template. Link the barcode data to a specific field in your Excel data source.
7.5. Automating the Process with VBA
- What It Is: Using VBA (Visual Basic for Applications) to automate repetitive mail merge tasks.
- Example: Creating a macro that automatically generates and prints Avery labels from an Excel spreadsheet.
- How to Implement: Write VBA code in Word’s Visual Basic Editor to automate the mail merge process. This requires some programming knowledge but can save a lot of time for complex and repetitive tasks.
8. How Can Amazingprint.net Help with Your Label Printing Needs?
At amazingprint.net, we understand the importance of high-quality and efficient label printing. Whether you need assistance with setting up your mail merge, choosing the right Avery label template, or troubleshooting printing issues, we are here to help.
8.1. Comprehensive Guides and Tutorials
- Detailed Instructions: Access our comprehensive guides and tutorials for step-by-step instructions on how to print Avery labels from Word using Excel data.
- Visual Aids: Benefit from visual aids, including screenshots and videos, to make the process even easier.
8.2. Expert Support
- Professional Assistance: Contact our expert support team for professional assistance with any label printing issues you may encounter.
- Personalized Advice: Receive personalized advice and solutions tailored to your specific needs and requirements.
8.3. Wide Range of Label Printing Services
- Custom Labels: Explore our wide range of label printing services, including custom label design and printing for various applications.
- High-Quality Materials: Choose from a variety of high-quality materials and finishes to create labels that meet your exact specifications.
8.4. Time-Saving Solutions
- Efficient Printing: Save time and effort with our efficient label printing solutions, designed to streamline your workflow and improve productivity.
- Cost-Effective Options: Benefit from cost-effective options that help you save money without compromising on quality.
9. What Are the Latest Trends in Label Printing in the USA?
Staying up-to-date with the latest trends in label printing can help you create labels that are both functional and visually appealing. Here are some of the current trends in the USA:
| Trend | Description | Benefits |
|---|---|---|
| Sustainability | Using eco-friendly materials and printing processes to reduce environmental impact. | Appeals to environmentally conscious customers, reduces carbon footprint. |
| Personalization | Customizing labels with variable data, such as names, addresses, and unique codes. | Enhances customer engagement, improves brand loyalty. |
| Digital Printing | Using digital printing technology for short-run and on-demand label printing. | Offers flexibility, reduces setup costs, allows for variable data printing. |
| Smart Labels | Incorporating NFC (Near Field Communication) or RFID (Radio-Frequency Identification) technology into labels. | Enables product tracking, provides authentication, enhances customer experience. |
| Minimalist Design | Using clean and simple designs with a focus on typography and negative space. | Creates a modern and sophisticated look, improves readability. |
| Bold Colors | Using vibrant and eye-catching colors to make labels stand out on shelves. | Attracts attention, conveys energy and excitement. |
9.1. Sustainability in Label Printing
Sustainability is a major trend in the label printing industry. According to a report by the Sustainable Packaging Coalition, more companies are seeking eco-friendly labeling options to reduce their environmental impact. This includes using recycled materials, water-based inks, and biodegradable adhesives.
9.2. Personalization in Label Printing
Personalization is another key trend, with companies using variable data printing to create labels that are tailored to individual customers. This can include adding names, addresses, or unique codes to labels to enhance customer engagement and brand loyalty. A study by Deloitte found that personalized products are more likely to influence purchase decisions.
9.3. Digital Printing for Labels
Digital printing technology is also gaining popularity, allowing for short-run and on-demand label printing. This offers flexibility, reduces setup costs, and enables variable data printing. According to research from Smithers Pira, digital printing is expected to continue growing in the label market due to its versatility and cost-effectiveness.
9.4. Smart Labels
Smart labels, which incorporate NFC or RFID technology, are becoming increasingly common. These labels can be used for product tracking, authentication, and enhanced customer experiences. A report by MarketsandMarkets projects significant growth in the smart labels market, driven by the increasing demand for supply chain visibility and anti-counterfeiting measures.
9.5. Minimalist Design
Minimalist design is another trend that is influencing label printing. Clean and simple designs with a focus on typography and negative space are becoming more popular, creating a modern and sophisticated look. This trend aligns with the broader movement towards simplicity and clarity in design.
9.6. Bold Colors
The use of bold colors is also on the rise, with companies using vibrant and eye-catching colors to make their labels stand out on shelves. This trend reflects a desire to attract attention and convey energy and excitement. Color Psychology studies show that different colors evoke different emotions and can influence consumer behavior.
10. FAQs About Printing Avery Labels in Word from Excel
10.1. Can I Use Any Version of Word for Mail Merge?
Yes, most versions of Microsoft Word support mail merge. The steps may vary slightly depending on the version you are using, but the basic principles remain the same.
10.2. What If My Avery Product Number Is Not Listed in Word?
If your Avery product number is not listed in Word, you can download a template from the Avery website (amazingprint.net) or use a similar product number and adjust the margins and field positions as needed.
10.3. How Do I Add a Logo to My Avery Labels?
To add a logo to your Avery labels, insert the image into the label template in Word. You can adjust its size and position as needed.
10.4. Can I Print Different Information on Each Label?
Yes, mail merge allows you to print different information on each label by linking your Excel data to the Word document.
10.5. What If My Labels Are Printing Off-Center?
If your labels are printing off-center, check that you have selected the correct Avery product number in Word and adjust the margins and field positions as needed.
10.6. How Do I Print Only a Specific Range of Labels?
To print only a specific range of labels, use the Edit Individual Labels option and specify the range of labels you want to print.
10.7. Can I Use a CSV File Instead of an Excel File?
Yes, you can use a CSV (Comma Separated Values) file as your data source for mail merge. Simply select the CSV file when browsing for your data source in Word.
10.8. How Do I Update All Labels After Making Changes to One?
After making changes to one label, click the Update All Labels button to apply the changes to all labels in the document.
10.9. What Paper Type Should I Select When Printing Labels?
When printing labels, select the Labels paper type in your printer settings to optimize the printing process for label sheets.
10.10. Is There a Limit to the Amount of Data I Can Merge?
While there is no strict limit, merging large amounts of data can slow down the process. It is recommended to break up large datasets into smaller batches for better performance.
Printing Avery labels from Word using Excel data is a simple and efficient way to create personalized labels for a variety of purposes. By following the steps outlined in this guide and utilizing the resources available at amazingprint.net, you can ensure your labels are perfectly aligned and professionally printed every time. Explore the world of label printing with amazingprint.net and discover the endless possibilities for your personal and business needs.
Ready to create stunning labels with ease? Visit amazingprint.net today to explore our comprehensive guides, expert support, and wide range of label printing services!
