Cleaning the print head is crucial for maintaining optimal print quality and preventing frustrating issues like streaks or faded prints. At amazingprint.net, we understand the importance of clear, crisp prints and offer solutions to keep your printer in top condition. Discover effective methods and expert tips for cleaning your print head, ensuring consistent and reliable printing results. Explore our site for more insightful articles on print head maintenance, printer troubleshooting, and ink cartridge care to enhance your printing experience.
1. Understanding the Importance of a Clean Print Head
Why is maintaining a clean print head so critical for your printing endeavors?
A clean print head is vital for ensuring optimal print quality, preventing clogs, and extending the life of your printer. Just as a clean lens is essential for clear photography, a clean print head is necessary for producing crisp, accurate prints. Ignoring print head maintenance can lead to a myriad of issues, including streaky prints, faded colors, and even complete printing failure. Regular cleaning helps to remove dried ink, dust, and debris that can accumulate and obstruct the tiny nozzles on the print head. This, in turn, ensures that ink flows smoothly and evenly onto the paper, resulting in vibrant, high-quality prints. Proper print head maintenance also plays a significant role in prolonging the lifespan of your printer. By preventing clogs and ensuring efficient ink flow, you reduce the strain on your printer’s internal components, minimizing the risk of costly repairs or replacements.
The impact of a dirty print head extends beyond just print quality. It can also lead to wasted ink, as the printer may attempt to compensate for the obstructions by using more ink than necessary. This not only increases your printing costs but also contributes to environmental waste. To avoid these issues and maintain the peak performance of your printer, incorporating regular print head cleaning into your printer maintenance routine is essential.
1.1. Recognizing the Signs of a Dirty Print Head
How can you tell if your print head needs a cleaning intervention?
Recognizing the signs of a dirty print head is the first step in maintaining your printer’s performance. Common indicators include:
- Streaky Prints: Lines or streaks running through your prints, indicating ink isn’t being distributed evenly.
- Faded Colors: Colors appearing dull or washed out, suggesting a blockage is preventing proper ink flow.
- Missing Colors: Certain colors not printing at all, pointing to a specific nozzle being clogged.
- Blurry Text: Text lacking sharpness, indicating ink is not being applied precisely.
- Error Messages: Printer displaying error messages related to the print head or ink cartridges.
- Incomplete Prints: Sections of the print job missing, suggesting intermittent ink flow.
These signs often indicate that the print head nozzles are clogged with dried ink or debris, hindering the printer’s ability to produce accurate and vibrant prints. Regular cleaning can resolve these issues, restoring your printer’s performance. Neglecting these signs can lead to more severe problems, such as permanent damage to the print head or the need for costly repairs. If you notice any of these issues, it’s crucial to take action promptly and clean the print head to ensure optimal printing results. Regularly checking print quality and addressing any irregularities can save you time, money, and frustration in the long run.
1.2. The Science Behind Inkjet Printing and Print Heads
What makes print heads so crucial in the world of inkjet printing?
Inkjet printers work by propelling tiny droplets of ink onto paper with remarkable precision. The print head, a critical component in this process, contains numerous small nozzles that spray ink to create images and text. According to research from the Printing Industries of America (PIA), precise ink application is crucial for high-quality prints. These nozzles must remain clear and unobstructed to ensure that ink flows smoothly and accurately. The size and spacing of these nozzles determine the resolution and detail of the printed output.
The ink used in inkjet printers typically consists of water, solvents, dyes, and pigments. Over time, the water and solvents can evaporate, leaving behind concentrated dyes and pigments that can clog the print head nozzles. This is especially true when the printer is not used frequently, allowing the ink to dry and harden within the nozzles. Additionally, dust and debris can accumulate on the print head, further contributing to blockages and reduced print quality.
Maintaining a clean print head is essential for preserving the integrity of the inkjet printing process. By removing dried ink and debris, you ensure that the nozzles remain clear and capable of delivering ink with the precision needed for high-quality prints. This not only improves the appearance of your printed documents and images but also helps to prolong the life of your printer by preventing damage to the delicate print head components. Understanding the science behind inkjet printing and the role of the print head underscores the importance of regular cleaning and maintenance.
2. Preparing to Clean Your Print Head
What do you need to gather before embarking on your print head cleaning mission?
Before you start cleaning your print head, gather these essentials:
- Soft, Lint-Free Cloths: Essential for gently wiping the print head and surrounding areas without leaving residue.
- Distilled Water: The ideal cleaning solution for dissolving dried ink without introducing impurities.
- Isopropyl Alcohol (Optional): For stubborn clogs, use 90% or higher isopropyl alcohol, but with caution.
- Cotton Swabs: Useful for cleaning hard-to-reach areas and delicate nozzles.
- Paper Towels: To protect your work surface and absorb excess liquid.
- Gloves (Optional): To keep your hands clean and prevent ink from staining your skin.
Ensure your workspace is well-lit and organized. Having these materials ready will make the cleaning process efficient and safe for your printer. Avoid using harsh chemicals or abrasive materials, as they can damage the print head. With the right tools and a careful approach, you can effectively clean your print head and restore your printer’s performance.
2.1. Checking Ink Levels and Cartridge Condition
Why is it important to check ink levels and cartridge condition before cleaning?
Checking ink levels and cartridge condition before cleaning the print head is a crucial step in the maintenance process. Low ink levels can sometimes mimic the symptoms of a clogged print head, such as faded or streaky prints. Ensuring that your ink cartridges are adequately filled can help you avoid unnecessary cleaning. Additionally, inspecting the condition of your cartridges is important to identify any potential issues that could be affecting print quality.
Examine the cartridges for leaks, damage, or expiration dates. Expired ink can dry out and cause clogs, even in cartridges that appear to be full. If you notice any signs of damage or leakage, replace the cartridge before proceeding with the cleaning process. Using damaged or expired cartridges can not only compromise print quality but also potentially harm the print head itself.
By verifying ink levels and cartridge condition beforehand, you can accurately diagnose the cause of any printing issues and take the appropriate steps to resolve them. This proactive approach can save you time and effort by preventing unnecessary cleaning or identifying the need for cartridge replacement. In some cases, simply replacing a low or damaged cartridge may be enough to restore your printer’s performance without requiring any further cleaning.
2.2. Running a Nozzle Check
What does a nozzle check reveal about your print head’s health?
Running a nozzle check is a diagnostic procedure that helps determine the condition of your print head. Most printers have a built-in utility that prints a test page with a series of colored lines or patterns. By examining this test page, you can identify whether any of the nozzles on the print head are clogged or malfunctioning.
A nozzle check reveals valuable information about the health of your print head by showing if all colors are printing correctly and if there are any gaps or breaks in the printed lines. If the test page shows missing segments or faded colors, it indicates that some of the nozzles are clogged and need cleaning. This allows you to focus your cleaning efforts on the specific areas of the print head that are causing problems.
Performing a nozzle check before and after cleaning is also useful for assessing the effectiveness of your cleaning efforts. If the nozzle check shows improvement after cleaning, it indicates that the cleaning process has been successful in clearing the clogs. If there is no improvement, you may need to repeat the cleaning process or try a different cleaning method. Regularly running nozzle checks as part of your printer maintenance routine can help you identify and address print quality issues early on, preventing more serious problems from developing.
3. Automatic Print Head Cleaning
How can your printer’s built-in features help clean the print head?
Most modern printers come equipped with an automatic print head cleaning function. This feature uses the printer’s internal mechanisms to flush ink through the print head nozzles, dislodging dried ink and debris. To initiate the automatic cleaning process:
- Access the printer’s control panel or software interface on your computer.
- Navigate to the “Maintenance,” “Tools,” or “Settings” menu.
- Look for an option such as “Clean Print Head,” “Head Cleaning,” or “Nozzle Cleaning.”
- Follow the on-screen prompts to start the cleaning cycle.
The printer will then run through a series of cleaning steps, which may include flushing ink, wiping the print head, and performing a nozzle check. This process typically takes a few minutes to complete. It’s important to avoid interrupting the cleaning cycle, as doing so could potentially damage the print head or other printer components.
Automatic print head cleaning is a convenient and effective way to maintain your printer’s performance. It can often resolve minor clogs and prevent more serious issues from developing. However, it’s essential to use this feature sparingly, as excessive cleaning can deplete ink cartridges and shorten the lifespan of the print head. If the automatic cleaning function doesn’t resolve the print quality issues, you may need to consider manual cleaning methods.
3.1. Accessing the Cleaning Utility Through Your Printer’s Software
How do you navigate your printer’s software to find the cleaning utility?
Accessing the cleaning utility through your printer’s software is a straightforward process that can vary slightly depending on the printer model and operating system. Typically, you can find the cleaning utility within the printer’s software interface on your computer. To access it:
- Open the “Start” menu on your computer and go to “Settings” then “Devices” and select “Printers & scanners.”
- Select your printer from the list of installed printers.
- Click on “Manage” and then “Printing preferences.” This will open the printer’s driver settings.
- Look for a “Maintenance,” “Tools,” or “Services” tab within the driver settings.
- Under this tab, you should find options such as “Clean Print Head,” “Head Cleaning,” or “Nozzle Cleaning.”
- Click on the appropriate option to launch the cleaning utility.
The cleaning utility will guide you through the steps of the automatic print head cleaning process. It may include options to select the cleaning level (e.g., light, medium, or deep clean) or to perform a nozzle check before and after cleaning. Follow the on-screen prompts to complete the cleaning process.
Alternatively, you can often access the cleaning utility directly from the printer’s control panel. Look for a “Setup,” “Maintenance,” or “Tools” menu on the printer’s display screen. Navigate to the print head cleaning option and follow the instructions to start the cleaning cycle.
3.2. When to Use the Automatic Cleaning Function
Under what circumstances is the automatic cleaning function most effective?
The automatic cleaning function is most effective in the following situations:
- Minor Print Quality Issues: When you notice slight streaks, faded colors, or blurry text in your prints.
- Preventative Maintenance: As part of a regular printer maintenance routine to prevent clogs from forming.
- After Periods of Inactivity: If your printer has been idle for an extended period, such as several weeks or months.
- Before Important Print Jobs: To ensure optimal print quality for important documents or photos.
The automatic cleaning function is designed to address minor clogs and ink build-up in the print head nozzles. It’s a convenient way to maintain your printer’s performance without requiring manual intervention. However, it’s important to use this feature judiciously. Overusing the automatic cleaning function can deplete your ink cartridges and potentially damage the print head. If you’re experiencing severe print quality issues or if the automatic cleaning function doesn’t resolve the problem after a few attempts, it may be necessary to consider manual cleaning methods. Manual cleaning allows for a more thorough and targeted approach to removing stubborn clogs and restoring print head performance.
4. Manual Print Head Cleaning: The Detailed Steps
When the automatic cleaning doesn’t cut it, how do you manually clean the print head?
For more stubborn clogs, manual cleaning is necessary. Follow these steps carefully:
- Turn Off and Unplug the Printer: Ensure the printer is completely powered off and disconnected from the power source to prevent electrical shock.
- Access the Print Head: Open the printer cover and wait for the print head to move to the center. If it doesn’t move automatically, consult your printer manual for instructions on how to manually move it.
- Remove Ink Cartridges: Take out each ink cartridge from the print head assembly. Store them in an airtight container or wrap them in plastic to prevent them from drying out.
- Prepare Cleaning Solution: Dampen a lint-free cloth or paper towel with distilled water. For stubborn clogs, you can use a solution of isopropyl alcohol (90% or higher) diluted with distilled water.
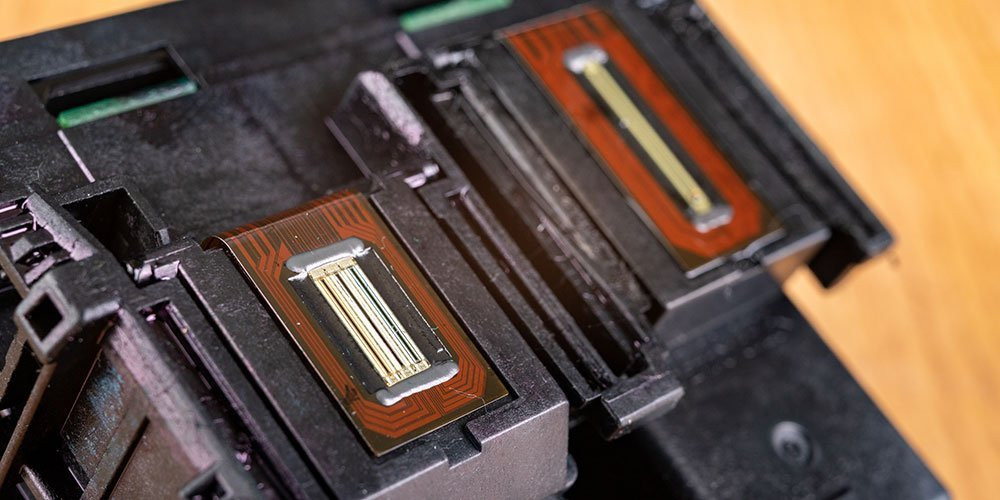
- Clean the Print Head Nozzles: Gently wipe the print head nozzles with the damp cloth or paper towel. Be careful not to apply too much pressure, as this could damage the delicate nozzles.
- Clean the Electrical Contacts: Use a clean, dry cotton swab to gently wipe the electrical contacts on the print head and inside the printer.
- Reassemble the Printer: Reinsert the ink cartridges, close the printer cover, and plug the printer back in.
- Run a Test Print: Print a test page to check if the cleaning has resolved the print quality issues. If necessary, repeat the cleaning process.
Manual print head cleaning requires patience and care. By following these steps diligently, you can effectively remove stubborn clogs and restore your printer’s performance.
 Manual Print Head Cleaning
4.1. Removing the Print Head (If Possible)
Is it possible to remove the print head, and how does that affect the cleaning process?
In some printer models, the print head is designed to be removable, while in others, it is permanently integrated into the printer. If your printer has a removable print head, removing it can make the cleaning process easier and more effective. To determine if your print head is removable, consult your printer manual or the manufacturer’s website.
To remove the print head:
- Turn off and unplug the printer.
- Open the printer cover and wait for the print head to move to the center.
- Locate the release mechanism for the print head. This may be a lever, button, or clip.
- Release the mechanism and carefully lift the print head out of the printer.
Once the print head is removed, you can clean it more thoroughly. Soak the print head in a shallow dish of warm distilled water or cleaning solution for several minutes to loosen dried ink. Then, gently wipe the nozzles with a lint-free cloth or cotton swab. Be careful not to touch the electrical contacts on the print head.
After cleaning, rinse the print head with distilled water and allow it to air dry completely before reinserting it into the printer. Make sure the print head is securely in place and the release mechanism is properly engaged.
Removing the print head can provide better access to the nozzles and allow for more effective cleaning. However, it’s important to handle the print head with care to avoid damaging the delicate components. If you’re not comfortable removing the print head yourself, you can still clean it while it’s installed in the printer, following the steps outlined in the previous section.
4.2. Soaking the Print Head
Why is soaking the print head an effective cleaning method?
Soaking the print head is an effective cleaning method because it allows the cleaning solution to penetrate and dissolve dried ink and debris that may be clogging the nozzles. This method is particularly useful for stubborn clogs that cannot be removed by simply wiping the print head.
To soak the print head:
- Remove the print head from the printer, if possible.
- Fill a shallow dish with warm distilled water or a cleaning solution made of equal parts distilled water and isopropyl alcohol (90% or higher).
- Place the print head in the dish, with the nozzles facing down. Make sure the electrical contacts on the print head are not submerged in the liquid.
- Allow the print head to soak for several minutes to several hours, depending on the severity of the clogs.
- After soaking, remove the print head from the dish and gently wipe the nozzles with a lint-free cloth or cotton swab.
- Rinse the print head with distilled water and allow it to air dry completely before reinserting it into the printer.
Soaking the print head helps to loosen and dissolve the dried ink, making it easier to remove with gentle wiping. The warm water or cleaning solution penetrates the nozzles, breaking down the clogs and restoring proper ink flow. This method is especially effective for printers that have been idle for a long period of time, as the ink tends to dry and harden within the nozzles.
When soaking the print head, it’s important to use distilled water or a cleaning solution specifically designed for print heads. Avoid using tap water, as it may contain minerals and impurities that can further clog the nozzles. Additionally, be careful not to submerge the electrical contacts on the print head, as this could damage the print head.
4.3. Using a Cleaning Solution
What types of cleaning solutions are safe and effective for print heads?
When cleaning a print head, it’s important to use a cleaning solution that is both safe and effective. Harsh chemicals can damage the delicate components of the print head, while ineffective solutions may not remove stubborn clogs. Here are some types of cleaning solutions that are generally considered safe and effective for print heads:
- Distilled Water: Distilled water is the safest and most gentle cleaning solution for print heads. It is free of minerals and impurities that can clog the nozzles. Warm distilled water can help dissolve dried ink and loosen debris.
- Isopropyl Alcohol (90% or Higher): Isopropyl alcohol is a strong solvent that can effectively dissolve stubborn clogs. However, it should be used with caution, as it can also damage some types of print heads. Dilute the isopropyl alcohol with distilled water before use.
- Commercial Print Head Cleaning Solutions: There are many commercial print head cleaning solutions available on the market. These solutions are specifically formulated to clean print heads without causing damage. Follow the manufacturer’s instructions when using these solutions.
When using a cleaning solution, it’s important to avoid getting it on the electrical contacts of the print head. If the contacts do get wet, dry them thoroughly with a clean, dry cotton swab. Additionally, avoid using excessive amounts of cleaning solution, as this can damage the print head.
4.4. Reinstalling and Testing the Print Head
What steps should you take after cleaning to ensure the print head is working correctly?
After cleaning the print head, it’s important to reinstall it properly and test its functionality to ensure that the cleaning process has been successful. Here are the steps you should take after cleaning:
- Allow the Print Head to Dry Completely: Before reinstalling the print head, make sure it is completely dry. Any moisture inside the print head can cause electrical damage or printing issues. Allow the print head to air dry for several hours or use a clean, dry cloth to gently pat it dry.
- Reinstall the Print Head: Carefully reinsert the print head into the printer, making sure it is securely in place. If your printer has a release mechanism for the print head, make sure it is properly engaged.
- Reinstall the Ink Cartridges: Insert the ink cartridges into the print head, making sure they are properly seated and locked into place.
- Turn On the Printer: Plug in the printer and turn it on. Allow the printer to go through its startup sequence, which may include priming the print head.
- Run a Nozzle Check: After the printer has finished its startup sequence, run a nozzle check to verify that all of the nozzles are firing correctly. If the nozzle check shows any gaps or breaks in the printed lines, repeat the cleaning process.
- Print a Test Page: Print a test page with a variety of colors and text to assess the overall print quality. If the print quality is still poor, you may need to repeat the cleaning process or consider replacing the print head.
By following these steps, you can ensure that the print head is properly reinstalled and functioning correctly after cleaning. Testing the print head with a nozzle check and a test page will help you identify any remaining issues and take corrective action.
5. Preventing Future Print Head Clogs
How can you minimize the risk of print head clogs in the future?
Preventing future print head clogs involves adopting proactive habits and maintenance practices. Here are some effective strategies:
- Regular Printing: Print something at least once a week to keep ink flowing and prevent it from drying in the nozzles.
- Use High-Quality Ink: Opt for genuine ink cartridges or reputable third-party brands to ensure consistent ink quality and minimize clogging.
- Proper Storage: Store ink cartridges in a cool, dry place, away from direct sunlight and extreme temperatures.
- Printer Maintenance: Run the printer’s built-in cleaning cycle periodically, even if you don’t notice any print quality issues.
- Avoid Power Interruptions: Always turn off the printer using the power button to allow it to cap the print head properly.
- Clean the Printer Regularly: Dust and debris can accumulate in the printer and contribute to clogs. Clean the interior of the printer regularly with a soft, dry cloth.
By incorporating these practices into your routine, you can significantly reduce the likelihood of print head clogs and keep your printer running smoothly.
5.1. The Importance of Using Genuine Ink Cartridges
Why is using genuine ink cartridges often recommended for preventing clogs?
Using genuine ink cartridges is often recommended because they are specifically formulated and designed to work seamlessly with your printer model. Genuine ink cartridges undergo rigorous testing and quality control processes to ensure consistent ink quality, proper viscosity, and optimal performance. This reduces the risk of clogs and other printing issues that can arise from using non-genuine or refilled cartridges.
Non-genuine ink cartridges may contain ink that is not compatible with your printer’s print head. The ink may be too thick, too thin, or contain impurities that can clog the nozzles. Additionally, non-genuine cartridges may not be manufactured to the same standards as genuine cartridges, leading to leaks, inconsistent ink flow, and other problems.
While genuine ink cartridges may be more expensive than non-genuine alternatives, they can save you money in the long run by preventing clogs, extending the life of your print head, and ensuring high-quality prints. Using genuine ink cartridges also helps to maintain your printer’s warranty, as some manufacturers may void the warranty if non-genuine cartridges are used.
5.2. Printer Maintenance Tips
What routine maintenance tasks can help prevent print head issues?
Routine printer maintenance is crucial for preventing print head issues and keeping your printer in optimal condition. Here are some essential maintenance tips:
- Regularly Run the Printer’s Cleaning Cycle: Use the printer’s built-in cleaning cycle to flush ink through the print head nozzles and prevent clogs.
- Keep the Printer Clean: Dust and debris can accumulate in the printer and contribute to clogs. Clean the interior of the printer regularly with a soft, dry cloth.
- Protect the Printer from Environmental Factors: Avoid placing the printer in direct sunlight, near heat sources, or in humid environments. These conditions can cause the ink to dry out and clog the nozzles.
- Use the Printer Regularly: Printing something at least once a week can help keep the ink flowing and prevent it from drying in the nozzles.
- Check and Clean the Print Head Periodically: Even if you don’t notice any print quality issues, it’s a good idea to check and clean the print head periodically. This can help you identify and address potential problems before they become severe.
- Update Printer Firmware: Keep your printer’s firmware up to date to ensure compatibility with the latest ink cartridges and printing technologies.
- Follow Manufacturer’s Recommendations: Consult your printer’s manual for specific maintenance recommendations and guidelines.
By incorporating these maintenance tasks into your routine, you can significantly reduce the risk of print head issues and prolong the life of your printer.
5.3. Proper Printer Storage
How does printer storage affect the likelihood of print head clogs?
Proper printer storage plays a significant role in preventing print head clogs. When a printer is not in use, the ink in the print head nozzles can dry out and harden, leading to clogs. Proper storage can help minimize this risk. Here are some tips for proper printer storage:
- Store the Printer in a Cool, Dry Place: Avoid storing the printer in direct sunlight, near heat sources, or in humid environments. These conditions can accelerate the drying of ink and increase the likelihood of clogs.
- Turn Off the Printer Properly: Always turn off the printer using the power button to allow it to cap the print head properly. This helps to prevent the ink from drying out.
- Remove Ink Cartridges for Long-Term Storage: If you plan to store the printer for an extended period of time, remove the ink cartridges and store them separately in an airtight container. This will prevent the ink from drying out and potentially damaging the print head.
- Clean the Print Head Before Storage: Before storing the printer, run a cleaning cycle to clear any existing clogs. This will help to prevent the clogs from worsening during storage.
- Cover the Printer: Use a dust cover to protect the printer from dust and debris.
By following these storage tips, you can minimize the risk of print head clogs and ensure that your printer is ready to use when you need it.
6. Troubleshooting Common Print Head Issues
What should you do if cleaning doesn’t completely resolve your print quality problems?
If cleaning doesn’t completely resolve your print quality problems, there may be other underlying issues that need to be addressed. Here are some troubleshooting steps you can take:
- Check Ink Levels: Ensure that all ink cartridges have sufficient ink. Low ink levels can cause faded or streaky prints.
- Inspect Ink Cartridges: Examine the ink cartridges for leaks, damage, or expiration dates. Replace any damaged or expired cartridges.
- Run a Nozzle Check: Perform a nozzle check to identify any remaining clogs or malfunctioning nozzles.
- Align the Print Head: Misalignment of the print head can cause blurry or distorted prints. Run the printer’s print head alignment utility to correct any misalignment.
- Check Paper Type and Settings: Ensure that you are using the correct paper type for your printer and that the printer settings are configured accordingly.
- Update Printer Drivers: Outdated printer drivers can cause compatibility issues and printing problems. Update your printer drivers to the latest version.
- Restart the Printer and Computer: Sometimes, simply restarting the printer and computer can resolve printing issues.
- Contact Printer Support: If you have tried all of the above troubleshooting steps and are still experiencing print quality problems, contact the printer manufacturer’s support for further assistance.
By systematically troubleshooting these common print head issues, you can identify the root cause of the problem and take the appropriate steps to resolve it.
6.1. When to Seek Professional Help
When is it time to call in the experts for print head problems?
Knowing when to seek professional help for print head problems can save you time, money, and frustration. Here are some situations where it’s best to consult a professional:
- Persistent Print Quality Issues: If you have tried cleaning the print head multiple times and are still experiencing print quality problems, such as streaks, faded colors, or blurry text.
- Physical Damage to the Print Head: If the print head is physically damaged, such as cracked nozzles or bent electrical contacts.
- Ink Leaks or Spills: If there are ink leaks or spills inside the printer, which can damage the print head and other components.
- Unusual Noises: If the printer is making unusual noises during printing, which could indicate a problem with the print head or other mechanical components.
- Error Messages: If the printer is displaying error messages related to the print head that you cannot resolve.
- Lack of Technical Expertise: If you are not comfortable troubleshooting printer problems or if you lack the technical expertise to perform more advanced repairs.
In these situations, it’s best to contact a qualified printer technician or the printer manufacturer’s support for assistance. They have the knowledge, experience, and tools to diagnose and repair complex print head problems. Attempting to repair the print head yourself could potentially cause further damage and void your printer’s warranty.
6.2. Diagnosing Print Head Failure
How can you determine if a print head is beyond repair?
Diagnosing print head failure can be challenging, but there are several indicators that suggest the print head may be beyond repair:
- Complete Absence of Ink: If no ink is being printed, even after cleaning and replacing ink cartridges.
- Severe Nozzle Clogs: If multiple nozzles remain clogged despite repeated cleaning attempts.
- Physical Damage: Visible cracks, breaks, or melted components on the print head.
- Electrical Issues: Short circuits or other electrical problems that prevent the print head from functioning.
- Inconsistent Printing: Erratic or unpredictable print quality that cannot be resolved through troubleshooting.
- Error Codes: Persistent error codes related to print head malfunction.
If you observe these signs, the print head may have reached the end of its lifespan. Replacing the print head or the entire printer may be necessary.
6.3. Alternative Printing Solutions at Amazingprint.net
What alternative printing solutions does amazingprint.net offer for those facing irreparable print head damage?
At amazingprint.net, we understand the frustration of dealing with irreparable print head damage. That’s why we offer a range of alternative printing solutions to meet your needs:
- New Printers: We offer a wide selection of high-quality printers from top brands, including inkjet, laser, and all-in-one models. Our knowledgeable staff can help you choose the right printer for your specific needs and budget.
- Print Head Replacement: In some cases, it may be possible to replace the print head rather than replacing the entire printer. We can help you determine if a print head replacement is a viable option and provide you with a compatible print head.
- Professional Printing Services: If you only need to print occasionally, or if you have a large printing project, our professional printing services may be a more cost-effective solution. We offer high-quality printing on a variety of materials, with fast turnaround times and competitive pricing.
- Printer Repair Services: Our experienced technicians can diagnose and repair a wide range of printer problems, including print head issues. We offer fast, reliable, and affordable printer repair services.
Whether you need a new printer, a print head replacement, professional printing services, or printer repair services, amazingprint.net has the solutions you need to keep your printing operations running smoothly. Contact us today to learn more about our alternative printing solutions.
7. Print Head Cleaning FAQs
Navigating print head maintenance can be tricky, so here are some frequently asked questions:
7.1. Can I Use Tap Water to Clean My Print Head?
No, you should never use tap water to clean your print head. Tap water contains minerals and impurities that can clog the nozzles and damage the print head. Always use distilled water or a cleaning solution specifically designed for print heads.
7.2. How Often Should I Clean My Print Head?
The frequency of print head cleaning depends on your printing habits and the environment in which your printer is located. As a general guideline, you should clean your print head:
- When you notice print quality issues, such as streaks, faded colors, or blurry text.
- If your printer has been idle for an extended period of time.
- As part of a regular printer maintenance routine, such as every few months.
7.3. Can I Damage My Print Head by Cleaning It Too Much?
Yes, it is possible to damage your print head by cleaning it too much. Excessive cleaning can wear down the delicate nozzles and electrical contacts on the print head. Only clean your print head when necessary and follow the manufacturer’s instructions carefully.
7.4. What Is the Best Way to Store Ink Cartridges?
The best way to store ink cartridges is in a cool, dry place, away from direct sunlight and extreme temperatures. Store the cartridges in an airtight container or wrap them in plastic to prevent them from drying out.
7.5. Can Expired Ink Cartridges Cause Print Head Clogs?
Yes, expired ink cartridges can cause print head clogs. The ink in expired cartridges can dry out and harden, leading to clogs. Replace any expired ink cartridges with fresh ones.
7.6. What Should I Do If My Print Head Is Still Clogged After Cleaning?
If your print head is still clogged after cleaning, try repeating the cleaning process. You may also need to soak the print head in a cleaning solution for a longer period of time. If the print head remains clogged, it may be necessary to replace it.
7.7. Can I Use Compressed Air to Clean My Print Head?
No, you should not use compressed air to clean your print head. Compressed air can force debris further into the nozzles and damage the print head.
7.8. How Can I Prevent My Ink Cartridges from Drying Out?
To prevent your ink cartridges from drying out, print something at least once a week. This will keep the ink flowing and prevent it from drying in the nozzles. You should also store the cartridges in a cool, dry place, away from direct sunlight and extreme temperatures.
7.9. Is It Possible to Clean a Print Head Without Removing It?
Yes, it is possible to clean a print head without removing it. Most printers have a built-in cleaning cycle that can be accessed through the printer’s control panel or software interface. You can also clean the print head manually while it is still installed in the printer, following the steps outlined in this article.
7.10. Can I Refill My Ink Cartridges to Save Money?
Refilling ink cartridges can save money, but it also carries risks. Non-genuine ink may not be compatible with your printer and can cause clogs and other printing problems. Additionally, refilling cartridges can void your printer’s warranty. If you choose to refill your ink cartridges, use high-quality ink and follow the manufacturer’s instructions carefully.
8. Optimizing Your Printing Experience with Amazingprint.net
Ready to elevate your printing game? Discover a wealth of resources and solutions at amazingprint.net:
- Informative Articles: Dive into our blog for expert tips, troubleshooting guides, and the latest printing trends.
- Product Reviews: Explore unbiased reviews of printers, ink cartridges, and other printing supplies.
- Printing Services: Streamline your projects with our professional printing services, offering exceptional quality and fast turnaround times.
- Community Forum: Connect with fellow printing enthusiasts, share insights, and get your questions answered.
At amazingprint.net, we’re committed to providing you with the knowledge and resources you need to achieve outstanding printing results.
Are you ready to take your printing to the next level? Visit amazingprint.net today to explore our comprehensive resources, discover innovative printing solutions, and connect with a community of passionate printing enthusiasts. Whether you’re a small business owner, a marketing professional, a graphic designer, or simply someone who enjoys printing at home, amazingprint.net is your one-stop destination for all things printing.
Explore our collection of insightful articles, compare printing options with ease, and find the inspiration you need to bring your creative projects to life. Contact us at +1 (650) 253-0000 or visit our location at 1600 Amphitheatre Parkway, Mountain View, CA 94043, United States. Let amazingprint.net be your trusted partner in achieving printing excellence.