
3d Print From Minecraft is an innovative way to bring your virtual creations into the real world, and amazingprint.net provides the resources and inspiration you need to get started. From understanding the basics of 3D printing to exploring advanced techniques, you can transform your favorite Minecraft designs into tangible objects. Let’s explore how you can leverage 3D printing technology to enhance your Minecraft experience, focusing on the latest trends and best practices in the 3D printing industry, including cost-effective 3D printing solutions, innovative design techniques, and unique printing materials.
1. Understanding the Basics of 3D Printing from Minecraft
What are the fundamental steps involved in 3D printing your Minecraft creations?
The initial step involves exporting your Minecraft design into a compatible file format, typically an STL file, followed by using slicing software to prepare the model for 3D printing, then selecting the appropriate printing parameters and material before finally initiating the printing process. Understanding the basics of 3D printing is crucial before you start bringing your Minecraft creations to life.
1.1 What is 3D Printing and How Does It Work?
3D printing, also known as additive manufacturing, is a process of making three-dimensional solid objects from a digital file. According to research from the Printing Industries of America (PIA), 3D printing is projected to grow significantly in the coming years, offering new opportunities for customization and rapid prototyping.
The process typically involves the following steps:
- Creating a 3D Model: Design a model using CAD software or download one from online repositories.
- Slicing: The 3D model is sliced into thin layers using specialized software.
- Printing: The 3D printer builds the object layer by layer, using materials such as plastic, resin, or metal.
- Post-Processing: The final object may require post-processing, such as cleaning, sanding, or painting.
1.2 Why 3D Print Minecraft Designs?
3D printing Minecraft designs allows you to transform your virtual creations into tangible objects, enhancing your gaming experience and showcasing your creativity. It’s a fantastic way to personalize your space with unique decorations and gifts.
1.3 What Software Do You Need?
To 3D print your Minecraft designs, you’ll need the following software:
- Minecraft: The game itself, where you create your designs.
- Minecraft to STL Exporter: Software to convert your Minecraft creations into STL files.
- Slicing Software: Programs like Cura, Simplify3D, or PrusaSlicer to prepare the STL file for 3D printing.
- CAD Software (Optional): For advanced modifications, you might need software like Blender or Tinkercad.
2. Converting Minecraft Designs for 3D Printing
How do you convert your Minecraft creations into 3D printable files?
Converting Minecraft designs for 3D printing involves exporting the design from Minecraft using a tool like Mineways, importing the exported file into a 3D modeling software for any necessary adjustments, and then exporting the final model as an STL file. Converting your Minecraft designs into a format suitable for 3D printing is a crucial step in bringing your virtual creations to life.
2.1 Exporting Your Minecraft Creation
The first step is to export your Minecraft creation into a format that 3D printers can understand. The most common format is STL (Stereolithography). Here’s how you can do it:
-
Using Mineways: Mineways is a popular tool for exporting Minecraft worlds into STL files. It allows you to select a specific area of your world and export it as a 3D model.
- Download and install Mineways.
- Open your Minecraft world in Mineways.
- Select the area you want to export.
- Export the selection as an STL file.
-
Alternative Tools: Other tools like MCPrep and Blender can also be used, especially for more complex designs.
2.2 Preparing the STL File for Printing
Once you have the STL file, you need to prepare it for 3D printing using slicing software.
-
Importing into Slicing Software: Open the STL file in your slicing software (e.g., Cura, Simplify3D).
-
Adjusting Settings: Adjust the settings according to your printer and material. Key settings include:
- Layer Height: Determines the resolution of the print (e.g., 0.1mm – 0.2mm).
- Infill Density: The amount of material inside the model (e.g., 15% – 20%).
- Support Structures: Necessary for overhanging parts of the model.
- Print Speed: How fast the printer moves (e.g., 40mm/s – 60mm/s).
- Bed Adhesion: Techniques like using a brim or raft to ensure the print sticks to the bed.
2.3 Optimizing the Design for 3D Printing
Optimizing your design can improve the print quality and reduce material usage.
- Simplify Geometry: Remove unnecessary details that won’t be visible in the final print.
- Hollow Sections: Hollow out the model to reduce material usage and weight.
- Ensure Watertightness: Make sure the model is watertight, meaning it has no holes or gaps.
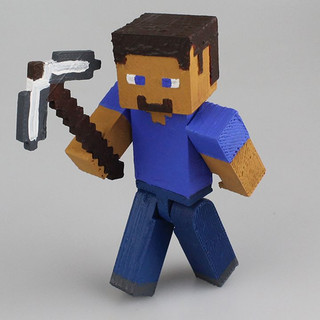 Minecraft Steve 3D Print
Articulated Steve is an iconic Minecraft character 3D printed.
3. Choosing the Right 3D Printer and Materials
What are the best 3D printers and materials for Minecraft prints?
The best 3D printers for Minecraft prints are those that offer high resolution and reliability, such as the Creality Ender 3 or Prusa i3 MK3S+, and the ideal materials include PLA for its ease of use and eco-friendliness, or ABS for more durable prints. Selecting the right 3D printer and materials is crucial for achieving high-quality Minecraft prints that meet your specific needs.
3.1 Types of 3D Printers
There are several types of 3D printers, each with its own strengths and weaknesses. The most common types include:
- Fused Deposition Modeling (FDM): FDM printers are the most affordable and widely used. They work by extruding molten plastic layer by layer.
- Stereolithography (SLA): SLA printers use a laser to cure liquid resin, resulting in high-resolution prints.
- Selective Laser Sintering (SLS): SLS printers use a laser to fuse powder materials, such as nylon or metal.
3.2 Recommended 3D Printers for Minecraft Prints
For printing Minecraft designs, FDM printers are generally the best choice due to their affordability and ease of use. Some recommended models include:
- Creality Ender 3: A budget-friendly option with a large build volume and good print quality.
- Prusa i3 MK3S+: Known for its reliability and precision.
- Anycubic i3 Mega: A user-friendly printer with a sturdy frame and good performance.
3.3 Choosing the Right Material
The choice of material depends on the desired properties of the final print. The most common materials include:
- PLA (Polylactic Acid): PLA is a biodegradable thermoplastic derived from renewable resources. It is easy to print, has low warping, and is available in a wide range of colors.
- ABS (Acrylonitrile Butadiene Styrene): ABS is a strong and durable plastic that is more resistant to heat and impact than PLA. However, it is more difficult to print and requires a heated bed.
- PETG (Polyethylene Terephthalate Glycol): PETG combines the best properties of PLA and ABS. It is easy to print, strong, and heat-resistant.
According to a report by Grand View Research, the demand for PLA and other biodegradable materials is increasing due to growing environmental concerns.
4. Step-by-Step Guide to 3D Printing a Minecraft Model
What are the detailed steps to 3D printing a Minecraft model from start to finish?
The process begins with exporting your Minecraft design as an STL file, followed by importing the file into slicing software to adjust print settings, then printing the model with your chosen 3D printer, and finally, post-processing the print for the desired finish. Following a step-by-step guide ensures a smooth and successful 3D printing process for your Minecraft models.
4.1 Exporting the Model from Minecraft
Use a tool like Mineways to select and export the desired portion of your Minecraft world as an STL file.
4.2 Importing and Preparing the STL File
-
Open Slicing Software: Launch your preferred slicing software (e.g., Cura).
-
Import the STL File: Import the exported STL file into the software.
-
Adjust Orientation: Adjust the model’s orientation to minimize the need for supports and improve print quality.
-
Set Print Settings: Configure the print settings based on your printer and material:
- Layer Height: 0.1mm – 0.2mm
- Infill Density: 15% – 20%
- Print Speed: 40mm/s – 60mm/s
- Temperature: According to the material manufacturer’s recommendations.
-
Generate Support Structures: If necessary, generate support structures for overhanging parts of the model.
-
Slice the Model: Slice the model to generate the G-code file, which contains the instructions for the 3D printer.
4.3 Printing the Model
- Prepare the Printer: Ensure your 3D printer is properly calibrated and the print bed is clean.
- Load the G-code File: Load the G-code file onto the printer.
- Start Printing: Start the printing process and monitor the progress.
4.4 Post-Processing
- Remove Support Structures: Carefully remove any support structures from the printed model.
- Clean the Model: Clean the model to remove any residual material or imperfections.
- Sanding: Sand the surface to smooth out any rough edges or layer lines.
- Painting: Paint the model to add color and detail.
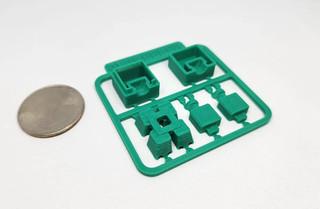 Minecraft Creeper 3D Print
Minecraft Creeper Mini Figure Kit is a quick-to-print and assemble design.
5. Advanced Techniques for 3D Printing Minecraft Creations
What advanced techniques can enhance your 3D printed Minecraft creations?
Advanced techniques include using multi-material printing to add color and complexity, employing post-processing methods like sanding and painting for a polished look, and incorporating electronic components for interactive features. These techniques can significantly enhance the quality and functionality of your 3D printed Minecraft creations.
5.1 Multi-Material Printing
Multi-material printing allows you to print objects with different colors or materials in a single print. This can be used to create more detailed and visually appealing Minecraft models.
- Preparing the Model: Split the model into different parts based on color or material.
- Assigning Materials: Assign each part to a specific material in the slicing software.
- Printing: The printer will automatically switch between materials during the printing process.
5.2 Smoothing and Finishing Techniques
Smoothing and finishing techniques can improve the surface quality of your 3D printed Minecraft models.
- Sanding: Use sandpaper to smooth out any rough edges or layer lines.
- Priming: Apply a primer to prepare the surface for painting.
- Painting: Use acrylic paints to add color and detail.
- Clear Coating: Apply a clear coat to protect the paint and add a glossy finish.
5.3 Adding Electronic Components
Adding electronic components can bring your 3D printed Minecraft creations to life.
- Integrating LEDs: Add LEDs to create glowing effects.
- Adding Sensors: Incorporate sensors to make the model interactive.
- Using Microcontrollers: Use microcontrollers like Arduino to control the electronic components.
6. Common Issues and Troubleshooting
What are the common issues encountered during 3D printing and how can they be resolved?
Common issues include warping, adhesion problems, nozzle clogging, and stringing, which can be resolved by adjusting bed temperature, using adhesives, cleaning the nozzle, and optimizing print settings. Addressing these common issues ensures a smoother and more successful 3D printing experience.
6.1 Warping
Warping occurs when the corners of the print lift off the bed during printing.
- Solution:
- Use a heated bed.
- Apply an adhesive like glue stick or hairspray to the bed.
- Use a brim or raft to increase bed adhesion.
- Ensure the bed is properly leveled.
6.2 Adhesion Problems
Adhesion problems occur when the print does not stick to the bed.
- Solution:
- Clean the bed with isopropyl alcohol.
- Adjust the Z-offset to ensure the nozzle is close enough to the bed.
- Use a bed adhesive.
- Increase the initial layer temperature.
6.3 Nozzle Clogging
Nozzle clogging occurs when the nozzle becomes blocked with filament.
- Solution:
- Clean the nozzle with a needle or wire.
- Increase the printing temperature.
- Use a filament filter to remove debris from the filament.
- Replace the nozzle.
6.4 Stringing
Stringing occurs when thin strands of filament are left between different parts of the print.
- Solution:
- Reduce the printing temperature.
- Increase the retraction distance and speed.
- Disable the “Combing” setting in the slicing software.
- Dry the filament before printing.
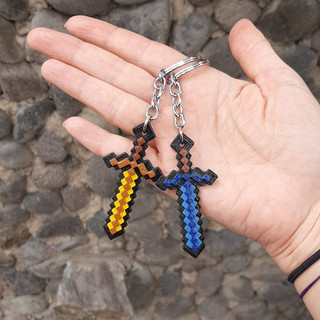 Minecraft Sword 3D Print
Minecraft sword keychains provide a great way to showcase your love for the game.
7. Inspiring Minecraft 3D Print Ideas
What are some inspiring ideas for 3D printing from Minecraft?
Inspiring ideas include printing character figurines like Steve or Creepers, creating functional items such as Minecraft-themed storage boxes or lamps, and designing intricate structures like castles or villages. These ideas can spark your creativity and showcase the versatility of 3D printing with Minecraft.
7.1 Character Figurines
Print your favorite Minecraft characters, such as Steve, Alex, Creepers, and Endermen.
7.2 Functional Items
Create functional items like storage boxes, lamps, and phone stands with a Minecraft theme.
7.3 Architectural Models
Print detailed models of Minecraft buildings, such as houses, castles, and villages.
7.4 Decorative Items
Design and print decorative items like wall art, keychains, and desk ornaments with a Minecraft theme.
8. Where to Find 3D Models and Resources
Where can you find 3D models and resources for Minecraft printing?
You can find 3D models and resources on platforms like Thingiverse, MyMiniFactory, and Cults3D, as well as on dedicated Minecraft communities and forums where users share their designs and tips. Utilizing these resources can save time and inspire new projects.
8.1 Online Repositories
- Thingiverse: A popular platform for sharing and downloading 3D models.
- MyMiniFactory: Offers curated 3D models with a focus on quality.
- Cults3D: Provides a wide range of 3D models, including many Minecraft designs.
8.2 Minecraft Communities and Forums
- Reddit (r/Minecraft3DPrinting): A community dedicated to 3D printing Minecraft creations.
- Minecraft Forums: A general forum with a section for 3D printing.
8.3 Design Software Resources
- Tinkercad: A free and easy-to-use CAD software for beginners.
- Blender: A powerful open-source 3D modeling software.
9. The Future of 3D Printing in Minecraft
How will 3D printing evolve in the context of Minecraft?
The future of 3D printing in Minecraft will likely involve more integration with in-game design tools, advancements in multi-material printing for more complex creations, and increased accessibility through user-friendly software and affordable printers. These developments will further blur the lines between the virtual and physical worlds, enhancing the Minecraft experience.
9.1 Integration with Minecraft
Future versions of Minecraft may include built-in tools for exporting designs directly to 3D printers.
9.2 Advanced Materials
New materials, such as flexible filaments and conductive materials, will allow for more creative and functional Minecraft prints.
9.3 Enhanced Customization
Improved software and hardware will enable more precise and detailed customization of 3D printed Minecraft models.
10. Why Choose Amazingprint.net for Your 3D Printing Needs
Why should you choose amazingprint.net for your 3D printing projects?
Amazingprint.net provides comprehensive resources, expert guidance, and a wide range of services tailored to meet your 3D printing needs, ensuring high-quality results and a seamless experience. Choosing amazingprint.net empowers you to bring your creative visions to life with confidence and ease.
10.1 Comprehensive Information
amazingprint.net offers a wealth of information on 3D printing, including tutorials, guides, and reviews.
10.2 Easy Comparison of Options
The website allows you to easily compare different 3D printers, materials, and services.
10.3 Creative Inspiration
amazingprint.net provides a constant stream of creative ideas and inspiration for your 3D printing projects.
By understanding the basics of 3D printing, converting your Minecraft designs, choosing the right printer and materials, and following the step-by-step guide, you can bring your virtual creations to life. Whether you’re printing character figurines, functional items, or architectural models, the possibilities are endless.
Explore the resources and services available at amazingprint.net to take your Minecraft 3D printing journey to the next level. Discover new techniques, find inspiration, and connect with a community of fellow creators.
Address: 1600 Amphitheatre Parkway, Mountain View, CA 94043, United States
Phone: +1 (650) 253-0000
Website: amazingprint.net
Ready to transform your Minecraft world into reality? Visit amazingprint.net today and start your 3D printing adventure.
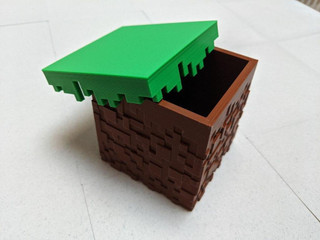 Minecraft Grass Block 3D Print
A textured Minecraft Grass Block Box with vibrant green color and coarse texture.
FAQ: 3D Printing from Minecraft
1. Can I 3D print anything from Minecraft?
Yes, you can 3D print almost anything you create in Minecraft, provided you can export the design as an STL file and prepare it for printing.
2. What is the best software for converting Minecraft designs to STL?
Mineways is a popular tool for exporting Minecraft worlds into STL files. Other options include MCPrep and Blender.
3. What type of 3D printer is best for Minecraft prints?
FDM printers like the Creality Ender 3 and Prusa i3 MK3S+ are generally the best choice due to their affordability and ease of use.
4. What material should I use for 3D printing Minecraft models?
PLA is a good choice for its ease of use and wide range of colors. ABS and PETG are also suitable for more durable and heat-resistant prints.
5. How do I prevent warping when 3D printing Minecraft models?
Use a heated bed, apply an adhesive like glue stick or hairspray to the bed, and ensure the bed is properly leveled.
6. How do I smooth the surface of my 3D printed Minecraft models?
Use sandpaper to smooth out any rough edges or layer lines, then apply a primer, paint, and clear coat for a polished finish.
7. Can I add lights or other electronic components to my 3D printed Minecraft models?
Yes, you can integrate LEDs, sensors, and microcontrollers like Arduino to add interactive features to your 3D printed models.
8. Where can I find free Minecraft 3D models to print?
Online repositories like Thingiverse, MyMiniFactory, and Cults3D offer a wide range of free Minecraft 3D models.
9. What are the best print settings for 3D printing Minecraft models?
Recommended settings include a layer height of 0.1mm – 0.2mm, infill density of 15% – 20%, and print speed of 40mm/s – 60mm/s.
10. How can amazingprint.net help with my 3D printing needs?
amazingprint.net provides comprehensive information, easy comparison of options, and creative inspiration for your 3D printing projects, ensuring high-quality results and a seamless experience.