Navigating the digital landscape often requires capturing and sharing what’s on your screen. How do I print screen on Windows 10 for printing? It’s easily done through various methods discussed at amazingprint.net, which empowers you to capture, edit, and share screenshots effectively for all your printing projects, offering seamless integration with printing services for flawless physical outputs. Learning these techniques ensures that you can preserve and share important information efficiently, optimizing your digital and physical workflows.
1. What is Print Screen and Why is it Important for Windows 10 Users?
Print Screen, often labeled PrtScn, PrntScr, or similar abbreviations on your keyboard, is a fundamental feature for Windows 10 users to capture screenshots—digital images of your screen. The importance of this function lies in its ability to quickly preserve and share information displayed on your computer. Whether you’re documenting software issues, creating tutorials, or capturing memorable moments, Print Screen provides a simple yet powerful way to transfer visual content from your screen into shareable formats, significantly enhancing your digital communication and productivity.
1.1 Why is Print Screen Important?
Print Screen is important because it offers several key benefits:
- Instant Capture: It provides a quick and easy way to capture what is on your screen at any given moment.
- Documentation: It’s invaluable for creating documentation, guides, or tutorials.
- Support: It helps in explaining technical issues or providing visual support to others.
- Sharing: It allows you to easily share visual information with colleagues, friends, or family.
1.2 What are the Primary Functions of Print Screen?
The primary functions of Print Screen include:
- Capturing the entire screen: Saves an image of everything visible on your monitor.
- Capturing a single window: Allows you to select and save an image of only the active window, keeping the capture focused.
- Copying to clipboard: The captured image is copied to your clipboard, ready to be pasted into an image editor or document.
1.3 What are the Benefits of Learning How to Print Screen on Windows 10?
Knowing how to use the Print Screen function in Windows 10 effectively can greatly enhance your productivity and communication. The benefits include:
- Time-saving: Quickly capture and share information instead of manually typing it out.
- Clarity: Visual aids often communicate more effectively than text.
- Problem-solving: Easily document and share technical issues for faster resolution.
- Creative Uses: Use screenshots in presentations, design projects, and social media.
2. What are the Different Ways to Print Screen on Windows 10?
Windows 10 offers several methods to capture screenshots, each catering to different needs and preferences.
- Using the PrtScn key alone captures the entire screen and copies it to the clipboard.
- Alt + PrtScn captures only the active window.
- The Windows key + PrtScn saves the screenshot directly as a file.
- The Snipping Tool provides advanced options for selecting specific areas of the screen.
- Windows + Shift + S activates the Snip & Sketch tool for more flexible capture options.
Understanding these options allows you to choose the most efficient method for any situation, streamlining your workflow and enhancing your ability to share information effectively.
2.1 Using the PrtScn Key Alone
Pressing the PrtScn key by itself is the simplest method to capture your entire screen on Windows 10. When you press this key, Windows takes a snapshot of your entire screen and copies it to the clipboard. This means the image is not saved as a file but is temporarily stored in your computer’s memory.
To use this captured image, you need to paste it into an application like Microsoft Paint, Word, or any image editing software. Open your desired application and use the Ctrl + V shortcut to paste the screenshot. From there, you can edit, save, or share the image as needed.
This method is quick and straightforward, making it ideal for situations where you need to capture and share your entire screen without saving it as a separate file immediately.
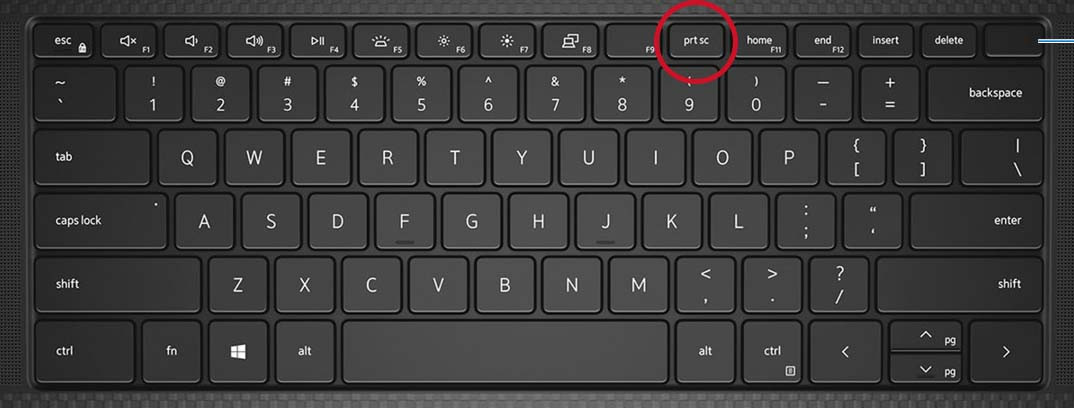 Illustration of print screen key on Dell KM5221W wireless keyboard
2.2 Using Alt + PrtScn to Capture a Single Window
Capturing a single window is useful when you only need a specific part of your screen, like an application or dialog box. To capture only the active window:
- Select the Window: First, click on the window you want to capture to make sure it is active.
- Press Alt + PrtScn: Hold down the Alt key and press the PrtScn key simultaneously. This command captures only the active window and copies it to the clipboard.
- Paste the Image: Open your preferred image editing software, such as Microsoft Paint or Adobe Photoshop, and press Ctrl + V to paste the captured window.
- Edit and Save: You can now edit the image and save it as a file.
This method is particularly useful for documenting specific application features or error messages without capturing unnecessary parts of your screen.
2.3 Using Windows Key + PrtScn to Save a Screenshot Directly
For those who prefer to save screenshots directly as files without needing to paste them into an application first, Windows 10 offers a convenient shortcut:
- Press Windows Key + PrtScn: Simultaneously press the Windows key and the PrtScn key. The screen will briefly dim, indicating that a screenshot has been taken.
- Locate the Screenshot: The screenshot is automatically saved as a PNG file in the “Screenshots” folder, which is located inside the “Pictures” folder in your user directory.
- Access and Use: You can now access the saved image file directly, share it, or edit it as needed.
This method is ideal for users who frequently take screenshots and prefer a quick way to save them for later use, such as creating a visual guide or documenting a process.
2.4 Using the Snipping Tool for More Flexible Captures
The Snipping Tool is a built-in Windows utility that offers more flexible options for capturing screenshots. It allows you to capture specific areas of your screen, making it a powerful tool for detailed documentation and sharing.
-
Open the Snipping Tool:
- You can find it by typing “Snipping Tool” in the Windows search bar and selecting it from the results.
-
Choose a Snip Type:
- In the Snipping Tool, you can choose from several modes:
- Free-form Snip: Draw a free-form shape around the area you want to capture.
- Rectangular Snip: Drag a rectangle around the area you want to capture.
- Window Snip: Select a specific window to capture.
- Full-screen Snip: Capture the entire screen, similar to the PrtScn key.
- In the Snipping Tool, you can choose from several modes:
-
Capture the Snip:
- Click “New” and then select the area you want to capture.
-
Edit and Save:
- The captured snip opens in the Snipping Tool window where you can annotate it with a pen, highlighter, or eraser.
- Save the snip by clicking the “Save” button and choosing a location and file name.
The Snipping Tool provides greater precision and editing capabilities, making it an excellent choice for creating detailed guides or capturing specific elements on your screen.
2.5 Using Windows + Shift + S to Activate Snip & Sketch
Snip & Sketch is a more modern version of the Snipping Tool, offering enhanced features and a more intuitive interface. This tool is especially useful for quick annotations and sharing.
-
Activate Snip & Sketch:
- Press Windows + Shift + S simultaneously. The screen will dim, and a small toolbar will appear at the top of the screen.
-
Choose a Snip Type:
- The toolbar offers several options:
- Rectangular Snip: Drag a rectangle around the area you want to capture.
- Freeform Snip: Draw a free-form shape around the area you want to capture.
- Window Snip: Select a specific window to capture.
- Full-screen Snip: Capture the entire screen.
- The toolbar offers several options:
-
Capture the Snip:
- Select the desired snip type and capture the area you want to save.
-
Edit and Share:
- The captured snip automatically opens in the Snip & Sketch app where you can annotate it with pens, pencils, highlighters, and more.
- You can save the snip, copy it to the clipboard, or share it directly via email or other apps.
Snip & Sketch is perfect for users who need to quickly capture, annotate, and share screenshots, streamlining the process of visual communication.
3. How to Edit a Print Screen Image in Windows 10
After capturing a screenshot in Windows 10, editing it can help you highlight important details, remove sensitive information, or add context. Windows 10 offers several built-in tools and third-party options for editing your print screen images.
- Using Paint: A basic but useful tool for simple edits like cropping, resizing, and adding text.
- Using Snip & Sketch: Offers more advanced annotation tools and easier sharing options.
- Third-party software options: Provides a wide range of powerful editing features for professional use.
3.1 Using Paint for Basic Editing
Paint is a simple but effective image editing program that comes standard with Windows 10. It’s perfect for basic edits like cropping, resizing, adding text, and drawing simple shapes.
-
Open Paint:
- Search for “Paint” in the Windows search bar and open the application.
-
Paste the Screenshot:
- If you copied the screenshot to your clipboard using the PrtScn key, press Ctrl + V to paste it into Paint.
- Alternatively, if you saved the screenshot as a file, open the file in Paint using the “File” > “Open” menu.
-
Use the Editing Tools:
- Crop: Select the “Select” tool, drag a rectangle around the area you want to keep, and then click “Crop.”
- Resize: Click “Resize” in the “Image” section of the toolbar. You can resize by percentage or pixels.
- Add Text: Select the “Text” tool (the “A” icon), click on the image where you want to add text, and type your text.
- Draw Shapes: Use the “Shapes” tool to add lines, rectangles, circles, and other shapes.
- Pencil and Brush: Use the “Pencil” and “Brush” tools to draw freehand lines and shapes.
-
Save Your Edits:
- Click “File” > “Save As” and choose a file name, format (such as PNG or JPEG), and location to save your edited screenshot.
Paint is great for quick edits and annotations, making it a practical tool for everyday use.
3.2 Using Snip & Sketch for Annotations
Snip & Sketch is a more modern tool that offers enhanced annotation capabilities. It’s excellent for adding notes, highlights, and drawings to your screenshots.
-
Open Snip & Sketch:
- After capturing a screenshot using Windows + Shift + S, the image automatically opens in the Snip & Sketch app.
- Alternatively, you can search for “Snip & Sketch” in the Windows search bar and open the application. Then, click the “New” button to take a new screenshot or open an existing one.
-
Use the Annotation Tools:
- Pen: Draw freehand lines with different colors and thicknesses.
- Pencil: Similar to the pen tool but with a more subtle effect.
- Highlighter: Highlight important sections of the screenshot.
- Eraser: Erase any unwanted annotations.
- Ruler: Draw straight lines.
- Crop: Crop the image to focus on specific areas.
-
Save or Share Your Edits:
- Click the “Save” icon to save the annotated screenshot.
- Click the “Copy” icon to copy the annotated screenshot to the clipboard.
- Click the “Share” icon to share the annotated screenshot directly via email or other apps.
Snip & Sketch provides a streamlined way to annotate and share screenshots, making it a valuable tool for collaboration and communication.
3.3 Exploring Third-Party Software Options for Advanced Editing
For more advanced editing needs, several third-party software options offer a wide range of features and capabilities.
-
Adobe Photoshop:
- Industry-standard software for professional image editing.
- Offers advanced tools for retouching, color correction, layering, and more.
- Ideal for complex editing tasks and creating high-quality images.
-
GIMP (GNU Image Manipulation Program):
- Free and open-source image editing software.
- Provides many of the same features as Photoshop, including layers, filters, and advanced selection tools.
- A great option for users who need powerful editing capabilities without the cost.
-
Snagit:
- A popular screen capture and recording tool with robust editing features.
- Offers annotation tools, effects, and the ability to create animated GIFs.
- Ideal for creating tutorials, presentations, and visual documentation.
-
PicPick:
- A free screen capture tool with a built-in image editor.
- Includes annotation tools, shapes, arrows, and effects.
- A lightweight and user-friendly option for quick and easy edits.
These third-party software options provide a comprehensive set of tools for enhancing your screenshots, whether you need basic annotations or advanced image manipulation.
4. What are the Common Issues with Print Screen and How to Fix Them?
While Print Screen is a straightforward tool, users may encounter issues such as the Print Screen key not working, screenshots not saving properly, or difficulty capturing specific content. These issues can often be resolved with simple troubleshooting steps.
4.1 Print Screen Key Not Working
If the Print Screen key is not working, there are several potential causes and solutions.
-
Check Keyboard Functionality:
- Make sure the Print Screen key is not damaged or stuck.
- Test other keys on your keyboard to ensure they are functioning correctly.
-
Disable Conflicting Programs:
- Some programs may interfere with the Print Screen function. Close any running applications that capture keyboard input or manage screenshots.
-
Check Keyboard Drivers:
- Outdated or corrupted keyboard drivers can cause issues.
- Update your keyboard drivers through the Device Manager:
- Press Windows + X and select “Device Manager.”
- Expand “Keyboards,” right-click on your keyboard, and select “Update driver.”
- Choose “Search automatically for drivers” and follow the instructions.
-
Use the On-Screen Keyboard:
- As a temporary workaround, use the On-Screen Keyboard to test the Print Screen function:
- Search for “On-Screen Keyboard” in the Windows search bar and open the application.
- Press the PrtScn key on the On-Screen Keyboard and paste the screenshot into an application.
- As a temporary workaround, use the On-Screen Keyboard to test the Print Screen function:
4.2 Screenshots Not Saving Properly
If screenshots are not saving properly when using the Windows Key + PrtScn shortcut, there are a few things you can check.
-
Check the Screenshots Folder:
- Make sure the “Screenshots” folder exists in your “Pictures” folder. If it’s missing, create a new folder and name it “Screenshots.”
-
Verify Folder Permissions:
- Ensure that you have the necessary permissions to write to the “Screenshots” folder.
- Right-click on the “Screenshots” folder, select “Properties,” go to the “Security” tab, and verify that your user account has “Write” permissions.
-
Check OneDrive Settings:
- If OneDrive is enabled, it may be interfering with the saving process.
- Check your OneDrive settings to ensure that it is not causing conflicts with the “Screenshots” folder.
-
Restart Windows Explorer:
- Restarting Windows Explorer can resolve issues with file saving.
- Press Ctrl + Shift + Esc to open the Task Manager, find “Windows Explorer” in the list, right-click on it, and select “Restart.”
4.3 Difficulty Capturing Specific Content
Sometimes, capturing specific content, such as videos or protected content, can be challenging due to security restrictions.
-
Use Alternative Methods:
- Try using the Snipping Tool or Snip & Sketch, which may be able to capture content that the PrtScn key cannot.
-
Disable Hardware Acceleration:
- Hardware acceleration can sometimes interfere with screen captures.
- Disable hardware acceleration in your browser or media player settings and try again.
-
Use a Screen Recording Tool:
- For capturing videos, consider using a screen recording tool like OBS Studio or the Xbox Game Bar (Windows Key + G), which can record video and audio.
-
Check for DRM Protection:
- Some content may be protected by Digital Rights Management (DRM), which prevents screen captures. In these cases, you may not be able to capture the content.
5. How to Optimize Print Screen for Printing Purposes
Optimizing screenshots for printing ensures that the final printed output looks clear and professional. This involves adjusting resolution, file format, and editing the image to suit printing requirements.
- Adjust resolution: Increasing the resolution ensures that the printed image is sharp and detailed.
- Choose the right file format: Selecting a suitable file format like PNG or TIFF preserves image quality.
- Edit for clarity: Enhancing contrast and brightness improves visibility on printed materials.
5.1 Adjusting Resolution for Printing
Adjusting the resolution of your screenshot is crucial for ensuring a high-quality printed image. Resolution refers to the number of pixels in an image, and higher resolution means more detail and sharpness.
-
Determine the Required Resolution:
- For printing, a resolution of 300 DPI (dots per inch) is generally recommended for sharp, clear images.
- Lower resolutions (e.g., 150 DPI) may be acceptable for draft prints or smaller images.
-
Check the Current Resolution:
- Open the screenshot in an image editing program like Photoshop or GIMP.
- Go to “Image” > “Image Size” to view the current resolution and dimensions.
-
Increase the Resolution (Resampling):
- In the “Image Size” dialog, increase the resolution to 300 DPI.
- Make sure to enable “Resample” and choose a resampling method like “Bicubic Smoother” for enlargement.
- Increasing the resolution will also increase the file size and may slightly reduce image quality, so it’s best to start with the highest possible resolution when taking the screenshot.
-
Adjust Dimensions if Necessary:
- If you need to print the image at a specific size (e.g., 4×6 inches), adjust the dimensions accordingly while keeping the resolution at 300 DPI.
5.2 Choosing the Right File Format for Printing
The file format you choose for saving your screenshot can significantly impact the quality of the printed image. Different file formats use different compression methods, which can affect the level of detail and sharpness.
-
PNG (Portable Network Graphics):
- A lossless file format that preserves image quality without compression artifacts.
- Ideal for screenshots with text, graphics, and sharp lines.
- PNG files tend to be larger than JPEG files.
-
TIFF (Tagged Image File Format):
- Another lossless file format that is commonly used for professional printing and archiving.
- Supports high bit depths and preserves maximum image detail.
- TIFF files are typically very large.
-
JPEG (Joint Photographic Experts Group):
- A lossy file format that uses compression to reduce file size.
- Suitable for photographs and images with smooth gradients.
- JPEG compression can introduce artifacts and reduce sharpness, especially at high compression levels.
-
Recommendation:
- For most printing purposes, PNG is a good balance between file size and image quality.
- If you need the highest possible quality and file size is not a concern, use TIFF.
- Avoid using JPEG for screenshots with text or graphics, as it can make them look blurry.
5.3 Editing the Print Screen Image for Clarity
Editing your screenshot to enhance clarity can make a big difference in the final printed output. Adjusting brightness, contrast, and sharpness can improve visibility and ensure that all details are clear.
-
Open the Screenshot in an Image Editor:
- Use a program like Photoshop, GIMP, or even Paint to edit the image.
-
Adjust Brightness and Contrast:
- Increase the brightness to make the image lighter and more visible.
- Adjust the contrast to make the details stand out more.
- Be careful not to overdo it, as too much brightness or contrast can make the image look unnatural.
-
Sharpen the Image:
- Use the “Sharpen” filter to enhance the sharpness of the image.
- Apply the filter sparingly, as too much sharpening can introduce artifacts and make the image look grainy.
-
Remove Unnecessary Elements:
- Crop the image to focus on the most important details.
- Use the eraser tool to remove any unwanted elements or distractions.
-
Add Annotations:
- Use text and shapes to add annotations that highlight important details or provide context.
- Make sure the annotations are clear and easy to read.
-
Check the Colors:
- If you are printing in color, make sure the colors in the screenshot look accurate and vibrant.
- Adjust the color balance if necessary.
6. What are the Print Screen Alternatives on Windows 10?
While the Print Screen key is a staple for capturing screens, Windows 10 offers several alternatives with enhanced features, flexibility, and ease of use. These tools provide a range of options from basic snips to full-screen recordings.
6.1 Xbox Game Bar
The Xbox Game Bar is a built-in Windows 10 feature primarily designed for gamers, but it can also be used to capture screenshots and record screen activity.
-
Accessing the Xbox Game Bar:
- Press Windows Key + G to open the Xbox Game Bar.
-
Taking a Screenshot:
- Click the “Screenshot” button (camera icon) on the Game Bar.
- Alternatively, use the shortcut Windows Key + Alt + PrtScn to capture a screenshot.
-
Recording a Video:
- Click the “Start Recording” button (circle icon) to begin recording your screen.
- Alternatively, use the shortcut Windows Key + Alt + R to start and stop recording.
-
Accessing Captured Media:
- Captured screenshots and videos are saved in the “Captures” folder within the “Videos” folder in your user directory.
The Xbox Game Bar is a convenient option for quickly capturing screenshots and videos, especially if you need to record gameplay or other dynamic content.
6.2 Greenshot
Greenshot is a free and open-source screenshot tool that offers a wide range of features and customization options. It is a popular choice for users who need more advanced capabilities than the built-in Windows tools.
-
Downloading and Installing Greenshot:
- Download Greenshot from the official website and install it on your computer.
-
Capturing Screenshots:
- Press the PrtScn key to activate Greenshot.
- You can choose from several capture modes:
- Capture Window: Capture a specific window.
- Capture Region: Select a rectangular area to capture.
- Capture Last Region: Capture the last selected region.
- Capture Fullscreen: Capture the entire screen.
- Capture Internet Explorer: Capture a webpage in Internet Explorer.
-
Editing Screenshots:
- Greenshot includes a built-in image editor with tools for annotation, highlighting, and obfuscation.
-
Saving and Exporting:
- You can save screenshots to various file formats, including PNG, JPEG, TIFF, and BMP.
- Greenshot also supports exporting screenshots directly to printers, email, and online services like Imgur and Flickr.
Greenshot is a powerful and versatile screenshot tool that is ideal for users who need advanced features and customization options.
6.3 ShareX
ShareX is another free and open-source screenshot and screen recording tool that offers an extensive set of features and customization options. It is a popular choice for power users who need advanced capabilities and automation.
-
Downloading and Installing ShareX:
- Download ShareX from the official website and install it on your computer.
-
Capturing Screenshots:
- ShareX supports a wide range of capture methods, including:
- Fullscreen: Capture the entire screen.
- Window: Capture a specific window.
- Region: Select a rectangular area to capture.
- Freehand: Draw a freehand shape around the area you want to capture.
- Scrolling Capture: Capture an entire webpage by scrolling down automatically.
- ShareX supports a wide range of capture methods, including:
-
Editing Screenshots:
- ShareX includes a built-in image editor with tools for annotation, highlighting, and effects.
-
Uploading and Sharing:
- ShareX supports uploading screenshots and recordings to over 80 different online services, including Imgur, Dropbox, Google Drive, and FTP servers.
- You can also configure custom upload destinations and workflows.
ShareX is a highly customizable and feature-rich screenshot tool that is ideal for power users who need advanced capabilities and automation.
7. How to Take a Print Screen on a Dell Computer
Taking a print screen on a Dell computer is similar to any other Windows 10 device, but there are a few Dell-specific considerations to keep in mind.
- Using the PrtScn Key: Locate the PrtScn key, usually in the upper right corner.
- Keyboard Variations: Some Dell keyboards require the Fn key to be pressed with PrtScn.
- Dell SupportAssist: Dell computers often come with SupportAssist, which can help troubleshoot any issues.
7.1 Using the PrtScn Key on a Dell Computer
The basic method for taking a print screen on a Dell computer involves using the PrtScn key.
-
Locate the PrtScn Key:
- The PrtScn key is typically located in the upper right corner of the keyboard, often near the F12 key.
- It may be labeled as “PrtScn,” “PrtSc,” or “Print Screen.”
-
Capture the Screen:
- Press the PrtScn key to capture the entire screen. The screenshot is copied to the clipboard.
-
Paste the Screenshot:
- Open an image editing program like Paint or Photoshop.
- Press Ctrl + V to paste the screenshot into the program.
-
Edit and Save:
- Edit the screenshot as needed and save it to your desired location.
7.2 Keyboard Variations on Dell Laptops
On some Dell laptops, the PrtScn key may be combined with another function, requiring you to press the Fn key as well.
-
Identify the PrtScn Key Combination:
- Look for the PrtScn key on your keyboard. If it has a secondary function (indicated by a different color or symbol), you may need to press the Fn key to access it.
-
Capture the Screen:
- Press Fn + PrtScn to capture the entire screen.
-
Paste the Screenshot:
- Open an image editing program.
- Press Ctrl + V to paste the screenshot.
-
Edit and Save:
- Edit the screenshot and save it to your desired location.
7.3 Using Dell SupportAssist for Troubleshooting
Dell SupportAssist is a pre-installed application on many Dell computers that can help troubleshoot hardware and software issues, including problems with the keyboard or screenshot functionality.
-
Open Dell SupportAssist:
- Search for “SupportAssist” in the Windows search bar and open the application.
-
Run a Hardware Scan:
- In SupportAssist, run a hardware scan to check for any issues with your keyboard.
-
Update Drivers:
- SupportAssist can also help you update your drivers, including keyboard drivers.
- Click “Get drivers & downloads” to check for and install any available updates.
-
Use the Troubleshooter:
- If you are experiencing issues with the screenshot functionality, use the SupportAssist troubleshooter to diagnose and resolve the problem.
8. How to Print Screen on a Mac
While this article primarily focuses on Windows 10, it’s useful to know how to take screenshots on other operating systems, such as macOS. The process on a Mac is different but equally straightforward.
- Shift-Command-3: Captures the entire screen and saves it as a file.
- Shift-Command-4: Allows you to select a specific area to capture.
- Shift-Command-5: Opens a toolbar with options for capturing the entire screen, a window, or recording video.
8.1 Capturing the Entire Screen on a Mac
To capture the entire screen on a Mac and save it as a file:
-
Press Shift-Command-3:
- Press the Shift, Command, and 3 keys simultaneously.
- The screenshot is automatically saved as a PNG file on your desktop.
-
Locate the Screenshot:
- Find the screenshot file on your desktop. It will be named something like “Screenshot [date] at [time].png”.
-
Edit and Share:
- You can now open the screenshot in Preview or another image editing program to edit it, or share it as needed.
8.2 Capturing a Specific Area on a Mac
To capture a specific area of the screen on a Mac:
-
Press Shift-Command-4:
- Press the Shift, Command, and 4 keys simultaneously.
- The cursor will change to a crosshair.
-
Select the Area:
- Click and drag the crosshair to select the area you want to capture.
- Release the mouse button to take the screenshot.
-
Locate the Screenshot:
- The screenshot is automatically saved as a PNG file on your desktop.
-
Edit and Share:
- Open the screenshot in Preview or another image editing program to edit it, or share it as needed.
8.3 Using the Screenshot Toolbar on macOS
macOS also provides a Screenshot toolbar with additional options for capturing screenshots and screen recordings.
-
Press Shift-Command-5:
- Press the Shift, Command, and 5 keys simultaneously.
- The Screenshot toolbar will appear at the bottom of the screen.
-
Choose a Capture Mode:
- The toolbar offers several options:
- Capture Entire Screen: Capture the entire screen.
- Capture Selected Window: Capture a specific window.
- Capture Selected Portion: Select a specific area to capture.
- Record Entire Screen: Record a video of the entire screen.
- Record Selected Portion: Record a video of a specific area.
- The toolbar offers several options:
-
Capture or Record:
- Click the “Capture” or “Record” button to start the process.
-
Locate the Screenshot or Recording:
- The screenshot or recording is automatically saved as a file on your desktop.
-
Edit and Share:
- Open the file in Preview or another editing program to edit it, or share it as needed.
9. How Can Amazingprint.net Help with Print Screen Images?
While amazingprint.net doesn’t directly interact with your print screen function, it serves as an invaluable resource for printing the images you capture. Amazingprint.net offers a range of printing services that can transform your digital screenshots into high-quality physical prints. Whether you need to print screenshots for documentation, presentations, or creative projects, amazingprint.net can help you achieve professional results.
9.1 Printing High-Quality Screenshots
Amazingprint.net provides high-quality printing services that can bring your screenshots to life. By ensuring that your printed screenshots look sharp and vibrant, amazingprint.net helps you create professional-looking documents and presentations.
-
Uploading Your Screenshots:
- Visit the amazingprint.net website and upload your screenshot files.
- Supported file formats include PNG, JPEG, and TIFF.
-
Selecting Printing Options:
- Choose your desired printing options, such as paper type, size, and finish.
- Amazingprint.net offers a variety of paper options, including glossy, matte, and premium photo paper.
-
Previewing and Ordering:
- Preview your screenshots to ensure they look correct.
- Place your order and have your printed screenshots delivered to your doorstep.
9.2 Enhancing Screenshots for Print
To ensure that your screenshots look their best when printed, consider enhancing them using image editing software before uploading them to amazingprint.net.
-
Adjusting Resolution:
- Increase the resolution of your screenshots to 300 DPI for sharp, clear prints.
-
Adjusting Brightness and Contrast:
- Adjust the brightness and contrast to make the details stand out.
-
Sharpening the Image:
- Use the “Sharpen” filter to enhance the sharpness of the image.
-
Removing Unnecessary Elements:
- Crop the image to focus on the most important details.
-
Adding Annotations:
- Use text and shapes to add annotations that highlight important details or provide context.
9.3 Utilizing Amazingprint.net for Professional Printing Needs
Amazingprint.net is an excellent choice for businesses and professionals who need high-quality printing services. Whether you are printing screenshots for internal documentation, client presentations, or marketing materials, amazingprint.net can help you create professional-looking results.
-
Business Cards:
- Print business cards with screenshots of your products or services to showcase your offerings.
-
Brochures and Flyers:
- Incorporate screenshots into brochures and flyers to illustrate key features and benefits.
-
Presentations:
- Print screenshots as handouts for presentations to provide visual support for your message.
-
Posters and Banners:
- Create posters and banners with screenshots to promote your products or services at events and trade shows.
By using amazingprint.net, you can transform your digital screenshots into high-quality physical prints that make a lasting impression.
10. What are Some Creative Uses for Print Screen Images?
Print Screen images aren’t just for technical documentation; they can also be used creatively in various ways. Whether you’re a professional or just looking for fun projects, Print Screen offers numerous possibilities.
- Creating Tutorials: Step-by-step guides enhanced with visuals.
- Designing Mockups: Showcasing designs and interfaces.
- Making Digital Art: Incorporating screenshots into artwork.