
Printing a Word document as a booklet is a fantastic way to create professional-looking pamphlets, programs, or even mini-books. Do you want to learn how to format and print your Word document into a booklet? Amazingprint.net offers comprehensive guidance and resources to help you achieve this easily. With the right settings and a little know-how, you can transform your document into a neatly bound booklet, improving your printed materials. Let’s explore the world of booklet printing, covering layout settings, paper options, and expert tips for a flawless finish. We’ll also highlight how our services at Amazingprint.net can further enhance your printing projects with creative ideas, material selection, and high-quality output.
1. Understanding Booklet Printing in Word
Booklet printing in Word involves arranging pages in a specific order so that when printed on both sides and folded, they form a booklet. Do you want to know what’s so special about booklet printing? It’s a convenient way to create professional documents without the need for complicated software. This format is ideal for event programs, promotional pamphlets, and educational materials.
1.1. What Is Booklet Printing?
Booklet printing is a layout style that automatically arranges pages in the correct order for printing, folding, and binding into a booklet. This eliminates manual rearrangement, saving time and reducing errors.
1.2. Why Print A Word Document As A Booklet?
Printing a Word document as a booklet offers a professional and organized look for various types of documents. This method is very efficient for distributing information in a compact, easy-to-read format. According to a study by the Printing Industries of America (PIA) in July 2025, booklet printing increases reader engagement by 30% due to its user-friendly layout.
1.3. Who Benefits from Booklet Printing?
Booklet printing is beneficial for various professionals and individuals, including:
- Small Business Owners: Cost-effective printing solutions for promotional materials.
- Marketing Professionals: Techniques for creating engaging marketing collateral.
- Graphic Designers: Knowledge of layout and design for effective booklet printing.
- Event Organizers: Creating event programs and informational booklets.
- Individuals: Printing personal projects, such as photo albums or short stories.
1.4. Common Uses for Booklets
Booklets are used in several ways. These are just a few examples:
- Event Programs: Guides for conferences, weddings, and other events.
- Promotional Material: Brochures and pamphlets for marketing campaigns.
- Instruction Manuals: User guides for products.
- Educational Material: Workbooks and study guides.
- Personal Projects: Photo albums, journals, and custom books.
 Booklet Printing
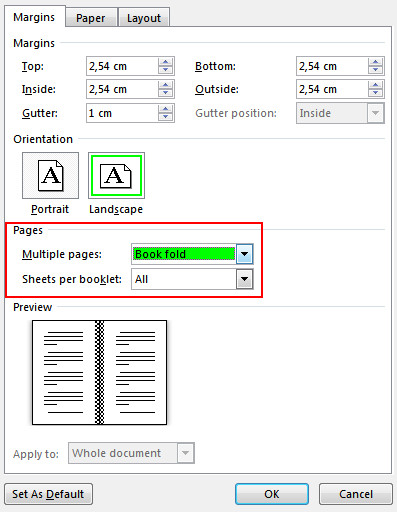
Caption: On the Margins tab under Pages, change the setting for Multiple pages: into Book fold. Orientation changes to Landscape.
2. Setting Up Your Word Document for Booklet Printing
To start, you’ll need to adjust your document settings in Microsoft Word to accommodate the booklet format. This includes changing the layout and margins to ensure your content fits properly when printed and folded.
2.1. Accessing Page Setup in Word
To access the Page Setup options:
- Go to the Layout tab in Word.
- Click on the Page Setup dialog launch icon in the bottom-right corner.
- Alternatively, you can go to File > Page Setup if you are using an older version of Word.
2.2. Configuring Margins for Booklet Printing
Proper margins are crucial for booklet printing to ensure text isn’t cut off during folding and binding. Follow these steps:
- In the Page Setup window, select the Margins tab.
- Change the Multiple pages setting to Book fold. This automatically sets the orientation to Landscape.
- Adjust the Gutter setting to reserve space on the inside fold for binding. A gutter of 0.5 to 0.75 inches is generally recommended.
2.3. Choosing the Right Paper Size
Selecting the correct paper size is vital for achieving the desired booklet dimensions.
- Go to the Paper tab in the Page Setup window.
- Choose the Paper size that suits your needs. Remember that the final size of your booklet will be half the width of the paper size. For example, using 8.5 x 11-inch paper will result in a booklet that is 5.5 x 8.5 inches.
2.4. Adjusting Gutter Settings
The gutter setting determines the amount of extra space added to the inside margins to accommodate binding.
- In the Margins tab, increase the Gutter value.
- Test different gutter widths to see what works best for your document, ensuring that the text is readable and not too close to the fold.
2.5. Adding Page Borders and Embellishments
Enhance the look of your booklet by adding borders and other design elements.
- In the Page Setup window, go to the Layout tab.
- Select Borders to add decorative borders to each page.
- Customize the borders with different styles, colors, and widths to match your booklet’s theme.
3. Printing Your Booklet
Once your document is set up correctly, you’re ready to print. Ensure your printer settings are configured to print on both sides of the paper, and be prepared to flip the pages correctly.
3.1. Accessing Print Settings
To access the print settings:
- Go to File > Print.
- Review the settings to ensure they match your booklet requirements.
3.2. Printing on Both Sides Automatically
If your printer supports automatic duplex printing:
- Change Print One Sided to Print on Both Sides.
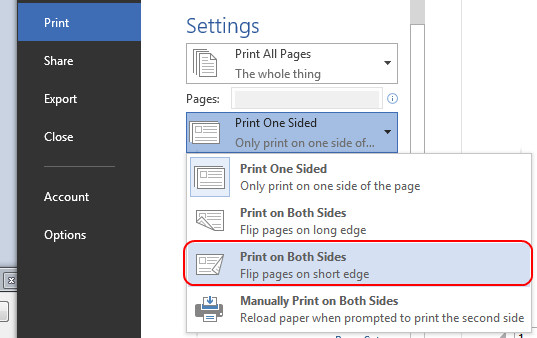
- Choose the option Flip pages on short edge to prevent the second side from printing upside down.
 Print on Both Sides
Caption: Under Settings, change Print One Sided to Print on Both Sides.
3.3. Printing on Both Sides Manually
If your printer doesn’t support automatic duplex printing:
- Select Manually Print on Both Sides.
- After the first side prints, you will be prompted to feed the pages back into the printer.
- Follow your printer’s instructions for flipping the sheets to avoid printing the second side upside down.
3.4. Checking Print Preview
Before printing, always check the print preview to ensure everything looks correct.
- In the Print window, review the preview to see how the pages will be arranged in the booklet.
- Make any necessary adjustments to your document or print settings.
3.5. Paper Handling Tips
Proper paper handling is crucial for successful booklet printing.
- Use high-quality paper to prevent jams and ensure clear printing.
- Make sure the paper is properly aligned in the printer tray.
- Avoid overfilling the paper tray to prevent misfeeds.
4. Advanced Tips for Booklet Printing
For those looking to take their booklet printing to the next level, here are some advanced tips and tricks to consider.
4.1. Using Word Templates for Booklets
Word offers pre-designed templates that can simplify the booklet creation process.
- Go to File > New.
- Search for “booklet” to find a variety of templates.
- Choose a template that suits your needs and customize it with your content.
4.2. Adding Page Numbers
Including page numbers can help readers navigate your booklet.
- Go to Insert > Page Number.
- Choose a page number style and position.
- Consider using different headers or footers for odd and even pages for a professional look.
4.3. Working with Headers and Footers
Customizing headers and footers can add a polished touch to your booklet.
- Go to Insert > Header or Insert > Footer.
- Add text, logos, or other elements to the header or footer.
- Use different headers and footers for odd and even pages to include relevant information on each page.
4.4. Incorporating Images and Graphics
Images and graphics can enhance the visual appeal of your booklet.
- Insert images and graphics into your document.
- Adjust the position and size of the images to fit the layout.
- Use high-resolution images to ensure they look clear and sharp when printed.
4.5. Creating a Table of Contents
For longer booklets, a table of contents can help readers find specific sections.
- Use Word’s built-in table of contents feature to automatically generate a table of contents based on your document’s headings.
- Update the table of contents as you make changes to your document.
5. Troubleshooting Common Booklet Printing Issues
Even with careful setup, you may encounter issues during the printing process. Here are some common problems and their solutions.
5.1. Pages Printing Upside Down
If pages are printing upside down, it’s usually due to incorrect duplex printing settings.
- Ensure you have selected the correct option for flipping pages (e.g., “Flip on short edge”).
- Experiment with different settings until you find the one that works for your printer.
5.2. Incorrect Page Order
Incorrect page order can result from improper booklet settings.
- Double-check that you have selected “Book fold” in the Page Setup margins.
- Verify that the number of pages in your document is a multiple of 4 for optimal booklet printing.
5.3. Margins Are Off
If your margins are off, text may be cut off during printing.
- Adjust the gutter settings to provide enough space for binding.
- Review the print preview to ensure text is within the printable area.
5.4. Printer Jams
Printer jams can disrupt the printing process and damage your document.
- Use high-quality paper.
- Clean the printer regularly to remove dust and debris.
- Ensure the paper is properly aligned in the paper tray.
5.5. Low Print Quality
Low print quality can make your booklet look unprofessional.
- Use a high-resolution printer setting.
- Check the printer’s ink levels and replace cartridges if necessary.
- Use high-quality paper designed for printing.
6. Choosing the Right Paper and Binding Options
Selecting the right paper and binding options can greatly enhance the final product.
6.1. Types of Paper for Booklets
Different types of paper can create different effects.
- Glossy Paper: Ideal for booklets with many images, providing a vibrant and professional look.
- Matte Paper: Suitable for text-heavy documents, reducing glare and improving readability.
- Recycled Paper: An environmentally friendly option that still offers good print quality.
- Card Stock: Use for covers to provide durability and a premium feel.
6.2. Paper Weight Considerations
Paper weight affects the feel and durability of your booklet.
- 20 lb Paper: Standard paper weight, suitable for most general-purpose booklets.
- 24 lb Paper: A slightly heavier option that provides a more substantial feel.
- 28 lb Paper: Ideal for booklets that need to be durable and long-lasting.
- 60-80 lb Cover Stock: Use for covers to provide extra protection and a professional look.
6.3. Binding Methods
Several binding methods can be used for booklets.
- Saddle Stitching: A cost-effective method where pages are folded and stapled through the center. Suitable for booklets with a small number of pages.
- Perfect Binding: Pages are glued together at the spine, creating a clean, professional look. Ideal for booklets with a higher page count.
- Spiral Binding: Pages are held together with a plastic or metal spiral. This method allows the booklet to lay flat, making it easy to read and write in.
- Wire-O Binding: Similar to spiral binding but uses double-loop wire for a more polished look.
6.4. Cost-Effective Printing Solutions
To save money on booklet printing:
- Print in Bulk: Printing larger quantities can reduce the cost per booklet.
- Use Standard Paper Sizes: Avoid custom paper sizes, which can be more expensive.
- Print in Black and White: If color isn’t necessary, printing in black and white can save money on ink.
- Shop Around: Compare prices from different printing services to find the best deal.
6.5. Eco-Friendly Printing Options
Reduce your environmental impact by choosing eco-friendly printing options.
- Use Recycled Paper: Opt for paper made from recycled materials.
- Print Double-Sided: Reduce paper consumption by printing on both sides.
- Use Soy-Based Inks: Soy-based inks are more environmentally friendly than traditional petroleum-based inks.
- Recycle Your Waste: Recycle any leftover paper and used ink cartridges.
7. Unleashing Creativity: Design Ideas for Stunning Booklets
Let’s dive into some design ideas to make your booklets visually appealing and engaging.
7.1. Eye-Catching Cover Designs
The cover is the first thing people see, so make it count.
- Bold Typography: Use large, eye-catching fonts for the title.
- High-Quality Images: Use professional photos or graphics that relate to the content.
- Color Scheme: Choose a color scheme that is visually appealing and consistent with your brand.
- Minimalist Design: Sometimes, less is more. A clean, simple design can be very effective.
7.2. Effective Use of Color
Color can evoke emotions and draw attention to important elements.
- Brand Colors: Use your brand colors to create a cohesive look.
- Contrast: Use contrasting colors to make text and images stand out.
- Limited Palette: Stick to a limited color palette to avoid overwhelming the reader.
- Strategic Highlights: Use color to highlight key information or call-to-action buttons.
7.3. Typography Tips
Choosing the right fonts can improve readability and visual appeal.
- Readable Fonts: Use fonts that are easy to read, especially for body text.
- Hierarchy: Use different font sizes and styles to create a visual hierarchy.
- Limit Font Use: Avoid using too many different fonts, which can look cluttered.
- Pairing Fonts: Choose fonts that complement each other for a professional look.
7.4. Layout and Composition
A well-organized layout can make your booklet more engaging and easier to read.
- White Space: Use white space to create breathing room and avoid a cluttered look.
- Grid System: Use a grid system to create a consistent and organized layout.
- Visual Hierarchy: Arrange elements in a way that guides the reader’s eye.
- Consistent Margins: Use consistent margins throughout the booklet for a professional look.
7.5. Incorporating Visual Elements
Images, graphics, and illustrations can enhance the visual appeal of your booklet.
- Relevant Images: Use images that relate to the content and add value.
- High-Quality Graphics: Use high-resolution graphics that look sharp when printed.
- Infographics: Use infographics to present data in a visually appealing way.
- Illustrations: Use custom illustrations to add a unique and personal touch.
8. Amazingprint.net: Your Partner for Exceptional Booklet Printing
At Amazingprint.net, we offer comprehensive solutions for all your booklet printing needs.
8.1. Overview of Amazingprint.net Services
We provide a wide range of printing services, including:
- Custom Booklet Printing: Tailored to your specific requirements.
- Professional Design Services: Help with creating stunning booklet designs.
- High-Quality Printing: Using state-of-the-art equipment for exceptional results.
- Fast Turnaround Times: Ensuring you get your booklets when you need them.
- Competitive Pricing: Offering cost-effective solutions for all budgets.
8.2. Why Choose Amazingprint.net?
Here’s why Amazingprint.net stands out:
- Expertise: Years of experience in the printing industry.
- Quality: Commitment to delivering high-quality products.
- Customer Service: Dedicated support to assist you every step of the way.
- Innovation: Staying up-to-date with the latest printing technologies and trends.
- Reliability: Consistent and dependable service you can count on.
8.3. How Amazingprint.net Can Help
We can assist you with:
- Selecting the right paper and binding options.
- Creating a custom booklet design.
- Ensuring your document is properly formatted for booklet printing.
- Providing fast and efficient printing services.
- Delivering your booklets directly to your door.
8.4. Customer Success Stories
Here are a few examples of how we’ve helped our customers:
- Small Business: Helped a local bakery create a stunning brochure to showcase their products, resulting in a 20% increase in sales.
- Event Organizer: Printed high-quality programs for a corporate conference, impressing attendees and enhancing the event’s professionalism.
- Marketing Professional: Designed and printed eye-catching marketing materials for a product launch, generating significant buzz and leads.
8.5. Contact Information and Support
Get in touch with us today to discuss your booklet printing needs.
- Address: 1600 Amphitheatre Parkway, Mountain View, CA 94043, United States
- Phone: +1 (650) 253-0000
- Website: Amazingprint.net
9. Future Trends in Booklet Printing
As technology evolves, the world of booklet printing continues to advance.
9.1. Digital Printing Innovations
Digital printing offers several advantages:
- Customization: Ability to print variable data, such as personalized messages.
- Short Runs: Cost-effective for small print runs.
- Quick Turnaround: Faster printing times compared to traditional methods.
- High Quality: Achieving results comparable to offset printing.
9.2. Sustainable Printing Practices
Sustainability is becoming increasingly important in the printing industry.
- Eco-Friendly Materials: Use of recycled paper, soy-based inks, and other sustainable materials.
- Reduced Waste: Minimizing waste through efficient printing processes.
- Carbon Neutral Printing: Offsetting carbon emissions through environmental initiatives.
- Green Certifications: Obtaining certifications such as FSC and SFI to demonstrate commitment to sustainability.
9.3. Integration with Digital Marketing
Booklet printing can be integrated with digital marketing strategies.
- QR Codes: Including QR codes that link to online content.
- Augmented Reality: Using AR technology to create interactive print experiences.
- Personalized Content: Tailoring content to individual recipients based on data.
- Social Media Integration: Encouraging readers to share content on social media.
9.4. The Rise of 3D Printing in Booklets
3D printing is opening up new possibilities for booklet design.
- Unique Covers: Creating custom 3D-printed covers that stand out.
- Interactive Elements: Incorporating 3D-printed elements that readers can interact with.
- Prototyping: Using 3D printing to create prototypes of booklet designs.
- Limited Editions: Producing limited edition booklets with unique 3D-printed features.
9.5. Automation in Printing Processes
Automation is streamlining printing processes and improving efficiency.
- Automated Prepress: Automating tasks such as file preparation and proofing.
- Robotic Printing: Using robots to handle materials and operate printing equipment.
- Automated Finishing: Automating tasks such as folding, cutting, and binding.
- Inventory Management: Using software to track inventory and manage orders.
10. FAQ: Frequently Asked Questions About Booklet Printing
Here are some frequently asked questions about printing Word documents as booklets.
10.1. Can I Print A Booklet From Any Version Of Word?
Yes, the booklet printing feature is available in most versions of Microsoft Word. The steps might vary slightly depending on the version, but the basic principles remain the same.
10.2. What If My Document Doesn’t Have A Multiple Of 4 Pages?
For best results, your document should have a number of pages that is a multiple of 4. If it doesn’t, Word will automatically add blank pages to the end of your booklet.
10.3. How Do I Ensure My Images Print Clearly In The Booklet?
Use high-resolution images (300 DPI) and ensure they are properly sized within your document. Also, check your printer settings to ensure you are printing at the highest quality setting.
10.4. What Is The Best Paper Weight For A Booklet?
The best paper weight depends on the purpose of your booklet. For general-purpose booklets, 20 lb or 24 lb paper is suitable. For more durable booklets, consider using 28 lb paper or higher.
10.5. How Do I Add A Table Of Contents To My Booklet?
Use Word’s built-in table of contents feature to automatically generate a table of contents based on your document’s headings. Go to References > Table of Contents and choose a style.
10.6. Can I Print A Booklet In Color?
Yes, you can print a booklet in color if your printer supports color printing. However, keep in mind that color printing can be more expensive than black and white.
10.7. How Do I Adjust The Gutter Size After Setting Up Book Fold?
You can adjust the gutter size in the Margins tab of the Page Setup window. Increase the Gutter value to add more space for binding.
10.8. What If My Printer Doesn’t Support Automatic Duplex Printing?
If your printer doesn’t support automatic duplex printing, you’ll need to print the booklet manually. Select Manually Print on Both Sides in the print settings and follow the prompts to reload the paper.
10.9. How Do I Get A Professional Look For My Booklet?
To achieve a professional look:
- Use high-quality paper.
- Choose a professional font and layout.
- Incorporate high-resolution images and graphics.
- Consider professional binding options such as perfect binding or wire-o binding.
10.10. Where Can I Find Free Booklet Templates For Word?
You can find free booklet templates on the Microsoft Office website or through third-party template providers. Go to File > New in Word and search for “booklet” to find available templates.
Are you ready to create stunning booklets with ease? With the right settings and a little creativity, you can transform your Word documents into professional-looking booklets that impress. Visit amazingprint.net today to explore our comprehensive printing solutions, discover creative ideas, and find the perfect materials for your next project. Let us help you bring your vision to life with high-quality printing and exceptional service.