Mounting canvas prints beautifully transforms your artwork, and amazingprint.net is here to guide you through every step. This guide provides you with all the expertise and practical advice you need for canvas mounting, ensuring your prints become stunning focal points. We will cover everything from choosing the right materials to step-by-step mounting techniques to help you achieve professional-looking results.
1. What Are Canvas Prints and Why Mount Them?
Canvas prints involve transferring an image onto canvas, creating a textured, artistic effect. According to a 2024 report by the Printing Industries of America (PIA), canvas prints have seen a 15% increase in popularity due to their durability and aesthetic appeal. Mounting is essential for protecting the print, adding structure, and enhancing its visual impact. Mounted canvas prints look more polished and are ready to hang, making them ideal for both personal and commercial display.
Here’s a detailed look at the benefits of mounting canvas prints:
- Enhanced Presentation: Mounting elevates the print, providing a gallery-like appearance that enhances the artwork’s visual appeal.
- Protection: Mounting protects the canvas from sagging, wrinkles, and physical damage, ensuring longevity.
- Easy Display: A mounted canvas is ready to hang, eliminating the need for additional framing unless desired.
- Versatility: Suitable for various settings, from homes to offices, mounted canvases add a touch of sophistication to any space.
2. Understanding Different Types of Canvas Mounting
Choosing the right mounting method is crucial for achieving the desired look and ensuring the longevity of your canvas print. Each method offers unique benefits, and the best choice depends on the specific artwork and your personal preferences.
2.1. Gallery Wrap
Gallery wrap involves stretching the canvas around a wooden frame (stretcher bars) so that the image wraps around the sides. This method provides a clean, contemporary look and eliminates the need for an additional frame. It’s a popular choice for modern art and photography.
- Pros: Modern appearance, no need for an additional frame, ready to hang.
- Cons: Some of the image is wrapped around the edges, which might not be suitable for all artworks.
- Ideal for: Contemporary art, photographs, and designs where edge details are not critical.
 Gallery Wrapped Canvas Print
2.2. Museum Wrap
Museum wrap is similar to gallery wrap but leaves a blank border around the edges of the canvas. This method ensures that the entire image remains visible on the front of the canvas. The blank edges are typically white or black, providing a clean, professional finish.
- Pros: Entire image visible on the front, professional and clean appearance.
- Cons: Requires a larger canvas size to accommodate the blank borders.
- Ideal for: Artworks where the entire image must be visible and edge details are important.
2.3. Stretching on Stretcher Bars
Stretching the canvas on stretcher bars involves securing the canvas to a wooden frame using staples or tacks. This method provides a taut surface for the artwork and prepares it for framing or display. It’s a common technique for both rolled canvas prints and original paintings.
- Pros: Provides a taut surface, prepares the canvas for framing, and is suitable for various sizes.
- Cons: Requires tools like staple guns and canvas pliers, and some skill to achieve a tight stretch.
- Ideal for: Preparing canvas prints for framing or creating a traditional canvas look.
2.4. Mounting on Foam Board
Mounting on foam board involves adhering the canvas print to a rigid foam board substrate. This method provides a smooth, flat surface and is ideal for prints that will be placed in frames or displayed on easels.
- Pros: Smooth and flat surface, lightweight, and easy to frame.
- Cons: Not as durable as other methods, and susceptible to damage from moisture.
- Ideal for: Prints intended for framing, temporary displays, and lightweight artworks.
2.5. Block Mounting
Block mounting involves adhering the canvas print to a wooden block, creating a solid, self-supporting display. The edges of the block can be painted or left natural, providing a clean and modern look.
- Pros: Solid and self-supporting, modern appearance, and no need for additional framing.
- Cons: Can be heavier than other methods, and the edges of the block may be visible.
- Ideal for: Creating standalone displays, modern art, and photographs.
3. Essential Tools and Materials for Mounting Canvas Prints
Before you begin, gathering the right tools and materials ensures a smooth and successful mounting process. Here’s a comprehensive list to help you prepare:
- Canvas Print: Ensure your canvas print is of high quality and the correct size for your chosen mounting method.
- Stretcher Bars or Wooden Frame: These provide the structure for stretching the canvas. Choose the size and thickness appropriate for your print.
- Staple Gun or Tack Hammer: For securing the canvas to the frame. A heavy-duty staple gun is recommended for professional results.
- Staples or Tacks: Use high-quality staples or tacks that are compatible with your staple gun or tack hammer.
- Canvas Pliers: These help to grip and stretch the canvas evenly around the frame.
- Measuring Tape: Essential for accurate measurements and ensuring the canvas is evenly positioned.
- Scissors or Utility Knife: For trimming excess canvas.
- Wood Glue: To reinforce the corners of the frame for added stability.
- Foam Board or Wooden Block: Depending on your chosen mounting method.
- Adhesive: Acid-free adhesive spray or double-sided tape for adhering the canvas to the substrate.
- Cutting Mat: To protect your work surface when trimming the canvas.
- Level: To ensure your mounted canvas hangs straight.
- Gloves: To protect the canvas from fingerprints and oils.
- Dust Cloth: For cleaning the canvas and work surface.
4. Step-by-Step Guide to Mounting Canvas Prints
Now, let’s dive into the step-by-step instructions for mounting your canvas prints using various methods.
4.1. How to Mount Canvas Prints Using Gallery Wrap
Gallery wrapping involves stretching the canvas around a wooden frame so that the image wraps around the sides. Here’s how to do it:
4.1.1. Prepare Your Materials
Gather your canvas print, stretcher bars, staple gun, staples, canvas pliers, measuring tape, scissors, and gloves.
4.1.2. Assemble the Stretcher Bars
Assemble the stretcher bars to form a rectangular frame. Ensure the corners are square and secure. Use wood glue to reinforce the corners for added stability.
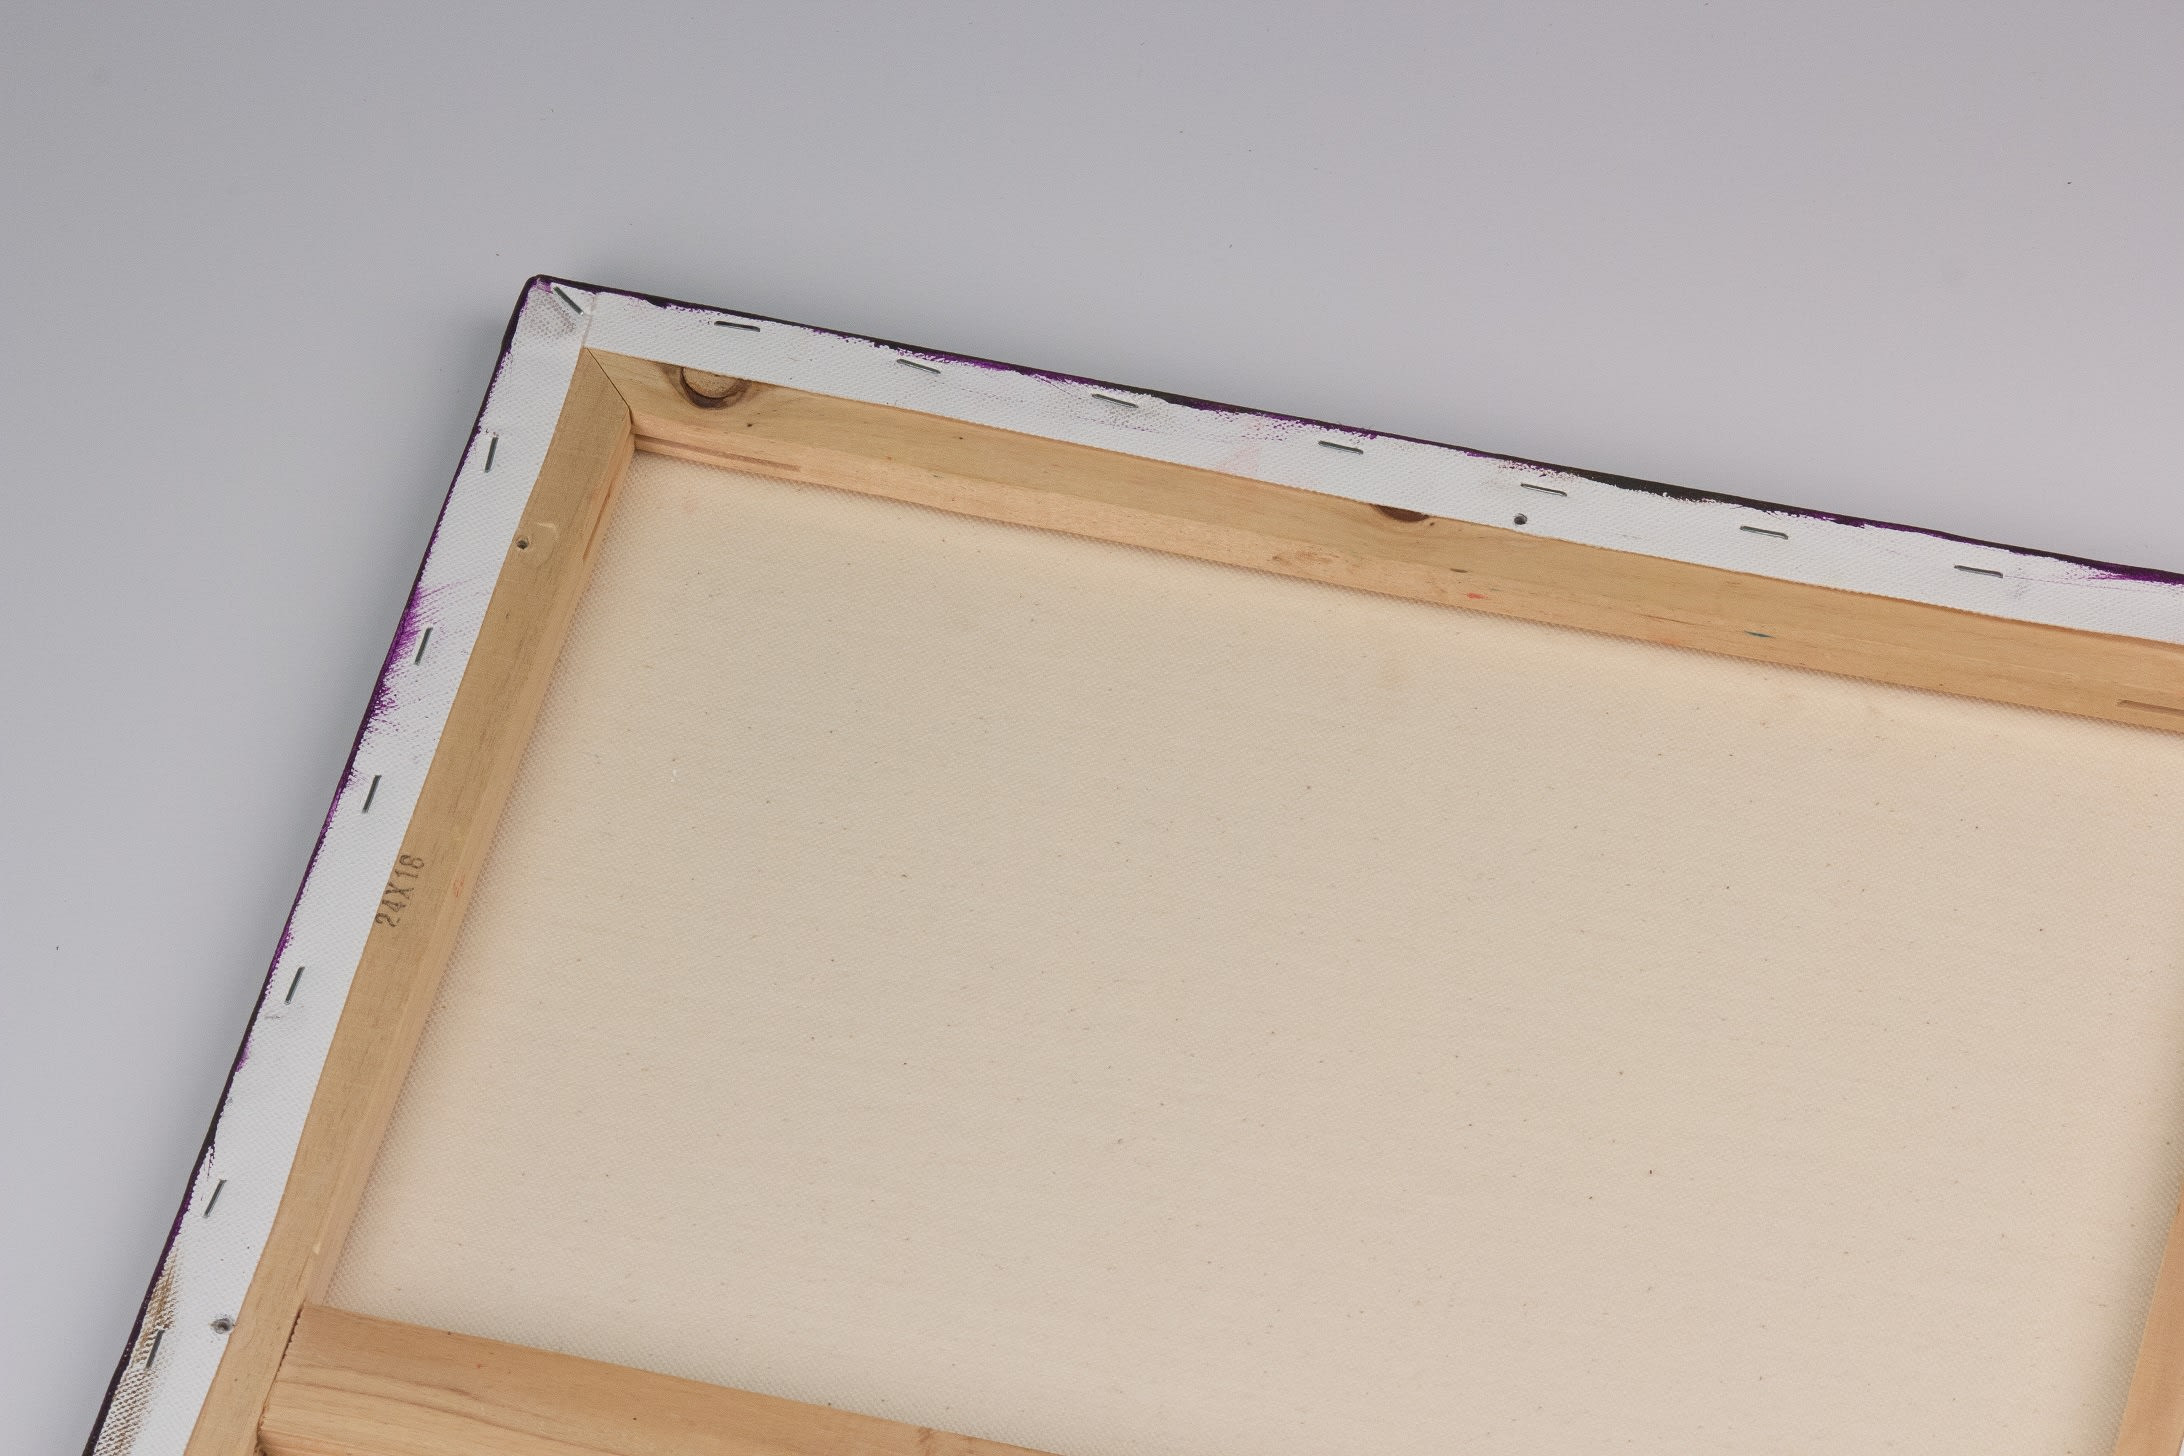
4.1.3. Position the Canvas
Place the canvas print face down on a clean, flat surface. Center the frame on the canvas, leaving enough canvas to wrap around the edges (typically 2-3 inches).
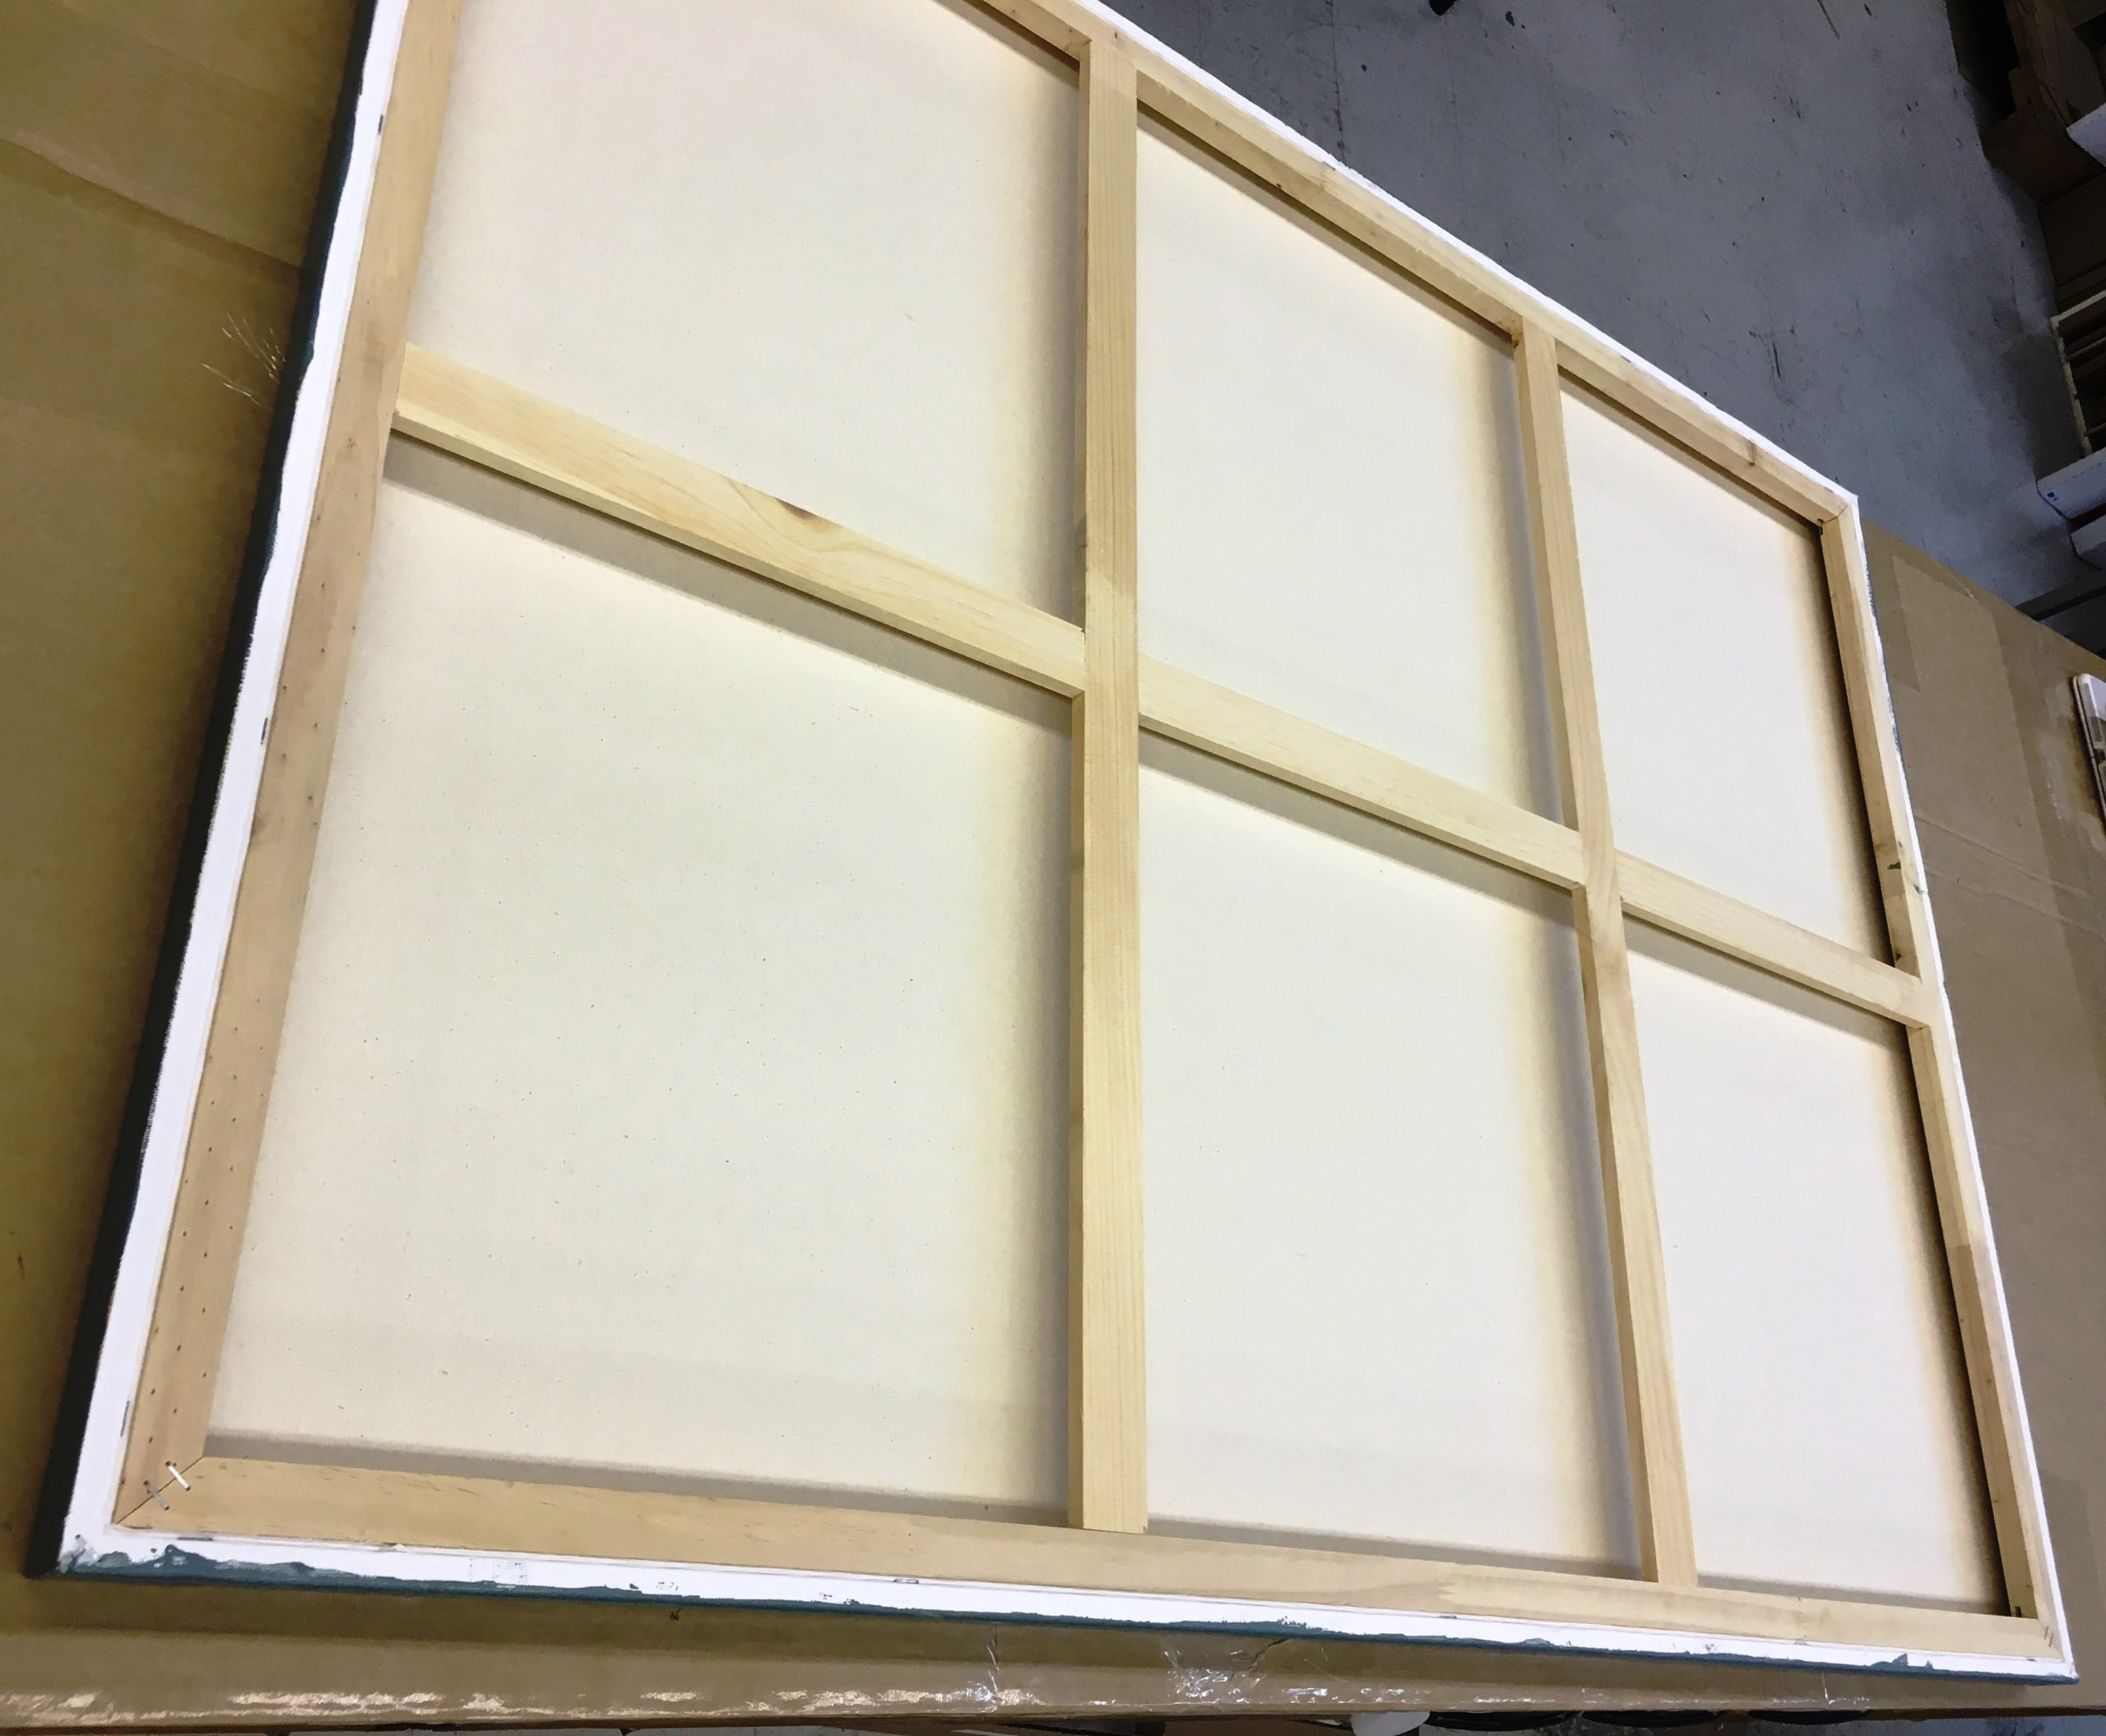 Position the Canvas for Stretching
4.1.4. Start Stapling
Fold one side of the canvas over the stretcher bar and use canvas pliers to hold it in place. Staple once in the middle of the folded piece of canvas.
4.1.5. Stretch and Staple the Opposite Side
Turn the canvas to the opposite side (180 degrees) and repeat the folding and stapling step. Pull the canvas slightly to ensure it is taut but not overstretched.
4.1.6. Continue Stapling the Remaining Sides
Repeat the process for the remaining two sides, always pulling the canvas slightly to maintain tension. Work your way from the center outwards, spacing the staples evenly apart (about 2-3 inches).
4.1.7. Fold the Corners
Fold the corners neatly by tucking one side under the other, ensuring a tight pull. Trim any excess canvas to reduce bulk. Staple the folded corners securely.
4.1.8. Check and Adjust
Inspect the canvas for any sagging or wrinkles. If necessary, remove some staples and re-stretch the canvas to achieve a smooth, taut surface.
4.1.9. Finishing Touches
Trim any remaining excess canvas from the back of the frame. Add a hanging wire or sawtooth hanger to the back for easy display.
4.2. How to Mount Canvas Prints Using Museum Wrap
Museum wrapping is similar to gallery wrapping, but it leaves a blank border around the edges of the canvas. Here’s how to do it:
4.2.1. Prepare Your Materials
Gather your canvas print, stretcher bars, staple gun, staples, canvas pliers, measuring tape, scissors, and gloves.
4.2.2. Assemble the Stretcher Bars
Assemble the stretcher bars to form a rectangular frame. Ensure the corners are square and secure. Use wood glue to reinforce the corners for added stability.
4.2.3. Position the Canvas
Place the canvas print face down on a clean, flat surface. Center the frame on the canvas, leaving enough canvas to wrap around the edges and create a blank border (typically 2-3 inches).
4.2.4. Start Stapling
Fold one side of the canvas over the stretcher bar and use canvas pliers to hold it in place. Staple once in the middle of the folded piece of canvas.
4.2.5. Stretch and Staple the Opposite Side
Turn the canvas to the opposite side (180 degrees) and repeat the folding and stapling step. Pull the canvas slightly to ensure it is taut but not overstretched.
4.2.6. Continue Stapling the Remaining Sides
Repeat the process for the remaining two sides, always pulling the canvas slightly to maintain tension. Work your way from the center outwards, spacing the staples evenly apart (about 2-3 inches).
4.2.7. Fold the Corners
Fold the corners neatly by tucking one side under the other, ensuring a tight pull. Trim any excess canvas to reduce bulk. Staple the folded corners securely.
4.2.8. Check and Adjust
Inspect the canvas for any sagging or wrinkles. If necessary, remove some staples and re-stretch the canvas to achieve a smooth, taut surface.
4.2.9. Finishing Touches
Trim any remaining excess canvas from the back of the frame. Add a hanging wire or sawtooth hanger to the back for easy display. The blank borders can be left as is or painted to match your décor.
4.3. How to Mount Rolled Canvas Art
 Stretching Rolled Canvas Art
If you have a rolled canvas print, you’ll need to stretch it onto stretcher bars before framing it. Here’s how:
4.3.1. Prepare Your Materials
Gather your rolled canvas print, stretcher bars, staple gun, staples, canvas pliers, measuring tape, scissors, and gloves.
4.3.2. Assemble the Stretcher Bars
Assemble the stretcher bars to form a rectangular frame. Ensure the corners are square and secure. Use wood glue to reinforce the corners for added stability.
4.3.3. Position the Canvas
Place the canvas print face down on a clean, flat surface. Center the frame on the canvas, leaving enough canvas to wrap around the edges (typically 2-3 inches).
4.3.4. Start Stapling
Fold one side of the canvas over the stretcher bar and use canvas pliers to hold it in place. Staple once in the middle of the folded piece of canvas.
4.3.5. Stretch and Staple the Opposite Side
Turn the canvas to the opposite side (180 degrees) and repeat the folding and stapling step. Pull the canvas slightly to ensure it is taut but not overstretched.
4.3.6. Continue Stapling the Remaining Sides
Repeat the process for the remaining two sides, always pulling the canvas slightly to maintain tension. Work your way from the center outwards, spacing the staples evenly apart (about 2-3 inches).
4.3.7. Fold the Corners
Fold the corners neatly by tucking one side under the other, ensuring a tight pull. Trim any excess canvas to reduce bulk. Staple the folded corners securely.
4.3.8. Check and Adjust
Inspect the canvas for any sagging or wrinkles. If necessary, remove some staples and re-stretch the canvas to achieve a smooth, taut surface.
4.3.9. Finishing Touches
Trim any remaining excess canvas from the back of the frame. Add a hanging wire or sawtooth hanger to the back for easy display. Your stretched canvas is now ready for framing.
4.4. How to Frame Stretched Canvas Prints
Once your canvas print is stretched onto stretcher bars, you can frame it for an added touch of elegance. Here’s how:
4.4.1. Choose the Right Frame
Select a frame that complements the style and colors of your artwork. Consider the rabbet (the recess on the back of the frame) to ensure it is deep enough to accommodate the thickness of the stretcher bars.
4.4.2. Prepare the Frame
Remove the backing and any protective materials from the frame. Clean the inside of the frame to remove any dust or debris.
4.4.3. Insert the Stretched Canvas
Carefully insert the stretched canvas into the frame. Ensure it fits snugly and is centered within the frame.
4.4.4. Secure the Canvas
Use frame points or spring clips to secure the canvas inside the frame. These will hold the canvas in place and prevent it from shifting.
4.4.5. Add Hanging Hardware
Attach a hanging wire or sawtooth hanger to the back of the frame for easy display.
4.4.6. Final Inspection
Inspect the framed canvas to ensure it is securely mounted and looks professional. Clean the glass or acrylic facing (if any) to remove any fingerprints or smudges.
4.5. How to Mount Canvas Prints on Foam Board
Mounting canvas prints on foam board provides a smooth, flat surface and is ideal for prints that will be placed in frames or displayed on easels. Here’s how:
4.5.1. Prepare Your Materials
Gather your canvas print, foam board, adhesive spray or double-sided tape, cutting mat, scissors or utility knife, and a clean cloth.
4.5.2. Cut the Foam Board
Cut the foam board to the exact size of your canvas print. Use a sharp utility knife and a cutting mat for precise cuts.
4.5.3. Apply Adhesive
Apply adhesive spray evenly to the foam board or apply double-sided tape to the edges and center of the foam board.
4.5.4. Position the Canvas
Carefully position the canvas print on the foam board, ensuring it is centered and aligned.
4.5.5. Press and Smooth
Press the canvas firmly onto the foam board, starting from the center and working your way outwards. Use a clean cloth to smooth out any wrinkles or bubbles.
4.5.6. Trim Excess Canvas
Trim any excess canvas from the edges of the foam board using scissors or a utility knife.
4.5.7. Finishing Touches
Clean the surface of the mounted canvas with a soft cloth. Your canvas print is now mounted on foam board and ready for framing or display.
4.6. How to Mount Canvas Prints on a Block
Block mounting involves adhering the canvas print to a wooden block, creating a solid, self-supporting display. Here’s how:
4.6.1. Prepare Your Materials
Gather your canvas print, wooden block, adhesive spray or double-sided tape, cutting mat, scissors or utility knife, sandpaper, paint or stain (optional), and a clean cloth.
4.6.2. Prepare the Wooden Block
Sand the edges of the wooden block to smooth any rough spots. If desired, paint or stain the block to match your décor. Allow the paint or stain to dry completely.
4.6.3. Cut the Canvas
Cut the canvas print to the exact size of the wooden block, plus an additional 1-2 inches on each side to wrap around the edges.
4.6.4. Apply Adhesive
Apply adhesive spray evenly to the wooden block or apply double-sided tape to the edges and center of the block.
4.6.5. Position the Canvas
Carefully position the canvas print on the wooden block, ensuring it is centered and aligned.
4.6.6. Press and Smooth
Press the canvas firmly onto the wooden block, starting from the center and working your way outwards. Use a clean cloth to smooth out any wrinkles or bubbles.
4.6.7. Wrap the Edges
Wrap the excess canvas around the edges of the wooden block, securing it to the back with adhesive spray or staples. Fold the corners neatly and trim any excess canvas.
4.6.8. Finishing Touches
Clean the surface of the mounted canvas with a soft cloth. Your canvas print is now block-mounted and ready for display.
5. Choosing the Right Frame for Your Mounted Canvas
Selecting the perfect frame can significantly enhance the aesthetic appeal of your mounted canvas. Here are some tips for choosing the right frame:
- Consider the Style: Choose a frame that complements the style of your artwork and your décor. Simple, minimalist frames work well with modern art, while ornate, decorative frames are better suited for classic pieces.
- Match the Colors: Select a frame color that enhances the colors in your artwork. Neutral colors like black, white, and natural wood tones are versatile options.
- Check the Rabbet: Ensure the rabbet (the recess on the back of the frame) is deep enough to accommodate the thickness of your mounted canvas.
- Think About the Material: Wood frames offer a classic, timeless look, while metal frames provide a sleek, contemporary feel.
- Experiment with Floater Frames: Floater frames are designed specifically for canvas prints, creating the illusion that the artwork is floating within the frame.
Here’s a table to help you choose the right frame:
| Canvas Type | Frame Style | Material | Color |
|---|---|---|---|
| Modern Art | Minimalist | Metal or Wood | Black, White, Gray |
| Classic Art | Ornate | Wood | Gold, Silver, Brown |
| Photography | Simple | Metal or Wood | Black, Silver, Natural |
| Abstract Art | Floater Frame | Wood or Metal | Any color that complements the art |
| Watercolor Painting | Thin, Natural Wood | Wood | Natural, Light Brown |
6. Tips for Achieving Professional-Looking Results
To ensure your mounted canvas prints look professional, keep these tips in mind:
- Use High-Quality Materials: Invest in high-quality canvas prints, stretcher bars, frames, and adhesives for the best results.
- Measure Accurately: Accurate measurements are essential for ensuring a proper fit and a professional appearance.
- Stretch the Canvas Tightly: A taut canvas surface is crucial for preventing sagging and wrinkles.
- Fold Corners Neatly: Neatly folded corners add to the overall polished look of your mounted canvas.
- Clean the Surface: Always clean the surface of the canvas and frame to remove any dust or fingerprints.
- Use Proper Lighting: Display your mounted canvas prints in well-lit areas to enhance their visual impact.
7. Common Mistakes to Avoid When Mounting Canvas Prints
Avoid these common mistakes to ensure a successful mounting process:
- Overstretching the Canvas: Stretching the canvas too tightly can distort the image and damage the material.
- Using the Wrong Adhesive: Using the wrong adhesive can cause the canvas to peel or bubble.
- Misaligning the Canvas: Misaligning the canvas on the frame or substrate can result in a crooked or unprofessional look.
- Ignoring the Corners: Neglecting the corners can result in a messy or unfinished appearance.
- Skipping Preparations: Neglecting to prepare your materials or work surface can lead to mistakes and a less-than-perfect result.
8. Caring for Your Mounted Canvas Prints
Proper care will help to preserve the beauty and longevity of your mounted canvas prints. Here are some tips for caring for your artwork:
- Dust Regularly: Dust your mounted canvas prints regularly with a soft, dry cloth to remove any surface dirt or debris.
- Avoid Direct Sunlight: Avoid displaying your canvas prints in direct sunlight, as this can cause the colors to fade over time.
- Control Humidity: Maintain a stable humidity level in the room to prevent the canvas from warping or cracking.
- Handle with Care: Always handle your mounted canvas prints with clean hands to avoid transferring oils or dirt.
- Avoid Harsh Cleaners: Avoid using harsh cleaners or solvents on your canvas prints, as these can damage the surface.
- Store Properly: If you need to store your mounted canvas prints, wrap them in acid-free paper and store them in a cool, dry place.
9. Ideas for Displaying Your Mounted Canvas Prints
Mounted canvas prints can be displayed in a variety of creative ways to enhance your home or office décor. Here are some ideas:
- Gallery Wall: Create a gallery wall by grouping multiple mounted canvas prints of different sizes and styles.
- Focal Point: Use a large mounted canvas print as a focal point in a room, such as above a sofa or fireplace.
- Floating Shelves: Display smaller mounted canvas prints on floating shelves for a modern, minimalist look.
- Easel Display: Use an easel to display a mounted canvas print in a hallway or entryway.
- Office Decor: Add mounted canvas prints to your office to create a more inviting and inspiring workspace.
10. FAQ About How to Mount Canvas Prints
Here are some frequently asked questions about mounting canvas prints:
10.1. Can you frame a canvas in a floating frame?
Yes, you can frame a canvas in a floating frame. Floating frames are specifically designed for canvas prints, creating the illusion that the artwork is floating within the frame.
10.2. What is the best way to frame a canvas print?
The best way to frame a canvas print depends on your personal preferences and the style of the artwork. Some popular options include floating frames, traditional frames with a mat, and simple frames without a mat. Consider the style and colors of the artwork when choosing a frame.
10.3. How do you frame a canvas at home?
To frame a canvas at home, you will need a frame that is slightly larger than the canvas, a mat (optional), and mounting materials such as screws or clips. You can then attach the canvas to the frame and add a mat if desired. Be sure to use acid-free materials to protect the artwork.
10.4. What is the best frame for a canvas painting?
The best frame for a canvas painting depends on the style and colors of the artwork. A simple frame without a mat can work well for modern or minimalist artwork, while a traditional frame with a mat can add elegance to a more classic piece. Consider the overall look and feel of the artwork when choosing a frame.
10.5. How to frame a canvas print?
To frame a rolled canvas print, you will need to first stretch the canvas onto a wooden frame. Once the canvas is stretched, you can then choose a frame that is slightly larger than the canvas and attach the canvas to the custom art frame using clips or screws. Be sure to use acid-free materials to protect the artwork.
10.6. What is the difference between gallery wrap and museum wrap?
The main difference is that gallery wrap involves wrapping the image around the sides of the frame, while museum wrap leaves a blank border around the edges of the canvas.
10.7. Can I use regular staples instead of canvas staples?
While you can use regular staples, canvas staples are designed to be gentler on the canvas and provide a more secure hold. It’s recommended to use canvas staples for best results.
10.8. How do I prevent my canvas from sagging?
To prevent your canvas from sagging, ensure you stretch it tightly and evenly around the frame. You can also use canvas pliers to help grip and pull the canvas taut.
10.9. What type of adhesive should I use to mount a canvas on foam board?
Use an acid-free adhesive spray or double-sided tape to mount a canvas on foam board. These adhesives are gentle on the canvas and won’t cause discoloration or damage.
10.10. How do I clean a mounted canvas print?
Clean a mounted canvas print with a soft, dry cloth to remove any surface dust or dirt. Avoid using harsh cleaners or solvents, as these can damage the surface.
Mounting canvas prints is a fantastic way to showcase your favorite artworks, and with the right techniques, you can achieve professional-looking results at home. By following this comprehensive guide, you’ll be able to transform your canvas prints into stunning focal points that enhance any space.
Ready to elevate your canvas prints? Visit amazingprint.net today for a wide selection of high-quality canvas prints, frames, and mounting supplies. Let us help you bring your artistic visions to life! For more information, contact us at Address: 1600 Amphitheatre Parkway, Mountain View, CA 94043, United States. Phone: +1 (650) 253-0000. Website: amazingprint.net.