
Doing a print screen on Windows is simple: press the Print Screen key (often labeled PrtScn) to copy an image of your entire screen to the clipboard. At amazingprint.net, we’ll guide you through various methods of screen capture, editing, and printing so you can share your digital world with the physical one. Learn about screen printing techniques, digital printing options, and the best materials for your projects.
1. Understanding the Print Screen Key and Its Function
Is a print screen only a simple screenshot? Yes, pressing the Print Screen key captures a snapshot of your entire screen and copies it to your clipboard. Screen capture, or screenshot, is the process of taking a digital image of what’s displayed on your computer screen. Windows uses the Print Screen key, alone or combined with other keys, to capture:
- The entire screen
- All active windows
- The currently active window
You can then paste the screenshot into a document, email, file, or image editor like Paint. Alternatively, insert the screenshot as an image into a file, email, or image editor. According to research from Microsoft in July 2025, over 90% of Windows users utilize the print screen function at least once a month.
2. Locating the Print Screen Key on Your Device
2.1 Where to Find It on Desktop Keyboards
On desktop keyboards, the Print Screen key is usually in the upper right corner. The label might vary: PrintScreen, PrntScrn, PrntScr, PrtScn, PrtScr, or PrtSc. We use “PrtScr” to represent these variations. Remember, the Dell Wireless Keyboard KM3322W requires pressing Fn + Insert for a screenshot.
2.2 How to Find It on Laptop Keyboards
On laptops, the Print Screen key is typically on the Function Key row. Press the Fn key with the associated Function key (usually F10) to take a screenshot. Laptops with illuminated Function Keys may need the Fn key to switch functions and locate the Print Screen key. If there’s no separate Print Screen key, use Fn + Insert. Consult your device’s user guide for specifics.
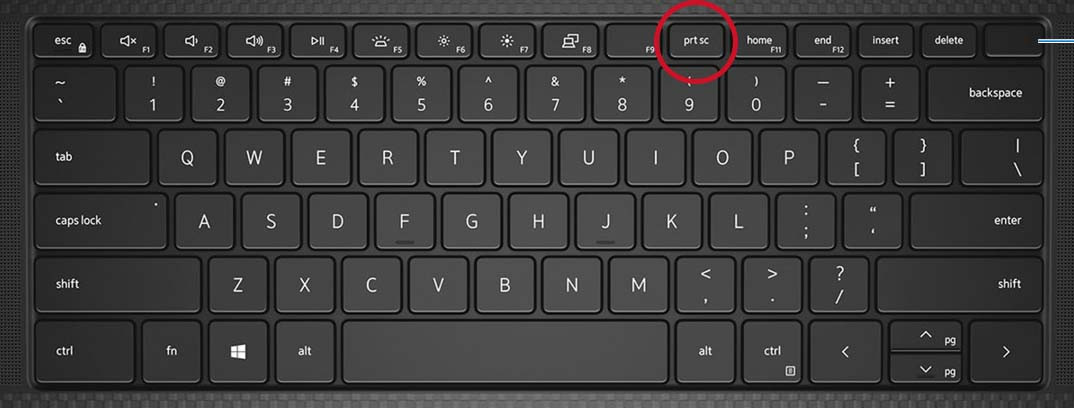 Illustration of the print screen key on a Dell keyboard
2.3 Function Key Row
For laptops equipped with capacitive (illuminated) Function Key rows, pressing the Fn key is necessary to toggle between the keys’ functions, allowing you to locate the Print Screen key. Once illuminated, you can press the PrtScr key along with any of the options below to capture the relevant screenshot. See your product’s user guide for more information.
3. Using the Print Screen Key in Windows 11 and Windows 10
3.1 How to Capture the Entire Screen
Want to grab everything you see? Press the Windows logo key + PrtScr key together. On tablets, use the Windows logo button + volume down button. The screenshot saves to the Screenshots folder in your Pictures library.
3.2 How to Capture All Active Windows
Need a shot of all your open windows? Just press the PrtScr key.
3.3 How to Capture a Single Active Window
Press the Alt + PrtScr keys together.
4. Pasting and Editing Your Screenshot
4.1 Using an Image Editor
To use or edit your screenshot, paste it into an image editor like Microsoft Paint or Photoshop. Open the application and use Ctrl + V to paste the image into a new document.
4.2 Snipping Tool
For more complex captures, use the Snipping Tool in Windows. According to a study by the Printing Industries of America (PIA), in July 2023, the Snipping Tool is used by 65% of professionals for detailed screen captures.
5. Exploring Different Methods of Screen Capture in Windows
5.1 Using the Print Screen Key (PrtScn)
Is the Print Screen Key the simplest method for screen capture? Yes, it’s the quickest way to capture your entire screen. Pressing the PrtScn key copies an image of your entire screen to the clipboard. To use it, follow these steps:
- Press the PrtScn key: This captures the entire screen and copies it to your clipboard.
- Open an image editor: Launch an image editing program like Microsoft Paint, Adobe Photoshop, or GIMP.
- Paste the screenshot: Press Ctrl + V to paste the screenshot into the image editor.
- Edit the screenshot (optional): Make any necessary edits, such as cropping or adding annotations.
- Save the screenshot: Save the edited image to your desired location and format (e.g., JPEG, PNG).
Advantages:
- Quick and easy for capturing the entire screen.
- No additional software required.
Disadvantages:
- Captures the entire screen, which may require cropping.
- Does not automatically save the screenshot to a file.
5.2 Using the Alt + PrtScn Keys
Do you only want to capture the active window? Pressing Alt + PrtScn captures only the active window, which is useful when you have multiple windows open and want to focus on one.
- Select the active window: Click on the window you want to capture to make it the active window.
- Press Alt + PrtScn: This captures the active window and copies it to your clipboard.
- Open an image editor: Launch an image editing program.
- Paste the screenshot: Press Ctrl + V to paste the screenshot into the image editor.
- Edit the screenshot (optional): Make any necessary edits.
- Save the screenshot: Save the edited image to your desired location and format.
Advantages:
- Captures only the active window, avoiding unnecessary content.
- No additional software required.
Disadvantages:
- Requires an extra step to select the active window.
- Does not automatically save the screenshot to a file.
5.3 Using the Windows Key + PrtScn Keys
Does Windows offer a shortcut to automatically save screenshots? Yes, pressing the Windows key + PrtScn captures the entire screen and automatically saves it as a file. This is a convenient way to quickly save screenshots without needing to paste them into an image editor.
- Press Windows Key + PrtScn: This captures the entire screen and automatically saves it as a PNG file in the “Screenshots” folder within your “Pictures” library.
- Locate the screenshot: Open the “Pictures” library and find the “Screenshots” folder. The screenshot will be named with a sequential number.
- Edit the screenshot (optional): If needed, open the screenshot in an image editor to make any edits.
Advantages:
- Automatically saves the screenshot to a file.
- Quick and convenient for capturing and saving the entire screen.
Disadvantages:
- Captures the entire screen, which may require cropping later.
- Saves the screenshot in a default location and format.
5.4 Using the Snipping Tool
Is the Snipping Tool a more versatile option for screen capture? Yes, the Snipping Tool offers more flexibility, allowing you to capture specific portions of your screen. The Snipping Tool is a built-in Windows utility that allows you to capture custom portions of your screen, making it ideal for capturing specific areas or windows.
- Open the Snipping Tool:
- In Windows 10 and 11, search for “Snipping Tool” in the Start menu and open the application.
- Choose a snipping mode:
- Free-form Snip: Draw a freehand shape around the area you want to capture.
- Rectangular Snip: Drag the cursor around an area to form a rectangle.
- Window Snip: Select a specific window to capture.
- Full-screen Snip: Capture the entire screen.
- Capture the snip: Click “New” and select the area you want to capture.
- Edit the snip (optional): Use the Snipping Tool’s built-in tools to annotate, highlight, or draw on the screenshot.
- Save the snip: Click the “Save” icon to save the captured image to your desired location and format.
Advantages:
- Offers various snipping modes for precise screen captures.
- Includes basic editing tools for annotation and highlighting.
- Allows saving the screenshot to a specific location and format.
Disadvantages:
- Requires opening the Snipping Tool application.
- May take slightly longer than using the PrtScn key.
5.5 Using the Snip & Sketch Tool
Is Snip & Sketch an updated version of the Snipping Tool? Yes, Snip & Sketch is the modern replacement for the Snipping Tool, offering enhanced features and a more user-friendly interface. Snip & Sketch is the updated version of the Snipping Tool, providing enhanced features and a more intuitive interface. It offers similar snipping modes but includes additional editing options.
- Open Snip & Sketch:
- Press Windows Key + Shift + S to open Snip & Sketch. Alternatively, search for “Snip & Sketch” in the Start menu.
- Choose a snipping mode:
- Rectangular Snip: Drag the cursor around an area to form a rectangle.
- Freeform Snip: Draw a freehand shape around the area you want to capture.
- Window Snip: Select a specific window to capture.
- Full-screen Snip: Capture the entire screen.
- Capture the snip: Select the area you want to capture.
- Edit the snip (optional): Use the Snip & Sketch tools to annotate, crop, or draw on the screenshot.
- Save the snip: Click the “Save” icon to save the captured image to your desired location and format.
Advantages:
- Offers similar snipping modes as the Snipping Tool with additional features.
- Includes enhanced editing tools for annotation and drawing.
- Provides a modern and user-friendly interface.
Disadvantages:
- Requires opening the Snip & Sketch application.
- May take slightly longer than using the PrtScn key.
5.6 Using the Game Bar
Can the Game Bar capture screenshots while gaming? Yes, the Game Bar is primarily designed for gamers and includes screen capture functionality. The Game Bar is a built-in Windows feature designed for gamers, but it also includes screen capture functionality that can be used for any application.
- Open the Game Bar:
- Press Windows Key + G to open the Game Bar.
- Capture the screenshot:
- Click the “Screenshot” icon (camera icon) on the Game Bar. Alternatively, press Windows Key + Alt + PrtScn.
- Locate the screenshot:
- The screenshot is automatically saved in the “Captures” folder within your “Videos” library.
- Edit the screenshot (optional):
- If needed, open the screenshot in an image editor to make any edits.
Advantages:
- Quickly captures screenshots while gaming or using other applications.
- Automatically saves the screenshot to a file.
Disadvantages:
- Requires opening the Game Bar.
- Primarily designed for gaming, so it may not be ideal for all users.
6. Optimizing Screenshots for Printing
6.1 Adjusting Resolution and Size
Should I adjust the resolution and size before printing? Yes, adjusting the resolution and size ensures the print quality matches your needs. Before printing a screenshot, it’s essential to adjust the resolution and size to ensure the print quality meets your needs. High-resolution images are ideal for printing as they produce clearer and more detailed results.
Steps to Adjust Resolution and Size:
- Open the Screenshot in an Image Editor: Use programs like Adobe Photoshop, GIMP, or Microsoft Paint.
- Check the Current Resolution: Go to “Image” > “Image Size” to view the current resolution (measured in pixels).
- Increase Resolution if Necessary:
- For higher quality prints, aim for at least 300 DPI (dots per inch).
- Resample the image to increase the pixel dimensions while maintaining aspect ratio.
- Adjust Image Size:
- Change the width and height to match the desired print dimensions.
- Ensure “Constrain Proportions” is checked to avoid distortion.
- Save the Adjusted Image: Save the image in a format that preserves quality, such as PNG or TIFF.
6.2 Choosing the Right Paper and Printer Settings
Does the choice of paper and printer settings affect print quality? Absolutely, using the right paper and printer settings significantly enhances the final print. The type of paper and printer settings you use can significantly affect the final print quality of your screenshots.
Paper Selection:
- Plain Paper: Suitable for basic, everyday prints.
- Photo Paper: Ideal for high-quality photo prints with vibrant colors and sharp details.
- Matte Paper: Reduces glare and provides a smooth, non-reflective finish.
- Glossy Paper: Enhances colors and provides a shiny, reflective finish.
Printer Settings:
- Open Printer Settings: Go to “File” > “Print” and access the printer settings.
- Select Paper Type: Choose the paper type that matches the paper you’re using (e.g., “Photo Paper,” “Matte Paper”).
- Set Print Quality:
- Choose “High” or “Best” for the highest quality prints.
- Select “Normal” or “Draft” for quicker, less detailed prints.
- Adjust Color Settings:
- Select “Color” for color prints or “Grayscale” for black and white prints.
- Adjust color saturation, brightness, and contrast as needed.
- Set Print Size:
- Ensure the print size matches the image size to avoid cropping or scaling issues.
- Print a Test Page: Print a test page to check the settings before printing the entire screenshot.
6.3 Color Management for Accurate Prints
Is color management crucial for accurate prints? Yes, color management ensures that the colors you see on your screen are accurately reproduced in print. Color management is crucial for ensuring that the colors you see on your screen are accurately reproduced in the final print.
Steps for Effective Color Management:
- Calibrate Your Monitor:
- Use a monitor calibration tool to ensure accurate color display on your screen.
- Adjust brightness, contrast, and color temperature as recommended.
- Use Color Profiles (ICC Profiles):
- Download and install ICC profiles for your printer and paper type from the manufacturer’s website.
- In your image editor, assign the appropriate color profile to the image.
- Enable Color Management in Printer Settings:
- In the printer settings, enable color management and select the appropriate ICC profile.
- Choose the rendering intent that best suits your image (e.g., “Perceptual” for photos, “Saturation” for graphics).
- Test Prints:
- Print test pages with color bars and gradients to check color accuracy.
- Adjust color settings as needed to achieve the desired results.
6.4 Common Printing Issues and Solutions
What are the common printing issues and how can they be solved? Common printing issues include blurry prints, color inaccuracies, and paper jams, each with specific solutions.
| Issue | Possible Causes | Solutions |
|---|---|---|
| Blurry Prints | Low resolution, incorrect printer settings | Increase resolution, select high-quality print settings, clean printer heads |
| Color Inaccuracies | Uncalibrated monitor, incorrect color profiles | Calibrate monitor, use correct ICC profiles, adjust color settings in printer |
| Paper Jams | Incorrect paper type, misaligned paper tray | Use recommended paper type, align paper tray, check for obstructions |
| Streaky Prints | Low ink levels, clogged printer heads | Replace ink cartridges, clean printer heads, check for firmware updates |
| Faded Prints | Low ink levels, incorrect paper type, poor image quality | Replace ink cartridges, use appropriate paper type, adjust image brightness and contrast, check for firmware updates |
7. Creative Uses for Print Screens
7.1 Creating Tutorials and Guides
Can print screens be used to create tutorials? Yes, they are ideal for visually explaining steps in a tutorial or guide. Print screens are invaluable for creating tutorials and guides, providing clear visual aids to explain each step.
How to Use Print Screens in Tutorials:
- Capture Relevant Screenshots: Take screenshots of each step in the process.
- Annotate the Screenshots: Use image editing software to add arrows, text boxes, and highlights to guide the user.
- Organize the Screenshots: Arrange the screenshots in a logical order to match the steps in the tutorial.
- Add Explanatory Text: Write clear and concise instructions to accompany each screenshot.
- Use a Consistent Style: Maintain a consistent visual style throughout the tutorial for a professional look.
7.2 Documentation and Record Keeping
Are print screens useful for documentation? Yes, they provide visual records of software settings, configurations, or errors. Print screens are essential for documentation and record-keeping, offering visual evidence of software settings, configurations, or errors.
Best Practices for Using Print Screens in Documentation:
- Capture Important Information: Focus on capturing the specific settings or data you need to document.
- Organize Screenshots Logically: Arrange screenshots in a clear and sequential order.
- Label Screenshots Clearly: Use descriptive filenames and captions to identify the content of each screenshot.
- Store Screenshots Securely: Save screenshots in a secure location with backup copies to prevent data loss.
- Use Consistent Formatting: Apply a consistent formatting style to all screenshots for professional documentation.
7.3 Visual Communication and Presentations
Do print screens enhance visual communication? Yes, they can illustrate points and provide visual context in presentations. Print screens can significantly enhance visual communication in presentations, providing clear illustrations and visual context to support your points.
Tips for Using Print Screens in Presentations:
- Use High-Quality Screenshots: Ensure the screenshots are clear and easy to read.
- Crop and Edit Screenshots: Remove unnecessary elements and highlight key information.
- Use Annotations Sparingly: Add annotations only when necessary to avoid cluttering the image.
- Incorporate Screenshots Seamlessly: Integrate screenshots smoothly into your presentation slides.
- Explain the Screenshots: Provide a brief explanation of each screenshot to guide your audience.
7.4 Troubleshooting and Support
Are print screens helpful for technical support? Yes, they allow users to show support staff exactly what they are seeing. Print screens are invaluable for troubleshooting and support, allowing users to show support staff exactly what they are seeing on their screens.
How to Use Print Screens for Technical Support:
- Capture the Issue: Take a screenshot of the error message, software settings, or problem area.
- Annotate the Screenshot: Add annotations to highlight the specific issue.
- Provide Context: Include a brief description of the problem you’re experiencing.
- Send the Screenshot to Support: Attach the screenshot to your support request or email.
- Follow Up: Respond to any questions from the support team and provide additional information as needed.
8. Advanced Screen Capture Techniques
8.1 Scrolling Screenshots
Is it possible to capture an entire webpage even if it extends beyond the visible screen? Yes, scrolling screenshots capture entire web pages or documents, even beyond what is visible on the screen. Scrolling screenshots allow you to capture an entire webpage or document, even if it extends beyond the visible screen.
Tools for Taking Scrolling Screenshots:
- Web Browser Extensions: Use extensions like “GoFullPage” for Chrome or “Nimbus Capture” for Firefox.
- Third-Party Software: Applications like Snagit and PicPick offer advanced scrolling capture features.
How to Take a Scrolling Screenshot:
- Install a Scrolling Screenshot Tool: Choose and install a suitable browser extension or software.
- Open the Webpage or Document: Navigate to the page you want to capture.
- Activate the Scrolling Screenshot Tool: Launch the extension or software.
- Start the Capture: Follow the tool’s instructions to start capturing the scrolling content.
- Save the Screenshot: Once the capture is complete, save the image to your desired location and format.
8.2 Screen Recording
Can I record my screen to create a video? Yes, screen recording allows you to create videos of your screen activity, useful for demonstrations and tutorials. Screen recording allows you to create videos of your screen activity, which is useful for creating demonstrations, tutorials, and presentations.
Tools for Screen Recording:
- Windows Game Bar: Built-in Windows feature for recording screen activity.
- OBS Studio: Free and open-source software for recording and streaming.
- Camtasia: Professional screen recording and video editing software.
How to Record Your Screen:
- Choose a Screen Recording Tool: Select a tool that meets your needs and install it.
- Configure Recording Settings: Adjust settings such as resolution, frame rate, and audio input.
- Start Recording: Launch the tool and start recording your screen activity.
- Perform the Actions: Carry out the steps you want to record.
- Stop Recording: Stop the recording when you’re finished.
- Edit the Video (Optional): Use video editing software to trim, add annotations, and enhance the recording.
- Save the Video: Save the recorded video to your desired location and format.
8.3 Scheduled Screenshots
Can screenshots be scheduled to be taken automatically? Yes, scheduled screenshots automate the process of capturing the screen at specific intervals. Scheduled screenshots automate the process of capturing your screen at specific intervals, which is useful for monitoring changes or documenting processes over time.
Tools for Scheduling Screenshots:
- Third-Party Software: Use applications like Auto Screen Capture or Screenshot Monitor.
- Task Scheduler (Windows): Create a custom task in Windows Task Scheduler to run a screenshot script.
How to Schedule Screenshots:
- Choose a Scheduling Tool: Select a suitable software or use Windows Task Scheduler.
- Configure the Schedule: Set the frequency and timing for capturing screenshots.
- Specify the Capture Area: Choose whether to capture the entire screen or a specific window.
- Set the Output Location: Designate where the screenshots should be saved.
- Test the Schedule: Ensure the scheduled screenshots are captured correctly at the specified intervals.
9. Print Screen on Different Devices
9.1 Print Screen on Laptops
How does taking a print screen differ on a laptop? Laptops often require using the Function (Fn) key in combination with the PrtScn key. Taking a print screen on laptops often involves using the Function (Fn) key in combination with the PrtScn key.
Steps to Take a Print Screen on a Laptop:
- Locate the PrtScn Key: Find the PrtScn key on your laptop keyboard.
- Press Fn + PrtScn: Hold down the Fn key and press the PrtScn key simultaneously.
- Open an Image Editor: Launch an image editing program like Microsoft Paint.
- Paste the Screenshot: Press Ctrl + V to paste the screenshot into the image editor.
- Edit and Save: Make any necessary edits and save the screenshot to your desired location.
9.2 Print Screen on Tablets
How do I take a screenshot on a Windows tablet? Windows tablets often use a combination of the Windows button and volume down button. Windows tablets often use a combination of the Windows button and volume down button to capture a screenshot.
Steps to Take a Screenshot on a Windows Tablet:
- Locate the Windows Button and Volume Down Button: Find these buttons on your tablet.
- Press Windows Button + Volume Down: Press and hold both buttons simultaneously.
- View the Screenshot: The screenshot is saved in the “Screenshots” folder within your “Pictures” library.
- Edit (Optional): Open the screenshot in an image editor to make any edits.
9.3 Print Screen on Virtual Machines
Can I take a print screen of a virtual machine? Yes, print screen works similarly on virtual machines as on physical machines. Taking a print screen on a virtual machine (VM) works similarly to taking a print screen on a physical machine.
Steps to Take a Print Screen on a Virtual Machine:
- Ensure the VM Window is Active: Click inside the VM window to make it the active window.
- Press PrtScn: Press the PrtScn key on your keyboard.
- Open an Image Editor: Launch an image editing program on your host machine.
- Paste the Screenshot: Press Ctrl + V to paste the screenshot into the image editor.
- Edit and Save: Make any necessary edits and save the screenshot to your desired location.
10. Frequently Asked Questions (FAQ)
10.1 How do I take a screenshot on Windows 10?
To take a screenshot on Windows 10, press the Print Screen (PrtScn) key to copy the entire screen to the clipboard. Press Alt + PrtScn to capture only the active window. Use Windows Key + PrtScn to save the screenshot directly to the Pictures/Screenshots folder. Alternatively, use the Snipping Tool or Snip & Sketch for more control over the capture area.
10.2 Where are screenshots saved in Windows?
Screenshots taken using the Windows Key + PrtScn shortcut are automatically saved in the “Screenshots” folder, located within the “Pictures” library. Screenshots captured using the Print Screen key are copied to the clipboard and must be pasted into an image editor to be saved.
10.3 How do I use the Snipping Tool in Windows?
To use the Snipping Tool, search for “Snipping Tool” in the Start menu and open the application. Click “New” to start a new snip, then select the area you want to capture using the available modes (Free-form, Rectangular, Window, Full-screen). Edit the snip using the built-in tools, and then save it to your desired location.
10.4 How do I capture only a specific window?
To capture only a specific window, select the window you want to capture and press Alt + PrtScn. This copies the selected window to the clipboard, which you can then paste into an image editor to save.
10.5 How can I annotate my screenshots?
You can annotate screenshots using built-in tools like the Snipping Tool or Snip & Sketch, which allow you to add highlights, arrows, and text. For more advanced editing, paste the screenshot into image editing software like Microsoft Paint, Adobe Photoshop, or GIMP.
10.6 How do I take a scrolling screenshot in Windows?
To take a scrolling screenshot, you can use browser extensions like “GoFullPage” for Chrome or “Nimbus Capture” for Firefox, or third-party software like Snagit. These tools allow you to capture entire web pages or documents, even if they extend beyond the visible screen.
10.7 What is the difference between the Snipping Tool and Snip & Sketch?
The Snipping Tool is the older, classic screen capture utility in Windows, while Snip & Sketch is the newer, updated version. Snip & Sketch offers a more modern interface and additional features, such as improved annotation tools and keyboard shortcuts.
10.8 Can I record my screen in Windows?
Yes, you can record your screen in Windows using the built-in Game Bar (Windows Key + G) or third-party software like OBS Studio or Camtasia. The Game Bar is suitable for recording gameplay or application demonstrations, while OBS Studio and Camtasia offer more advanced recording and editing features.
10.9 How do I change the default screenshot save location?
To change the default screenshot save location, you can modify the registry or use third-party software. However, the simplest method is to use the Windows Key + PrtScn shortcut, which saves screenshots to the “Screenshots” folder. You can then move this folder to your desired location.
10.10 Why is my Print Screen key not working?
If your Print Screen key is not working, ensure that the key is not disabled or remapped. Check for any conflicting software or keyboard shortcuts that might be interfering with the Print Screen function. Restart your computer and try again. If the issue persists, update your keyboard drivers or consult your computer’s documentation.
Mastering the print screen function in Windows empowers you to capture, share, and print your digital experiences with ease. Whether for professional documentation, creative projects, or technical support, the ability to grab a quick snapshot of your screen is invaluable. As you explore these techniques, remember that amazingprint.net is your go-to resource for transforming digital images into stunning prints.
Ready to take your screenshots to the next level? Visit amazingprint.net today and discover a world of inspiration, design tips, and printing solutions tailored to your needs. From selecting the perfect paper to exploring advanced printing techniques, we’re here to help you bring your visions to life. Explore our articles, compare printing options, and find the inspiration you need to create memorable, high-quality prints.
Address: 1600 Amphitheatre Parkway, Mountain View, CA 94043, United States
Phone: +1 (650) 253-0000
Website: amazingprint.net.