
Changing your default printer is essential for streamlining your printing process, and amazingprint.net is here to guide you. By setting a default printer, you ensure that your documents are automatically sent to the printer you use most often, saving you time and hassle. Let’s explore how to make this simple yet impactful change.
1. Understanding the Concept of Default Printer Settings
A default printer is the printer your computer automatically selects when you choose to print a document. This eliminates the need to manually select a printer each time you print, improving efficiency.
1.1. What is a Default Printer?
Your default printer is the go-to device for all your printing needs, selected automatically by your operating system. It’s like setting a favorite contact on your phone—the one you call most often.
1.2. Why is Setting a Default Printer Important?
Setting a default printer saves time and reduces the potential for errors. According to a study by the International Data Corporation (IDC), employees can waste up to 20% of their time due to inefficient document workflows, including printing-related issues. By streamlining the printing process, you can improve productivity and focus on more important tasks.
1.3. Benefits of Customizing Your Default Printer
Customizing your default printer can lead to:
- Efficiency: Quick, hassle-free printing.
- Convenience: No need to select a printer every time.
- Reduced Errors: Minimizes the risk of accidentally printing to the wrong device.
- Time-Saving: Simplifies your printing process.
2. Identifying Your Printing Needs
Before changing your default printer, it’s helpful to consider your printing habits and requirements. This will ensure you select the most suitable printer as your default.
2.1. Assessing Your Printing Habits
Consider the type of documents you print most often (text documents, photos, graphics), the frequency of printing, and whether you require color or black and white prints.
2.2. Determining the Best Printer for Your Needs
Different printers excel in different areas. For example, inkjet printers are great for photos, while laser printers are better for text-heavy documents. Determine which printer best suits your primary printing needs. According to research from Consumer Reports, laser printers are generally more cost-effective for high-volume black and white printing, while inkjet printers offer better color accuracy and versatility.
2.3. Factors to Consider When Choosing a Default Printer
- Print Quality: Evaluate the print resolution and color accuracy.
- Print Speed: Consider the pages per minute (PPM) for efficient printing.
- Paper Handling: Ensure the printer supports the paper sizes and types you need.
- Connectivity: Check for compatibility with your computer and network.
- Cost: Compare the upfront cost of the printer and the ongoing cost of ink or toner.
3. Step-by-Step Guide to Changing Your Default Printer on Windows
Changing your default printer on Windows is straightforward. Follow these steps to set your preferred printer as the default.
3.1. Accessing the “Devices and Printers” Settings
- Open the Start Menu: Click the Windows icon in the bottom-left corner of your screen.
- Type “Control Panel”: Start typing and select “Control Panel” from the search results.
- Navigate to “Devices and Printers”: In the Control Panel, click on “View devices and printers” under the “Hardware and Sound” category.
3.2. Selecting Your Preferred Printer
- Identify Your Printer: In the “Devices and Printers” window, find the printer you want to set as the default.
- Right-Click on the Printer: Right-click on the printer icon to open the context menu.
- Set as Default Printer: Select “Set as default printer” from the menu. A green checkmark will appear on the printer icon, indicating that it is now the default.
3.3. Verifying the Change
- Check the Printer Icon: Ensure the green checkmark is visible on the printer icon.
- Test Print: Open a document and select “Print.” Verify that your chosen printer is automatically selected in the print dialog box.
3.4. Troubleshooting Common Issues
- Printer Not Listed: If your printer is not listed, ensure it is properly connected to your computer and turned on. You may need to install the printer driver.
- Default Printer Not Changing: Ensure you have administrative privileges on your computer. If the issue persists, try restarting your computer.
- Driver Issues: Update or reinstall the printer driver. You can usually find the latest driver on the manufacturer’s website.
4. Step-by-Step Guide to Changing Your Default Printer on macOS
Changing your default printer on macOS is just as simple as on Windows. Here’s how to do it.
4.1. Accessing the “Printers & Scanners” Preferences
- Open System Preferences: Click on the Apple icon in the top-left corner of your screen and select “System Preferences.”
- Navigate to “Printers & Scanners”: In System Preferences, click on “Printers & Scanners.”
4.2. Selecting Your Preferred Printer
- Choose Default Printer: In the “Printers & Scanners” window, you’ll see a dropdown menu labeled “Default printer.”
- Select Your Printer: Click on the dropdown menu and choose the printer you want to set as the default.
4.3. Verifying the Change
- Check the Selection: Ensure your chosen printer is now displayed as the “Default printer” in the “Printers & Scanners” window.
- Test Print: Open a document and select “Print.” Verify that your chosen printer is automatically selected in the print dialog box.
4.4. Troubleshooting Common Issues
- Printer Not Listed: If your printer is not listed, ensure it is properly connected to your computer and turned on. Click the “+” button to add the printer.
- Default Printer Not Changing: Ensure you have the necessary permissions on your computer. If the issue persists, try restarting your computer.
- Driver Issues: Update or reinstall the printer driver. You can usually find the latest driver on the manufacturer’s website.
5. Advanced Printer Settings and Customization
Beyond setting a default printer, you can further customize your printing experience with advanced settings.
5.1. Setting Printing Preferences (Duplex, Color, Quality)
Printing preferences allow you to customize settings such as duplex printing (printing on both sides of the paper), color or black and white printing, and print quality (resolution).
Windows:
- Access Printer Properties: In “Devices and Printers,” right-click on your default printer and select “Printer properties.”
- Navigate to “Preferences”: In the Printer properties window, click on the “Preferences” button.
- Customize Settings: Adjust settings such as duplex printing, color, and print quality. Click “Apply” and “OK” to save your changes.
macOS:
- Access Print Dialog: Open a document and select “Print.”
- Show Details: Click on “Show Details” if the print dialog is in simplified mode.
- Customize Settings: Adjust settings such as duplex printing, color, and print quality using the dropdown menus. Save your settings as a preset for future use.
5.2. Creating and Managing Printer Presets
Printer presets allow you to save specific printing configurations for different types of documents or tasks. For example, you can create a preset for “Draft Printing” with low quality and black and white settings, and another for “Photo Printing” with high quality and color settings.
Windows:
- Access Printer Preferences: Follow the steps above to access the printer preferences.
- Save Settings as Preset: Configure your desired settings and click on the “Save As” button to save them as a preset.
- Name Your Preset: Enter a name for your preset and click “OK.”
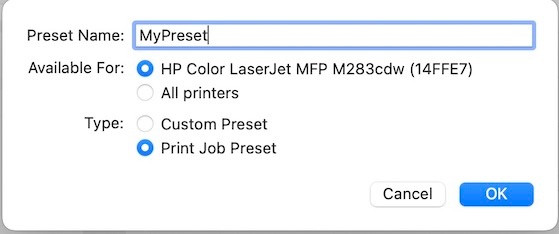
macOS:
- Access Print Dialog: Open a document and select “Print.”
- Customize Settings: Configure your desired settings in the print dialog.
- Save as Preset: Click on the “Presets” dropdown menu and select “Save Current Settings as Preset.”
- Name Your Preset: Enter a name for your preset and click “OK.”
5.3. Using Multiple Printers Efficiently
If you have multiple printers, you can manage them efficiently by assigning specific tasks to each printer. For example, you can use a laser printer for text documents and an inkjet printer for photos.
- Set Defaults for Different Applications: Some applications allow you to specify a default printer for that specific application. Check the application settings to see if this option is available.
- Use Printer Shortcuts: Create shortcuts to different printers on your desktop for quick access.
- Organize Your Printers: Label your printers clearly to avoid confusion.
6. Optimizing Your Printing for Cost and Quality
Optimizing your printing habits can save you money on ink, toner, and paper, while also improving the quality of your prints.
6.1. Choosing the Right Paper Type
The type of paper you use can significantly impact the quality and cost of your prints. Use standard paper for everyday documents, glossy paper for photos, and specialty paper for important presentations or projects.
- Standard Paper: Economical for everyday printing.
- Glossy Paper: Enhances the vibrancy and detail of photos.
- Matte Paper: Reduces glare and fingerprints, ideal for presentations.
- Recycled Paper: Environmentally friendly option.
6.2. Selecting the Appropriate Print Quality
Higher print quality settings consume more ink or toner. Use the appropriate print quality setting for your needs. Draft quality is suitable for internal documents, while high quality is best for photos and presentations.
- Draft Quality: Low resolution, uses less ink.
- Standard Quality: Balanced resolution and ink usage.
- High Quality: High resolution, uses more ink.
6.3. Utilizing Duplex Printing
Duplex printing can save you up to 50% on paper costs by printing on both sides of the paper. Enable duplex printing in your printer settings.
Windows:
- Access Printer Preferences: Follow the steps above to access the printer preferences.
- Enable Duplex Printing: Look for a “Duplex Printing” or “Print on Both Sides” option and enable it.
macOS:
- Access Print Dialog: Open a document and select “Print.”
- Show Details: Click on “Show Details” if the print dialog is in simplified mode.
- Enable Duplex Printing: Look for a “Two-Sided” option and select “Long-Edge binding” or “Short-Edge binding” as appropriate.
6.4. Managing Ink and Toner Usage
- Use Economy Mode: Many printers offer an “Economy Mode” that uses less ink or toner.
- Print in Black and White: Print non-essential documents in black and white to conserve color ink.
- Monitor Ink Levels: Regularly check your ink or toner levels and replace cartridges when needed.
- Consider Refilling Cartridges: Refilling ink cartridges can be a cost-effective alternative to buying new ones.
According to a study by Keypoint Intelligence, using economy mode and printing in black and white can reduce ink consumption by up to 50%.
7. Addressing Common Printing Problems
Even with the correct default printer settings, you may encounter printing problems. Here are some common issues and how to resolve them.
7.1. Printer Not Responding
- Check Connections: Ensure the printer is properly connected to your computer and turned on.
- Restart Printer: Turn the printer off and on again.
- Check for Errors: Look for any error messages on the printer display or in the print queue on your computer.
- Update Drivers: Update or reinstall the printer driver.
7.2. Poor Print Quality
- Check Ink Levels: Ensure ink or toner levels are sufficient.
- Clean Print Heads: Use the printer’s built-in cleaning function to clean the print heads.
- Adjust Print Quality Settings: Increase the print quality setting in the printer preferences.
- Use Appropriate Paper: Use the correct type of paper for your printing needs.
7.3. Paper Jams
- Turn Off Printer: Turn off the printer before attempting to remove the paper jam.
- Open Access Panels: Open all access panels and carefully remove any visible paper.
- Check Paper Path: Ensure there are no small pieces of paper blocking the paper path.
- Reload Paper: Reload the paper tray and ensure the paper is properly aligned.
7.4. Wireless Printing Issues
- Check Wi-Fi Connection: Ensure the printer is connected to the Wi-Fi network and that the network is working properly.
- Restart Router: Restart your Wi-Fi router.
- Update Printer Firmware: Update the printer’s firmware to the latest version.
- Reinstall Printer: Reinstall the printer on your computer.
8. Maintaining Your Printer for Optimal Performance
Regular maintenance can prolong the life of your printer and ensure optimal performance.
8.1. Cleaning Your Printer Regularly
Clean the exterior of your printer with a soft, dry cloth. Use a vacuum cleaner to remove dust and debris from the interior.
8.2. Updating Printer Drivers and Firmware
Keep your printer drivers and firmware up to date to ensure compatibility and optimal performance. Visit the manufacturer’s website to download the latest updates.
8.3. Storing Ink and Toner Properly
Store ink and toner cartridges in a cool, dry place away from direct sunlight. This will prevent them from drying out or deteriorating.
8.4. Performing Routine Maintenance Tasks
Follow the manufacturer’s recommendations for routine maintenance tasks, such as cleaning the print heads and calibrating the printer.
9. The Future of Printing Technology
The printing industry is continuously evolving, with new technologies and trends emerging all the time.
9.1. Advances in Inkjet and Laser Technology
Inkjet technology is advancing with improved ink formulations and print head designs, resulting in higher print quality and faster print speeds. Laser technology is becoming more energy-efficient and offering better color accuracy.
9.2. The Rise of 3D Printing
3D printing is revolutionizing manufacturing, healthcare, and other industries. 3D printers can create complex objects from a variety of materials, including plastics, metals, and ceramics.
9.3. Sustainable Printing Solutions
Sustainability is becoming increasingly important in the printing industry. Manufacturers are developing more energy-efficient printers, using recycled materials, and offering ink and toner recycling programs.
9.4. Mobile Printing and Cloud Integration
Mobile printing allows you to print documents directly from your smartphone or tablet. Cloud integration enables you to print from cloud storage services such as Google Drive and Dropbox.
10. Finding the Right Printing Solutions with Amazingprint.net
At amazingprint.net, we understand the importance of efficient and high-quality printing. Whether you’re a small business owner, marketing professional, graphic designer, event planner, or individual with personal printing needs, we offer a comprehensive range of resources to help you find the perfect printing solutions.
10.1. Exploring Different Types of Printing Services
- Digital Printing: Ideal for short runs and personalized prints.
- Offset Printing: Best for high-volume projects with consistent quality.
- 3D Printing: Perfect for creating prototypes and custom objects.
10.2. Comparing Printing Options and Their Benefits
We provide detailed comparisons of different printing options, highlighting the pros and cons of each method to help you make informed decisions.
10.3. Getting Inspired with Creative Printing Ideas
Discover innovative printing ideas for marketing materials, event decorations, personalized gifts, and more. Let your creativity shine with our inspiring suggestions.
10.4. Finding Reliable Printing Service Providers
We connect you with a network of trusted printing service providers in the USA, ensuring you receive top-notch quality and service.
10.5. Staying Updated with the Latest Printing Trends
Stay ahead of the curve with our blog, featuring the latest trends, technologies, and best practices in the printing industry.
We also provide services such as:
- Cost-Effective Printing: We help you find budget-friendly solutions without compromising quality.
- Material Choices: Guidance on selecting the best materials for your projects.
- Effective Design Tips: Learn how to design for effective and impactful prints.
10.6. How to Get Started with Amazingprint.net
- Visit our Website: Explore our comprehensive range of printing resources at amazingprint.net.
- Browse Articles and Guides: Dive into our informative articles and guides to learn about different printing options, design tips, and industry trends.
- Connect with Printing Service Providers: Find reliable printing service providers in your area through our directory.
- Get Inspired: Discover creative printing ideas and bring your visions to life.
- Contact Us: Have questions or need personalized assistance? Contact our team for expert advice.
Contact Information:
- Address: 1600 Amphitheatre Parkway, Mountain View, CA 94043, United States
- Phone: +1 (650) 253-0000
- Website: amazingprint.net
Changing your default printer is just the beginning. Visit amazingprint.net today and unlock a world of printing possibilities.
FAQ: Changing Your Default Printer
1. Why can’t I change my default printer?
You may lack administrative privileges or the printer driver might be corrupted. Ensure you have the necessary permissions and try reinstalling the driver.
2. How do I add a printer to my computer?
On Windows, go to “Devices and Printers” and click “Add a printer.” On macOS, go to “Printers & Scanners” and click the “+” button. Follow the on-screen instructions to install the printer.
3. Can I have multiple default printers?
No, you can only have one default printer at a time. However, you can easily switch between different printers as needed.
4. What if my printer is not listed in the “Devices and Printers” or “Printers & Scanners” settings?
Ensure the printer is properly connected to your computer and turned on. You may need to install the printer driver.
5. How do I update my printer driver?
Visit the printer manufacturer’s website and download the latest driver for your operating system. Follow the installation instructions.
6. What is duplex printing and how do I enable it?
Duplex printing is printing on both sides of the paper. Enable it in your printer preferences under the “Duplex Printing” or “Print on Both Sides” option.
7. How do I create a printer preset?
Configure your desired printing settings and click on the “Save As” button to save them as a preset in Windows. On macOS, click on the “Presets” dropdown menu and select “Save Current Settings as Preset.”
8. What is economy mode and how does it save ink?
Economy mode reduces the amount of ink used for printing, resulting in lower print quality but significant ink savings. Enable it in your printer preferences.
9. How do I clean my printer’s print heads?
Use the printer’s built-in cleaning function to clean the print heads. Refer to your printer’s manual for instructions.
10. How often should I maintain my printer?
Perform routine maintenance tasks such as cleaning the print heads and calibrating the printer every few months or as needed, depending on your printing volume.
 Preset Menu