
Are you looking for the best Free 3d Design Software For 3d Printing to bring your ideas to life? Amazingprint.net provides a comprehensive guide to the top free 3D modeling tools perfect for beginners and experts alike, ensuring your designs are print-ready and visually stunning. Explore our resources to master CAD software and discover innovative ways to create printable 3D models.
1. Understanding 3D Design Software for 3D Printing
What is 3D design software and why is it essential for 3D printing? 3D design software allows you to create digital models that can be transformed into physical objects through 3D printing. It is crucial for designing precise, printable models.
3D design software, also known as CAD (Computer-Aided Design) software, enables users to create, modify, and analyze designs in three dimensions. This technology is critical in various industries, from manufacturing and engineering to architecture and entertainment. When it comes to 3D printing, having the right software is essential to ensure that the final product matches the intended design.
Why 3D Design Software Matters for 3D Printing
- Precision: 3D printing requires precise models to ensure accurate reproduction. Software allows for detailed design and adjustments.
- Customization: Tailor designs to specific needs, creating unique and personalized items.
- Prototyping: Quickly create prototypes to test designs before mass production.
- Complexity: Design intricate and complex structures that would be difficult or impossible to create by hand.
- Error Reduction: Identify and correct design flaws before printing, saving time and materials.
Key Features to Look For
When selecting 3D design software for 3D printing, consider these important features:
- Ease of Use: An intuitive interface and readily available tutorials make the software accessible to beginners.
- File Compatibility: Compatibility with standard 3D printing file formats like STL and OBJ is essential.
- Solid Modeling: Ensures that models are “watertight,” with all walls having thickness, which is necessary for 3D printing.
- Parametric Modeling: Allows you to easily modify designs by changing parameters, providing flexibility and control.
- Mesh Repair Tools: Tools to fix common issues such as non-manifold edges and holes in the model.
- Preview and Simulation: Features that allow you to preview the final print and simulate the printing process to identify potential issues.
Benefits of Using 3D Design Software
3D design software provides numerous advantages for both hobbyists and professionals:
- Creative Freedom: Unleash your creativity and design anything you can imagine.
- Cost Efficiency: Reduce material waste and avoid costly errors by perfecting designs before printing.
- Time Savings: Streamline the design process and quickly iterate on ideas.
- Innovation: Explore new possibilities and push the boundaries of what can be created with 3D printing.
- Collaboration: Share designs and collaborate with others, facilitating teamwork and innovation.
2. What Are The Top Free 3D Design Software Options?
Discover the best free 3D design software options available, including Tinkercad, FreeCAD, and Blender, each offering unique features for creating 3D models. These tools provide a solid foundation for learning and designing for 3D printing.
Here are some of the top free 3D design software options:
Tinkercad
- Price: Free
- Solid Modeling: Yes
- Intended for: Beginners
- Special Features: Browser-based, intuitive block-building concept, extensive tutorials and guides.
Tinkercad is a browser-based 3D design app geared towards beginners. The software features an intuitive block-building concept, allowing you to develop models from a set of basic shapes. It is full of tutorials and guides to help novices get the designs they’re looking for, and it allows you to share and export files easily.
Key Benefits of Tinkercad
- User-Friendly Interface: Simple and easy to navigate, perfect for beginners.
- Extensive Tutorials: Plenty of resources to help you learn the basics of 3D modeling.
- Direct Printing Integration: Seamlessly print your designs through third-party services.
- Large Community: Access a vast library of user-created shapes and designs.
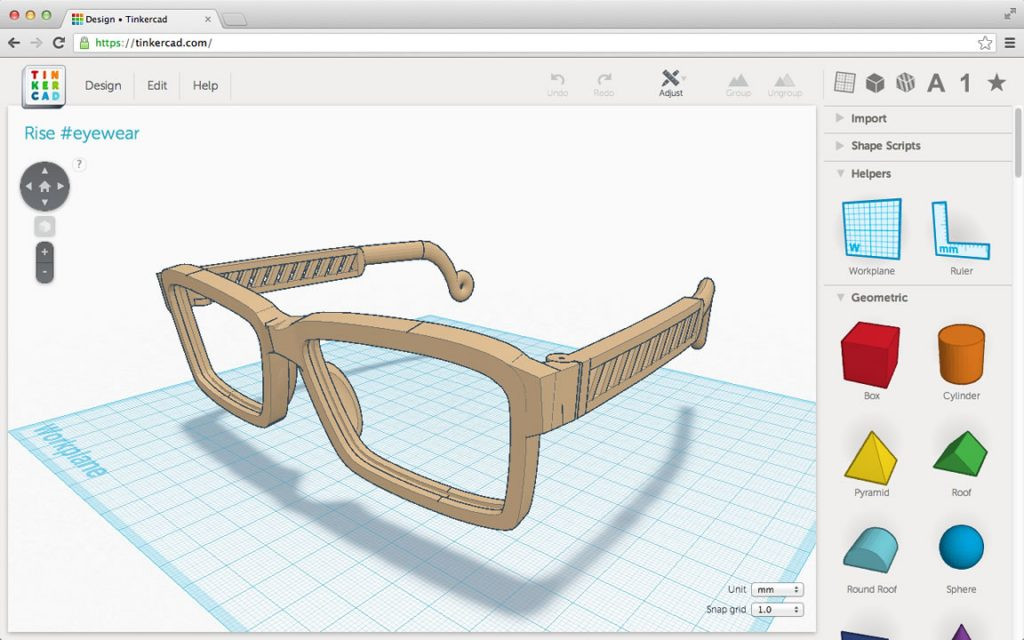 Tinkercad Interface
FreeCAD
- Price: Free
- Solid Modeling: Yes
- Intended for: Amateurs and advanced users
- Special Features: Parametric modeling, open-source, robotic simulation, architectural tools, CAM module.
FreeCAD is a parametric 3D modeling tool that is open-source and enables you to design real-life objects of any size. The parametric component makes editing your design simple; simply go to your model history and change the parameters. All tools are available without any paywalls, allowing you to tweak your models freely.
Key Benefits of FreeCAD
- Parametric Modeling: Easily modify designs by changing parameters.
- Open-Source: Fully customizable and free to use.
- Versatile: Suitable for various applications, including engineering and architecture.
- Comprehensive Tools: Includes features for robotic simulation, architectural design, and CAM.
 FreeCAD Interface
Blender
- Price: Free
- Solid Modeling: No
- Intended for: Amateurs and advanced users
- Special Features: Open source, feature-rich, tools for sculpting, animation, simulation, rendering, motion tracking, and video editing.
Blender covers many facets of 3D creation, including modeling, animation, and simulation. This open-source software has a steep learning curve and is ideal for users who feel ready to transition to designing complex 3D models. It offers photorealistic rendering options, giving models a high degree of realism.
Key Benefits of Blender
- Versatile: Suitable for modeling, animation, and simulation.
- Photorealistic Rendering: Creates models with a high degree of realism.
- Open-Source: Fully customizable and free to use.
- Extensive Community: A large community provides support and resources for learning.
DesignSpark Mechanical
- Price: Free
- Solid modeling: Yes
- Intended for: Amateurs and advanced users
- What makes it special: A library of 3D models from industrial suppliers and the ability to generate a bill-of-materials for designs. Electrical and PCB CAD tools are also available.
This nifty and free CAD software is ideal for professionals and advanced hobbyists alike. The user interface is relatively straightforward and the software runs quickly, meaning efficient designing. You also have the capability to generate a bill-of-materials that calculates the cost of printing potential 3D design projects.
Key Benefits of DesignSpark Mechanical
- Efficient Design: Ideal for professionals and advanced hobbyists, with a straightforward user interface and quick performance.
- Cost Calculation: Generate a bill-of-materials to estimate the cost of 3D printing projects.
- In-Built Library: Access an extensive library of pre-made models for easy integration into designs.
- User-Friendly Features: Includes a pull feature for creating 3D models from surfaces, making it beginner-friendly despite its advanced capabilities.
OpenSCAD
- Price: Free
- Solid modeling: Yes
- Intended for: Amateurs and advanced users
- What makes it special: Designed for programmers, models are generated through typing scripts.
OpenSCAD is a free software with a ton of features and a unique way of creating models. This software takes a programming approach to 3D modeling, making it a unique addition to this list of 3d printing software tools. Instead of the traditional interactive modeling interface, users write code in a script file that describes the parameters of the 3D object. Once you’ve entered your code, you can view the shapes you’ve created by clicking a “compile” button.
Key Benefits of OpenSCAD
- Programming Approach: Create models by writing code in a script file, offering a unique approach to 3D design.
- 2D Drawing Import: Import 2D drawings and extrude them into 3D models, expanding design possibilities.
- Customization: Offers extensive customization options through coding, appealing to users with programming skills.
- Powerful Tool: Despite its unique approach, OpenSCAD is a powerful tool for creating precise and complex 3D models.
3. How To Evaluate 3D Design Software?
What factors should you consider when evaluating 3D design software for 3D printing? Evaluate software based on user-friendliness, compatibility, features, and cost to find the best fit for your needs.
Choosing the right 3D design software can significantly impact the quality and efficiency of your 3D printing projects. Here are the key factors to consider when evaluating 3D design software:
User-Friendliness
- Intuitive Interface: The software should have an easy-to-navigate interface, especially for beginners.
- Learning Curve: Consider how quickly you can learn to use the software effectively. Look for software with ample tutorials, documentation, and community support.
- Ease of Use: Assess how simple it is to perform common tasks like creating basic shapes, modifying designs, and exporting files.
Compatibility
- File Formats: Ensure the software supports standard 3D printing file formats like STL, OBJ, and 3MF.
- Operating System: Check compatibility with your operating system (Windows, macOS, Linux).
- Hardware Requirements: Ensure your computer meets the minimum hardware requirements for the software to run smoothly.
- Slicer Compatibility: The software should work well with popular slicing software such as Cura, Simplify3D, and Slic3r.
Features
- Modeling Tools: Evaluate the range and quality of modeling tools available, including solid modeling, surface modeling, and sculpting tools.
- Parametric Design: If you need to make frequent adjustments to your designs, parametric modeling can be a significant advantage.
- Simulation and Analysis: Some software offers simulation and analysis tools to test the structural integrity of your designs before printing.
- Collaboration: If you work in a team, look for software that supports collaboration features like shared projects and version control.
Cost
- Free vs. Paid: Determine whether a free software option meets your needs or if you require the advanced features of a paid version.
- Subscription vs. Perpetual License: Consider the pricing model. Subscription-based software often includes regular updates and support, while a perpetual license involves a one-time purchase.
- Additional Costs: Factor in potential costs for plugins, add-ons, or training resources.
Performance
- Speed: The software should perform quickly, even with complex models.
- Stability: Look for software that is stable and doesn’t crash frequently.
- Memory Usage: Check how much memory the software consumes, especially if you work with large files.
Support and Community
- Documentation: Good documentation is essential for learning and troubleshooting.
- Tutorials: Look for software with a wide range of tutorials, both official and user-created.
- Community Forums: Active community forums can provide valuable support and help you find solutions to common problems.
By carefully considering these factors, you can choose the 3D design software that best fits your needs and helps you achieve your 3D printing goals.
4. What Are The Advantages of Paid 3D Design Software?
What benefits do paid 3D design software options offer over free ones? Paid software often includes advanced features, better support, and more comprehensive toolsets for professional use.
While free 3D design software can be excellent for beginners and hobbyists, paid options often offer a range of advantages that can be crucial for professionals and those with more demanding projects. Here are some key benefits of paid 3D design software:
Advanced Features and Tools
- More Comprehensive Toolsets: Paid software typically includes a broader range of advanced tools for modeling, simulation, and analysis.
- Specialized Features: Some paid software offers specialized features tailored to specific industries, such as architecture, engineering, or animation.
- Advanced Rendering and Visualization: Paid software often includes more advanced rendering capabilities, allowing you to create photorealistic images and animations of your designs.
- Better Precision and Control: Paid software often provides more precise control over design parameters and greater accuracy in simulations.
Improved Support and Training
- Dedicated Support: Paid software usually comes with dedicated customer support, providing faster and more reliable assistance when you encounter issues.
- Training Resources: Paid software developers often offer comprehensive training resources, including tutorials, webinars, and certifications.
- Regular Updates and Maintenance: Paid software typically receives regular updates and maintenance, ensuring compatibility with the latest hardware and software.
Enhanced Performance and Stability
- Optimized Performance: Paid software is often optimized for performance, allowing you to work with complex models more efficiently.
- Greater Stability: Paid software tends to be more stable and less prone to crashes, reducing the risk of losing work.
Integration and Compatibility
- Seamless Integration: Paid software often integrates seamlessly with other professional tools, such as CAD and CAM software.
- Better File Compatibility: Paid software typically offers better compatibility with a wider range of file formats, making it easier to collaborate with others.
Commercial Use and Licensing
- Commercial Use Rights: Paid software typically includes commercial use rights, allowing you to use the software for business purposes without restrictions.
- Licensing Options: Paid software often offers flexible licensing options, such as single-user licenses, network licenses, and floating licenses, to suit different business needs.
Examples of Paid 3D Design Software
- SolidWorks: A professional-grade CAD program known for its powerful editing tools and industrial applications.
- Autodesk Fusion 360: A cloud-based 3D CAD program that offers a wide range of features and is regularly updated.
- Rhino3D: A versatile 3D modeler that uses NURB, allowing precise manipulation of various elements.
While paid 3D design software requires an investment, the advanced features, improved support, and enhanced performance can be well worth the cost for professionals and serious hobbyists.
5. How Does 3D Printing Integrate with CAD Software?
What is the role of CAD software in the 3D printing process? CAD software is used to create the initial 3D model, which is then prepared for printing using slicing software.
The integration of 3D printing with CAD (Computer-Aided Design) software is a seamless and essential process that transforms digital designs into tangible objects. Here’s how these two technologies work together:
Design Creation in CAD Software
- Model Development: CAD software is used to create the initial 3D model of the object. This can range from simple shapes to highly complex designs.
- Precision and Accuracy: CAD software allows designers to create models with precise dimensions and specifications, ensuring that the final printed object meets the required standards.
- File Export: Once the design is complete, it is exported in a format compatible with 3D printing, such as STL (Stereolithography) or OBJ (Object).
Preparing the Model for 3D Printing
- Slicing Software: The exported file is then imported into slicing software, which prepares the model for 3D printing.
- Layering: Slicing software divides the 3D model into thin layers, which the 3D printer will build one at a time.
- Setting Parameters: Users can set various parameters such as layer height, print speed, temperature, and support structures to optimize the printing process.
The 3D Printing Process
- G-Code Generation: After slicing, the software generates G-code, a numerical control language that instructs the 3D printer on how to build the object layer by layer.
- Printing: The G-code is then sent to the 3D printer, which follows the instructions to deposit material and create the physical object.
- Post-Processing: Once the printing is complete, the object may require post-processing, such as removing support structures or smoothing the surface.
Key Benefits of CAD and 3D Printing Integration
- Rapid Prototyping: Quickly create prototypes to test designs and make improvements.
- Customization: Tailor designs to specific needs and create personalized products.
- Complexity: Design and create intricate structures that would be difficult or impossible to manufacture using traditional methods.
- Efficiency: Streamline the design and manufacturing process, reducing time and costs.
Examples of CAD Software Used in 3D Printing
- Tinkercad: A user-friendly, browser-based CAD software perfect for beginners.
- FreeCAD: An open-source parametric 3D modeler suitable for a wide range of applications.
- Autodesk Fusion 360: A cloud-based CAD program that offers advanced features for professionals.
- SolidWorks: A professional-grade CAD program widely used in industrial design and engineering.
How Amazingprint.net Can Help
At amazingprint.net, we understand the importance of seamless integration between CAD software and 3D printing. We provide resources, tutorials, and support to help you master both design and printing processes. Explore our website to discover:
- Comprehensive Guides: Detailed guides on using various CAD software for 3D printing.
- Software Recommendations: Expert recommendations on the best CAD software for your specific needs.
- Troubleshooting Tips: Solutions to common problems encountered during the design and printing process.
- Inspiration: Showcase of innovative 3D printing projects and designs to inspire your creativity.
By leveraging the power of CAD software and 3D printing, you can bring your ideas to life and create innovative products with ease. Visit amazingprint.net today to learn more and get started on your 3D printing journey.
6. What Are The Best File Formats For 3D Printing?
What file formats are best for 3D printing and why? STL and OBJ are the most common, with STL being simpler and OBJ supporting color and texture information.
Choosing the right file format is essential for successful 3D printing. Different file formats store 3D model data in various ways, affecting the print quality, file size, and compatibility with different software and printers. Here are some of the best file formats for 3D printing:
STL (Stereolithography)
- Description: STL is the most widely used file format for 3D printing. It represents the surface geometry of a 3D object as a collection of triangles.
- Advantages:
- Simplicity: STL files are relatively simple, making them easy to generate and process.
- Compatibility: Almost all 3D printers and slicing software support STL files.
- Small File Size: STL files can be smaller compared to other formats, especially for models with simple geometries.
- Disadvantages:
- No Color or Texture: STL files do not store color or texture information.
- Resolution Dependent: The resolution of the STL file (number of triangles) affects the smoothness of the printed object.
- Use Cases: Ideal for models with simple geometries where color and texture are not important.
OBJ (Object)
- Description: OBJ is another popular file format that stores 3D geometry, color, and texture information.
- Advantages:
- Color and Texture: OBJ files can store color and texture information, making them suitable for printing multi-colored objects.
- Versatility: OBJ files can represent more complex geometries compared to STL files.
- Disadvantages:
- Larger File Size: OBJ files tend to be larger than STL files, especially when they include color and texture information.
- Complexity: OBJ files can be more complex to process compared to STL files.
- Use Cases: Ideal for models with complex geometries and those requiring color and texture information.
3MF (3D Manufacturing Format)
- Description: 3MF is a modern file format developed specifically for 3D printing. It is designed to be more efficient and feature-rich than STL and OBJ.
- Advantages:
- Comprehensive Data: 3MF files can store a wide range of data, including geometry, color, texture, materials, and metadata.
- Efficiency: 3MF files are designed to be more efficient than STL and OBJ, resulting in smaller file sizes and faster processing times.
- Extensibility: 3MF is an extensible format, allowing for future enhancements and new features.
- Disadvantages:
- Limited Support: While support for 3MF is growing, it is not as widely supported as STL and OBJ.
- Use Cases: Ideal for complex models with advanced features and for future-proofing your designs.
Other File Formats
- PLY (Polygon File Format): Stores 3D geometry and can include color information. Commonly used for 3D scanning data.
- AMF (Additive Manufacturing File Format): An XML-based format that supports complex geometries, materials, and metadata.
- VRML (Virtual Reality Modeling Language): Used for representing 3D interactive vector graphics.
Choosing the Right File Format
When choosing a file format for 3D printing, consider the following factors:
- Complexity of the Model: For simple models, STL is often sufficient. For complex models with color and texture, OBJ or 3MF may be more appropriate.
- Software and Printer Compatibility: Ensure that your chosen file format is supported by your 3D printing software and printer.
- File Size: Consider the file size, especially if you have limited storage or bandwidth.
- Features: Determine whether you need to store color, texture, or other advanced features.
By understanding the strengths and limitations of different file formats, you can choose the one that best suits your needs and ensures the best possible results for your 3D printing projects. Visit amazingprint.net for more tips and resources on 3D printing.
7. How To Optimize 3D Models For Printing?
What steps can you take to optimize 3D models for 3D printing? Simplify geometry, ensure manifold models, and check for errors to improve print quality and success.
Optimizing 3D models for printing is crucial for ensuring successful and high-quality prints. Here are some essential steps to take when preparing your models for 3D printing:
Simplify Geometry
- Reduce Polygon Count: High polygon counts can lead to large file sizes and slow processing times. Simplify the geometry by reducing the number of polygons without sacrificing important details.
- Remove Unnecessary Details: Eliminate small, intricate details that may not be visible in the final print.
Ensure Manifold Models
- Watertight Geometry: 3D models must be “watertight,” meaning they have no holes or gaps in the surface. Use software tools to identify and fix non-manifold edges and holes.
- Proper Orientation: Orient the model so that it has a clear inside and outside.
Check for Errors
- Non-Manifold Edges: These are edges that are shared by more than two faces, which can cause issues during printing.
- Inverted Normals: Normals define the direction of the surface. Inverted normals can cause printing errors.
- Self-Intersections: These occur when parts of the model intersect with themselves.
Scale Appropriately
- Correct Dimensions: Ensure the model is scaled to the correct dimensions for printing.
- Printer Volume: Check that the model fits within the build volume of your 3D printer.
Add Support Structures
- Overhanging Features: Identify overhanging features that may require support structures to prevent them from collapsing during printing.
- Support Placement: Add support structures strategically to provide adequate support without wasting material or affecting the surface finish.
Optimize for Material
- Material Properties: Consider the properties of the 3D printing material when designing your model.
- Wall Thickness: Ensure that the walls of the model are thick enough to provide adequate strength and stability.
- Infill Density: Adjust the infill density to balance strength and weight.
Use Mesh Repair Tools
- Netfabb Basic: A free software tool that can automatically repair common mesh errors.
- MeshLab: An open-source tool for processing and editing 3D meshes.
- Online Services: Several online services can repair 3D models, such as MakePrintable and 3DPrinterOS.
Preview and Simulate
- Slicing Software: Use slicing software to preview the sliced model and simulate the printing process.
- Layer View: Check the layer view to identify potential issues such as floating features or inadequate support.
Examples of Optimization Techniques
- Reducing Triangles: Use decimation algorithms to reduce the number of triangles in the model while preserving its overall shape.
- Hollowing: Hollow out the model to reduce material consumption and weight.
- Adding Draft Angles: Add draft angles to vertical surfaces to make them easier to print.
By following these optimization steps, you can improve the quality, efficiency, and success rate of your 3D printing projects. Visit amazingprint.net for more tips and resources on 3D printing.
8. What Is Slicing Software and How Does It Work?
What is slicing software and how does it prepare a 3D model for printing? Slicing software converts a 3D model into layers and generates G-code, which guides the 3D printer.
Slicing software is a critical component in the 3D printing process. It acts as the bridge between the 3D model and the 3D printer, converting the digital design into a set of instructions that the printer can understand and execute. Here’s a detailed look at what slicing software is and how it works:
What is Slicing Software?
- Definition: Slicing software is a program that converts a 3D model into a series of thin layers, or slices, and generates a set of instructions (G-code) that the 3D printer uses to build the object layer by layer.
- Functionality: Slicing software takes a 3D model (typically in STL, OBJ, or 3MF format) and processes it according to user-defined settings to create the G-code.
How Slicing Software Works
- Importing the 3D Model:
- The user imports the 3D model into the slicing software.
- The software displays the model in a virtual environment.
- Setting Print Parameters:
- The user defines various print parameters, such as:
- Layer Height: The thickness of each layer, which affects the print resolution and printing time.
- Print Speed: The speed at which the printer moves.
- Temperature: The temperature of the nozzle and print bed.
- Infill Density: The amount of material used inside the object, affecting its strength and weight.
- Support Structures: Structures added to support overhanging features.
- Material Type: The type of material being used (e.g., PLA, ABS, PETG).
- The user defines various print parameters, such as:
- Slicing the Model:
- The slicing software divides the 3D model into thin, horizontal layers based on the specified layer height.
- Each layer represents a cross-section of the object at a particular height.
- Generating G-Code:
- The slicing software generates G-code, a numerical control language that contains instructions for the 3D printer.
- G-code includes commands for:
- Movement: Moving the print head and print bed.
- Extrusion: Extruding material.
- Temperature Control: Heating and maintaining the temperature of the nozzle and print bed.
- Fan Speed: Controlling the speed of the cooling fan.
- Previewing the Print:
- The slicing software allows the user to preview the sliced model layer by layer.
- This allows the user to identify potential issues, such as:
- Floating Features: Parts of the model that are not properly supported.
- Inadequate Support: Insufficient support structures for overhanging features.
- Gaps and Overlaps: Areas where the layers do not align properly.
- Saving the G-Code:
- Once the user is satisfied with the settings and preview, the G-code is saved to a file.
- The G-code file is then transferred to the 3D printer.
Key Features of Slicing Software
- Support Generation: Automatically generate support structures for overhanging features.
- Infill Control: Adjust the infill density to balance strength and weight.
- Layer Height Adjustment: Set the layer height to control the print resolution and printing time.
- Print Speed Control: Adjust the print speed to optimize print quality and efficiency.
- Temperature Control: Set the temperature of the nozzle and print bed for different materials.
- Preview and Simulation: Preview the sliced model and simulate the printing process.
Popular Slicing Software
- Ultimaker Cura: A free, open-source slicing software with a user-friendly interface and advanced features.
- Simplify3D: A premium slicing software with advanced features and excellent print quality.
- Slic3r: An open-source slicing software with real-time incremental slicing and 3D preview.
- Repetier-Host: An open-source software that supports multiple slicing engines and printer control.
How Amazingprint.net Can Help
At amazingprint.net, we provide resources, tutorials, and support to help you master slicing software and optimize your 3D printing projects. Explore our website to discover:
- Software Recommendations: Expert recommendations on the best slicing software for your specific needs.
- Tutorials: Step-by-step tutorials on using various slicing software.
- Troubleshooting Tips: Solutions to common problems encountered during the slicing process.
By understanding how slicing software works and using it effectively, you can optimize your 3D printing projects and achieve high-quality results.
9. How To Choose The Right 3D Printer?
What factors should you consider when choosing a 3D printer? Evaluate print quality, build volume, material compatibility, and budget to select the best printer for your needs.
Choosing the right 3D printer is a critical decision that can significantly impact the quality, efficiency, and success of your 3D printing projects. With a wide range of options available, it’s important to consider several key factors to ensure you select the best printer for your specific needs. Here’s a detailed guide on how to choose the right 3D printer:
1. Determine Your Needs and Applications
- What Will You Be Printing?:
- Prototypes: If you need to create prototypes quickly and efficiently, a desktop FDM printer may be suitable.
- Functional Parts: For functional parts that require high strength and durability, consider printers that support engineering-grade materials.
- Artistic Models: If you’re creating artistic models, consider printers that offer high resolution and color printing capabilities.
- What Is Your Budget?:
- Entry-Level Printers: These printers are affordable but may have limited features and capabilities.
- Mid-Range Printers: These printers offer a balance of features and performance at a reasonable price.
- High-End Printers: These printers provide the best possible print quality, build volume, and material compatibility but are more expensive.
2. Consider 3D Printing Technology
- Fused Deposition Modeling (FDM):
- How It Works: FDM printers extrude thermoplastic filaments through a heated nozzle and deposit the material layer by layer.
- Pros: Affordable, easy to use, wide range of materials.
- Cons: Lower resolution compared to other technologies, visible layer lines.
- Best For: Prototypes, functional parts, and hobbyist projects.
- Stereolithography (SLA) and Digital Light Processing (DLP):
- How It Works: SLA and DLP printers use a light source (laser or projector) to cure liquid resin layer by layer.
- Pros: High resolution, smooth surface finish, fine details.
- Cons: Limited material options, post-processing required, higher cost.
- Best For: Detailed models, jewelry, dental applications.
- Selective Laser Sintering (SLS):
- How It Works: SLS printers use a laser to fuse powder materials layer by layer.
- Pros: High strength, no support structures required, wide range of materials (nylon, TPU).
- Cons: High cost, complex process, limited color options.
- Best For: Functional parts, prototypes, and production parts.
- Multi Jet Fusion (MJF):
- How It Works: MJF printers use inkjet technology to apply fusing and detailing agents to a powder bed, which is then fused by heating elements.
- Pros: High throughput, isotropic parts, good surface finish.
- Cons: Limited material options, high cost.
- Best For: Functional parts, prototypes, and production parts.
3. Evaluate Key Printer Specifications
- Print Quality:
- Resolution: Measured in microns, lower micron values indicate higher resolution and finer details.
- Layer Height: The thickness of each layer, thinner layers result in smoother surfaces.
- Build Volume:
- Dimensions: The maximum size of the object you can print, measured in X, Y, and Z dimensions.
- Consider Your Needs: Choose a printer with a build volume that can accommodate the size of your typical prints.
- Material Compatibility:
- Supported Materials: Ensure the printer supports the materials you plan to use.
- Material Properties: Consider the material properties, such as strength, flexibility, and temperature resistance.
- Print Speed:
- Printing Time: The time it takes to print an object, faster print speeds can reduce production time.
- Balance Quality and Speed: Consider the trade-off between print speed and print quality.
4. Research and Read Reviews
- Online Reviews:
- User Feedback: Read online reviews to get feedback from other users about the printer’s performance, reliability, and ease of use.
- Expert Reviews: Look for reviews from industry experts and publications.
- Community Forums:
- Engage with Users: Join online forums and communities to ask questions and get advice from experienced users.
5. Consider Software and Connectivity
- Slicing Software Compatibility:
- Software Integration: Ensure the printer is compatible with popular slicing software such as Cura, Simplify3D, and Slic3r.
- User-Friendly Interface: Choose a printer with software that is easy to use and provides the necessary features for optimizing prints.
- Connectivity Options:
- Wi-Fi, USB, Ethernet: Consider the connectivity options and choose a printer that supports your preferred method of transferring files.
- Remote Monitoring: Some printers offer remote monitoring and control via a mobile app or web interface.
6. Check Warranty and Support
- Warranty Coverage:
- Duration: Check the duration of the warranty and what it covers.
- Support Services: Ensure the manufacturer offers reliable customer support and technical assistance.
7. Visit amazingprint.net for More Information
At amazingprint.net, we provide resources, tutorials, and support to help you choose the right 3D printer and optimize your 3D printing projects. Explore our website to discover:
- Printer Recommendations: Expert recommendations on