
Printing Excel files can seem daunting, but it’s a straightforward process with numerous options. Whether you’re a small business owner needing financial reports, a marketing professional presenting data, or an individual printing personal spreadsheets, understanding How To Print Excel File is essential. At amazingprint.net, we provide the solutions, tools, and insights you need to achieve high-quality Excel printing efficiently. We will guide you through every step, from basic printing to advanced techniques, ensuring your printed documents look professional and polished, helping you in Excel printing solutions, effective print settings and achieve the best printing quality.
1. Understanding Your Printing Needs
Before diving into the technical aspects of printing, it’s crucial to identify your specific printing needs. This involves understanding the purpose of the document, the intended audience, and the desired appearance. Do you need to print a simple list, a detailed report with charts, or a presentation-ready document? The answers to these questions will guide your printing setup and ensure the final product meets your expectations.
1.1. Identifying the Purpose of the Document
The purpose of your Excel document dictates the level of detail and formatting required.
- Informational Documents: These include reports, analyses, and data summaries. They require clear, concise formatting to present information effectively.
- Presentation Documents: These are designed to be visually appealing and easy to understand, often including charts, graphs, and other visual aids.
- Working Documents: These are primarily for internal use and may not require extensive formatting. The focus is on readability and accuracy.
1.2. Knowing Your Audience
Consider who will be reading the printed document.
- Internal Teams: Documents for internal use can be more technical and less focused on aesthetics.
- External Clients: Documents for clients should be professional, clear, and easy to understand.
- General Public: Documents for a general audience need to be accessible and visually engaging.
1.3. Desired Appearance and Quality
The desired appearance of your printed document will influence your choice of paper, printer settings, and formatting options.
- Professional Documents: Require high-quality printing on premium paper.
- Everyday Documents: Can be printed on standard paper with basic settings.
- Specialty Documents: May require specific paper types, such as glossy paper for photos or cardstock for business cards.
2. Basic Steps to Print an Excel File
Printing an Excel file involves a few basic steps. Here’s a straightforward guide to get you started.
2.1. Opening the Excel File
First, open the Excel file you wish to print. Ensure the file is properly formatted and contains all the necessary data.
2.2. Accessing the Print Menu
There are several ways to access the print menu:
- Using the File Menu: Click on “File” in the top-left corner, then select “Print.”
- Using Keyboard Shortcuts: Press
Ctrl + P(Windows) orCommand + P(Mac) to directly open the print dialog box.
2.3. Selecting a Printer
In the print dialog box, choose the printer you want to use from the available options. If your printer is not listed, ensure it is properly installed and connected to your computer.
2.4. Choosing Print Settings
Adjust the print settings according to your needs:
- Copies: Specify the number of copies you want to print.
- Page Range: Choose to print all pages, a specific range of pages, or the current page.
- Orientation: Select “Portrait” (vertical) or “Landscape” (horizontal) orientation.
- Collation: Choose whether to collate the copies (1, 2, 3) or print them uncollated (1, 1, 1).
2.5. Previewing the Print
Before printing, use the print preview feature to see how your document will look. This helps you identify any formatting issues or adjustments needed.
2.6. Printing the Document
Once you are satisfied with the settings and preview, click the “Print” button to start printing your Excel file.
3. Optimizing Print Settings for Best Results
To achieve the best possible print quality, it’s essential to optimize your print settings. This involves adjusting various parameters to suit your specific needs.
3.1. Page Orientation
Choosing the correct page orientation can significantly impact readability and the amount of data displayed on each page.
- Portrait: Ideal for documents with more rows than columns.
- Landscape: Best for documents with more columns than rows.
3.2. Scaling Options
Scaling options allow you to fit your Excel data onto the printed page.
- No Scaling: Prints the document at its actual size, which may result in some data being cut off.
- Fit Sheet on One Page: Reduces the size of the document to fit all data on a single page. This can make the text smaller and harder to read.
- Fit All Columns on One Page: Adjusts the width of the columns to fit them on one page, while the number of rows may span multiple pages.
- Fit All Rows on One Page: Adjusts the height of the rows to fit them on one page, while the number of columns may span multiple pages.
- Custom Scaling: Allows you to specify a percentage to increase or decrease the size of the document.
3.3. Margins
Adjusting margins can help you control the amount of white space around your data.
- Normal Margins: Standard margins for most documents.
- Wide Margins: Provides more white space, which can improve readability.
- Narrow Margins: Reduces white space, allowing more data to fit on the page.
- Custom Margins: Allows you to set specific margin sizes for each side of the page.
3.4. Headers and Footers
Headers and footers can add important information to your printed document, such as page numbers, dates, and company logos.
- Inserting Headers and Footers: Go to the “Insert” tab, click “Header & Footer,” and choose from predefined options or create custom ones.
- Customizing Headers and Footers: You can add text, page numbers, dates, times, file paths, and images to your headers and footers.
3.5. Print Quality
The print quality setting determines the resolution of your printed document.
- Draft Quality: Uses the lowest resolution for faster printing and less ink consumption.
- Standard Quality: Suitable for most everyday printing needs.
- High Quality: Provides the highest resolution for crisp, clear prints, ideal for professional documents and presentations.
3.6. Paper Type
The type of paper you use can also affect the print quality.
- Plain Paper: Suitable for most everyday printing needs.
- Glossy Paper: Ideal for printing photos and graphics.
- Matte Paper: Reduces glare and provides a professional look.
- Cardstock: Used for printing business cards, invitations, and other specialty items.
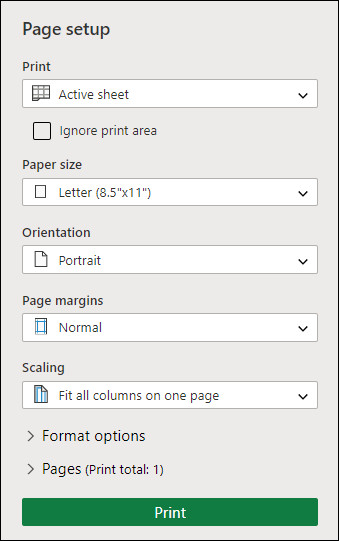 Print setup screen
Alt: Excel print setup screen showing various options such as printer selection, number of copies, and page settings.
4. Printing Specific Areas of an Excel Sheet
Sometimes, you only need to print a specific area of your Excel sheet. Here’s how to do it.
4.1. Setting the Print Area
- Select the Range: Highlight the cells you want to print.
- Go to Page Layout: Click on the “Page Layout” tab in the Excel ribbon.
- Choose Print Area: In the “Page Setup” group, click “Print Area” and select “Set Print Area.”
Now, only the selected cells will be printed.
4.2. Clearing the Print Area
If you want to remove the print area and print the entire sheet, follow these steps:
- Go to Page Layout: Click on the “Page Layout” tab.
- Choose Print Area: In the “Page Setup” group, click “Print Area” and select “Clear Print Area.”
4.3. Printing Multiple Non-Contiguous Areas
To print multiple non-contiguous areas, you can use the camera tool or take screenshots.
- Using the Camera Tool:
- Add the Camera Tool: Go to “File” > “Options” > “Customize Ribbon.” In the “Choose commands from” dropdown, select “All Commands.” Find “Camera” and add it to a custom group on any tab.
- Take Snapshots: Select the first range, click the Camera tool, and then click on the sheet to create a snapshot. Repeat for other ranges.
- Print the Snapshots: Arrange the snapshots as needed and print the sheet.
- Taking Screenshots:
- Capture Areas: Use the Snipping Tool (Windows) or
Shift + Command + 4(Mac) to take screenshots of each area. - Insert Screenshots: Insert the screenshots into a Word document or PowerPoint slide.
- Print the Document: Print the document containing the screenshots.
- Capture Areas: Use the Snipping Tool (Windows) or
5. Dealing with Common Printing Issues
Printing Excel files can sometimes be problematic. Here are some common issues and how to resolve them.
5.1. Data Being Cut Off
If your data is being cut off when printing, try these solutions:
- Adjust Margins: Reduce the margins to fit more data on the page.
- Change Orientation: Switch from portrait to landscape orientation.
- Use Scaling Options: Use the “Fit Sheet on One Page” or “Fit All Columns on One Page” options.
- Check Print Area: Ensure the print area is correctly set to include all necessary data.
5.2. Gridlines Not Printing
By default, Excel does not print gridlines. To print them:
- Go to Page Layout: Click on the “Page Layout” tab.
- Under Gridlines: In the “Sheet Options” group, check the “Print” box under “Gridlines.”
5.3. Blank Pages Printing
If you are getting blank pages when printing, it could be due to extra spaces or data outside the intended print area.
- Check Print Area: Make sure the print area is correctly set and doesn’t include any blank cells.
- Remove Extra Data: Delete any unnecessary rows or columns containing blank cells.
- View Page Breaks: Go to “View” > “Page Break Preview” to see where the page breaks are and adjust them as needed.
5.4. Poor Print Quality
If your print quality is poor, try these solutions:
- Check Ink Levels: Ensure your printer has enough ink or toner.
- Clean Print Heads: Use your printer’s utility to clean the print heads.
- Adjust Print Quality: Select a higher print quality setting in the print dialog box.
- Use High-Quality Paper: Use better quality paper for improved results.
5.5. Headers and Footers Not Displaying
If your headers and footers are not displaying, ensure they are properly set up.
- Go to Insert: Click on the “Insert” tab and select “Header & Footer.”
- Verify Settings: Make sure the headers and footers are enabled and contain the correct information.
- Check Page Setup: In the “Page Layout” tab, click the arrow in the bottom-right corner of the “Page Setup” group. Go to the “Header/Footer” tab and ensure the settings are correct.
6. Advanced Printing Techniques
For more complex printing needs, consider these advanced techniques.
6.1. Printing Comments
To print comments in your Excel sheet:
- Go to Page Layout: Click on the “Page Layout” tab.
- Click the Arrow: Click the arrow in the bottom-right corner of the “Page Setup” group.
- Go to Sheet Tab: Go to the “Sheet” tab.
- Choose Comments Option: In the “Comments” dropdown, select “At end of sheet” or “As displayed on sheet.”
- Print the Sheet: Print the sheet as usual.
6.2. Printing Formulas
To print formulas instead of their results:
- Go to Formulas: Click on the “Formulas” tab.
- Show Formulas: In the “Formula Auditing” group, click “Show Formulas.”
- Adjust Columns: Adjust column widths to ensure all formulas are visible.
- Print the Sheet: Print the sheet as usual.
6.3. Creating a Print-Friendly Template
To create a print-friendly template:
- Simplify Formatting: Remove unnecessary formatting, such as background colors and excessive borders.
- Use Clear Fonts: Choose easy-to-read fonts like Arial or Calibri.
- Adjust Column Widths: Ensure all data is visible without being cut off.
- Set Print Area: Define the print area to include only the necessary data.
- Add Headers and Footers: Include important information like titles, page numbers, and dates.
6.4. Using Macros for Printing
For repetitive printing tasks, you can use macros to automate the process.
- Open VBA Editor: Press
Alt + F11to open the Visual Basic for Applications (VBA) editor. - Insert Module: Go to “Insert” > “Module.”
- Write Macro Code: Write the VBA code to perform the desired printing tasks.
- Run the Macro: Run the macro to automate the printing process.
Here’s an example of a simple macro to print the active sheet:
Sub PrintActiveSheet()
    ActiveSheet.PrintOut
End Sub
7. Choosing the Right Printer for Excel Files
Selecting the right printer can significantly impact the quality and efficiency of your Excel printing tasks.
7.1. Laser Printers
- Pros:
- High print speed
- Sharp text quality
- Cost-effective for high-volume printing
- Cons:
- Higher initial cost
- May not be ideal for printing photos
Laser printers are best suited for businesses and individuals who need to print large volumes of text-based documents, such as reports and spreadsheets.
7.2. Inkjet Printers
- Pros:
- Lower initial cost
- Excellent color printing capabilities
- Suitable for printing photos and graphics
- Cons:
- Slower print speed
- Higher ink costs for high-volume printing
Inkjet printers are ideal for users who need to print a variety of documents, including photos, graphics, and text-based files.
7.3. All-in-One Printers
- Pros:
- Versatile functionality (printing, scanning, copying, faxing)
- Space-saving design
- Suitable for home and small office use
- Cons:
- May not excel in any single function compared to specialized printers
- Can be more expensive than single-function printers
All-in-one printers are a great option for users who need a variety of functions in a single device.
7.4. Factors to Consider When Choosing a Printer
- Print Volume: Determine how many pages you typically print per month.
- Print Quality: Consider the level of detail and color accuracy you need.
- Connectivity: Ensure the printer supports your preferred connection methods (USB, Wi-Fi, Ethernet).
- Paper Handling: Check the printer’s paper capacity and supported paper types.
- Cost: Compare the initial cost of the printer and the ongoing costs of ink or toner.
According to research from the Printing Industries of America (PIA), businesses can reduce printing costs by up to 30% by choosing the right printer and optimizing print settings.
8. Exploring Amazingprint.net for Your Printing Needs
At amazingprint.net, we understand the importance of high-quality printing and offer a range of services to meet your needs.
8.1. Comprehensive Information and Guides
We provide detailed guides and articles on various printing topics, including Excel printing, to help you make informed decisions.
8.2. Comparing Printing Options
Our platform allows you to easily compare different printing options, ensuring you find the best solution for your specific requirements.
8.3. Creative Printing Ideas
We offer inspiration and ideas for creative printing projects, helping you create visually stunning and impactful documents.
8.4. High-Quality Printing Services
Amazingprint.net provides access to top-notch printing services, ensuring your documents are printed to the highest standards. Whether you need business cards, brochures, banners, or custom Excel reports, we connect you with the best printing solutions available.
8.5. Expert Support and Consultation
Our team of printing experts is available to provide personalized support and consultation, helping you navigate the complexities of printing and achieve your desired results.
9. Latest Trends in Printing Technology
Staying updated with the latest trends in printing technology can help you leverage the most advanced and efficient solutions available.
9.1. Sustainable Printing
Sustainable printing practices are becoming increasingly important. This includes using recycled paper, eco-friendly inks, and energy-efficient printers. Many businesses are adopting sustainable printing policies to reduce their environmental impact.
9.2. Digital Printing
Digital printing offers numerous advantages, including faster turnaround times, lower costs for small print runs, and the ability to personalize documents. Digital printing is ideal for businesses that need to produce customized marketing materials and other documents quickly and efficiently.
9.3. 3D Printing
3D printing is revolutionizing various industries, allowing for the creation of complex and customized objects. While not directly related to Excel printing, understanding 3D printing can provide insights into the future of printing technology.
9.4. Mobile Printing
Mobile printing allows you to print documents directly from your smartphone or tablet. This is particularly useful for on-the-go professionals who need to print documents without being tied to a desktop computer.
9.5. Cloud-Based Printing
Cloud-based printing solutions enable you to print documents from anywhere with an internet connection. This is ideal for businesses with remote employees or multiple locations.
10. Optimizing Your Excel Files for Printing
Optimizing your Excel files for printing ensures that your documents look professional and are easy to read.
10.1. Formatting Tips for Readability
- Use Clear Fonts: Choose fonts that are easy to read, such as Arial, Calibri, or Times New Roman.
- Adjust Font Sizes: Use appropriate font sizes to ensure that the text is legible.
- Apply Consistent Formatting: Use consistent formatting throughout your document to create a professional look.
- Use White Space: Incorporate white space to improve readability and prevent the document from looking cluttered.
10.2. Using Tables and Charts Effectively
- Choose the Right Chart Type: Select the chart type that best represents your data.
- Label Data Clearly: Label all data points and axes to ensure that the information is easy to understand.
- Use Clear Titles: Use clear and concise titles to describe the purpose of each chart and table.
- Simplify Complex Data: Break down complex data into smaller, more manageable tables and charts.
10.3. Page Setup Best Practices
- Set Margins: Adjust margins to ensure that all data fits on the page.
- Choose Orientation: Select the appropriate page orientation (portrait or landscape).
- Use Headers and Footers: Add headers and footers to include important information like titles, page numbers, and dates.
- Scale Appropriately: Use scaling options to fit the data on the page without sacrificing readability.
10.4. Data Validation for Accuracy
- Use Data Validation Rules: Implement data validation rules to prevent errors and ensure data accuracy.
- Check for Errors: Regularly check your data for errors and inconsistencies.
- Use Formulas Carefully: Use formulas carefully to ensure that calculations are accurate.
- Test Your Spreadsheet: Test your spreadsheet thoroughly to identify and correct any issues before printing.
By following these tips and techniques, you can ensure that your Excel files are optimized for printing, resulting in professional and easy-to-read documents.
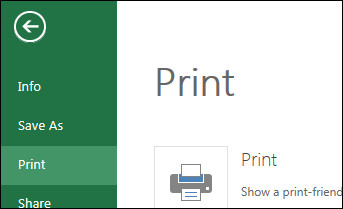 Print selected cells
Alt: Example of printing selected cells in Excel, highlighting the specific area chosen for printing.
FAQ: Frequently Asked Questions About Printing Excel Files
1. How do I print an Excel file without gridlines?
To print an Excel file without gridlines, go to the “Page Layout” tab, and in the “Sheet Options” group, uncheck the “Print” box under “Gridlines.”
2. How can I print only a selected area of an Excel sheet?
Select the cells you want to print, go to the “Page Layout” tab, click “Print Area,” and select “Set Print Area.”
3. How do I fit an entire Excel sheet on one page when printing?
In the print settings, choose the “Fit Sheet on One Page” option under scaling.
4. How do I add page numbers to my printed Excel document?
Go to the “Insert” tab, click “Header & Footer,” and add page numbers to either the header or footer section.
5. Why is my Excel data being cut off when I print?
Adjust the margins, change the orientation, or use scaling options to ensure all data fits on the page.
6. How do I print comments in my Excel sheet?
Go to the “Page Layout” tab, click the arrow in the bottom-right corner of the “Page Setup” group, go to the “Sheet” tab, and choose “At end of sheet” or “As displayed on sheet” in the “Comments” dropdown.
7. Can I print formulas instead of their results in Excel?
Yes, go to the “Formulas” tab and click “Show Formulas.” Adjust column widths as needed, then print the sheet.
8. How do I create a print-friendly template in Excel?
Simplify formatting, use clear fonts, adjust column widths, set the print area, and add headers and footers.
9. What type of printer is best for printing Excel files?
Laser printers are generally best for high-volume, text-based printing, while inkjet printers are suitable for a mix of text and graphics.
10. How can I reduce printing costs for my business?
Choose the right printer, optimize print settings, use recycled paper, and implement sustainable printing policies.
Conclusion: Mastering Excel Printing for Professional Results
Mastering how to print Excel file is essential for presenting data effectively and professionally. By understanding your printing needs, optimizing print settings, and troubleshooting common issues, you can achieve high-quality results every time. At amazingprint.net, we are dedicated to providing you with the resources and solutions you need to excel in your printing endeavors.
Explore our website, amazingprint.net, for more detailed guides, creative ideas, and expert support. Whether you’re printing financial reports, marketing materials, or personal spreadsheets, we’re here to help you achieve the best possible results. Contact us today and discover how we can transform your printing experience.
Address: 1600 Amphitheatre Parkway, Mountain View, CA 94043, United States. Phone: +1 (650) 253-0000. Website: amazingprint.net.