Pla Print Temp is a crucial factor in determining the strength and quality of your 3D prints, and finding the optimal temperature is essential for achieving the best results. At amazingprint.net, we’re dedicated to helping you master the art of 3D printing, and in this guide, we’ll delve into the ideal PLA printing temperatures, exploring the trade-offs between strength and aesthetics to help you unlock your filament’s true potential. Explore innovative 3D printing solutions and elevate your projects with our guidance on finding the perfect printing parameters, material selection, and advanced printing techniques.
1. Understanding PLA Print Temp: Why Does It Matter?
PLA, or Polylactic Acid, is a popular thermoplastic polymer derived from renewable resources like corn starch or sugarcane, making it a biodegradable and environmentally friendly option for 3D printing, but does PLA print temp really matter? Yes, PLA print temp greatly affects the final product. Finding the correct balance ensures strong, aesthetically pleasing prints.
- Optimal Layer Adhesion: The right PLA print temp ensures strong layer adhesion, leading to durable and reliable prints.
- Aesthetic Quality: Temperature affects the finish, with lower temperatures producing matte finishes and higher temperatures resulting in glossy surfaces.
- Material Properties: Printing outside the recommended PLA print temp range can lead to thermal degradation, affecting the material’s strength and flexibility.
2. What is the Ideal PLA Print Temp Range?
The ideal PLA print temp range typically falls between 180°C and 220°C, but it is crucial to find the sweet spot for your specific PLA filament, printer, and printing environment, as these factors can influence the optimal temperature, ensuring the best balance of strength and aesthetics. Most PLA brands will list the best PLA print temp on the packaging.
2.1 Factors Affecting PLA Print Temp
Many different factors affect PLA print temp. Here are some of them.
- Filament Brand and Color: Different PLA filaments may have varying compositions, requiring slightly adjusted PLA print temps for optimal results.
- Printer Model: The hotend design and heating capabilities of your 3D printer can impact the actual temperature experienced by the filament.
- Printing Speed: Higher printing speeds may require slightly higher temperatures to ensure proper melting and layer adhesion.
- Ambient Temperature: In colder environments, you may need to increase the PLA print temp to compensate for heat loss.
- Part Complexity: Complex parts with intricate details may benefit from lower temperatures to minimize stringing and improve precision.
3. How to Determine the Best PLA Print Temp for Your Filament?
Determining the best PLA print temp for your filament involves a systematic approach of testing and observation. A good way to do this is with a temperature tower. Start with the manufacturer’s recommended temperature range and then fine-tune the PLA print temp based on your printer, printing environment, and desired print quality.
3.1 Conducting a Temperature Tower Test
A temperature tower test involves printing a calibration object at different temperatures, allowing you to visually assess the impact of PLA print temp on print quality.
Steps for Performing a Temperature Tower Test:
- Download or design a temperature tower model: Many free temperature tower models are available online, designed to showcase different printing characteristics at various temperatures.
- Slice the model with varying PLA print temps: Divide the tower into sections, assigning a different temperature to each section within the recommended range for your filament.
- Print the temperature tower: Monitor the printing process, paying attention to the visual appearance of each section.
- Analyze the results: Examine the printed tower for signs of stringing, bridging issues, overhang quality, and surface finish, identifying the temperature range that produces the best overall results.
3.2 Visual Cues for Identifying the Optimal PLA Print Temp
Careful observation of your 3D prints can provide valuable insights into the optimal PLA print temp for your filament.
Key Visual Cues to Look For:
- Stringing: Excessive stringing indicates that the temperature is too high, causing the filament to ooze from the nozzle.
- Bridging: Poor bridging performance suggests that the PLA print temp is too low, preventing the filament from properly adhering to the previous layer.
- Overhangs: Drooping or curling overhangs can indicate that the temperature is too high, causing the filament to sag.
- Surface Finish: A rough or matte surface finish may suggest that the PLA print temp is too low, while a glossy or uneven surface finish can indicate that the temperature is too high.
- Layer Adhesion: Weak layer adhesion can result from a PLA print temp that is too low, preventing proper bonding between layers.
- Warping: Warping occurs when the corners of a print lift off the build plate during printing due to uneven cooling. It can happen if the PLA print temp is too high.
 PLA Filament Guide
3.3 Adjusting PLA Print Temp Based on Print Results
Based on the visual cues observed during the temperature tower test, you can make incremental adjustments to the PLA print temp to fine-tune your settings.
Guidelines for Adjusting PLA Print Temp:
- If stringing is present: Decrease the PLA print temp in 5°C increments until the stringing is minimized or eliminated.
- If bridging is poor: Increase the PLA print temp in 5°C increments until the bridging performance improves.
- If overhangs are drooping: Decrease the PLA print temp in 5°C increments until the overhangs are supported properly.
- If the surface finish is rough: Increase the PLA print temp in 5°C increments until the surface finish becomes smoother.
- If layer adhesion is weak: Increase the PLA print temp in 5°C increments until the layers bond properly.
4. How Does PLA Print Temp Affect Print Strength?
PLA print temp significantly affects the strength of 3D-printed parts, influencing layer adhesion, internal stress, and overall structural integrity.
4.1 The Relationship Between PLA Print Temp and Layer Adhesion
Layer adhesion, the bonding between successive layers of PLA, is crucial for the strength of 3D-printed parts. Too low of a PLA print temp results in poor layer adhesion, leading to weak and brittle parts, while too high of a temperature can cause thermal degradation and reduce material strength.
4.2 How to Optimize PLA Print Temp for Maximum Strength
Optimizing the PLA print temp for maximum strength involves finding the sweet spot that promotes strong layer adhesion without compromising material properties.
Strategies for Optimizing PLA Print Temp for Strength:
- Increase the PLA print temp within the recommended range: Higher temperatures can improve layer adhesion, but be mindful of potential thermal degradation.
- Adjust printing speed: Slower printing speeds allow for better heat distribution and layer bonding.
- Increase cooling fan speed: Adequate cooling can prevent warping and ensure proper layer formation.
- Use a heated bed: A heated bed helps maintain a consistent temperature, reducing warping and improving layer adhesion.
- Enclose the printing environment: An enclosed environment can minimize temperature fluctuations and promote even cooling.
4.3 Other Factors Affecting Print Strength
While PLA print temp plays a significant role in print strength, other factors can also contribute to the overall durability of 3D-printed parts.
Additional Factors Affecting Print Strength:
- Infill Density: Higher infill densities increase the amount of material within the part, resulting in greater strength and rigidity.
- Wall Thickness: Thicker walls provide additional support and resistance to stress.
- Part Orientation: Orienting the part strategically can optimize its strength in specific directions.
- Filament Quality: High-quality PLA filaments generally exhibit better strength and consistency.
- Post-Processing Techniques: Annealing, a heat treatment process, can improve the strength and thermal resistance of PLA parts.
5. How Does PLA Print Temp Affect Print Quality and Aesthetics?
PLA print temp significantly impacts the quality and aesthetics of 3D prints, influencing surface finish, dimensional accuracy, and the presence of defects like stringing and warping.
5.1 Achieving a Smooth Surface Finish with the Right PLA Print Temp
The right PLA print temp is essential for achieving a smooth and visually appealing surface finish on 3D prints. Too low of a temperature can result in a rough or matte finish, while too high of a temperature can cause excessive glossiness and unevenness.
5.2 Minimizing Stringing and Blobs by Optimizing PLA Print Temp
Stringing and blobs, unwanted strands or globs of plastic on the print surface, are common issues that can be minimized by optimizing the PLA print temp.
Strategies for Minimizing Stringing and Blobs:
- Lower the PLA print temp: Reducing the temperature can decrease the likelihood of filament oozing from the nozzle.
- Increase retraction speed and distance: Retraction settings control how much filament is pulled back into the nozzle during non-printing movements.
- Enable coasting: Coasting stops the extruder slightly before the end of a movement, reducing pressure in the nozzle and preventing oozing.
- Use a heated bed: A heated bed helps maintain a consistent temperature, reducing warping and improving layer adhesion.
- Dry the filament: Moisture in the filament can exacerbate stringing and blobs.
5.3 Managing Overhangs and Bridges by Fine-Tuning PLA Print Temp
Overhangs and bridges, unsupported sections of a 3D print, require careful management of PLA print temp to prevent sagging and ensure proper structural integrity.
Tips for Managing Overhangs and Bridges:
- Lower the PLA print temp: Reducing the temperature can prevent the filament from sagging and improve its ability to hold its shape.
- Increase cooling fan speed: Faster cooling helps solidify the filament quickly, providing support for overhangs and bridges.
- Use support structures: Support structures provide temporary support for overhangs and bridges, preventing them from collapsing during printing.
- Adjust the angle of overhangs: Reducing the angle of overhangs can make them easier to print without supports.
- Use bridging settings: Slicing software often includes specific settings for printing bridges, optimizing the flow rate and cooling for these sections.
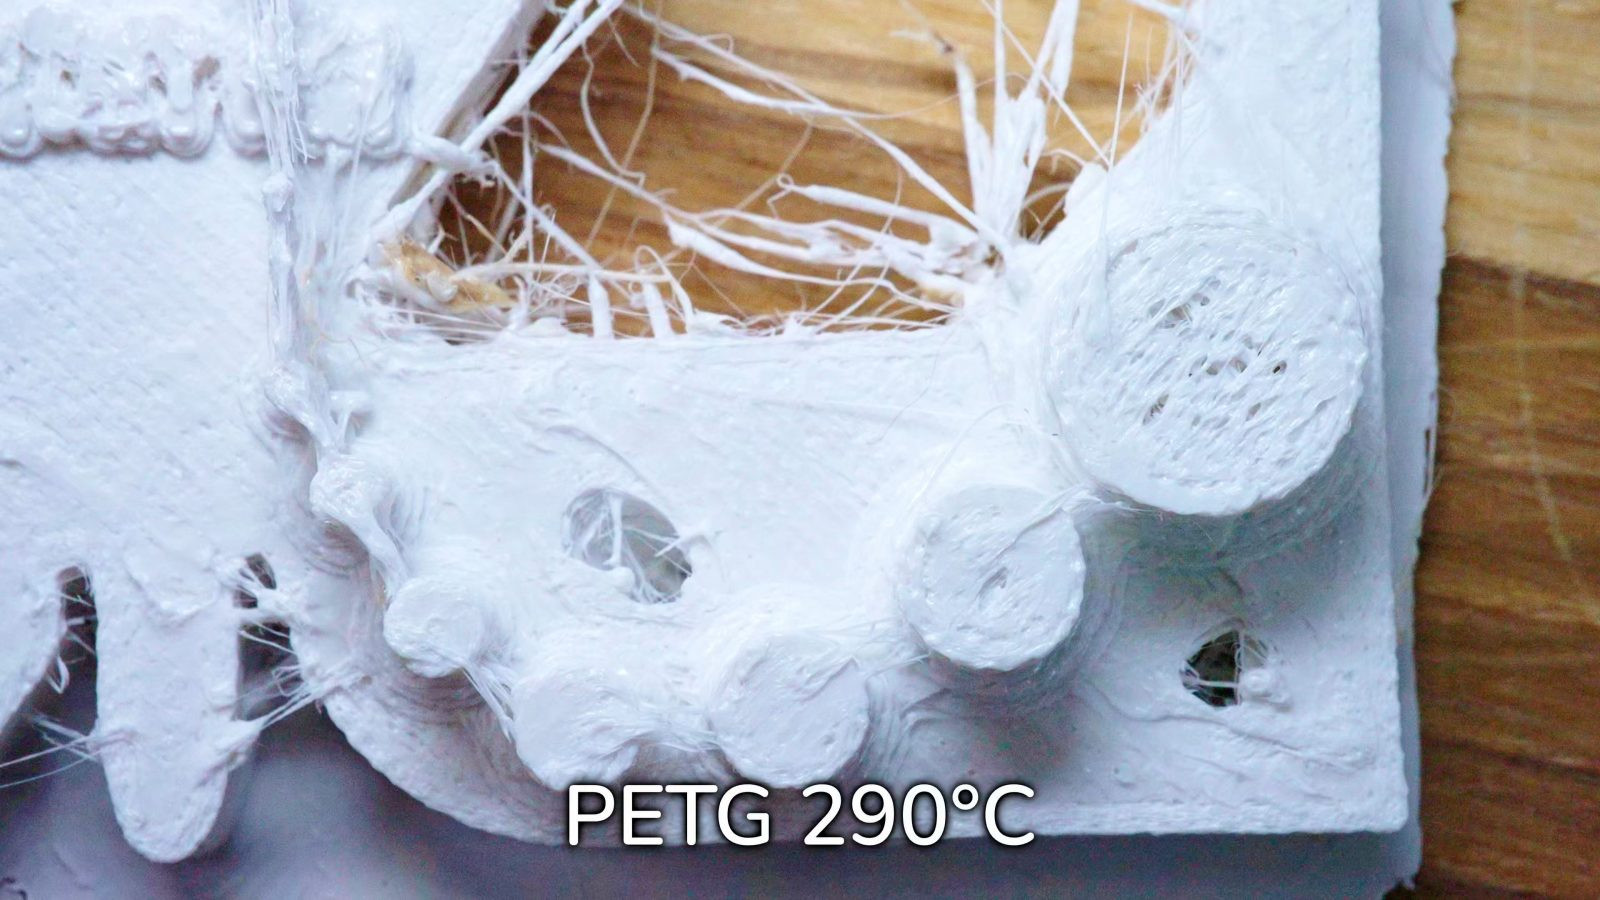
 PETG Material and its Uses
6. Can You Print PLA Too Hot?
Yes, you can definitely print PLA too hot, and doing so can lead to a range of issues that negatively impact print quality and strength. Printing PLA at excessively high temperatures can cause thermal degradation, where the plastic breaks down and loses its desirable properties.
6.1 Problems Caused by Overheating PLA
Here are some problems caused by overheating PLA
- Stringing and Blobs: High temperatures make the filament more fluid, leading to excessive stringing and blobs on the print surface.
- Warping and Curling: Overheated PLA can warp or curl, especially at the corners of the print.
- Poor Overhang Performance: Overheated PLA may sag or droop, resulting in poor overhang quality.
- Dimensional Inaccuracy: Excessive heat can cause the PLA to expand and contract unevenly, leading to dimensional inaccuracies.
- Reduced Strength: Thermal degradation can weaken the PLA, making the print more brittle and prone to failure.
6.2 Identifying Signs of Overheating
Identifying the signs of overheating is essential for preventing these problems and ensuring optimal print quality.
Key Signs of Overheating:
- Excessive stringing and blobs
- Warping and curling
- Sagging overhangs
- Dimensional inaccuracies
- Brittle prints
- Burning smell
- Discoloration of the filament
6.3 How to Cool Down Overheated PLA
If you suspect that your PLA is overheating, there are several steps you can take to cool it down and prevent further damage.
Strategies for Cooling Down Overheated PLA:
- Lower the PLA print temp: Reduce the temperature in 5°C increments until the signs of overheating are minimized.
- Increase cooling fan speed: Faster cooling helps solidify the filament quickly, preventing sagging and warping.
- Use a cooling duct: A cooling duct directs airflow to the print, improving cooling efficiency.
- Reduce printing speed: Slower printing speeds allow the PLA to cool more evenly.
- Use a larger nozzle: A larger nozzle can reduce the pressure in the hotend, preventing excessive oozing.
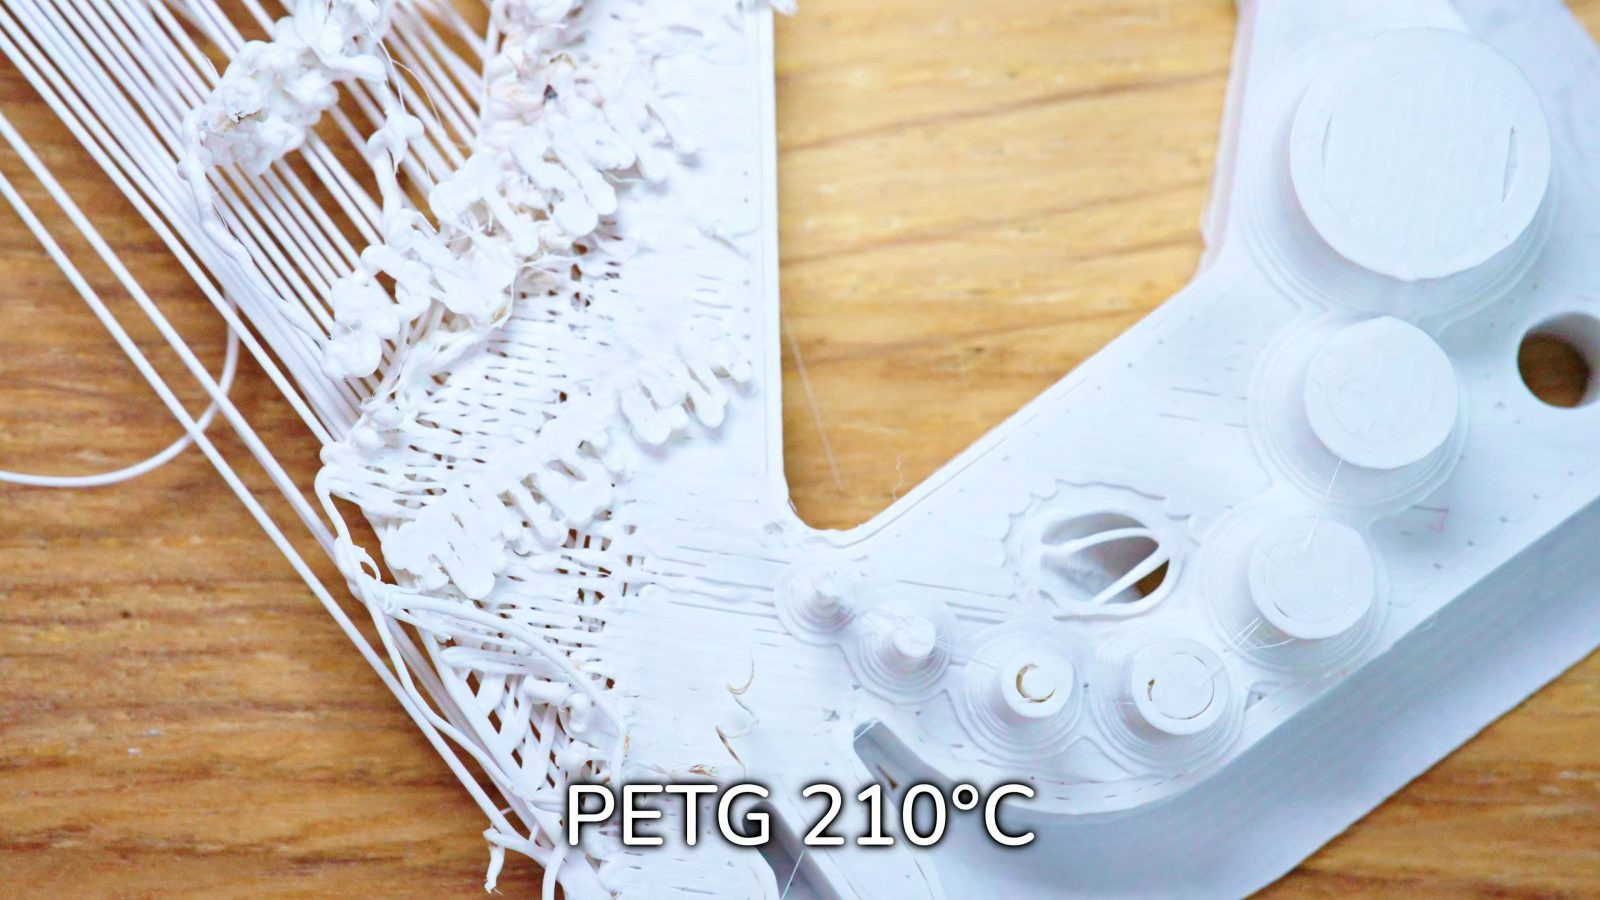
7. Can You Print PLA Too Cold?
Yes, just as printing PLA too hot can cause problems, printing it too cold can also lead to a range of issues that negatively affect print quality and strength. Insufficiently heated PLA may not properly adhere to the previous layer, resulting in weak layer adhesion and structural problems.
7.1 Problems Caused by Underheating PLA
Here are some problems caused by underheating PLA
- Poor Layer Adhesion: Insufficient heat prevents the PLA from properly bonding to the previous layer, leading to weak and brittle parts.
- Warping and Cracking: Uneven cooling can cause the PLA to warp or crack, especially in larger prints.
- Rough Surface Finish: Underheated PLA may result in a rough or matte surface finish.
- Extrusion Issues: Insufficient heat can make it difficult for the extruder to push the filament through the nozzle, leading to under-extrusion.
- Clogging: Underheated PLA may solidify prematurely in the nozzle, causing clogs.
7.2 Identifying Signs of Underheating
Identifying the signs of underheating is crucial for addressing these problems and ensuring optimal print quality.
Key Signs of Underheating:
- Poor layer adhesion
- Warping and cracking
- Rough surface finish
- Under-extrusion
- Clogging
- Extruder skipping
- Incomplete layer formation
7.3 How to Warm Up Underheated PLA
If you suspect that your PLA is underheated, there are several steps you can take to warm it up and improve print quality.
Strategies for Warming Up Underheated PLA:
- Increase the PLA print temp: Increase the temperature in 5°C increments until the signs of underheating are minimized.
- Reduce cooling fan speed: Slower cooling allows the PLA to retain more heat, improving layer adhesion.
- Use a heated bed: A heated bed helps maintain a consistent temperature, preventing warping and cracking.
- Enclose the printing environment: An enclosed environment can minimize temperature fluctuations and promote even heating.
- Reduce printing speed: Slower printing speeds allow the PLA to melt more thoroughly.
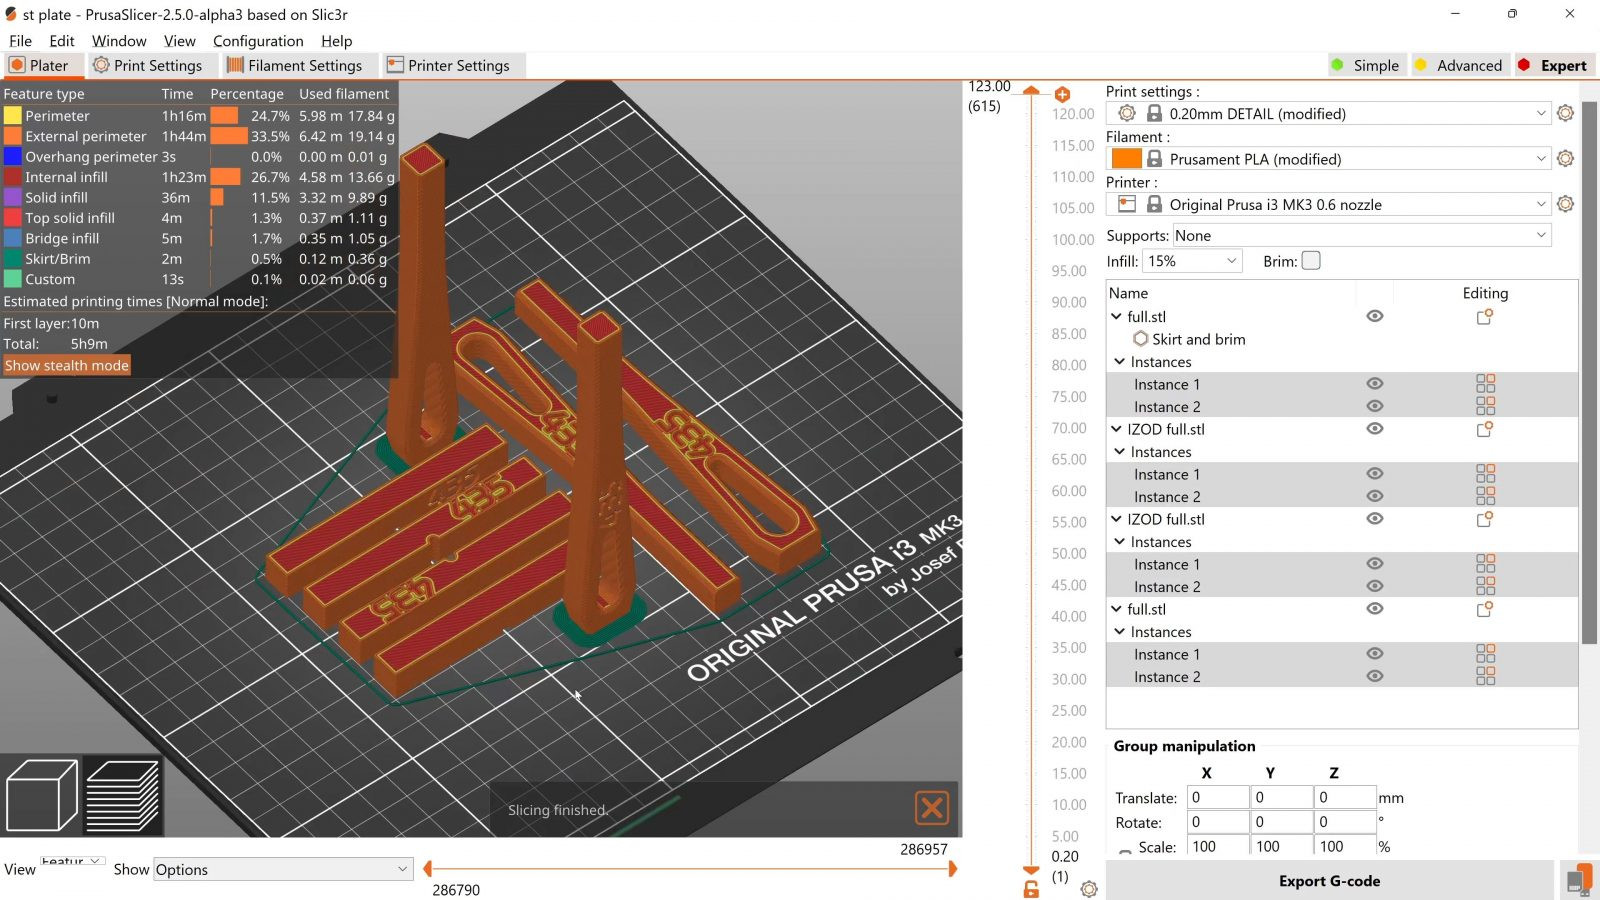 3D Printer
8. Optimizing Other Settings for the Best PLA Prints
While PLA print temp is a critical factor, other settings can also significantly impact the quality and strength of your 3D prints.
8.1 The Best Print Speed for PLA
Print speed, the rate at which the printer head moves during printing, can affect the smoothness, accuracy, and strength of your prints. The ideal print speed for PLA typically ranges from 40 to 60 mm/s, but it may vary depending on your printer, filament, and the complexity of the part.
Tips for Optimizing Print Speed:
- Start with the recommended speed for your filament: The filament manufacturer usually provides a recommended print speed range.
- Adjust speed based on part complexity: Slower speeds may be necessary for intricate parts with fine details.
- Increase speed for simple parts: Faster speeds can be used for simple parts with minimal overhangs or bridges.
- Monitor print quality: Observe the print for signs of under-extrusion, warping, or poor layer adhesion, and adjust the speed accordingly.
8.2 Layer Height: Balancing Speed and Resolution
Layer height, the thickness of each layer of PLA, affects the resolution and printing time of your prints. Lower layer heights result in finer details but increase printing time, while higher layer heights print faster but sacrifice resolution.
Guidelines for Choosing Layer Height:
- For high-detail prints: Use a layer height of 0.1 mm or less.
- For general-purpose prints: Use a layer height of 0.2 mm.
- For fast prints: Use a layer height of 0.3 mm or more.
8.3 Infill Density and Pattern: Strength vs. Material Use
Infill density, the amount of material inside the print, affects its strength, weight, and material consumption. Higher infill densities result in stronger, heavier prints that use more material, while lower infill densities produce lighter, weaker prints that conserve material.
Choosing the Right Infill Density and Pattern:
- For structural parts: Use an infill density of 20% or more.
- For decorative parts: Use an infill density of 10% or less.
- For lightweight parts: Use a low infill density and a sparse infill pattern.
- For strong parts: Use a high infill density and a dense infill pattern.
8.4 The Importance of Bed Adhesion
Bed adhesion, the ability of the first layer to stick to the print bed, is crucial for preventing warping and ensuring successful prints. Poor bed adhesion can cause the print to detach from the bed during printing, leading to failed prints.
Tips for Improving Bed Adhesion:
- Level the print bed: Ensure that the print bed is properly leveled and calibrated.
- Clean the print bed: Remove any dirt, oil, or debris from the print bed.
- Use a bed adhesive: Apply a thin layer of bed adhesive, such as glue stick, hairspray, or painter’s tape, to the print bed.
- Adjust the first layer height: Set the first layer height to be slightly higher than the subsequent layers.
- Increase the bed temperature: A heated bed helps maintain a consistent temperature, improving bed adhesion.
9. PLA Print Temp Troubleshooting: Common Issues and Solutions
Even with the right PLA print temp and settings, you may still encounter occasional issues during 3D printing. Here are some common problems and their solutions.
9.1 Dealing with Warping
Warping, the lifting of the corners of a print from the print bed, is a common issue with PLA, especially in larger prints.
Troubleshooting Warping:
- Improve bed adhesion: Follow the tips in Section 8.4 to improve bed adhesion.
- Use a brim: A brim is a wide, flat area that surrounds the base of the print, providing additional surface area for adhesion.
- Enclose the printing environment: An enclosed environment can minimize temperature fluctuations and prevent warping.
- Reduce cooling fan speed: Slower cooling allows the PLA to cool more evenly, reducing warping.
- Adjust the bed temperature: A heated bed helps maintain a consistent temperature, preventing warping.
9.2 Fixing Layer Splitting
Layer splitting, the separation of layers in a 3D print, indicates weak layer adhesion and can significantly compromise the strength of the part.
Troubleshooting Layer Splitting:
- Increase the PLA print temp: Higher temperatures can improve layer adhesion.
- Reduce cooling fan speed: Slower cooling allows the PLA to bond more effectively.
- Increase the extrusion multiplier: The extrusion multiplier controls the amount of plastic extruded by the printer.
- Check the filament diameter: Ensure that the filament diameter is set correctly in your slicing software.
- Dry the filament: Moisture in the filament can weaken layer adhesion.
9.3 Resolving Clogging
Clogging, the blockage of the nozzle with molten plastic, can interrupt printing and lead to failed prints.
Troubleshooting Clogging:
- Increase the PLA print temp: Higher temperatures can help melt the plastic more thoroughly.
- Clean the nozzle: Use a nozzle cleaning tool or a thin wire to remove any debris from the nozzle.
- Replace the nozzle: If the nozzle is severely clogged or damaged, replace it with a new one.
- Check the filament: Ensure that the filament is clean and free of debris.
- Use a filament filter: A filament filter can trap dust and debris before they enter the hotend.
10. Exploring Advanced Techniques with PLA
Once you’ve mastered the basics of PLA printing, you can explore advanced techniques to push the boundaries of what’s possible.
10.1 Multi-Material Printing with PLA
Multi-material printing involves using multiple extruders to print with different colors or types of PLA in the same print.
Benefits of Multi-Material Printing:
- Creating multi-colored prints: Print parts with different colors without having to paint them.
- Using different types of PLA: Combine flexible and rigid PLA in the same print.
- Printing with soluble support materials: Use soluble support materials for complex parts with intricate overhangs.
10.2 Using PLA Composites
PLA composites are PLA filaments that have been infused with other materials, such as wood fibers, carbon fiber, or metal particles, to enhance their properties.
Benefits of PLA Composites:
- Aesthetic enhancements: Wood-filled PLA can create prints with a natural wood-like appearance.
- Increased strength: Carbon fiber-filled PLA can produce prints with higher strength and stiffness.
- Improved thermal resistance: Some PLA composites offer improved thermal resistance compared to standard PLA.
10.3 Post-Processing PLA Prints
Post-processing techniques can be used to enhance the appearance, strength, and functionality of PLA prints.
Common Post-Processing Techniques:
- Sanding: Sanding can smooth out rough surfaces and remove layer lines.
- Painting: Painting can add color and detail to PLA prints.
- Gluing: Gluing can be used to assemble multi-part prints or repair broken prints.
- Annealing: Annealing, a heat treatment process, can improve the strength and thermal resistance of PLA parts.
- Coating: Coating with epoxy or other materials can improve the durability and chemical resistance of PLA prints.
Mastering PLA print temp is essential for achieving high-quality, strong, and aesthetically pleasing 3D prints, and by understanding the factors that influence optimal temperature, conducting temperature tower tests, and troubleshooting common issues, you can unlock the full potential of PLA and bring your creative visions to life. At amazingprint.net, we’re committed to providing you with the knowledge and resources you need to excel in the world of 3D printing.
Ready to take your 3D printing skills to the next level? Visit amazingprint.net today to explore our comprehensive guides, compare printing options, and discover innovative ideas for your next project in the USA. Contact us at Address: 1600 Amphitheatre Parkway, Mountain View, CA 94043, United States. Phone: +1 (650) 253-0000. Website: amazingprint.net.
FAQ About PLA Print Temp
1. What is PLA print temp?
PLA print temp is the temperature at which polylactic acid (PLA) filament is heated in a 3D printer to create parts. The ideal temperature range is between 180°C and 220°C, but it may vary depending on the filament brand, printer, and printing environment.
2. Why is PLA print temp important?
PLA print temp affects the strength, quality, and aesthetics of 3D prints. The right temperature ensures good layer adhesion, smooth surface finish, and minimal defects like stringing and warping.
3. How do I determine the best PLA print temp for my filament?
Start with the manufacturer’s recommended temperature range and perform a temperature tower test to fine-tune your settings. Observe the prints for stringing, bridging, overhangs, and surface finish, adjusting the temperature accordingly.
4. Can I print PLA too hot?
Yes, printing PLA too hot can cause stringing, warping, poor overhang performance, dimensional inaccuracies, and reduced strength.
5. Can I print PLA too cold?
Yes, printing PLA too cold can lead to poor layer adhesion, warping, rough surface finish, under-extrusion, and clogging.
6. What other settings affect PLA printing besides temperature?
Other important settings include print speed, layer height, infill density, and bed adhesion.
7. How do I improve bed adhesion for PLA?
Ensure the print bed is leveled and clean, use a bed adhesive like glue stick or hairspray, adjust the first layer height, and use a heated bed.
8. How do I deal with warping in PLA prints?
Improve bed adhesion, use a brim, enclose the printing environment, reduce cooling fan speed, and adjust the bed temperature.
9. What is layer splitting and how do I fix it?
Layer splitting is the separation of layers in a 3D print, indicating weak layer adhesion. Fix it by increasing the PLA print temp, reducing cooling fan speed, and drying the filament.
10. How do I resolve clogging issues in PLA printing?
Increase the PLA print temp, clean the nozzle, replace the nozzle if necessary, check the filament for debris, and use a filament filter.