Printing envelopes on your Epson ET-3850 can seem daunting, but it’s a straightforward process when you know the steps. At amazingprint.net, we’re here to guide you through every detail, ensuring your envelopes look professional and polished. Whether you’re sending out invitations, thank-you notes, or business correspondence, mastering envelope printing enhances your communication. By the end of this guide, you’ll have a solid understanding of envelope types, printer settings, and troubleshooting tips, leading to perfect prints every time.
1. Understanding the Epson ET-3850 Printer
The Epson ET-3850 is a popular choice for home and small office use due to its EcoTank system, which provides cost-effective printing. Knowing its features and capabilities is key to successful envelope printing.
1.1. Key Features of the Epson ET-3850
The Epson ET-3850 comes with several features that make it suitable for various printing needs, including envelope printing.
- EcoTank System: Reduces ink costs significantly compared to traditional cartridge printers.
- High Resolution Printing: Ensures sharp, clear prints for both text and images on envelopes.
- Wireless Connectivity: Allows you to print from various devices, including smartphones and tablets.
- Automatic Document Feeder (ADF): Simplifies multi-page document handling, though not typically used for envelopes.
- Versatile Paper Handling: Supports various paper types and sizes, essential for envelope printing.
1.2. Paper Handling Capabilities for Envelopes
The Epson ET-3850 can handle various envelope sizes, making it a versatile option for your printing needs.
- Supported Envelope Sizes: Typically supports standard envelope sizes such as #10, DL, C6, and C5. Always check the printer manual for a comprehensive list.
- Paper Tray Capacity: The main paper tray can usually hold a stack of envelopes, but it’s best to load a smaller quantity to avoid misfeeds.
- Rear Paper Feed: Some users find the rear paper feed (if available) more reliable for envelope printing as it provides a straighter paper path.
1.3. Limitations to Consider
While the ET-3850 is capable, there are some limitations to keep in mind when printing envelopes.
- Envelope Thickness: Very thick or rigid envelopes might not feed properly.
- Wrinkling: Envelopes can sometimes wrinkle during printing due to the paper’s thinness and the printer’s heat.
- Print Bleed: Ensure your design doesn’t extend too close to the edges to avoid print bleed.
2. Preparing Your Envelopes for Printing
Proper preparation is crucial for achieving high-quality prints. This includes selecting the right type of envelopes and ensuring they are in good condition.
2.1. Choosing the Right Type of Envelopes
Selecting the appropriate envelopes can significantly impact the print quality and the overall look of your mailings.
- Envelope Material: Opt for envelopes made from smooth, matte paper for best results. Avoid heavily textured or glossy envelopes.
- Envelope Size: Ensure the envelope size is compatible with your printer. Standard sizes like #10 are generally a safe bet.
- Sealed vs. Unsealed: Print on unsealed envelopes to prevent the adhesive from melting and causing jams.
- Weight of Paper: Use envelopes with a paper weight that is compatible with your printer. Heavier paper may not feed properly.
2.2. Checking Envelope Condition
Before loading envelopes into your printer, inspect them for any defects that could cause issues.
- Creases and Folds: Discard any envelopes with noticeable creases or folds, as these can cause misfeeds or poor print quality.
- Tears or Damage: Ensure envelopes are free from tears or any other damage.
- Moisture: Make sure the envelopes are dry. Damp envelopes can stick together and cause jams.
2.3. Preparing the Envelope Flap
The envelope flap can affect how the envelope feeds through the printer.
- Folding the Flap: For some printers, it’s best to fold the flap down and crease it firmly. This helps the envelope feed more smoothly.
- Securing the Flap: If you prefer to keep the flap open, ensure it’s lying flat and won’t curl up during printing.
3. Loading Envelopes into the Epson ET-3850
Properly loading envelopes into your printer is essential for a smooth printing process. Follow these steps to load envelopes correctly.
3.1. Accessing the Paper Tray
The paper tray is where you’ll load the envelopes.
- Location: The paper tray is usually located at the front of the Epson ET-3850.
- Opening the Tray: Gently pull out the paper tray until it stops. Be careful not to force it.
3.2. Adjusting the Paper Guides
Adjusting the paper guides ensures the envelopes are properly aligned.
- Sliding the Guides: Slide the edge guides outward to create space for the envelopes.
- Positioning the Envelopes: Place the envelopes in the tray, ensuring they are aligned with the center mark.
- Securing the Guides: Slide the edge guides inward until they gently touch the edges of the envelopes, but not so tightly that they cause the envelopes to bend.
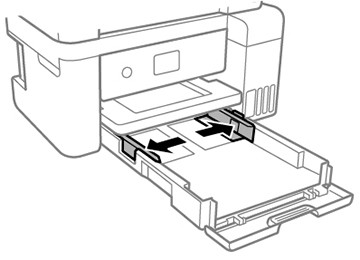 Sliding edge guides outward to load paper into Epson ET-3850
3.3. Orientation and Loading Capacity
The orientation in which you load the envelopes and the number of envelopes you load are important for proper feeding.
- Printable Side: Load the envelopes with the printable side facing down.
- Flap Position: Load envelopes with the flap edge to the left, as illustrated in the printer’s manual.
- Loading Quantity: Do not overload the tray. A stack of 10-15 envelopes is usually sufficient to prevent misfeeds.
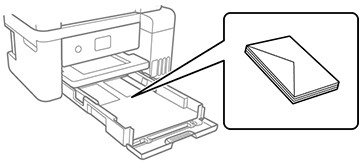 Loading envelopes with printable side facedown into Epson ET-3850
3.4. Closing the Paper Tray
Once the envelopes are loaded, close the paper tray carefully.
- Sliding the Tray In: Gently slide the paper tray back into the printer until it clicks into place.
- Ensuring Proper Closure: Make sure the tray is fully closed to prevent printing errors.
4. Adjusting Printer Settings for Envelope Printing
Proper printer settings are critical for printing envelopes correctly. These settings tell the printer what type of media it’s printing on, ensuring the best possible output.
4.1. Accessing Printer Settings
You can access printer settings through your computer’s print dialog box.
- Opening the Print Dialog: Open the document you want to print, then select “File” and “Print.”
- Locating Printer Preferences: In the print dialog box, find and click on “Printer Properties” or “Preferences.”
4.2. Selecting the Correct Paper Size and Type
Choosing the right paper size and type is essential for envelope printing.
- Paper Size: Select the correct envelope size from the dropdown menu (e.g., “#10 Envelope,” “DL Envelope”).
- Paper Type: Choose the appropriate paper type. “Envelope” or “Heavy Paper” settings often work best.
- Custom Sizes: If your envelope size isn’t listed, you may need to create a custom paper size. Refer to your printer manual for instructions.
4.3. Adjusting Print Quality Settings
Adjusting print quality settings can help you achieve the desired look for your envelopes.
- Print Quality: Set the print quality to “Standard” or “High” for best results. Avoid “Draft” mode, as it may produce lower quality prints.
- Color Settings: Choose between “Color” and “Grayscale” depending on your design.
- Print Density: Adjust the print density to ensure the ink doesn’t smear. A slightly lower density may be better for envelopes.
4.4. Advanced Settings: Paper Source and Feed
In advanced settings, you can specify the paper source and feed method.
- Paper Source: Select the paper tray where you loaded the envelopes.
- Manual Feed: If you’re only printing a few envelopes, consider using the manual feed option (if available) for more control.
4.5. Saving Your Settings
Once you’ve adjusted all the settings, save them to avoid having to re-enter them each time.
- Creating a Preset: Many printers allow you to save your settings as a preset for future use. Name it something like “Envelope Printing.”
- Applying the Preset: When you print envelopes again, simply select your saved preset from the print dialog box.
5. Designing Your Envelope Layout
A well-designed envelope layout is crucial for creating professional-looking mailings. Consider these design tips for optimal results.
5.1. Using Software for Envelope Design
Various software options can help you design your envelope layout.
- Microsoft Word: A common choice for basic envelope design. It offers templates and tools for adding addresses and graphics.
- Adobe InDesign: Ideal for more complex designs. It provides advanced layout and typography options.
- Online Design Tools: Canva and other online tools offer user-friendly interfaces and pre-designed templates.
5.2. Setting Up Your Document
Proper document setup ensures your design fits the envelope correctly.
- Page Size: Set the page size to match the dimensions of your envelope.
- Margins: Adjust the margins to ensure your text and graphics don’t get cut off during printing. A margin of 0.25 inches is usually sufficient.
- Orientation: Decide whether you want to print in landscape or portrait orientation. Consider the design and content of your envelope.
5.3. Adding Addresses and Return Addresses
Accurate address placement is essential for mail delivery.
- Recipient Address: Place the recipient address in the lower right corner of the envelope, following USPS guidelines.
- Return Address: Add your return address in the upper left corner. Use a smaller font size for the return address.
5.4. Choosing Fonts and Colors
Fonts and colors can significantly impact the readability and visual appeal of your envelopes.
- Font Selection: Choose clear, legible fonts. Avoid overly decorative or script fonts for addresses.
- Font Size: Use a font size that’s large enough to read easily but not so large that it overwhelms the design. A font size of 10-12 points is generally suitable.
- Color Considerations: Use high-contrast colors for text and background. Dark text on a light background is easiest to read.
5.5. Adding Graphics and Logos
Graphics and logos can enhance your envelope design.
- Image Resolution: Use high-resolution images to ensure they print clearly.
- Placement: Place graphics and logos strategically. Avoid covering up the addresses or postal markings.
- Minimalism: Keep the design clean and uncluttered. A minimalist approach often yields the best results.
6. Printing Your Envelopes
Once you’ve prepared your envelopes and adjusted your printer settings, you’re ready to print. Follow these steps for a successful print job.
6.1. Performing a Test Print
Before printing a large batch of envelopes, perform a test print to ensure everything is aligned correctly.
- Using Scrap Paper: Load a sheet of scrap paper into the paper tray.
- Printing a Sample: Print a sample envelope with the address and graphics.
- Checking Alignment: Examine the print to ensure the text and images are properly aligned. Adjust the settings as needed.
6.2. Monitoring the Printing Process
Keep an eye on the printer while it’s printing to catch any potential issues early.
- Watching for Misfeeds: Be alert for any misfeeds or jams. If a misfeed occurs, stop the printer and carefully remove the envelope.
- Checking Print Quality: Periodically check the print quality to ensure it remains consistent.
6.3. Addressing Common Printing Problems
Despite your best efforts, you may encounter some common printing problems.
- Smearing: If the ink is smearing, try reducing the print density or using a different type of envelope.
- Wrinkling: If the envelopes are wrinkling, try using a lighter paper weight or adjusting the printer settings.
- Jams: If the printer is jamming, make sure the envelopes are loaded correctly and that the paper guides are properly adjusted.
6.4. Alternative Printing Methods
If you’re having trouble printing envelopes with your Epson ET-3850, consider these alternative methods.
- Manual Feed: Use the manual feed slot for more control over the printing process.
- Professional Printing Services: If you need to print a large number of envelopes or want the highest quality results, consider using a professional printing service like amazingprint.net.
7. Maintaining Your Epson ET-3850 for Optimal Performance
Proper maintenance is essential for keeping your Epson ET-3850 running smoothly. Follow these tips to ensure optimal performance.
7.1. Cleaning the Print Heads
Clogged print heads can cause poor print quality.
- Running a Cleaning Cycle: Use the printer’s built-in cleaning function to clean the print heads. This usually involves accessing the printer settings through your computer.
- Performing a Nozzle Check: After cleaning the print heads, perform a nozzle check to ensure all the nozzles are firing properly.
7.2. Updating Printer Firmware
Keeping your printer’s firmware up to date can improve its performance and compatibility.
- Checking for Updates: Periodically check the Epson website for firmware updates.
- Installing Updates: Follow the instructions provided by Epson to install the updates.
7.3. Using Genuine Epson Ink
Using genuine Epson ink can help prevent print quality issues and prolong the life of your printer.
- Avoiding Third-Party Inks: While third-party inks may be cheaper, they can sometimes cause problems with print quality and printer performance.
- Checking Ink Levels: Regularly check the ink levels and refill them as needed.
7.4. Preventing Paper Jams
Preventing paper jams can save you time and frustration.
- Loading Paper Correctly: Ensure paper is loaded correctly in the paper tray.
- Avoiding Overloading: Do not overload the paper tray.
- Using the Right Paper Type: Use paper that is compatible with your printer.
8. Advanced Techniques for Envelope Printing
For those looking to take their envelope printing to the next level, here are some advanced techniques.
8.1. Using Variable Data Printing
Variable data printing allows you to personalize each envelope with unique information.
- Mail Merge: Use mail merge in Microsoft Word or other software to insert names, addresses, and other information into your envelope design.
- Database Integration: Integrate your printer with a database to automatically populate envelopes with data.
8.2. Printing on Specialty Envelopes
Printing on specialty envelopes can add a unique touch to your mailings.
- Colored Envelopes: Experiment with different colored envelopes to make your mailings stand out.
- Textured Envelopes: Use textured envelopes to add a tactile element to your design.
- Window Envelopes: Print directly onto the insert instead of the envelope for window envelopes.
8.3. Incorporating QR Codes
QR codes can be a useful addition to your envelopes, directing recipients to a website or other online resource.
- Generating QR Codes: Use a QR code generator to create a QR code for your desired URL.
- Placement: Place the QR code in a prominent location on the envelope.
- Testing: Test the QR code to ensure it scans correctly.
9. Troubleshooting Common Issues
Even with careful preparation, you may encounter issues when printing envelopes. Here are some solutions to common problems.
9.1. Envelopes Not Feeding Properly
If envelopes aren’t feeding properly, try these solutions:
- Adjust Paper Guides: Ensure the paper guides are snug but not too tight against the envelopes.
- Clean the Feed Rollers: Dust and debris on the feed rollers can cause feeding issues. Clean the rollers with a soft, dry cloth.
- Use Manual Feed: Try using the manual feed slot for more control.
9.2. Print Quality Issues
If you’re experiencing print quality issues, try these solutions:
- Clean Print Heads: Use the printer’s built-in cleaning function to clean the print heads.
- Adjust Print Density: Adjust the print density in the printer settings.
- Use High-Quality Envelopes: Use high-quality envelopes designed for printing.
9.3. Ink Smearing
If the ink is smearing, try these solutions:
- Reduce Print Density: Reduce the print density in the printer settings.
- Use a Different Paper Type: Try using a different type of envelope with a smoother surface.
- Allow Ink to Dry: Allow the ink to dry completely before handling the envelopes.
9.4. Printer Jams
If the printer is jamming, try these solutions:
- Remove Jammed Envelopes: Carefully remove any jammed envelopes from the printer.
- Check for Obstructions: Check for any obstructions in the paper path.
- Load Envelopes Correctly: Ensure envelopes are loaded correctly in the paper tray.
10. Frequently Asked Questions (FAQs) About Printing Envelopes on Epson ET-3850
Here are some frequently asked questions about printing envelopes on the Epson ET-3850.
10.1. Can the Epson ET-3850 Print on All Envelope Sizes?
The Epson ET-3850 supports various standard envelope sizes, including #10, DL, C6, and C5. Always check the printer manual for a complete list of supported sizes.
10.2. What Type of Envelopes Work Best with the Epson ET-3850?
Envelopes made from smooth, matte paper work best. Avoid heavily textured or glossy envelopes.
10.3. How Do I Load Envelopes into the Epson ET-3850?
Open the paper tray, slide the edge guides outward, load the envelopes with the printable side facing down and the flap edge to the left, adjust the paper guides, and close the tray.
10.4. What Printer Settings Should I Use for Envelope Printing?
Select the correct envelope size and paper type in the printer settings. Set the print quality to “Standard” or “High” and adjust the print density as needed.
10.5. Why Is My Epson ET-3850 Smearing Ink on Envelopes?
Try reducing the print density in the printer settings or using a different type of envelope with a smoother surface.
10.6. How Do I Prevent Envelopes from Wrinkling During Printing?
Use a lighter paper weight or adjust the printer settings. Ensure the envelopes are not damp or creased.
10.7. What Should I Do If My Epson ET-3850 Jams When Printing Envelopes?
Carefully remove any jammed envelopes, check for obstructions in the paper path, and ensure envelopes are loaded correctly.
10.8. Can I Print on Both Sides of an Envelope with the Epson ET-3850?
While possible, it’s generally not recommended due to potential feeding issues. If you must, do a test print first.
10.9. How Do I Create a Custom Envelope Size in the Printer Settings?
Access the printer settings through your computer, find the paper size options, and create a custom size by entering the dimensions of your envelope.
10.10. Where Can I Find More Help with My Epson ET-3850?
Consult the Epson ET-3850 user manual or visit the Epson support website for troubleshooting tips and additional information. You can also find valuable resources and services at amazingprint.net.
Printing envelopes on your Epson ET-3850 can be a breeze with the right knowledge and preparation. By following these steps and tips, you can achieve professional-looking results every time. Whether you’re printing invitations, thank-you notes, or business correspondence, mastering envelope printing can enhance your communication and leave a lasting impression. For more comprehensive guides, innovative printing solutions, and expert advice, visit amazingprint.net today and elevate your printing experience!
Navigating the world of printing can be complex, but amazingprint.net is here to simplify the process. From detailed tutorials to cutting-edge services, we provide everything you need to make your printing projects a success. Contact us at Address: 1600 Amphitheatre Parkway, Mountain View, CA 94043, United States or call +1 (650) 253-0000. Let amazingprint.net be your trusted partner in printing.