In a world increasingly dominated by digital communication, text messages have become a primary way we exchange information, from casual chats to crucial details. There are times, however, when digital isn’t enough. You might need a tangible record of a text conversation – perhaps to settle a disagreement, provide evidence, or simply keep a personal archive of important exchanges.
While iPhones excel at many things, directly printing text messages from the Messages app isn’t one of them. Unlike some devices, Apple doesn’t offer a straightforward “print” button within the messaging interface. But don’t worry, creating a hard copy of your iPhone text conversations is still absolutely achievable. Whether you need to print just a few messages or an entire conversation history, there are effective methods available.
This guide will walk you through four distinct ways to print text messages from your iPhone, catering to different needs and situations. From quick screenshots to more comprehensive methods using your Mac or third-party software, we’ll cover everything you need to know to get those messages onto paper.
Method 1: The Quick Screenshot Method
For those moments when you only need to print a small selection of messages, the screenshot method is the fastest and most readily available solution. It leverages your iPhone’s built-in screenshot capability to capture images of your text conversation, which you can then print like any other photo.
Here’s how to print text messages using screenshots:
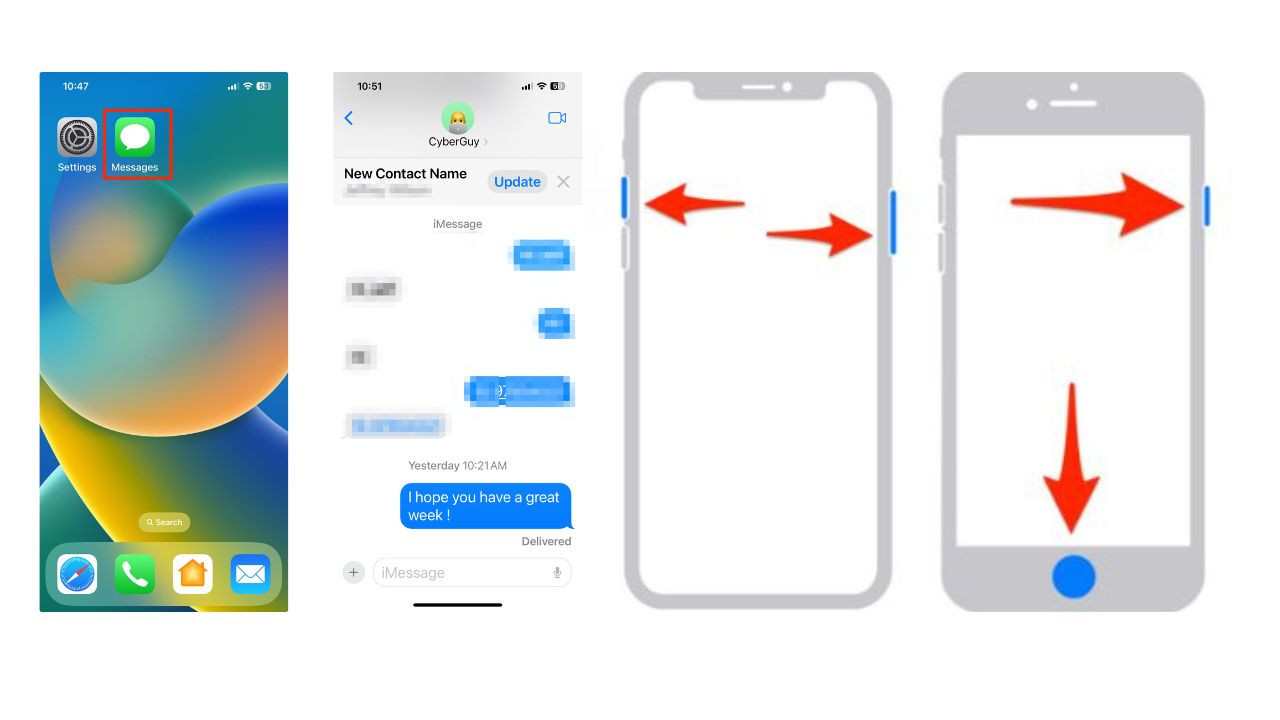
- Open the Messages App: Navigate to the Messages app on your iPhone and tap on the conversation you wish to print.
- Capture Screenshots: Scroll through the text conversation to display the messages you want to capture. Take a screenshot by simultaneously pressing the side button (lock button) and the volume up button on iPhones with Face ID. For older iPhones with a Home button, press the Home button and the side button (or top button) at the same time. The screen will briefly flash, and a thumbnail of the screenshot will appear in the bottom left corner.
 Screenshot of taking a text message screenshot on iPhone using side and volume up buttons
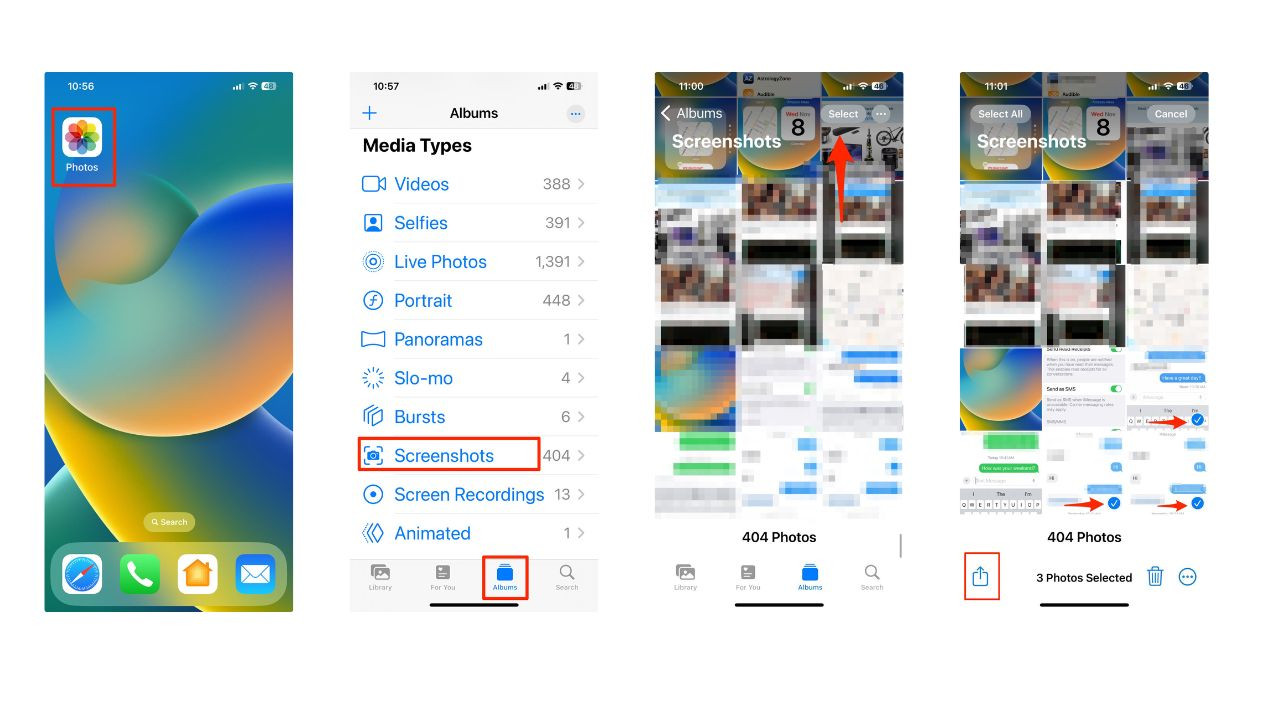
- Access Screenshots in Photos: Go to the Photos app on your iPhone.
- Find Screenshots Album: Tap the Albums tab at the bottom, then select the Screenshots album. Your newly captured screenshots will be located here.
- Select Screenshots for Printing: Tap Select in the top right corner. Then, tap on each screenshot you want to print. A blue checkmark will appear on the selected images.
- Share and Print: Tap the Share button in the bottom left corner (it looks like a square with an upward arrow).
 Screenshot of the share button in the Photos app on iPhone
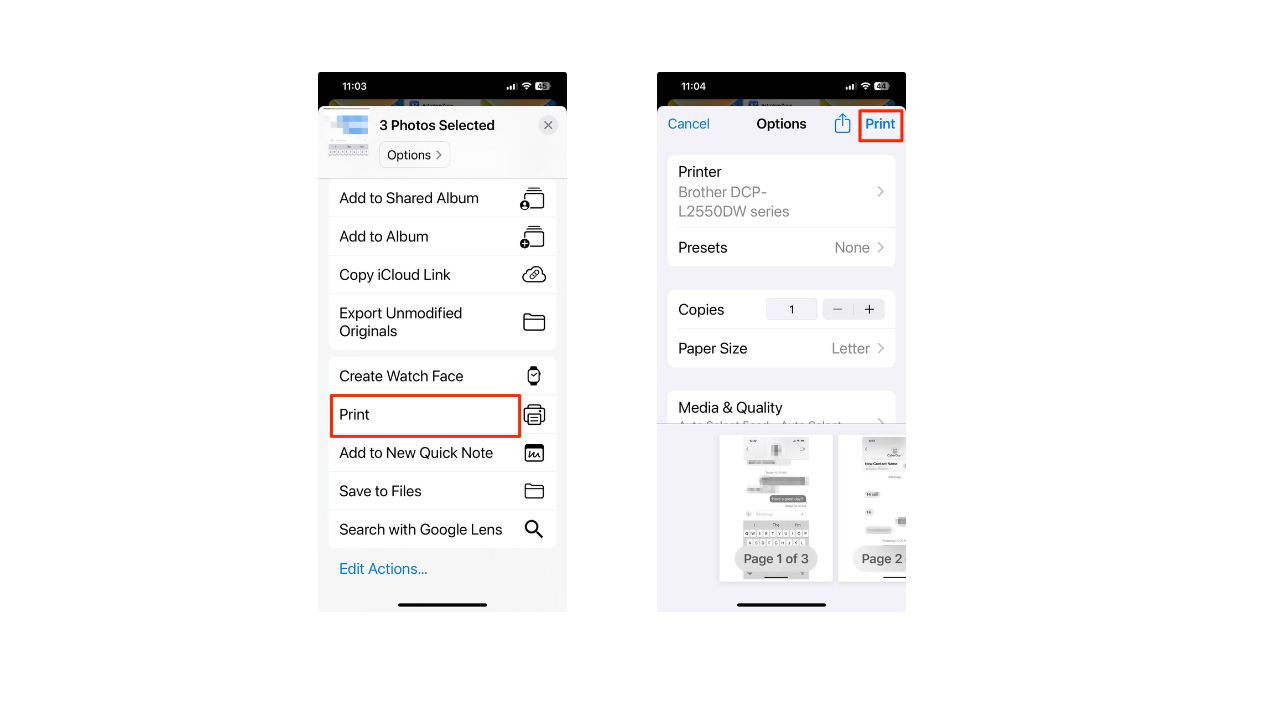
- Choose Print Option: Scroll through the share options and select Print.
- Printer Settings: Ensure your iPhone is connected to a wireless printer and that the printer is turned on and within range. Adjust printer settings like paper size and number of copies as needed.
- Print Your Messages: Tap Print in the top right corner to send the screenshots to your printer.
 Screenshot of the print options after selecting share in the Photos app on iPhone
Pros of using screenshots:
- Quick and Easy: This is the most immediate method for printing a few messages.
- No Extra Software Required: It utilizes built-in iPhone features.
Cons of using screenshots:
- Inefficient for Long Conversations: Taking and printing numerous screenshots for lengthy conversations is time-consuming.
- Image Format: Screenshots are images, not text, which may be less ideal for readability if you need to highlight or search within the text later.
- Potential Quality Loss: Depending on the zoom level and print settings, image quality might be reduced compared to text-based printing.
Method 2: Convert iMessage to PDF on Mac for Printing
If you use iMessage on a Mac, you can leverage your computer to convert entire text conversations into PDF documents, which are easily printable. This method is suitable for saving and printing longer conversations, although it may require some scrolling.
Here’s how to print iPhone text messages to PDF from your Mac:
- Open iMessages on Mac: Launch the Messages app on your macOS computer. Ensure you are logged in to the same iCloud account as your iPhone to access your iMessages.
- Select Conversation: Click on the text conversation in the Messages app sidebar that you want to print.
- Scroll to Load Messages: Scroll back within the conversation window to load all the messages you wish to include in your PDF. Be mindful that scrolling too far back at once might cause the application to become unresponsive, especially for very long conversations. It’s advisable to load messages in smaller chunks if dealing with extensive histories.
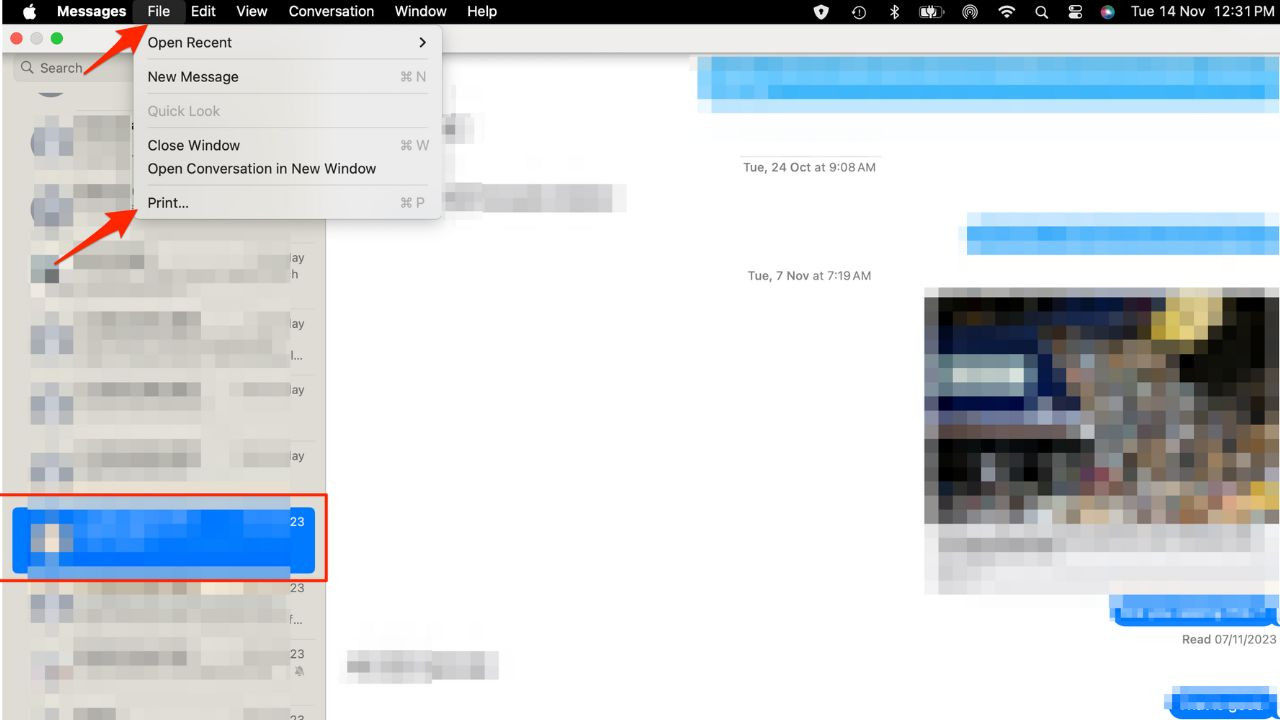
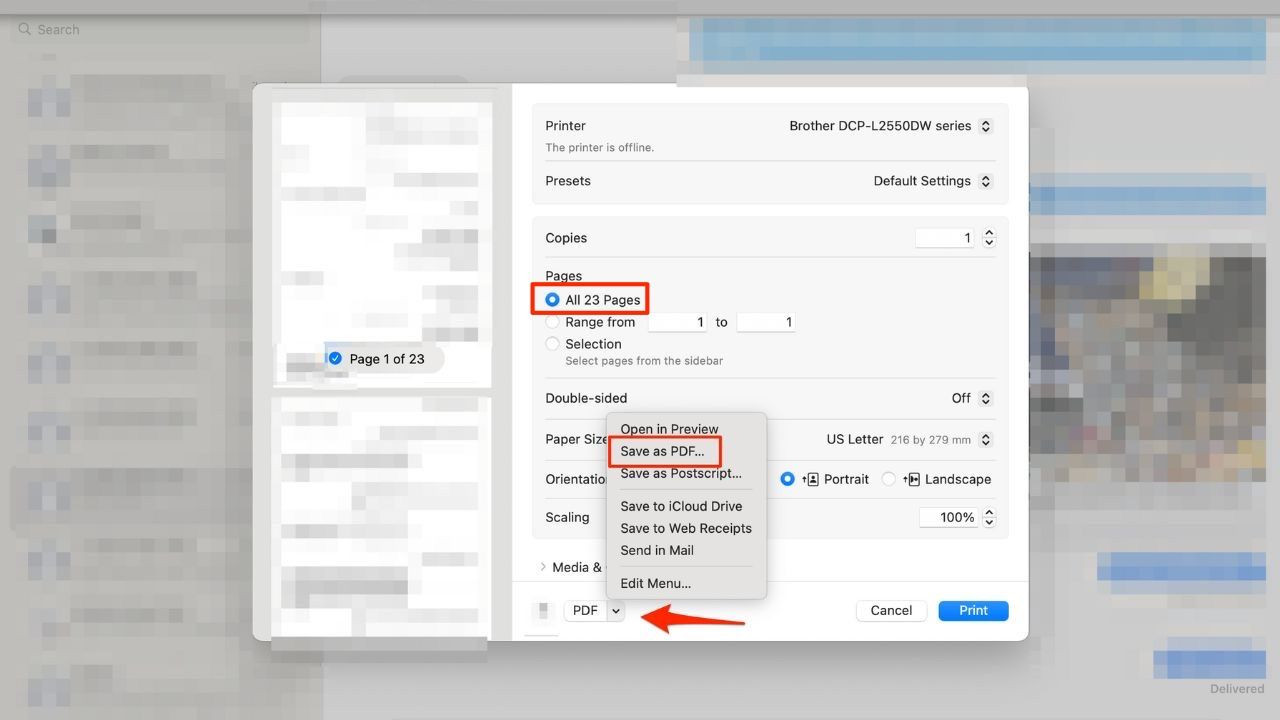
- Access Print Menu: Once the desired messages are loaded, navigate to the top menu bar, click on File, and then select Print.
 Screenshot of the File > Print menu option in iMessages app on Mac
- Review Pages and Select PDF: In the Print dialog box, you can see the estimated number of pages under the “Pages” section. Click the dropdown menu typically labeled “PDF” (or “Save as PDF” depending on your macOS version).
- Save as PDF: Choose Save as PDF from the dropdown options.
 Screenshot of the Save as PDF option in the Print dialog box on Mac
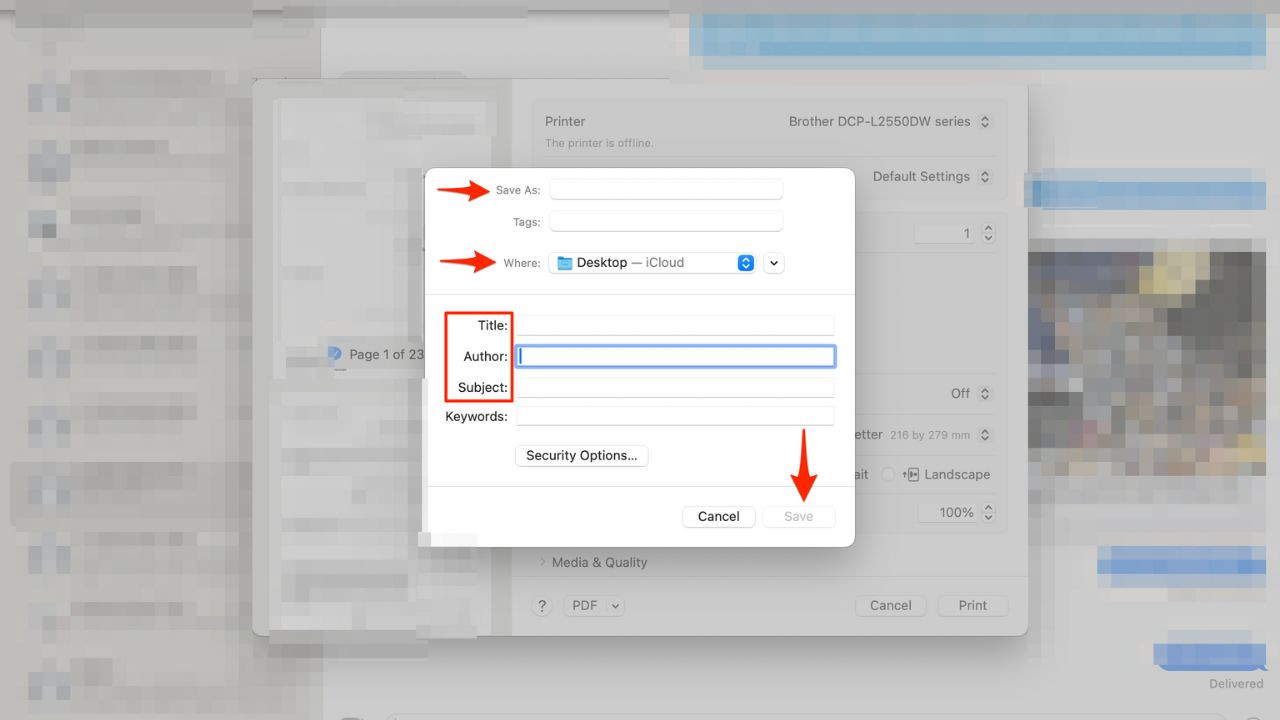
- Name and Save PDF: A save dialog box will appear. Choose a file name for your PDF, select a location to save it on your Mac, and optionally add a Title, Author, and Subject.
- Save and Print: Click Save to create the PDF file. Once saved, locate the PDF file and open it with a PDF viewer (like Preview or Adobe Acrobat Reader). From the PDF viewer, you can then print the document as you would any other PDF file.
 Screenshot of the Save dialog box for PDF in Mac, showing file name, location, title, author and subject fields
Pros of using Mac PDF conversion:
- Saves Entire Conversations: Easily create a PDF of a significant portion of a text thread.
- Text-Based PDF: The output is a selectable text document, which is better for readability and searching compared to screenshots.
Cons of using Mac PDF conversion:
- Requires Mac: This method is only applicable if you have access to a Mac and use iMessage on it.
- Potential Loading Issues: Loading very long conversations in the Messages app on Mac can be slow or prone to freezing.
- Manual Scrolling: You still need to manually scroll back to load the messages you want to include, which can be tedious for very long threads.
Method 3: Forwarding Conversations to Another Phone for Printing
In situations where you don’t have immediate access to a printer but still want to export your text thread for later printing, forwarding the conversation to another phone number can be a useful workaround. This is particularly helpful if you want to share specific parts of a conversation without printing your entire message history with someone.
Here’s how to forward text messages for printing:
- Open iMessage App and Select Conversation: Launch the Messages app on your iPhone and open the conversation you wish to print.
- Select Messages to Forward: Tap and hold on a message bubble within the conversation until a menu appears.
- Tap “More…”: From the menu options, select More….
- Select Multiple Messages: Circles will appear next to each message bubble. Manually tap on the circles to select all the individual messages you want to include.
- Tap Share Option: Once you’ve selected all desired messages, tap the Share option located in the bottom right corner of the screen (it looks like an arrow pointing upwards).
- Choose Recipient: In the “To” field, enter the phone number to which you want to send the selected messages. This could be your own number on another phone, or a friend’s phone if they will handle the printing.
- Send Messages: Tap the up arrow in the green circle to send the forwarded messages.
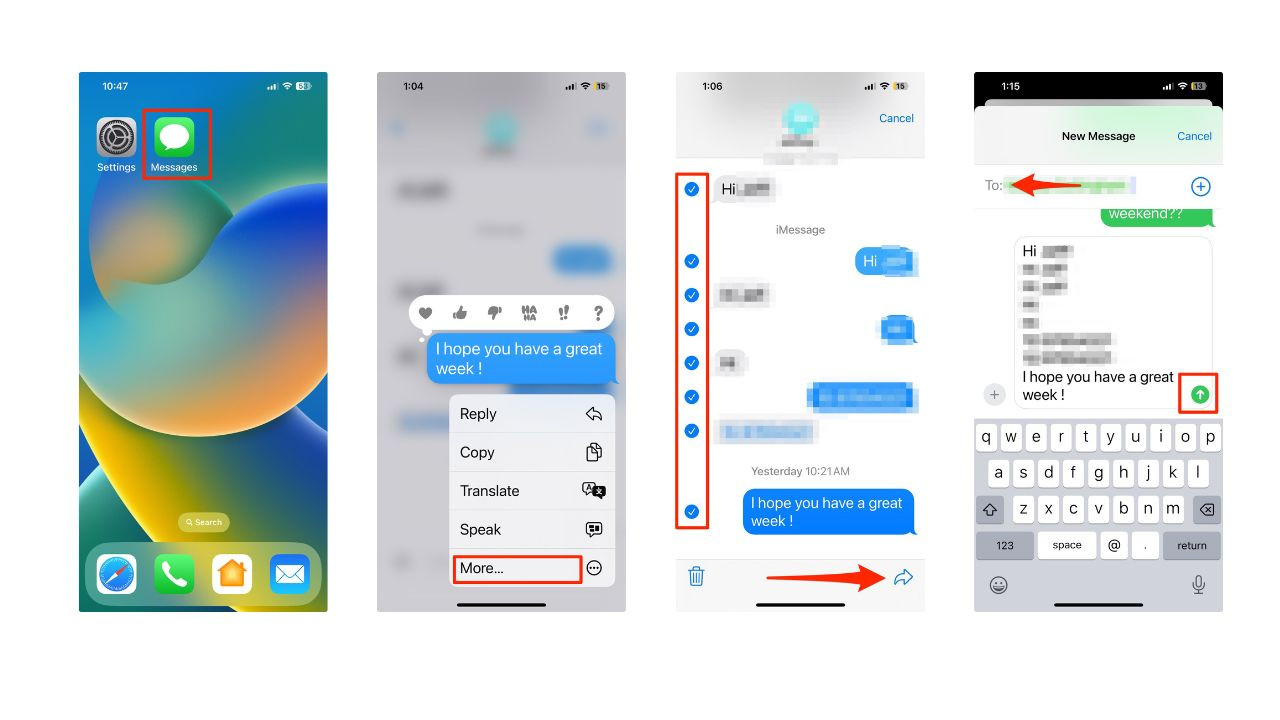 Screenshot of selecting messages and using the share option to forward text messages on iPhone
Once forwarded to another phone (it could be an Android or another iPhone), you can then explore printing options available on that device. For example, on an Android, you might have more direct printing capabilities, or you can again use screenshots and print from the Photos app on another iPhone.
Pros of forwarding messages:
- No Immediate Printer Needed: Allows you to export messages for printing later or from a different location.
- Selective Sharing: You can choose specific messages to forward, not necessarily the entire conversation.
- Versatile: Forwarded messages can be accessed on any phone that receives text messages.
Cons of forwarding messages:
- Still Requires Printing from Another Device: This method only moves the messages to another device; you still need a printing solution from there.
- Manual Selection: Selecting messages for forwarding is manual and can be time-consuming for large portions of conversations.
- Formatting May Vary: The appearance of forwarded messages might slightly differ on the receiving device.
Method 4: Utilizing Third-Party Apps for Comprehensive Printing (iMazing)
For users who need a robust and comprehensive solution to print entire message threads, including attachments, third-party applications like iMazing offer the most feature-rich option. iMazing allows you to export your messages in various formats, including PDF, directly from your iPhone to your computer, providing a reliable way to archive and print your conversations.
Here’s how to print text messages using iMazing:
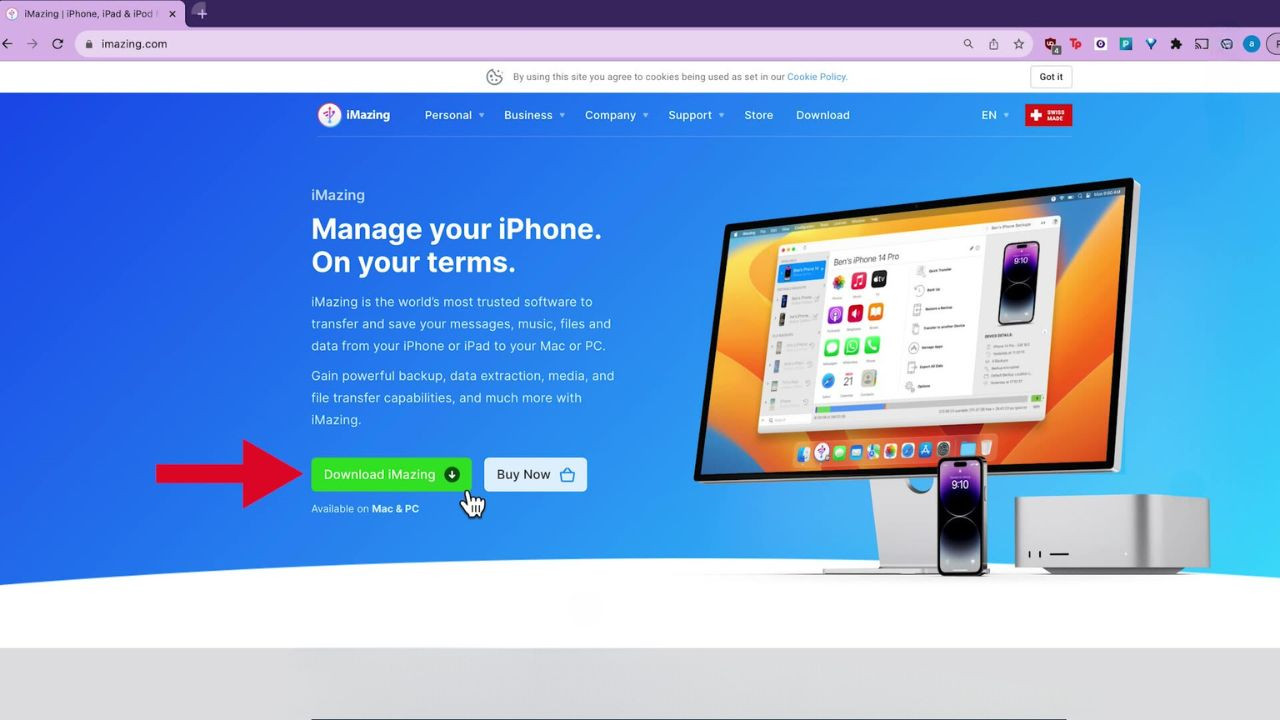
- Download and Install iMazing: Go to the iMazing website and download the application to your computer (Windows or Mac). Install and launch iMazing.
 iMazing Download Button
- Connect iPhone to Computer: Connect your iPhone to your computer using a USB cable.
- Trust Computer on iPhone: Unlock your iPhone. You might see a prompt asking “Trust This Computer?”. Tap Trust.
 Connect iPhone to computer prompt in iMazing
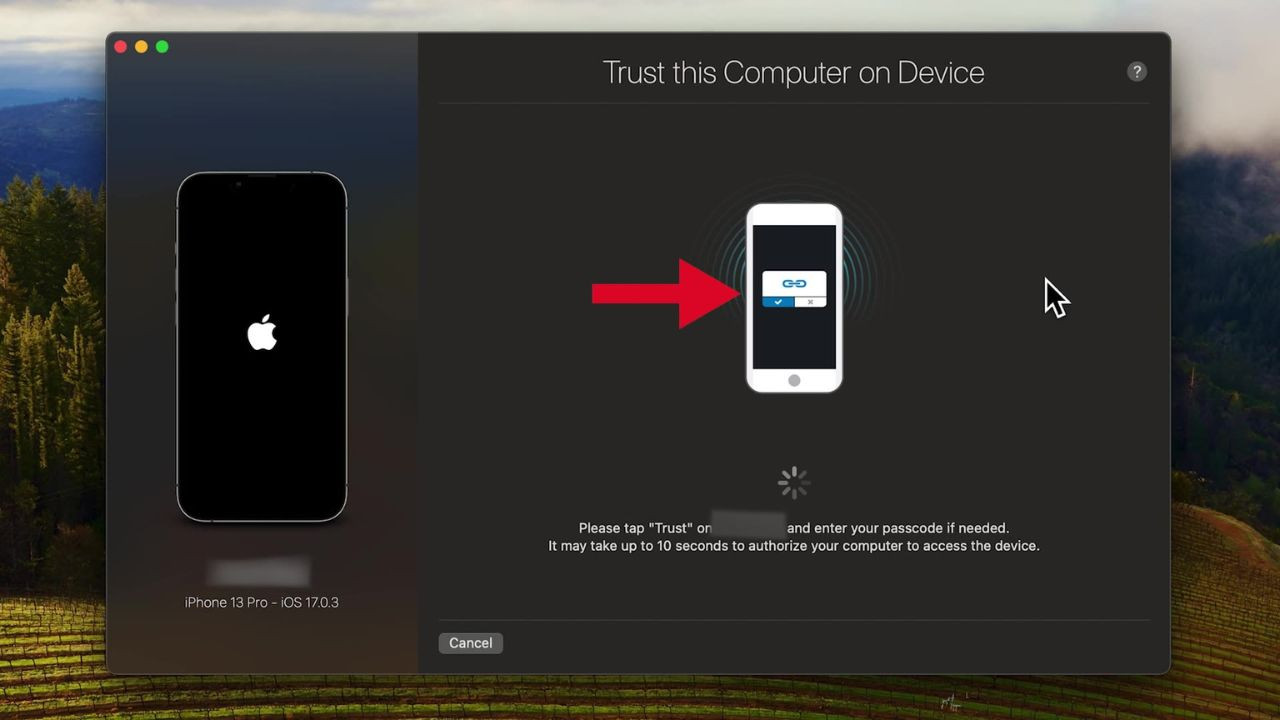 Trust This Computer prompt on iPhone
- Select Messages in iMazing: In the iMazing sidebar, select your device, and then click on Messages.
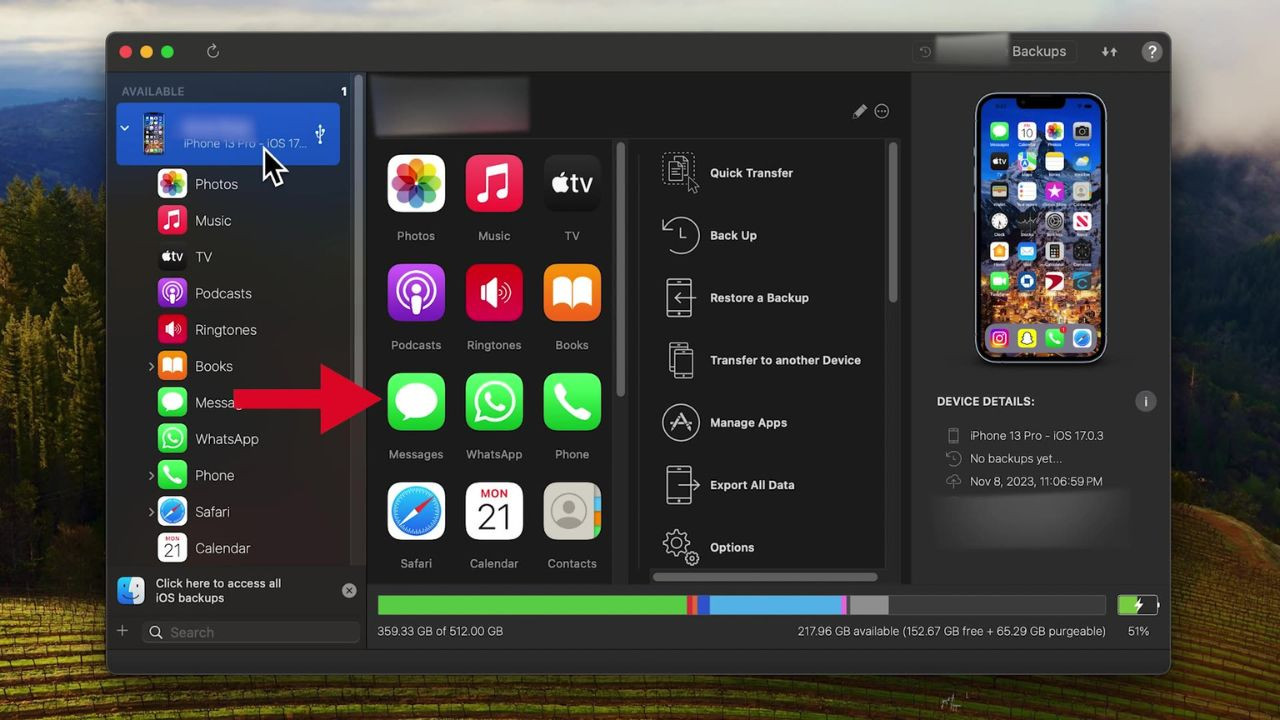 Select Messages option in iMazing sidebar
- Choose Conversation: Select the conversation you want to export and print by clicking on it.
- Set Date Range (Optional): In the top right corner, you can specify a date range for the messages you want to print by adjusting the “from” and “to” dates. This is useful if you only need to print messages from a specific period within a long conversation.
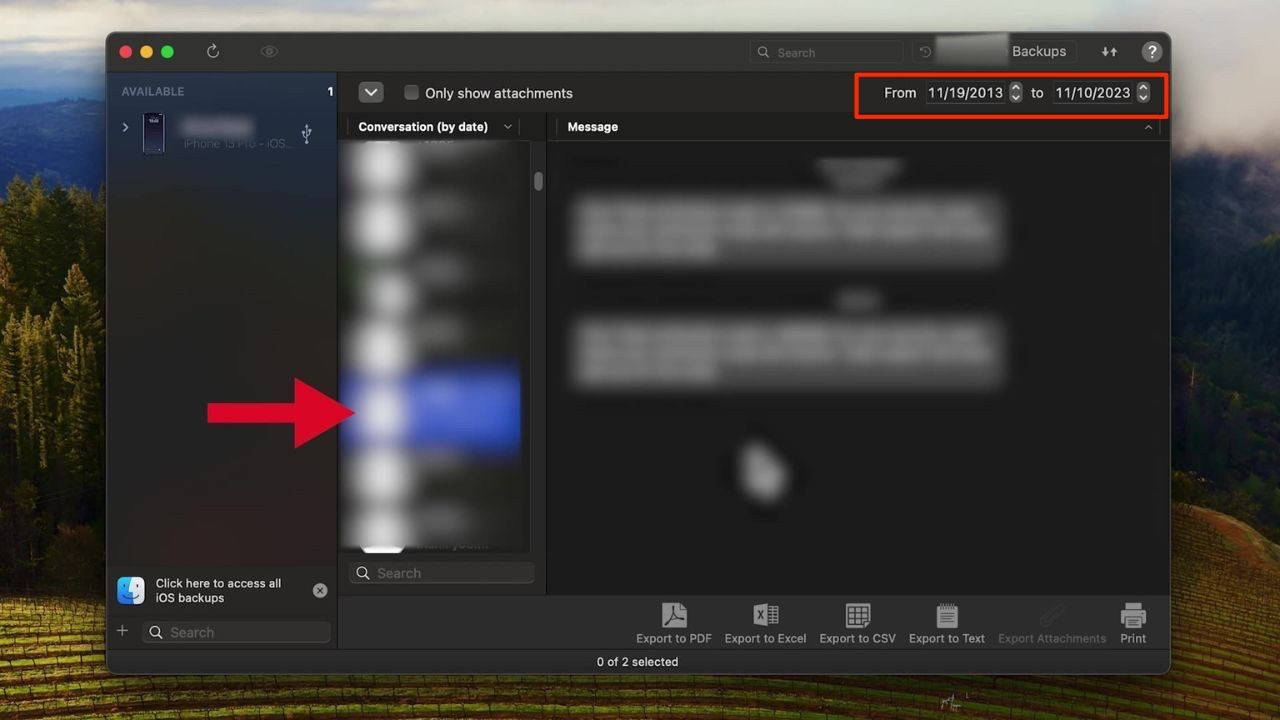 Date range selection in iMazing for messages export
- Click Print: Click the Print button, which is usually located in the bottom right or top toolbar, depending on your iMazing version.
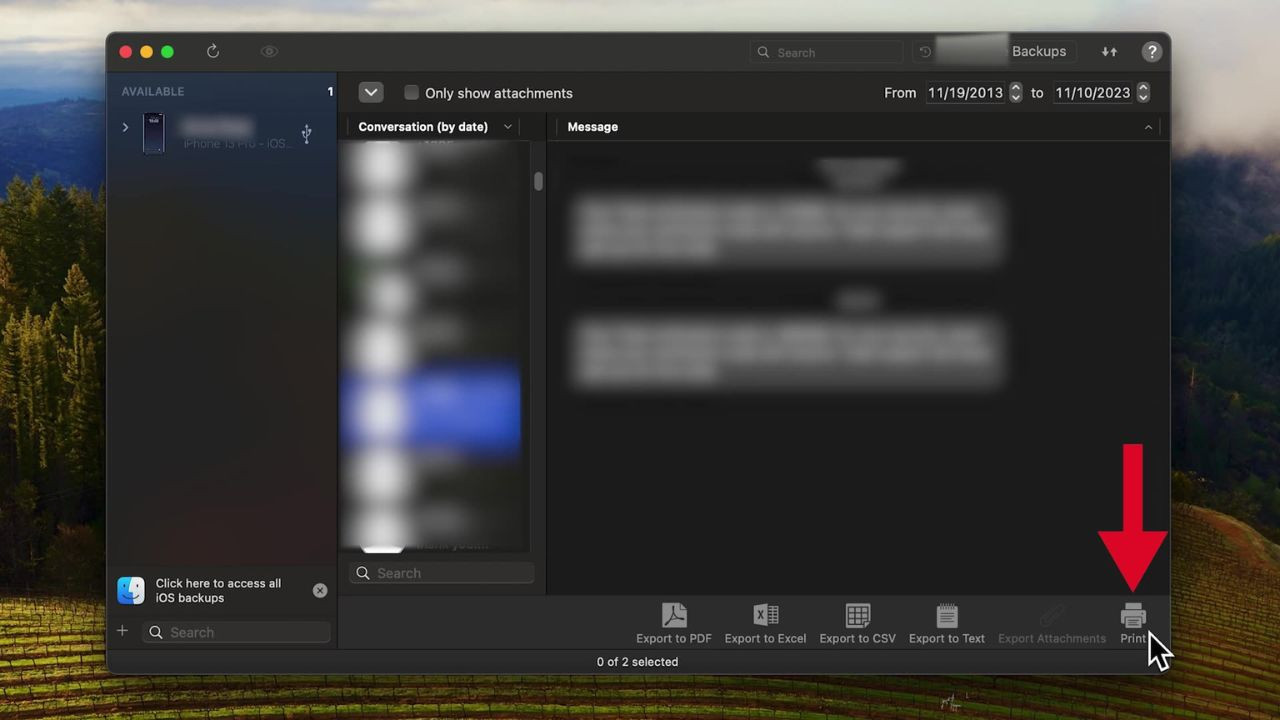 Print button in iMazing to print iPhone messages
- Adjust Print Settings and Print: A print dialog box will appear, allowing you to adjust settings such as page orientation, message layout, and choose your printer. Ensure your printer is connected to your computer. Click Print again in the print dialog to start printing your text messages.
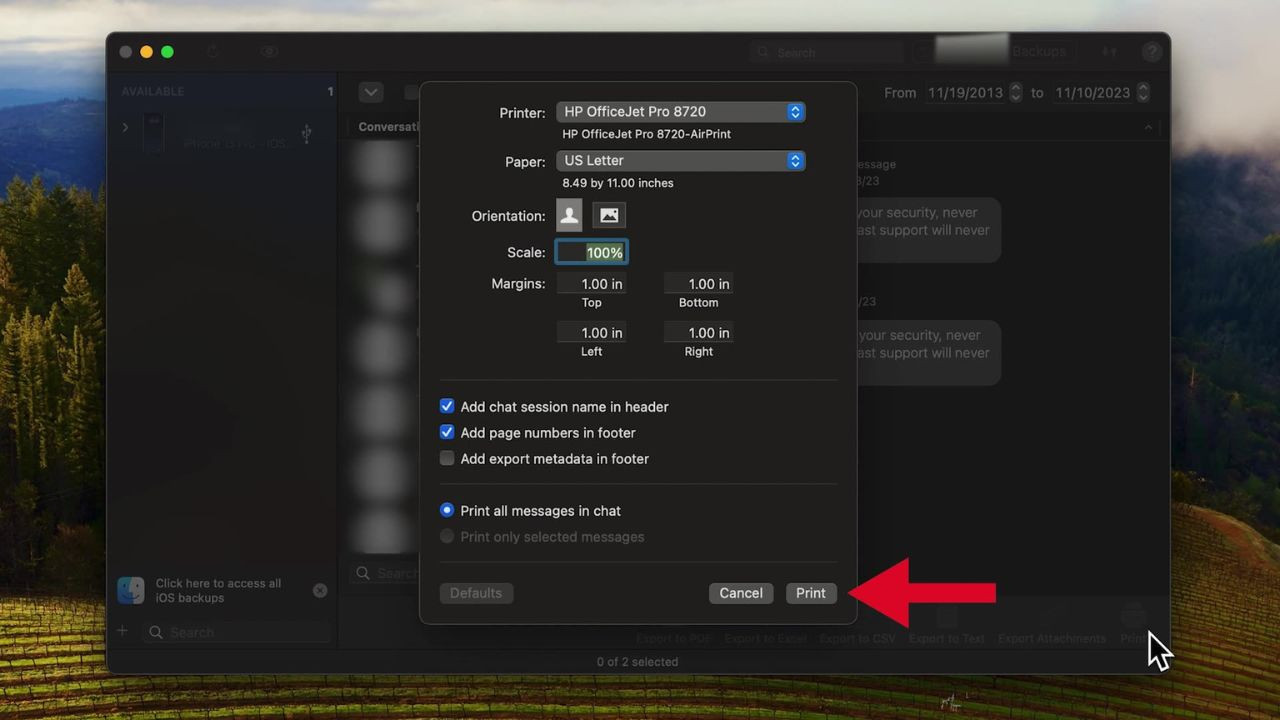 Print dialog box in iMazing to adjust settings and print messages
Alternatively, if you prefer a digital copy first, iMazing also allows you to export messages as a PDF or other formats:
- Follow steps 1-6 above.
- Click “Export to PDF”: Instead of “Print”, click the “Export to PDF” button (or similar export option depending on iMazing version).
- Choose Save Location and Export: Choose a name and location to save the PDF file on your computer. Click Export and wait for the process to complete. You can then print the saved PDF file at your convenience.
Pros of using iMazing or similar apps:
- Comprehensive Solution: Exports and prints entire conversations, including attachments.
- Various Export Formats: Offers options to export in PDF, CSV, Text, and more for versatile use.
- Reliable and Efficient: More robust for handling large message histories compared to manual methods.
Cons of using iMazing or similar apps:
- Third-Party Software: Requires downloading and installing third-party software.
- Cost: iMazing is a paid application, although they may offer trial versions.
- Requires Computer: You need access to a computer to use this method.
Conclusion
Printing text messages from an iPhone, while not a direct feature, is definitely possible using these methods. The best approach depends on your specific needs: For a quick print of a few messages, screenshots are your go-to. If you need to print longer conversations and have a Mac, converting to PDF via iMessage is a solid option. Forwarding provides flexibility when you can’t print immediately, and for the most comprehensive solution, third-party apps like iMazing offer advanced features and reliability.
Whether it’s for legal reasons, record-keeping, or simply preserving important conversations, knowing how to print your iPhone text messages ensures you have a tangible copy of your digital dialogues when you need them most. Remember to consider factors like conversation length, desired format, and available tools when choosing the best method for you.