
Are you looking to create custom stickers, personalized invitations, or unique crafts? How to print and cut with Cricut machines is a fantastic way to bring your creative ideas to life. Amazingprint.net can show you the possibilities this method offers, providing the precision and versatility you need for stunning results. You’ll explore inkjet printers, cutting mats, and the design space for project success.
1. Understanding Cricut Print Then Cut
What exactly is the Print Then Cut feature on a Cricut machine?
Print Then Cut is a function in Cricut’s Design Space software that allows you to print designs on your home printer and then precisely cut around them using your Cricut machine. This feature unlocks a world of creative possibilities, from creating custom stickers and labels to designing intricate paper crafts and personalized gifts. Print then cut projects are so satisfying!
To fully grasp the power of Print Then Cut, let’s break down its core components:
- Design Software (Design Space): This is where your creative journey begins. Design Space is Cricut’s proprietary software, available on desktop and mobile devices. It provides the tools to create, import, and manipulate your designs.
- Home Printer (Inkjet Printer): Your printer is responsible for bringing your digital design to life on physical media. An inkjet printer is crucial for creating detailed, vibrant images that will be cut by your Cricut machine.
- Cricut Cutting Machine: The star of the show! The Cricut machine uses its precision blade to follow the outlines of your printed design, cutting it out with accuracy.
1.1. Benefits of Using Print Then Cut
Why choose Print Then Cut over other methods?
Print Then Cut offers several advantages, including precise cutting, extensive design options, and compatibility with various materials, making it ideal for creating professional-looking, custom projects. Whether you’re a seasoned crafter or just starting, Print Then Cut can elevate your creations.
Here’s a closer look at the benefits:
- Accuracy: The Cricut machine’s optical sensors ensure precise cuts around your printed designs, eliminating jagged edges and ensuring a clean, professional finish.
- Versatility: Print Then Cut works with a wide range of materials, including sticker paper, printable vinyl, cardstock, and more, opening up endless possibilities for your projects.
- Customization: Design Space provides access to an extensive library of images, fonts, and templates, allowing you to create unique and personalized designs.
- Efficiency: Print Then Cut streamlines the crafting process by combining printing and cutting into a single workflow, saving you time and effort.
1.2. Common Applications of Print Then Cut
What can you create with Print Then Cut?
Print Then Cut is perfect for creating stickers, labels, custom cards, party decorations, and personalized gifts, providing a versatile solution for a wide array of crafting projects. The possibilities are truly endless, limited only by your imagination.
Here are some popular applications:
- Stickers and Labels: Design and create custom stickers for your planner, laptop, water bottle, or business. Make personalized labels for organizing your home or office.
- Cards and Invitations: Craft unique greeting cards, birthday invitations, wedding announcements, and thank-you notes with personalized designs.
- Party Decorations: Create custom banners, cupcake toppers, favor tags, and other party decorations to match your theme.
- Personalized Gifts: Design and create personalized gifts for friends and family, such as custom phone cases, mugs, tote bags, and more.
- Business Branding: Create professional-looking marketing materials, such as business cards, brochures, and promotional stickers, to enhance your brand identity.
2. Gathering Your Supplies
What do you need to get started with Print Then Cut?
To begin your Print Then Cut journey, you’ll need a compatible Cricut machine, an inkjet printer, suitable printing materials, a LightGrip cutting mat, and access to Cricut Design Space. Having these essential tools and materials will set you up for success.
Let’s dive deeper into each component:
- Compatible Cricut Machine: Ensure your machine supports the Print Then Cut feature. The Cricut Maker 3, Cricut Explore 3, Cricut Maker, Cricut Explore Air 2, and Cricut Explore Air are all compatible.
- Inkjet Printer: An inkjet printer is essential for printing your designs onto various materials.
- Printing Materials: Choose the right material for your project, such as white cardstock, printable sticker paper, printable vinyl, or printable clear sticker paper.
- LightGrip Cutting Mat: The LightGrip mat (blue) provides a gentle adhesive surface to hold your printed material in place during cutting.
- Cricut Design Space: This software is where you’ll design, print, and cut your projects.
2.1. Choosing the Right Cricut Machine
Which Cricut machines support Print Then Cut?
Cricut Maker 3, Cricut Explore 3, Cricut Maker, Cricut Explore Air 2, and Cricut Explore Air are all compatible with the Print Then Cut feature, each offering precision and versatility for your projects. Consider your budget and project needs when selecting a machine.
Here’s a comparison of these popular models:
| Machine | Print Then Cut Size | Key Features |
|---|---|---|
| Cricut Maker 3 | 11.5″ x 11.5″ | Cuts over 300 materials, Adaptive Tool System, Fast Mode |
| Cricut Explore 3 | 8.5″ x 11″ | Cuts over 100 materials, Fast Mode, Compatible with Smart Materials |
| Cricut Maker | 6.75″ x 9.25″ | Cuts over 300 materials, Adaptive Tool System |
| Cricut Explore Air 2 | 6.75″ x 9.25″ | Cuts over 100 materials, Fast Mode |
| Cricut Explore Air | 6.75″ x 9.25″ | Cuts over 100 materials |
2.2. Selecting the Best Printer
What type of printer works best for Print Then Cut?
An inkjet printer is recommended for Print Then Cut due to its ability to produce high-quality, vibrant images with precise detail, essential for accurate cutting by the Cricut machine. Laser printers are not compatible with the Print Then Cut feature.
When choosing an inkjet printer, consider these factors:
- Print Quality: Look for a printer with high DPI (dots per inch) resolution for crisp, detailed images.
- Ink Compatibility: Ensure the printer uses ink that is compatible with your chosen printing materials.
- Paper Handling: Select a printer that can handle various paper types and thicknesses, including cardstock and sticker paper.
- Wireless Connectivity: Wireless connectivity allows you to print directly from your computer or mobile device.
- Cost: Consider the initial cost of the printer and the ongoing cost of ink cartridges.
2.3. Choosing Your Printing Materials
What materials can you use for Print Then Cut?
You can use white cardstock, printable sticker paper, printable vinyl, and printable clear sticker paper for Print Then Cut, each offering unique properties for different projects. Experiment to find the best material for your needs.
Here’s a breakdown of popular options:
- White Cardstock: Ideal for cards, invitations, and paper crafts. Provides a sturdy base for your designs.
- Printable Sticker Paper: Perfect for creating custom stickers and labels. Available in various finishes, such as matte, glossy, and clear.
- Printable Vinyl: Durable and waterproof, making it ideal for outdoor applications, such as car decals and signage.
- Printable Clear Sticker Paper: Allows you to create transparent stickers that blend seamlessly with the background.
2.4. Other Essential Tools
What else do you need for a successful Print Then Cut project?
In addition to the core supplies, you’ll also need a LightGrip cutting mat to hold your material in place, weeding tools to remove excess material, and a scraper to smooth your material onto the mat. These tools will enhance your crafting experience.
Here’s a quick checklist:
- LightGrip Cutting Mat: Provides a gentle adhesive surface for delicate materials.
- Weeding Tools: Help you remove excess material from your cut designs.
- Scraper: Smooths your material onto the cutting mat to prevent wrinkles and bubbles.
- Brayer: Applies even pressure to the material, ensuring it adheres firmly to the mat.
- Ruler and Cutting Knife: Useful for trimming excess material before or after cutting.
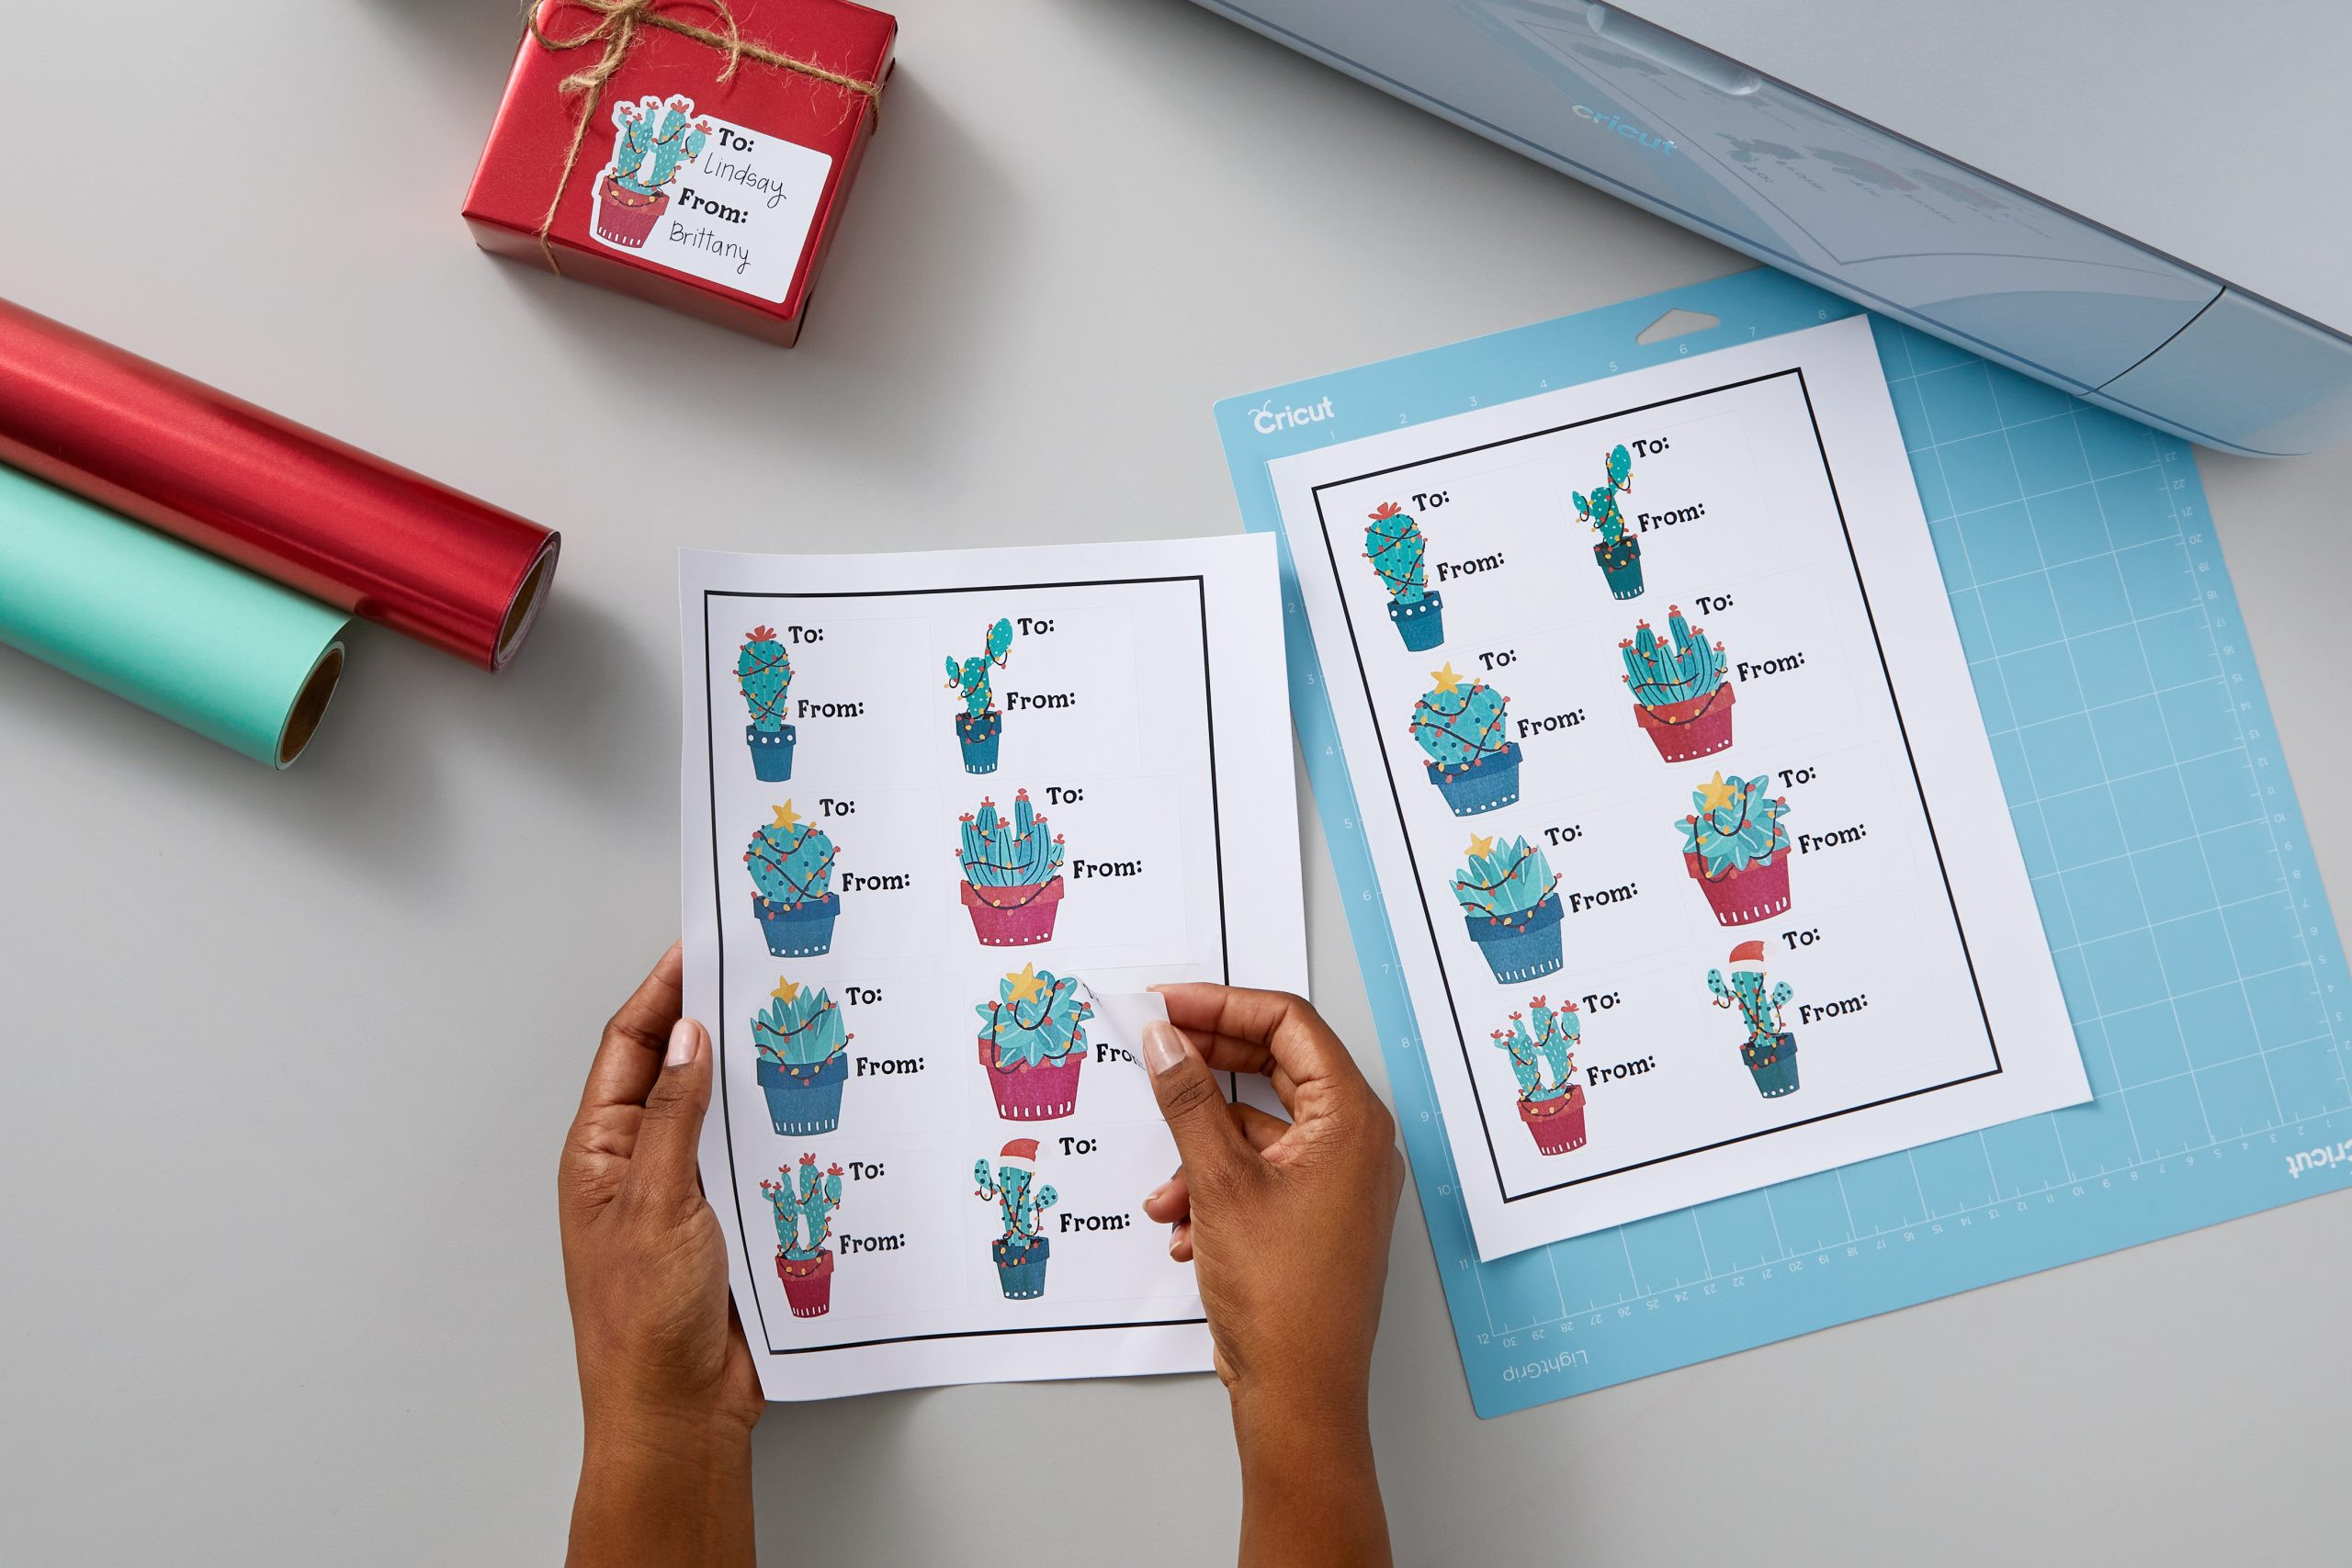 Print then cut supplies needed like the blue lightgrip mat
3. Designing Your Print Then Cut Project
How do you design a project for Print Then Cut?
Start by opening Cricut Design Space, creating a new project, and either uploading your own images or selecting from the Design Space library. Ensure your images are high-resolution for the best printing results. Amazingprint.net is a great place to get inspired by new design trends, too!
Let’s walk through the design process step by step:
- Open Design Space: Launch the Design Space software on your computer or mobile device.
- Start a New Project: Click on the “New Project” button to create a blank canvas.
- Upload Images or Select from Library: You can either upload your own images or choose from the vast library of images and fonts available in Design Space.
- Resize and Position Images: Adjust the size and position of your images on the canvas to create your desired design.
- Add Text (Optional): Use the text tool to add personalized messages or labels to your project.
- Flatten the Design: Select all the layers in your design and click on the “Flatten” button to merge them into a single printable layer.
3.1. Finding Print Then Cut Images in Design Space
How do you find ready-to-use Print Then Cut images?
In Design Space, use the “Operation Type” filter and select “Print Then Cut” to find images that are already optimized for this feature, saving you time and effort in your design process. These images are designed to work seamlessly with your Cricut machine.
Here’s how to find them:
- Open Design Space and start a new project.
- Select ‘Images’ from the menu.
- You will be taken to our image library and will see a filter menu.
- In the filter menu, select ‘operation type’ and tick the ‘Print Then Cut’ option.
- This will show images that are already Print Then Cut compatible.
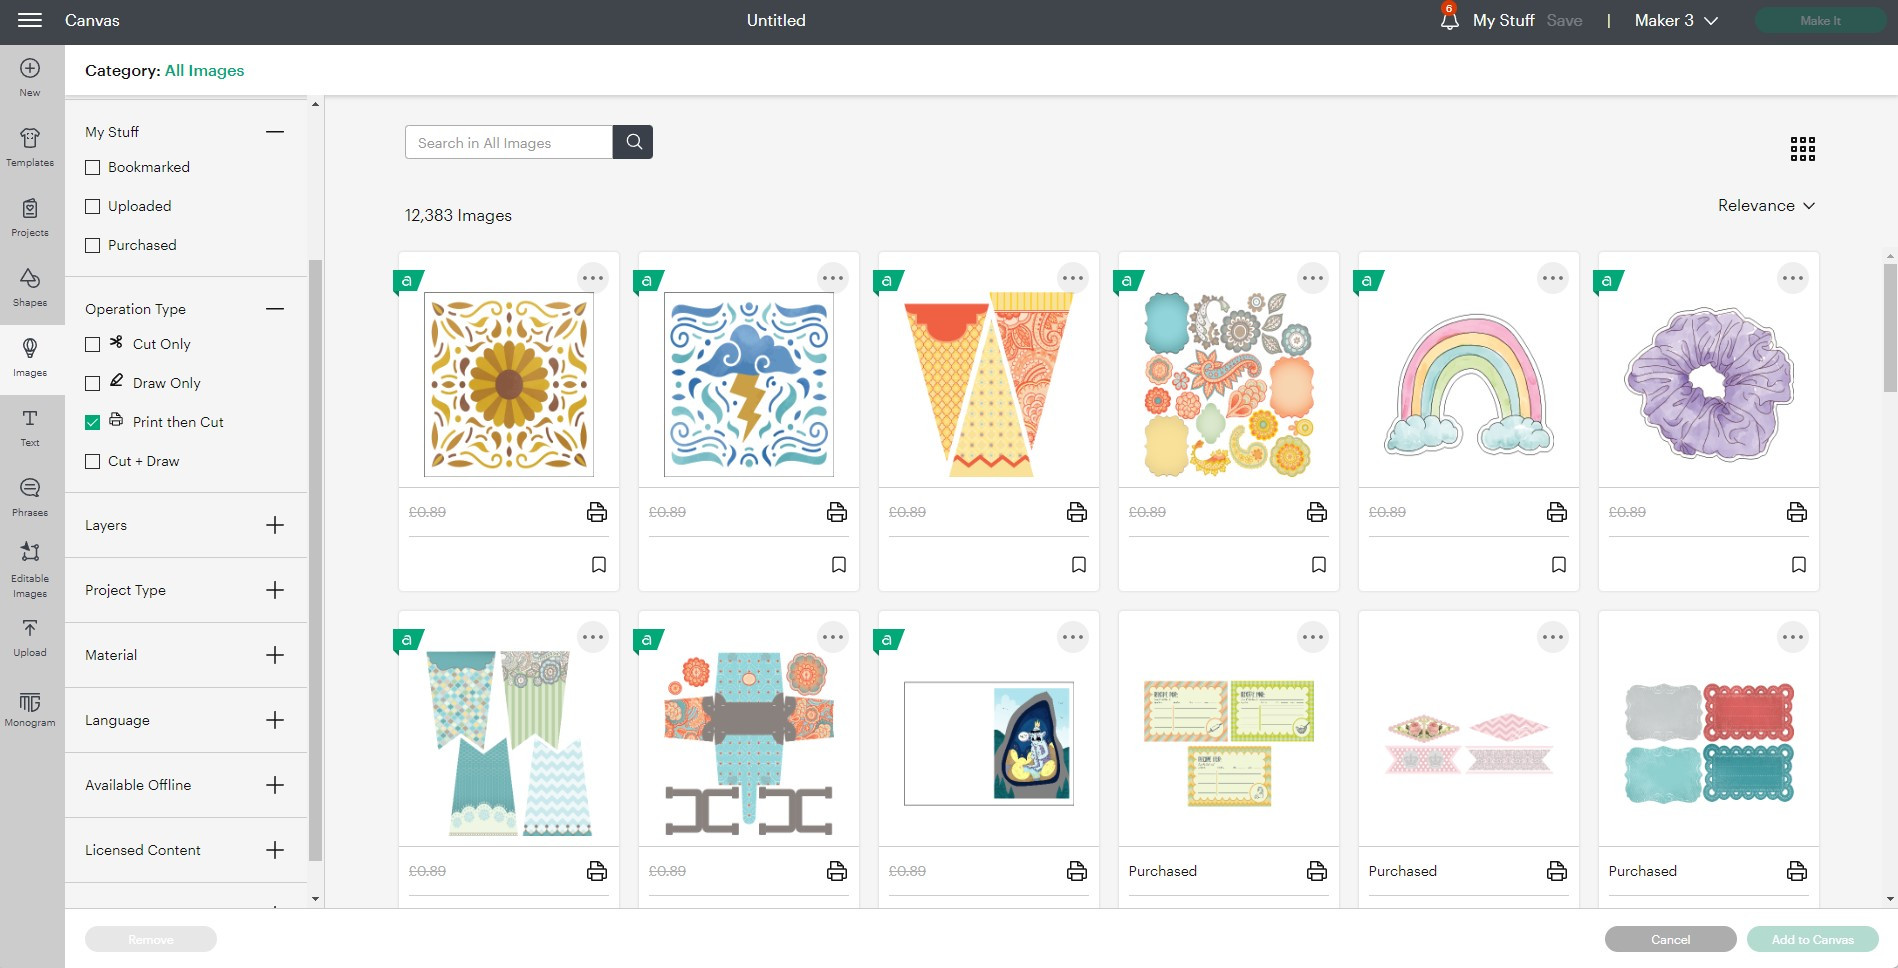 How to find print then cut images in Cricut Design Space with the Design Space filter menu
3.2. Creating Your Own Print Then Cut Images
Can you turn any image into a Print Then Cut image?
Yes, you can turn any cut image into a Print Then Cut image by adding an offset layer and using the “Flatten” tool in Design Space, giving you complete creative control over your projects. This allows you to customize any design to fit your specific needs.
Here’s a detailed guide:
- Select a cut image and add it to your canvas.
- If the image does not have a background layer, create one using the offset tool in the edit bar.
- Adjust the distance of the offset layer and click ‘apply’.
- Select all the layers and use the ‘flatten’ tool in the bottom right-hand corner (or actions menu).
- You will see all layers have merged together and the layer is now called a ‘print then cut’ layer.
3.3. Understanding Bleed
What is bleed and why is it important?
Bleed is a feature that extends the color of your design slightly beyond the cut lines, ensuring that there are no white borders after cutting, resulting in a professional and polished look. It’s essential for designs with edge-to-edge color.
Here’s why it matters:
- Eliminates White Borders: Bleed ensures that the color of your design extends to the very edge of the cut line, preventing unsightly white borders.
- Improves Cut Accuracy: Bleed compensates for slight inaccuracies in the cutting process, ensuring that the final product looks clean and professional.
- Enhances Visual Appeal: Bleed creates a more polished and professional look, especially for designs with intricate details or edge-to-edge color.
3.4. Adjusting Material Size
How do you adjust the material size in Design Space?
You can adjust the material size in Design Space settings under “Load Type” to match your printing material, ensuring accurate printing and cutting dimensions for your projects. Always verify the material size before printing.
Follow these steps:
- Head to the top left menu in Design Space and choose ‘settings’ in the dropdown.
- In the Design Space settings, click ‘Load Type’.
- Then select the correct material sizing in the ‘Print Then Cut Page Size’ dropdown.
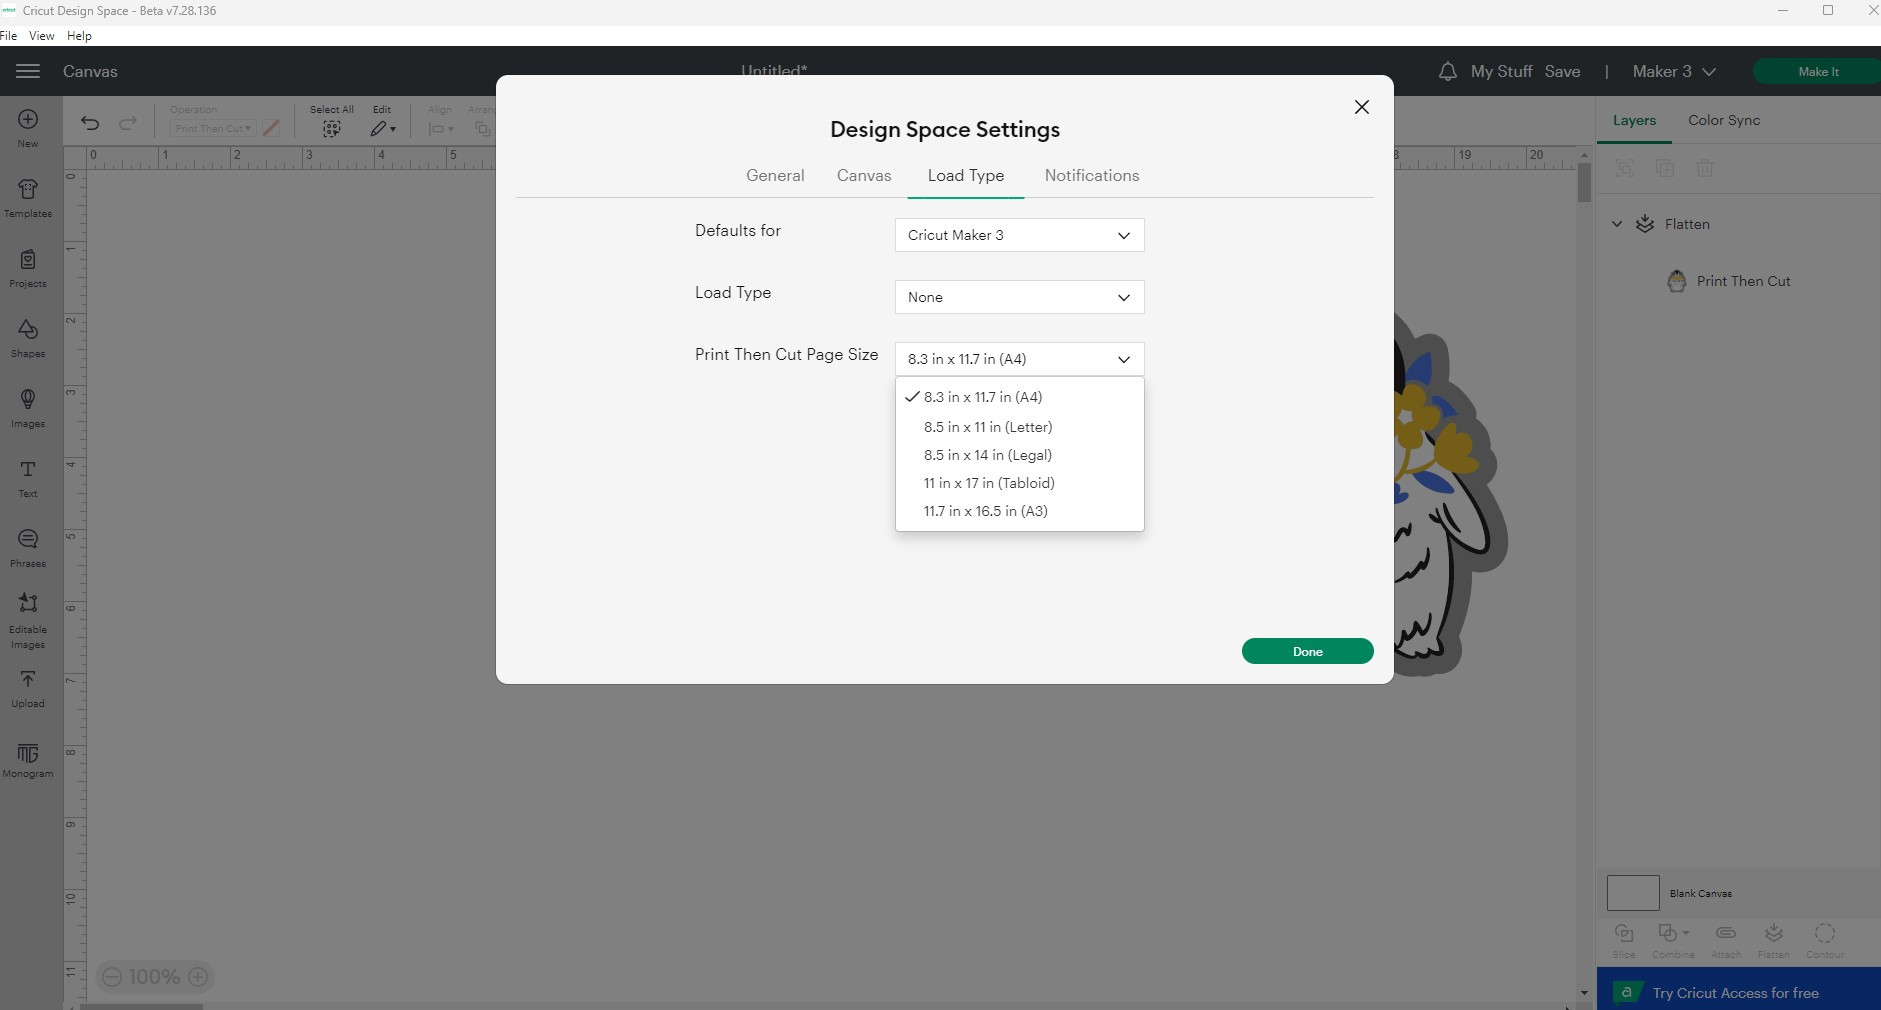 Changing Print then Cut materials size in Design Space in the settings menu
4. Printing Your Design
How do you print your Print Then Cut design?
After designing, send your project to your inkjet printer, ensuring you use the “System Dialogue” option to adjust printer settings for optimal print quality and color accuracy. Proper printer settings are crucial for achieving the best results.
Here’s a detailed guide:
- Click on the “Make It” button in Design Space.
- Review the mat preview and click on the “Continue” button.
- Click on the “Send to Printer” button.
- In the print setup window, make sure the “Add Bleed” option is selected (if applicable).
- Important: Always tick the box for ‘Use System Dialogue’.
- Select your printer from the dropdown menu.
- Click on the “Print” button.
- A new dialogue box opens up which is your printer settings.
- You can tailor the print to the material and quality type you need.
4.1. Understanding Printer Settings
What printer settings should you use for Print Then Cut?
Use the “System Dialogue” option to access your printer settings, adjusting the media type, print quality, and color settings to match your material for the best possible print outcome. Experimenting with settings is key to finding what works best for each material.
Here are some key settings to consider:
- Media Type: Select the appropriate media type for your chosen printing material, such as “Cardstock,” “Sticker Paper,” or “Photo Paper.”
- Print Quality: Choose the highest print quality setting for crisp, detailed images.
- Color Settings: Adjust the color settings to ensure accurate color reproduction. You may need to experiment with different color profiles to find the best match for your printer and material.
- Paper Size: Ensure the paper size setting matches the size of your printing material.
- Borderless Printing: If your design extends to the edge of the paper, enable the borderless printing option.
4.2. Why Colors May Not Match
Why do the colors on my printed item look different from what I see in Design Space?
Color variations can occur due to differences in monitor calibration and printer settings. Always use the “System Dialogue” option to fine-tune your printer settings for the most accurate color reproduction. Experimentation is key to achieving consistent results.
Here are some common causes of color discrepancies:
- Monitor Calibration: Your monitor’s color settings may not be accurate, causing the colors in Design Space to appear different from the actual printed colors.
- Printer Settings: Incorrect printer settings, such as the wrong color profile or print quality, can also affect color reproduction.
- Ink Quality: The quality of your printer ink can also impact the vibrancy and accuracy of the printed colors.
- Material Type: Different materials can absorb ink differently, leading to variations in color.
4.3. Printing on Colored Cardstock
Can you print on colored cardstock?
While it’s generally recommended to use white materials for Print Then Cut, Cricut Maker and Cricut Maker 3 can handle light to medium-colored papers, but reflective or patterned materials may interfere with the cut sensor marks. Always test your materials before starting a large project.
Here’s why white materials are preferred:
- Cut Sensor Accuracy: The Cricut machine relies on its optical sensors to read the black registration marks printed around your design. Reflective or patterned materials can interfere with the sensor’s ability to accurately detect these marks.
- Color Accuracy: White materials provide a neutral base for printing, allowing for more accurate color reproduction.
5. Cutting Your Design
How do you cut your printed design with your Cricut machine?
Place your printed design on the LightGrip cutting mat, load it into your Cricut machine, and calibrate your machine for Print Then Cut to ensure precise cutting along the edges of your design. Calibration is a crucial step for achieving accurate results.
Here’s a step-by-step guide:
- Carefully align your printed design on the LightGrip cutting mat, ensuring it is straight and centered.
- Smooth the material onto the mat using a scraper or brayer to prevent wrinkles and bubbles.
- Load the mat into your Cricut machine.
- In Design Space, select the appropriate material setting for your chosen printing material.
- Click on the “Go” button to start the cutting process.
5.1. Calibrating Your Machine
Why do you need to calibrate your machine for Print Then Cut?
Calibration ensures that your Cricut machine cuts precisely along the edges of your printed images, correcting any alignment issues and ensuring accurate results. Regular calibration is essential for maintaining optimal cutting performance.
Here’s how to calibrate your machine:
- In Design Space, go to the menu and select “Calibration.”
- Follow the on-screen instructions to print and cut the calibration sheet.
- The machine will then analyze the cut results and adjust its settings accordingly.
5.2. Material Settings for Sticker Sheets
Which material settings should you use for sticker sheets?
Use the specific material settings for printable sticker paper, printable vinyl, or printable clear sticker paper in Design Space to ensure the best cutting performance and sticker quality. These settings are optimized for these materials.
Here’s a quick guide:
- In Design Space, select the “Browse Materials” option.
- Search for “Printable Sticker Paper,” “Printable Vinyl,” or “Printable Clear Sticker Paper.”
- Select the appropriate material setting for your chosen sticker paper.
5.3. Troubleshooting Cutting Issues
What should you do if your Cricut machine isn’t cutting properly?
Check your blade, mat, and material settings, recalibrate your machine, and ensure your design is properly flattened in Design Space to resolve common cutting issues. Troubleshooting can save you time and material.
Here are some common cutting issues and their solutions:
- Uneven Cuts: This can be caused by a dull blade, a worn-out mat, or incorrect material settings. Try replacing the blade, cleaning the mat, or adjusting the material settings.
- Torn Material: This can be caused by cutting too deep or using the wrong material setting. Try reducing the cutting pressure or selecting a different material setting.
- Inaccurate Cuts: This can be caused by calibration issues or a design that is not properly flattened. Try calibrating your machine or flattening your design in Design Space.
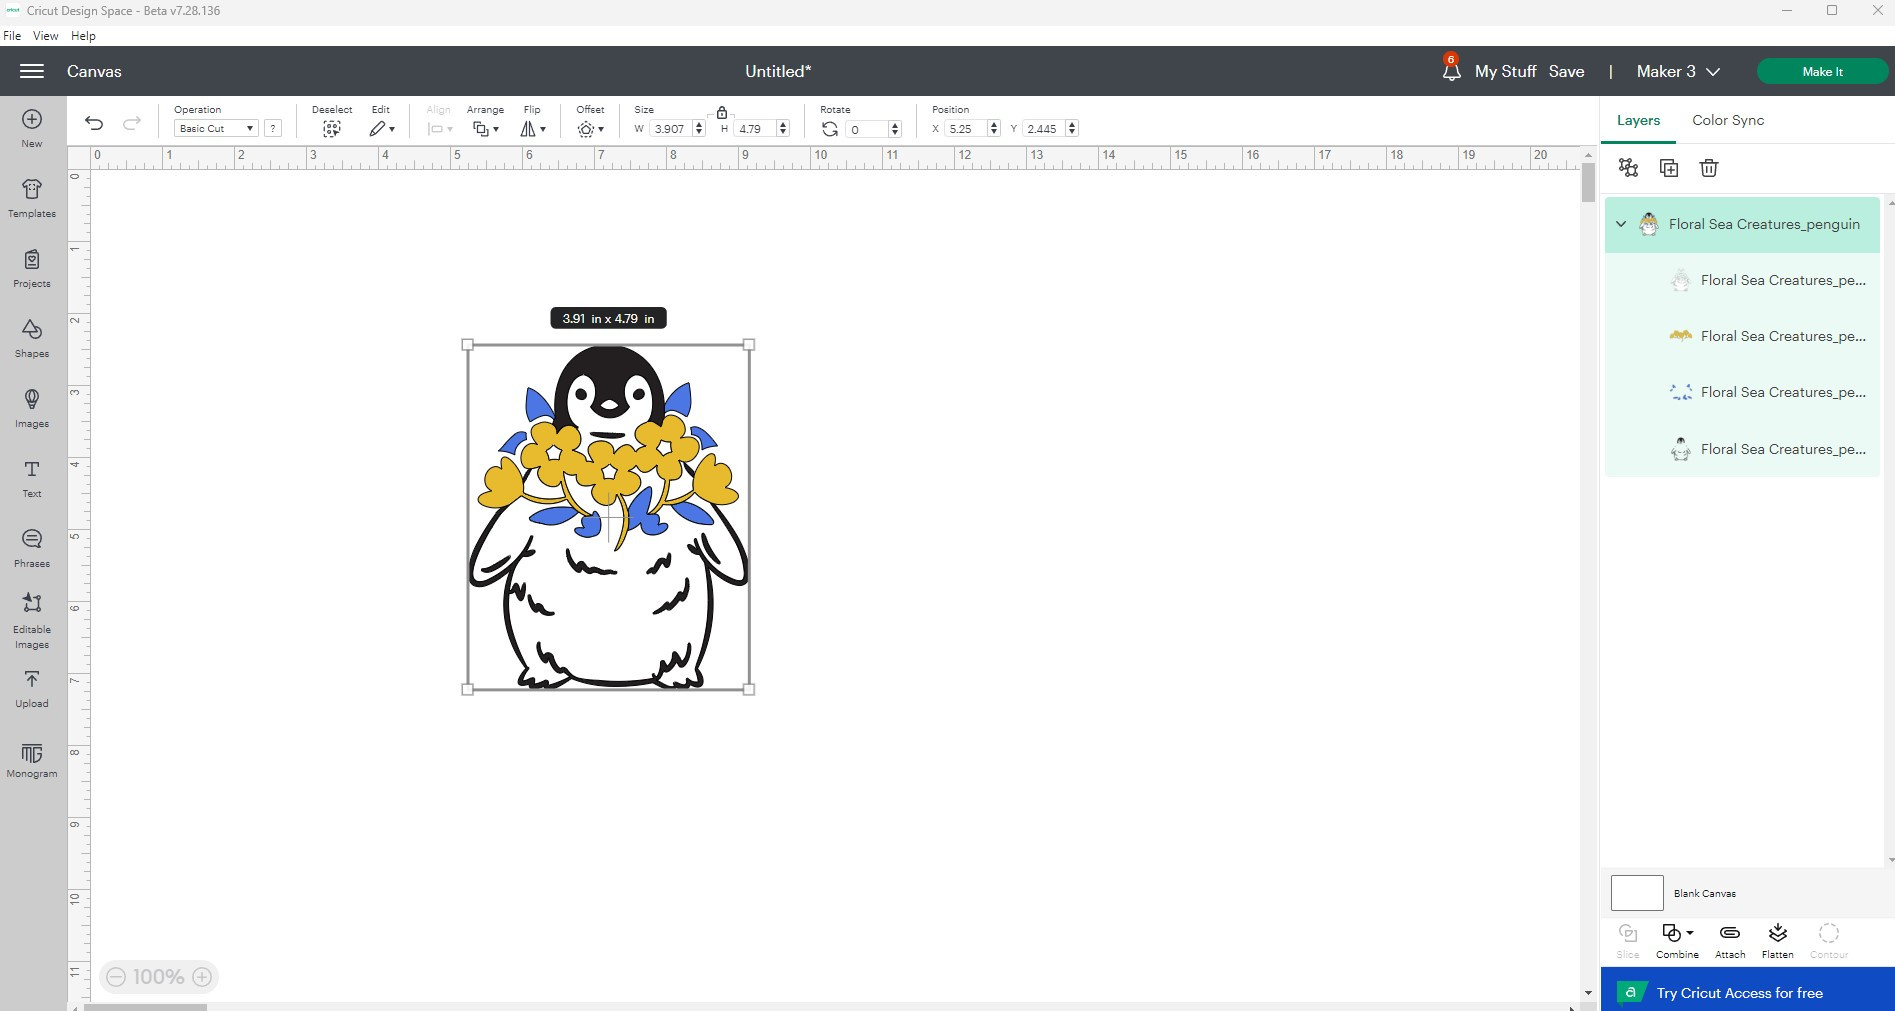 How to make your own print then cut image in Design Space with the flatten tool
6. Tips and Tricks for Print Then Cut
What are some tips for getting the best results with Print Then Cut?
Use high-quality images, calibrate your machine regularly, test your designs on scrap material, and experiment with different printer settings to achieve the best possible results with Print Then Cut. These tips can elevate your crafting game.
Here are some additional tips and tricks:
- Use High-Resolution Images: High-resolution images will result in sharper, more detailed prints.
- Clean Your Cutting Mat Regularly: A clean cutting mat will provide better adhesion and prevent your material from shifting during cutting.
- Use a Brayer: A brayer will help to smooth your material onto the cutting mat and ensure even adhesion.
- Weed Carefully: Take your time when weeding your designs to avoid tearing or damaging the material.
- Store Your Materials Properly: Store your printing materials in a cool, dry place to prevent them from becoming damaged or warped.
7. Inspiring Project Ideas
What are some creative projects you can make with Print Then Cut?
Create custom stickers, personalized cards, unique gift tags, and eye-catching party decorations using the Print Then Cut feature, showcasing its versatility for various crafting projects. Let your creativity run wild!
Here are some inspiring project ideas:
- Custom Stickers: Design and create stickers for your planner, laptop, water bottle, or business.
- Personalized Cards: Craft unique greeting cards, birthday invitations, wedding announcements, and thank-you notes.
- Unique Gift Tags: Create personalized gift tags for birthdays, holidays, or other special occasions.
- Eye-Catching Party Decorations: Design custom banners, cupcake toppers, favor tags, and other party decorations.
- Business Branding Materials: Create professional-looking business cards, brochures, and promotional stickers.
8. Maintaining Your Equipment
How do you keep your Cricut and printer in top condition?
Clean your Cricut blade and mat regularly, and perform routine maintenance on your printer to ensure optimal performance and longevity of your equipment. Proper maintenance is key to keeping your crafting tools in top shape.
Here are some essential maintenance tips:
- Clean Your Cricut Blade: Use a soft brush to remove any debris or adhesive buildup from the blade.
- Clean Your Cutting Mat: Use a scraper to remove any excess material from the mat. You can also wash the mat with mild soap and water.
- Maintain Your Printer: Follow the manufacturer’s instructions for cleaning and maintaining your printer. This may include cleaning the print heads, replacing ink cartridges, and running maintenance cycles.
9. Frequently Asked Questions (FAQs)
9.1. What Machines Are Compatible with Print Then Cut?
The Cricut Maker 3, Cricut Explore 3, Cricut Maker, Cricut Explore Air 2, and Cricut Explore Air are all compatible with Print Then Cut. Ensure your machine is on the list to utilize this feature.
9.2. Can I Use Any Printer for Print Then Cut?
No, an inkjet printer is required for Print Then Cut due to its ability to produce high-quality, detailed images. Laser printers are not compatible.
9.3. Why Can’t I Print on Colored Cardstock?
Reflective or patterned materials may interfere with the cut sensor marks. It is recommended to use white materials for Print Then Cut.
9.4. How Do I Change My Material Size in Design Space?
Go to the top left menu in Design Space, choose ‘settings’ in the dropdown, click ‘Load Type’, and select the correct material sizing in the ‘Print Then Cut Page Size’ dropdown.
9.5. What Material Settings Should I Use for Sticker Sheets?
Use the specific material settings for printable sticker paper, printable vinyl, or printable clear sticker paper in Design Space.
9.6. Why Do My Colors Not Match with My Printed Item vs Design Space?
This is often due to printer settings. Always use the ‘System Dialogue’ option to adjust printer settings for optimal print quality and color accuracy.
9.7. Do I Need to Calibrate My Machine for Print Then Cut?
Yes, calibration ensures your machine cuts precisely along the edge of your printed images. Regular calibration is essential for optimal performance.
9.8. What is “Bleed” and Why Is It Important?
Bleed is a feature that extends the color of your design slightly beyond the cut lines, ensuring that there are no white borders after cutting.
9.9. Can I Create My Own Print Then Cut Images?
Yes, you can turn any cut image into a Print Then Cut image by adding an offset layer and using the “Flatten” tool in Design Space.
9.10. What If My Cricut Machine Isn’t Cutting Properly?
Check your blade, mat, and material settings, recalibrate your machine, and ensure your design is properly flattened in Design Space to resolve common cutting issues.
10. Call to Action
Ready to take your crafting to the next level? Visit amazingprint.net today to explore more helpful guides, discover creative ideas, and find the perfect printing solutions for your next project in the USA. Let’s bring your visions to life with precision and flair. For inquiries, reach out to us at Address: 1600 Amphitheatre Parkway, Mountain View, CA 94043, United States or Phone: +1 (650) 253-0000. Let’s create something amazing together!