
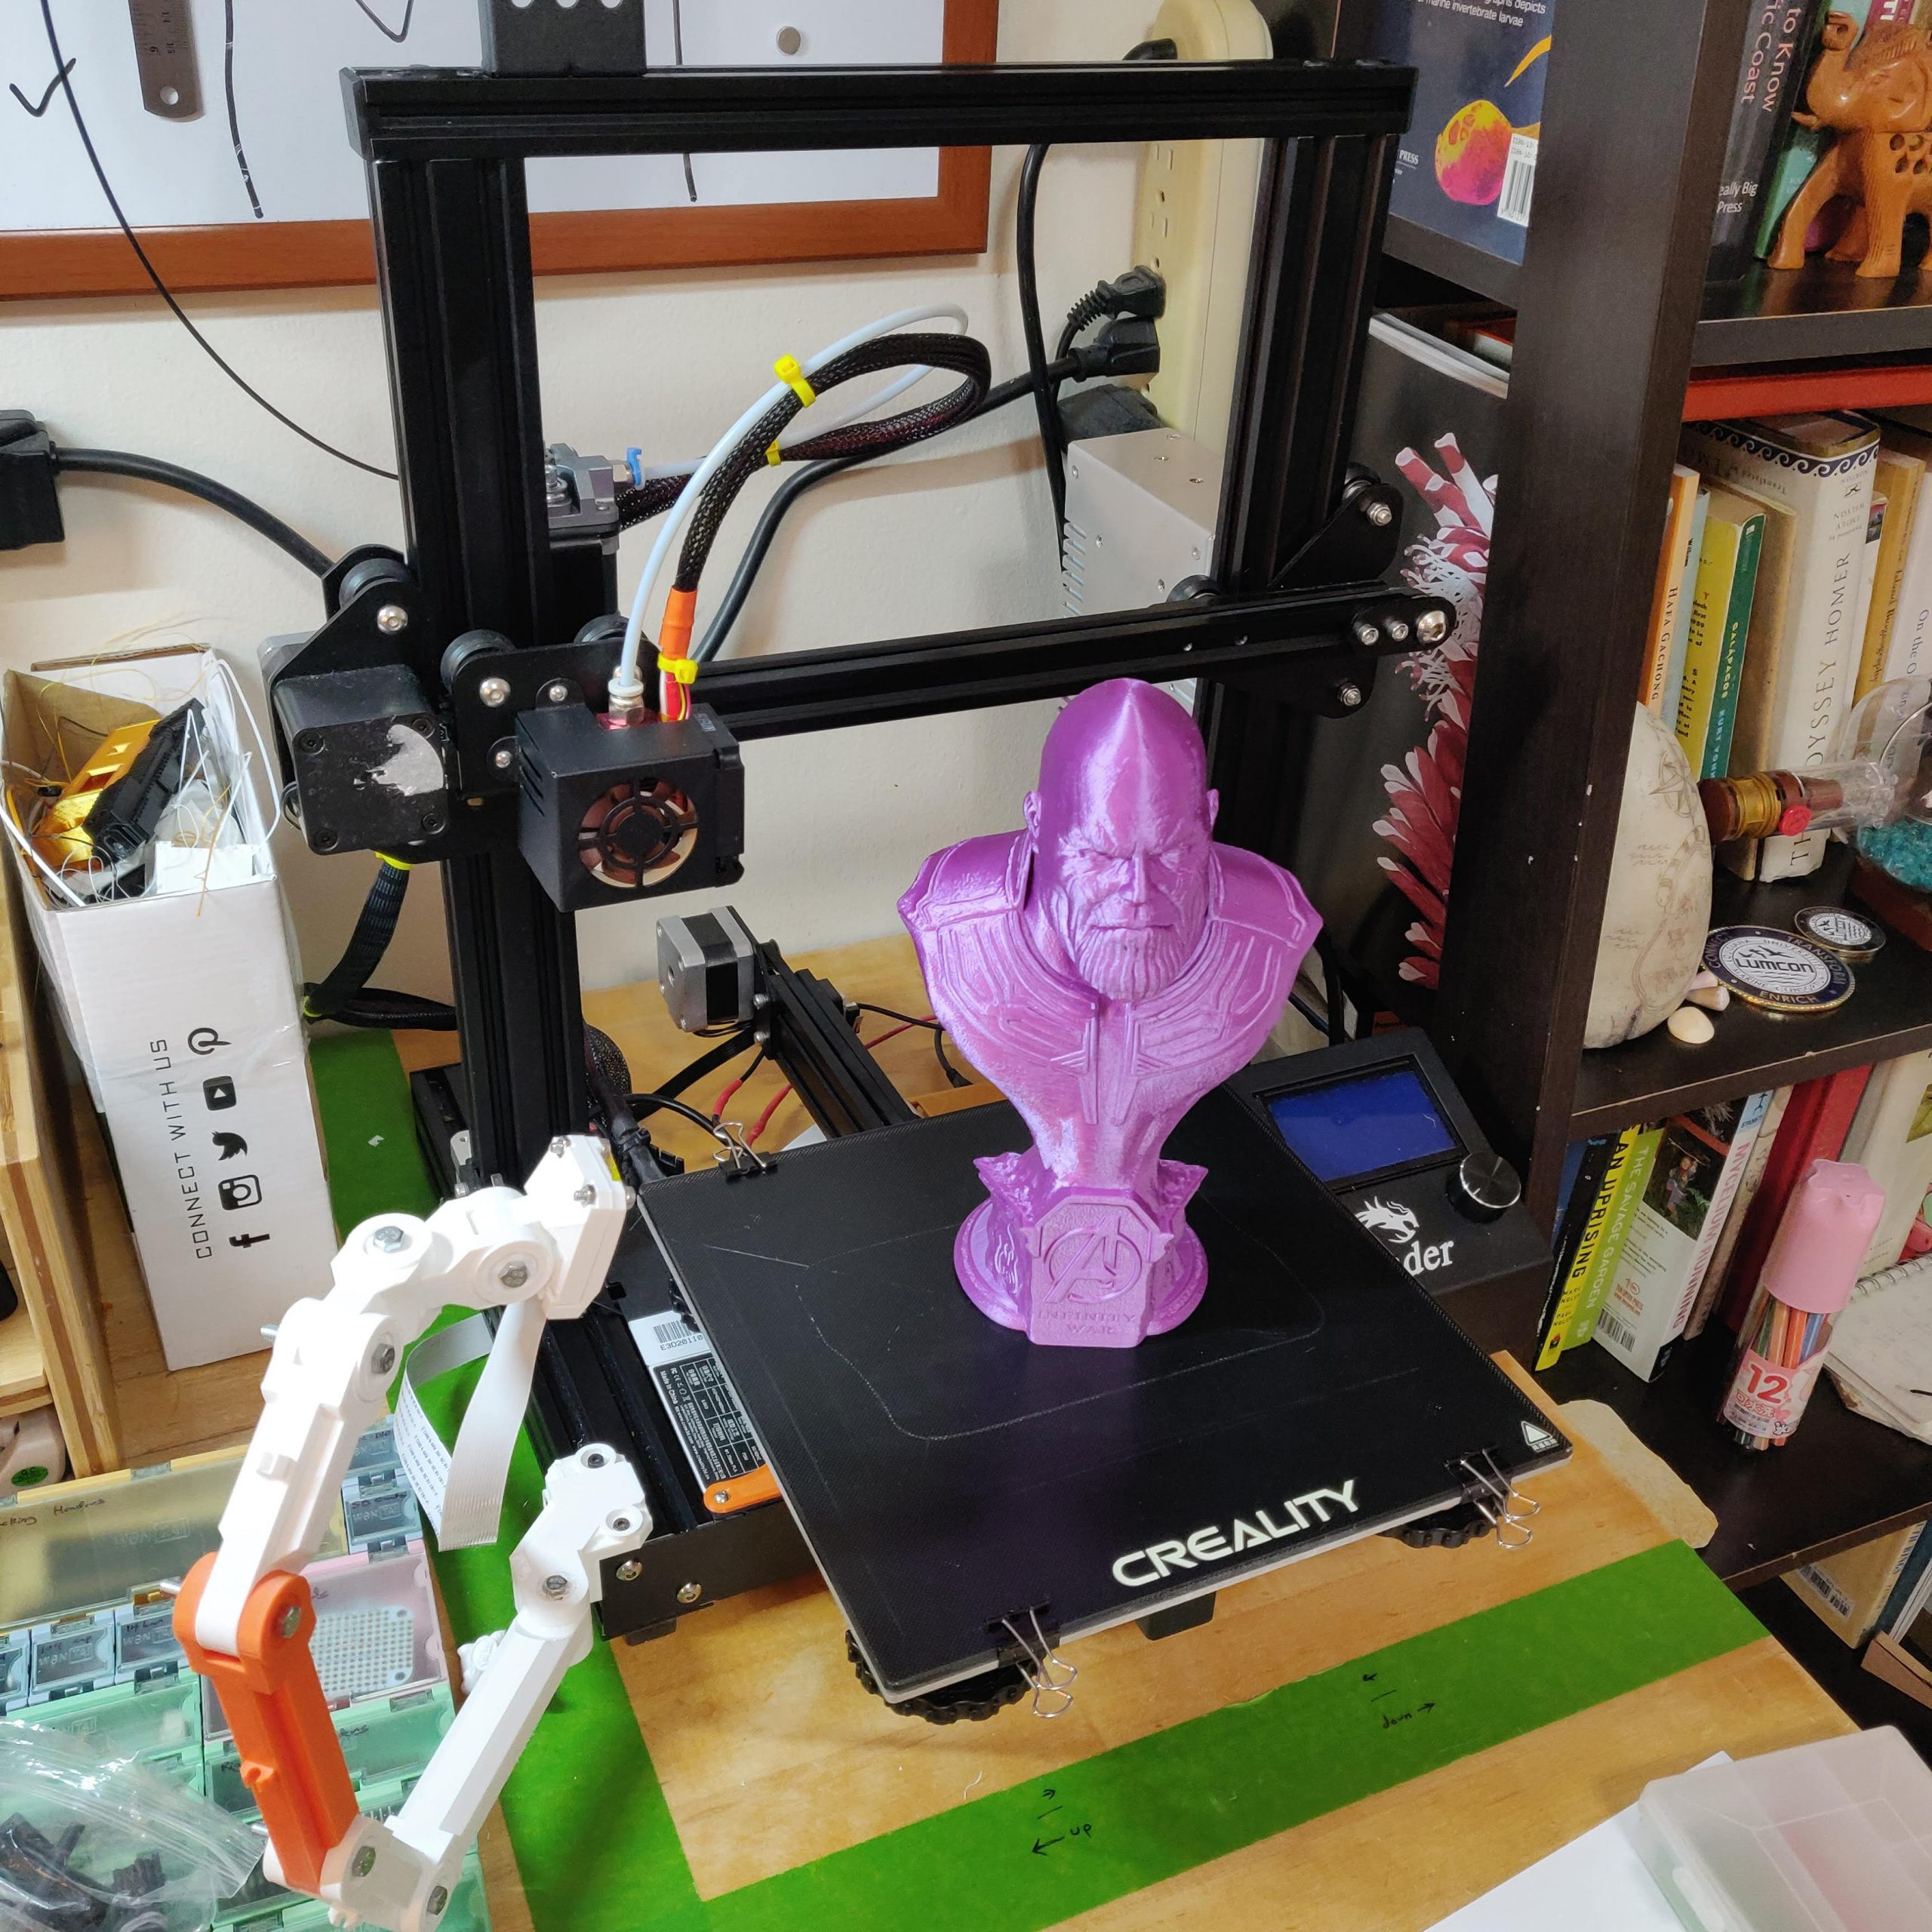
 A fully upgraded Ender-3
Four years ago, an ambitious research cruise on Lake Superior tested the waters for affordable, open-source tools in marine fieldwork. This expedition served as the proving ground for groundbreaking projects like the OpenCTD and Niskin3D, alongside the OpenROV 2.7. The core concept was revolutionary: ditch the bulky, expensive gear and embrace the potential of carrying everything needed on a simple flash drive, ready to Print Dirt Cheap components at sea.
During this pivotal cruise, my trusty Printrbot diligently produced Niskin bottles when a rogue wave struck, sending the 3D printer tumbling. Hours later, I discovered it overturned in a repurposed fish hold, yet still running smoothly. I righted it, placed it back on the counter, and returned to sleep. Remarkably, the print job hadn’t even failed.
That’s the resilience we need in a field-ready machine.
For years, whenever asked about the best 3D printer for fieldwork, my answer was unwavering: the Printrbot Simple Metal. However, with Printrbot’s departure (for now), a suitable replacement became essential. We needed to find a way to print dirt cheap but still achieve reliable results.
About six months prior, we undertook a comprehensive evaluation of the most budget-friendly 3D printers available. Our focus was on identifying robust, low-cost tools capable of withstanding the demands of fieldwork without exceeding grant budgets. We sought workhorse printers – machines that didn’t need to be aesthetically pleasing or produce flawless prints, but could consistently generate strong, functional parts with minimal hassle. Portability was a key factor, along with the ability to endure rough handling and maintain printing capability. The goal was to find options to print dirt cheap solutions for research needs.
While we never quite found a direct equivalent to the tank-like Printrbot Simple Metal, our extensive testing led us to two compelling alternatives – each offering incredible value, especially when considering the Printrbot’s original price point. For projects requiring larger build volumes, the Creality Ender-3 emerged as a top contender. For situations prioritizing ultimate portability, the Monoprice Mini-Delta stood out. These options allowed us to continue to print dirt cheap parts without sacrificing too much capability.
That was half a year ago. I pledged to rigorously test these two machines. After hundreds of printing hours, we’re ready to present an updated review of both, assessing how well they’ve held up in real-world use and whether they truly allow you to print dirt cheap and effectively.
Executive Summary: My initial recommendations remain largely unchanged. Both printers, however, benefit from specific modifications to become truly optimal field machines. Even with upgrades, they remain incredibly affordable, allowing users to print dirt cheap solutions for various applications.
Ender-3
The Ender-3 has become the primary workhorse in my office and workshop. Its robustness, reliability, and relatively small footprint make it a dependable tool for getting the job done. Being situated in my office, I prioritized noise reduction modifications, which might be less critical for fieldwork scenarios. However, even with upgrades, the Ender-3 remains a way to print dirt cheap and effectively.
Upgrades: The stock extruder, constructed from somewhat flimsy plastic, proved to be the Ender-3’s weakest point. The tension rod fractured after approximately five months of heavy use. Fortunately, a readily available all-metal upgrade offers a cost-effective solution and significantly enhances print quality and durability. This upgrade is crucial for anyone wanting to print dirt cheap but reliably. Another notable flaw was the heated bed – made of inexpensive, slightly warped aluminum. While functional, its lack of perfect flatness hindered large, high-quality prints. Replacing the stock bed with a tempered glass plate provided true levelness, essential for precision. This upgrade ensures that you can print dirt cheap parts that are also dimensionally accurate.
https://youtu.be/w-wbWGwZ7_k?t=19
To further stabilize the leveled bed, I installed stiffer springs. These help maintain bed level over extended periods and numerous prints. For vibration dampening and improved under-printer airflow, I elevated the Ender-3 with large rubber feet. These small additions contribute to the overall stability and longevity of the printer, ensuring you can continue to print dirt cheap for longer.
Parts (with Amazon Affiliate links):
Tuning: The gantry arm exhibited a slight wobble, easily rectified by adjusting the eccentric nut on the inner v-roller until all three rollers snugly contacted the aluminum extrusion. My mainboard came with thermal runaway protection enabled, but this isn’t universally guaranteed. Therefore, a quick firmware update is vital to ensure the printer shuts down safely in case of thermal issues, preventing potential hazards. Proper tuning is essential to print dirt cheap without compromising safety.
A peculiar design choice links the electronics case cooling fan to the parts cooling fan. The parts cooling fan speed varies with the print, while the electronics cooling fan, like the hot end fan, should operate continuously. I rewired the electronics cooling fan to the hot end cooling fan terminals to ensure constant operation. Another issue: the electronics fan intake is positioned directly beneath the heated bed, drawing in hot air. I 3D-printed a vent to redirect the intake away from the heated bed, also preventing debris from falling into the fan. These tuning adjustments optimize cooling and contribute to the printer’s long-term reliability, allowing you to print dirt cheap for extended periods.
Silent Running: Now for the fun challenge: minimizing 3D printer noise. Four primary noise sources exist: stepper motors, hot end cooling fan, electronics cooling fan, and PSU cooling fan. For stepper motors, upgrading the mainboard drivers to more refined versions significantly reduced noise, rendering them nearly silent. Creality offers an upgrade kit for this. These silent upgrades, while not essential for basic functionality, enhance the user experience if the printer is in a shared space, and still allow you to print dirt cheap with less noise.
The hot end fan is more complex. The Ender-3 uses a 24-volt system, but most high-quality silent fans operate at 12 volts. I installed a Noctua silent fan, using a buck converter to step down the voltage from 24 to 12 volts for the fan. This modification also addressed the electronics cooling fan noise. While not excessively loud, the drivers don’t generate excessive heat. By wiring the 24-volt electronics fan into the new 12-volt line, fan speed and noise were reduced sufficiently. A more efficient Noctua fan might be considered for future refinement. These silent fan modifications demonstrate that even when aiming to print dirt cheap, you can still achieve a quiet operating environment.
Finally, the PSU. This is where caution is paramount. These budget power supply units aren’t exemplars of electrical engineering and handle substantial mains loads. Tampering with the PSU can be hazardous. However, they are generally over-specified for typical 3D printer operation. Unless the heated bed is heavily utilized, minimal heat is generated within the PSU.
The PSU fan operates continuously and is large, inexpensive, and noisy. Initially, I 3D-printed a shroud to redirect the intake and reduce noise, but with limited success. Therefore, I carefully opened the PSU, ensuring capacitor discharge before approaching with a soldering iron, and soldered a 45°C normally open thermal switch to the fan power line. This keeps the fan off until the PSU reaches a specific temperature, meaning it remains off most of the time under normal loads but activates if overheating is possible. These PSU modifications, while requiring caution, further reduce noise without compromising safety, demonstrating that you can print dirt cheap and quietly.
The result of these modifications? The printer now operates at a near-silent 51 decibels, barely perceptible above typical office background noise. It could run in a library without causing disturbance. Achieving such quiet operation while still being able to print dirt cheap is a significant achievement.
Parts (with Amazon Affiliate links):
The other big change: I integrated a permanent OctoPrint setup at the printer’s rear. This enables wireless printing and control from a computer, print progress monitoring via smartphone, and the addition of a camera for observation and safety. Since the Raspberry Pi 3 A+ requires 5V power and to avoid multiple power cords, I installed a 5V buck converter connected to the PSU. This provides a micro-USB line for Pi power and an auxiliary powered USB port for accessories like LED lighting. OctoPrint significantly enhances the printer’s usability and monitoring capabilities, even when aiming to print dirt cheap.
Parts (with Amazon Affiliate links):
Cost with essential upgrades: $279.93
Cost with silent running + upgrades: $347.81
Cost with everything including OctoPrint and camera: $419.79
Mini-Delta
A fully upgraded Ender-3
The Monoprice Mini Delta was chosen for its exceptional portability and has lived up to its reputation. It has been shipped, carried in checked baggage, transported in truck beds, and even operated in the trunk of an SUV using a power inverter. Minimal modifications are needed for this robust little printer. Its frame is sturdy, the Bowden extruder is reliable, and the electronics are well-contained. It’s a truly portable way to print dirt cheap parts on the go.
While the Mini Delta requires some tuning for optimal performance, the spool placement is awkward, and the heated bed is underwhelming, all are easily addressable.
Upgrades: The primary upgrade was replacing the flimsy build-tak-like print bed with a borosilicate glass plate. This provides a flat, durable print surface with superior print adhesion. Instead of printed brackets to secure the glass, I used a thermal padding sheet. It holds the glass securely, allows easy bed removal, and efficiently conducts heat from the heating element. This glass bed upgrade is a simple way to improve print quality and reliability when you print dirt cheap with the Mini Delta.
I also printed a spool holder that mounts atop the printer (and remixed it to fit within the shipping crate), minimizing counter space. However, the spool rack is too large to be printed on the Mini Delta itself. This printed upgrade improves the printer’s footprint and convenience, further enhancing the experience of print dirt cheap on this portable machine.
The power supply, lacking a power switch, is a minor concern. Instead of major modifications, I simply plugged it into a surge protector, using its switch as a power control to prevent sparking. I also added the same rubber feet used on the Ender-3 to elevate the Mini Delta and improve airflow. These minor tweaks enhance safety and functionality without significantly increasing the cost of this print dirt cheap option.
Tuning: The Mini Delta’s factory calibration is not optimal, and bed leveling, even with the automatic bed leveler, can be challenging. Extensive online research led to this post detailing bed leveling optimization. Following these instructions resolved the leveling issues. Proper tuning is crucial to get the best results when you print dirt cheap with the Mini Delta.
And yes, a standalone OctoPrint module was also assembled for use with this or the older Printrbot when needed, further enhancing the versatility of even print dirt cheap setups.
Cost with essential mods: $182.05
Conclusion:
So, where do these printers stand now? With modifications, the Ender-3 becomes a truly exceptional printer. While not quite a Prusa MK3 competitor, for a budget-friendly, entry-level printer, it’s remarkably hard to beat. In the past six months, I’ve only occasionally returned to my Printrbot for highly specialized prints. However, the extruder breakage on the unmodified Ender-3 makes me hesitant to recommend its unmodified version for fieldwork. Therefore, I’m lowering my original rating for the stock Ender-3, but with modifications, it offers even greater value. It remains an excellent way to print dirt cheap while achieving professional-level results with upgrades.
The Mini Delta remains largely unchanged, just slightly more user-friendly with the upgrades. It continues to be the top choice for portable, print dirt cheap 3D printing.
A new contender has emerged: Prusa’s Mini printer. At $350, the Original Prusa MINI might challenge the Printrbot’s legacy. Unfortunately, project funding is depleted. To see a review of the Prusa MINI, support my Patreon campaign!. Your support makes it possible to continue exploring print dirt cheap options and provide valuable reviews.
To support future projects, use the Amazon Affiliate links in this post when purchasing printers or consumables, or sign up for my Patreon to support Southern Fried Science!