Experiencing issues with your HP printer producing faint, streaky, or spotty prints? You might be dealing with clogged print heads. Like any precision instrument, the print heads in your HP printer can become obstructed over time due to dried ink and dust accumulation. This is especially common with infrequent printer use, where ink can dry out and cause blockages. Regularly cleaning your print heads can significantly extend the life of your ink cartridges and prevent the need for premature replacements.
In this detailed guide, we will delve into the workings of HP print heads, explore the different types, and provide you with step-by-step instructions on how to effectively clean them. By following these methods, you can restore your printer to its optimal printing condition and achieve crisp, clear documents and vibrant photos.
Understanding HP Print Heads
The printhead is a vital component in your inkjet printer, responsible for transferring ink onto paper with precision. It operates by ejecting minuscule droplets of ink through numerous nozzles, forming the text and images you intend to print. When these nozzles become clogged, even partially, it disrupts the ink flow, leading to the common print quality problems mentioned earlier, such as faded or streaky output.
Types of HP Print Heads: Integrated vs. Built-in
HP printers employ two primary types of print head designs, which dictate the cleaning method you’ll need to use:
1. Integrated Print Heads (Built into the Cartridge)
Integrated print head cartridges, also known as single-unit cartridges, incorporate the print head directly into the ink cartridge itself. This means every time you replace the ink cartridge, you’re also replacing the print head. This design is frequently found in more affordable HP Deskjet and ENVY series printers, like the Deskjet 1112 or ENVY 7855. The convenience of this design is that replacing a problematic cartridge often resolves print quality issues, as you’re getting a fresh print head with each new cartridge. HP typically offers integrated print heads in black and tri-color ink cartridges.
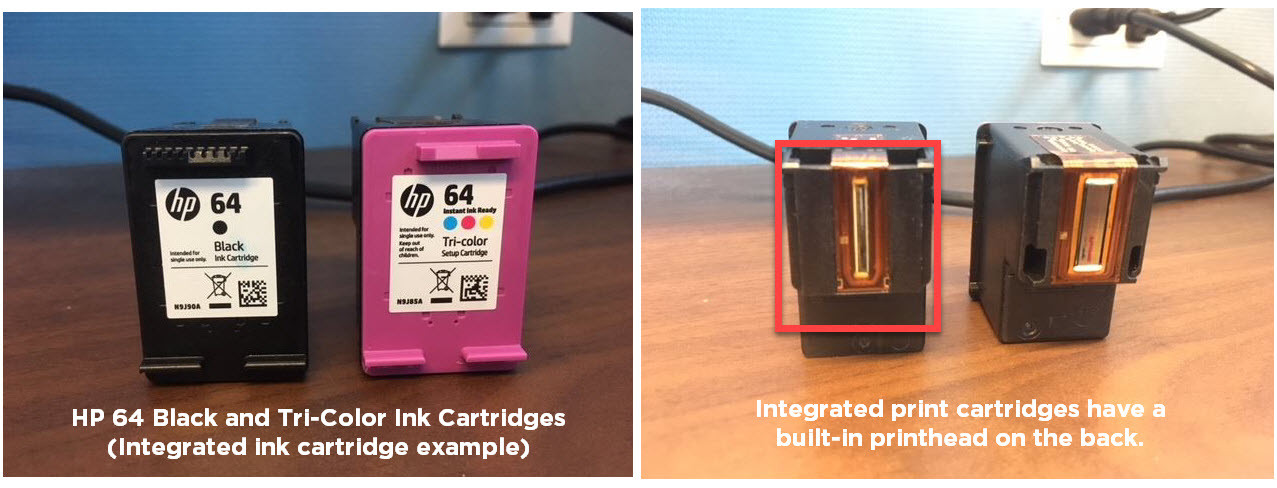 HP 64 ink cartridge with integrated printhead
Examples of integrated ink cartridge series include:
HP 61, HP 62, HP 63, HP 64, HP 65, and HP 67 series.
2. Built-in Print Heads (Separate from Ink Cartridges)
In contrast, some HP printers feature print heads that are built directly into the printer itself, separate from the individual ink cartridges. These printers utilize individual ink cartridges that slot into the built-in print head unit. While this design can sometimes offer cost savings on ink in the long run, as you only replace ink tanks, the print heads themselves have a lifespan and may require replacement eventually. However, replacing a built-in print head can be costly, often approaching the price of a new printer, making printer replacement a more common solution.
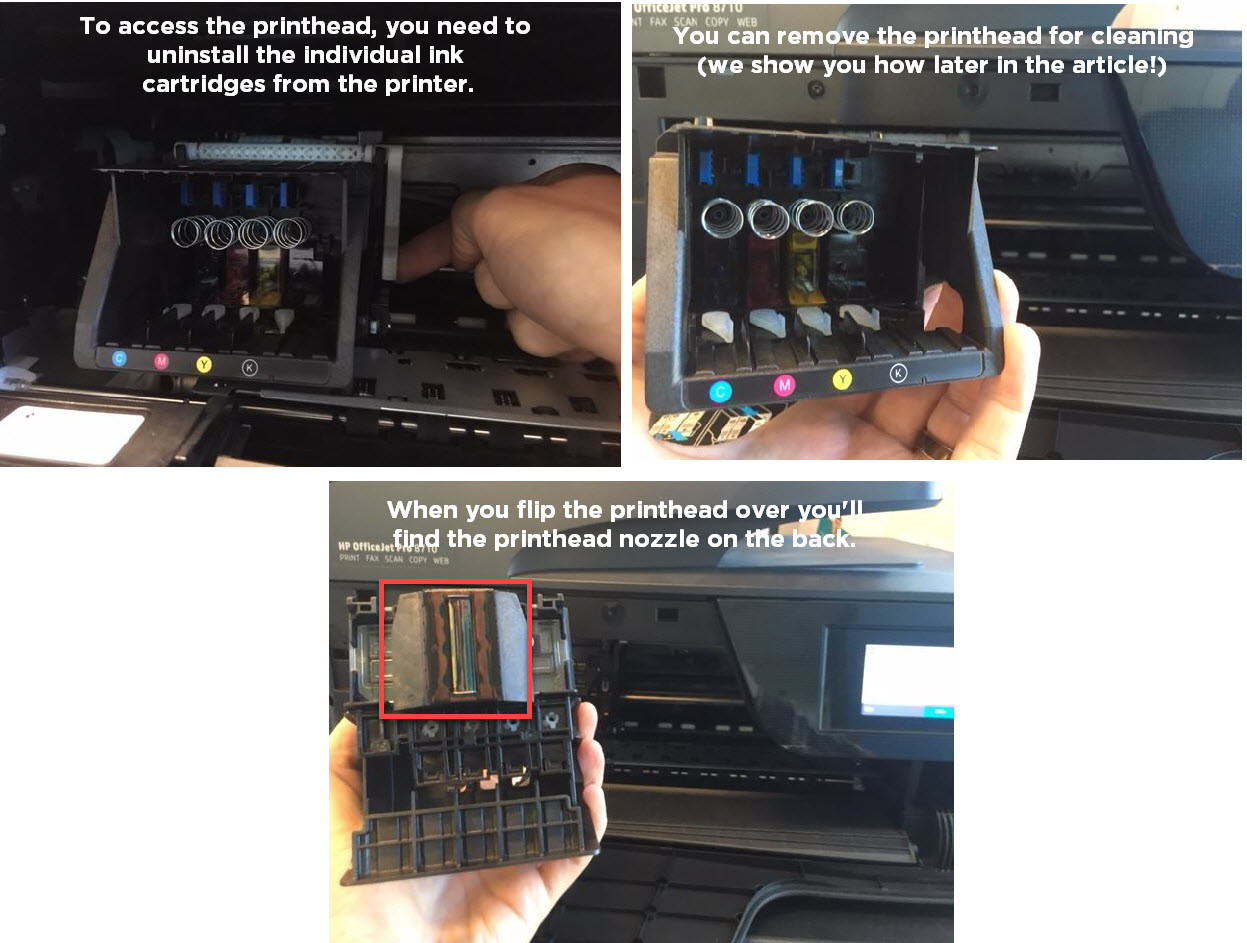 HP printer with removable printhead
Examples of individual ink cartridge series for printers with built-in print heads:
HP 902, HP 952, HP 910, HP 962 series.
Automatic Print Head Cleaning: The First Line of Defense
Before resorting to manual cleaning, your HP printer offers a built-in automatic print head cleaning function, which is the easiest and often most effective first step. This utility is accessible through your printer’s control panel or printer software on your computer, typically located within the “printer maintenance” or “tools” section of the menu. Consult your printer’s manual for precise instructions on accessing this feature for your specific model.
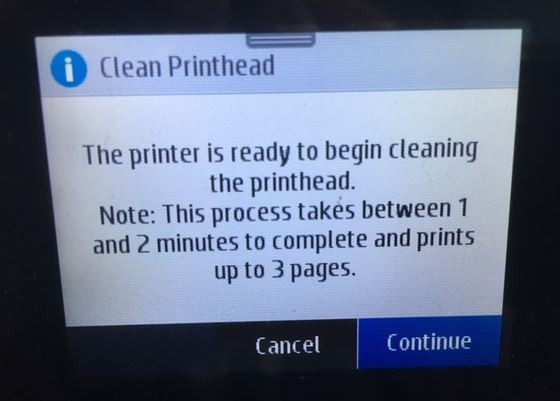 HP printer control panel showing clean printhead option
The automatic cleaning process usually takes just a few minutes, during which the printer will use a small amount of ink to flush through the nozzles and dislodge any minor clogs. Once the cleaning cycle is complete, it’s recommended to print a test page to evaluate print quality. If the test print appears improved, you can resume normal printing. If print quality is still lacking, you can repeat the automatic cleaning process 2-4 more times. However, avoid excessive automatic cleaning as it consumes ink and can deplete your cartridges unnecessarily. If automatic cleaning doesn’t resolve the issue after a few attempts, proceed to the manual cleaning methods outlined below.
Manual Print Head Cleaning: Step-by-Step Guides
For more stubborn clogs or when automatic cleaning is insufficient, manual cleaning of your HP print heads may be necessary. The manual cleaning process differs depending on whether your printer uses integrated print heads or built-in print heads. Follow the appropriate instructions below based on your printer type.
Manual Cleaning for Built-in Print Heads (Removable Type)
This method is designed for HP printers with removable print heads, such as the HP OfficeJet 8710, and can also be adapted for other non-HP printers with similar built-in print head designs.
Supplies you’ll need:
- Plastic container
- 2-3 dry paper towels
- Lint-free cloth
- Filtered or distilled hot water
Cleaning Steps:
- Prepare the Soaking Container: Fold a paper towel into quarters and place it at the bottom of the plastic container.
- Add Hot Water: Pour approximately two inches of hot water into the container, ensuring the paper towel is fully submerged.
- Open Printer and Remove Cartridges: Turn on your printer and open the cartridge access door. Wait for the carriage to move to the center. Remove all ink cartridges from the printer.
- Safeguard Cartridges: Place the removed cartridges upright on a separate paper towel to prevent ink leakage.
- Release the Print Head: Locate the gray latch behind the cartridge carriage. Lift this latch to release the print head assembly.
- Remove the Print Head: Gently pull the print head upwards and out of the printer to remove it.
- Initial Cleaning (Optional): Dampen the lint-free cloth with hot water and gently wipe away any excess ink visible on the print head nozzles. Be very careful not to apply too much pressure.
- Soak the Print Head: Place the print head in the container with the submerged paper towel, nozzle side down. Ensure the nozzles are immersed in the water. Avoid touching the nozzles directly as they are delicate.
- Soaking Time: Allow the print head to soak for approximately ten minutes.
- Dry the Print Head: Remove the print head from the water and place it nozzle side up on a fresh, dry paper towel. Let it air dry for about fifteen minutes.
- Reinstall and Clean Again: Carefully reinstall the print head back into the printer, ensuring the latch is securely closed. Reinstall the ink cartridges. Run the automatic print head cleaning function on your printer one more time to prime the print head.
- Test Print: Print a test page to check for improvement in print quality.
Manual Cleaning for Integrated Print Heads (Built into Cartridges) – “Paper Towel Method”
For printers using cartridges with integrated print heads, the “paper towel method” offers a simpler manual cleaning approach.
Supplies you’ll need:
- Warm, damp paper towel or coffee filter
- Dry paper towel
Cleaning Steps:
- Blotting: Take a warm, damp (not dripping wet) paper towel or coffee filter. Gently blot the print head nozzles of the cartridge by pressing it face down onto the damp paper towel. This action helps to dissolve and remove dried ink.
- Wicking: Immediately after blotting, hold the cartridge with the print head facing down against a dry paper towel for 2-3 minutes. The dry paper towel will wick away excess ink and moisture from the nozzles. Important: Do not wipe the print head, as this can potentially damage the delicate nozzles.
- Reinstall and Test: Reinstall the cleaned cartridge back into your printer. Print a test page to assess if print quality has improved. If issues persist after this method, you may need to consider replacing the ink cartridge.
When to Consider Print Head Replacement
If you’ve diligently followed both automatic and manual cleaning procedures and are still encountering poor print quality, it may indicate a more severe issue, possibly requiring print head replacement. For printers using integrated cartridges, replacing the cartridge effectively replaces the print head, which is often the most straightforward solution.
However, for printers with built-in print heads, replacement can be more complex and costly. As mentioned earlier, the cost of a replacement built-in print head can sometimes be comparable to the price of a new printer. Therefore, many users opt to purchase a new printer rather than invest in a print head replacement, especially if the printer is older or experiencing other issues.
Keeping Your Print Heads Clean: Preventative Measures
Regular printer maintenance and mindful usage habits can help prevent print head clogs and extend the life of your printer and cartridges.
- Print Regularly: Aim to print something at least once a week. Regular ink flow helps prevent ink from drying out in the nozzles.
- Proper Storage: When not in use for extended periods, store ink cartridges in an airtight container to minimize drying.
- Printer Environment: Avoid placing your printer in dusty or excessively humid environments, as these conditions can contribute to print head clogging.
- Use Quality Paper: Using high-quality paper can reduce paper dust and lint that can contribute to print head issues.
By understanding your HP print head type and implementing these cleaning and preventative measures, you can maintain optimal print quality and ensure your printer operates smoothly for longer. If you have further questions or encounter persistent print quality problems, consult your printer’s manual or HP support resources for additional assistance.