
Capturing what’s on your screen, known as taking a screenshot or screen capture, is a fundamental skill for anyone using a computer. Windows operating systems offer a built-in feature, the Print Screen key, to make this process quick and efficient. Once you press the Print Screen key, Windows automatically copies a snapshot of your screen to the clipboard, ready for you to use. You can capture different parts of your display depending on your needs, from the entire screen to just a single window. Let’s explore how to effectively use the Print Screen function on your Windows device.
Understanding the Print Screen Key Location
Before you can take a screenshot, you need to locate the Print Screen key on your keyboard. Its position can vary slightly depending on whether you are using a desktop or a laptop computer.
Finding PrtScr on Desktop Keyboards
On most desktop keyboards, the Print Screen key (often abbreviated as PrtScr, PrintScreen, PrntScrn, PrntScr, PrtScn, or PrtSc) is situated in the upper right area. Look for it near the function keys and the number pad.
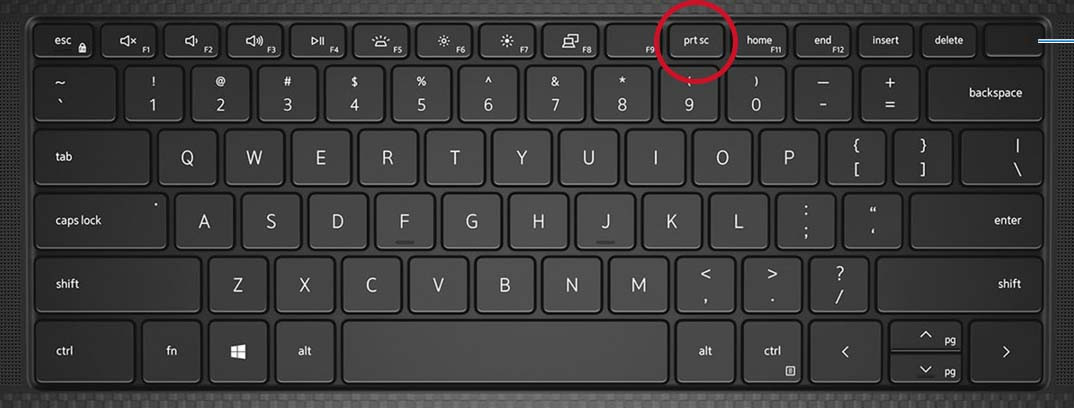 Illustration of the print screen key on Dell KM5221W wireless keyboard
Figure 1: Close-up of the Print Screen (PrtScr) key highlighted on a Dell desktop keyboard, typically located in the upper right corner.
It’s worth noting that some Dell wireless keyboard models, such as the KM3322W, might not have a dedicated Print Screen key. In such cases, you will need to press the Fn (Function) key along with the Insert key to perform a screen capture.
Finding PrtScr on Laptop Keyboards
Laptop keyboards usually incorporate the Print Screen key into the Function key row (F1, F2, F3, etc.). You’ll often find the PrtScr function assigned to one of the F-keys, commonly F10. To activate Print Screen, you’ll likely need to press and hold the Fn key simultaneously with the designated F-key (e.g., Fn + F10).
Illustration of the print screen key on Dell KM5221W wireless keyboard
Figure 2: Location of the Print Screen (PrtScr) key on a Dell laptop keyboard, integrated with a function key and requiring the Fn key to activate.
For laptops with capacitive Function Key rows (illuminated keys), you may need to press the Fn key once to switch the function keys to their secondary functions, which will illuminate the PrtScr key function. After illumination, you can then use the PrtScr key in combination with other keys as described below. Consult your laptop’s user manual for specific instructions if you’re unsure. Some laptops might also require using Fn + Insert if a dedicated Print Screen key is not present.
Illustration of the print screen key on Dell KM5221W wireless keyboard
Figure 3: Example of a laptop keyboard with a capacitive Function Key row, where the Fn key may need to be pressed to access the PrtScr function.
How to Use the Print Screen Key in Windows 10 and Windows 11
The Print Screen key offers several ways to capture your screen in Windows 10 and Windows 11, allowing you to grab the entire display, all active windows, or just the window you are currently working in.
Capturing the Entire Screen
To take a screenshot of everything visible on your monitor(s), press the Windows logo key + PrtScr keys at the same time. If you are using a Windows tablet, press the Windows logo button + the volume down button simultaneously. When you use this method, Windows will automatically save the screenshot as a PNG file in the “Screenshots” folder, located within your “Pictures” library. This provides a quick way to save full-screen captures without needing to paste them into another application first.
Capturing All Active Windows
If you want to capture all windows that are currently open and active on your screen, simply press the PrtScr key by itself. This action will copy a screenshot of the entire desktop, including all open windows, to your clipboard. You can then paste this image into an image editing program or document.
Capturing a Single Active Window
To capture only the specific window you are currently using, first, make sure that window is active by clicking on it. Then, press the Alt + PrtScr keys together. This will capture only the selected window and copy it to your clipboard, excluding any other open windows or the taskbar.
Pasting and Utilizing Your Screenshots
After you have captured your desired screenshot using any of the Print Screen methods described above, the image is temporarily stored on your clipboard. To save or edit this screenshot, you need to paste it into an application.
The most common way to use your screenshot is to paste it into an image editor like Microsoft Paint (included with Windows) or more advanced software like Adobe Photoshop. Open your chosen application and create a new image document. Then, use the keyboard shortcut Ctrl + V to paste the screenshot from your clipboard into the new document. From there, you can edit, annotate, save, or share your screenshot as needed.
For more advanced screen capturing options, Windows also offers the Snipping Tool, which provides more flexibility in selecting specific areas of your screen and offers annotation features. You can find the Snipping Tool in your Windows Start Menu.
By understanding how to use the Print Screen key and its various combinations, you can efficiently capture and share information from your screen, enhancing your productivity and communication.